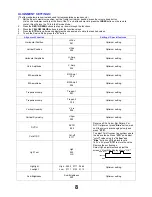
ALIGNMENT SETTINGS
:
(The figures below are nominal and used for representative purposes only.)
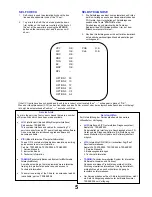
1. Set the Bass to maximum position, set the Treble to minimum position, press the volume down button
(-/v) on the customer controls at the front of the TV and at the same time press the INDEX button on the remote
control, this will place the TV into the Service Mode.
2. Press
the
RED / GREEN buttons to step up / down through the functions.
3. Press
the
YELLOW / BLUE buttons to alter the function values.
4. Press
the
STR button after each adjustment has been made to store the required values.
5. To exit the Service Mode, press the "N" button.
Alignment Function
Settings / Special features
Horizontal Position
H-Pos
061
Optimum setting.
Vertical Position
V-Pos
005
Optimum setting.
Horizontal Amplitude
H-Amp
055
Optimum setting.
Vert. Amplitude
V. Amp
054
Optimum setting.
EW-amplitude
E/W-Amp1
-128
Optimum setting.
EW-amplitude
E/W-Amp2
006
Optimum setting.
Trapezium-comp
Trapez-1
047
Optimum setting.
Trapezium-comp
Trapez-2
-128
Optimum setting.
Vertical Linearity
V-Lin
006
Optimum setting.
Vertical Symmetry
V-Sym
002
Optimum setting.
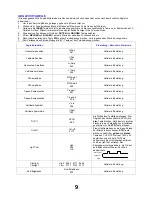
DVCO
DVCO
-005
Receive a PAL Colour Bar Pattern. For
DVCO alignment press "Blue" button, wait
until the colours are changing slowly and
press "STR".
Cut-off DC
Cut-off
0171
Ug2 Test
Ug2
055
O.K.
To adjust Cutoff connect an oscilloscope to
the blue cathode. Press "STR" and adjust
"cutoff" value using the "Yellow" and
"Blue" buttons until the black level is
160V ± 5V press "STR" to store the value.
Remove the oscilloscope.
Select Ug2 adjustment and adjust the
screen VR until the display shows "O.K."
Highlight
Lowlight
High
0902 0777 0864
Low
0117 0132 0112
Optimum setting.
Sub-Brightness
Sub-Brightness
255
Optimum setting.
Black Level
160V±5V
GND
8
Summary of Contents for TX-28SL20F
Page 25: ......
Page 26: ......
Page 27: ......
Page 28: ......
Page 29: ......
Page 30: ......
Page 33: ...N BOARD TNP8EN016 DIODES D1071 B3 D1072 A6 IC S IC1071 B2 C B A 1 2 3 4 5 6 7 8 29 ...
Page 34: ...P BOARD TNP8EP017 DIODES D580 A3 D581 A3 A B C 30 5 4 3 2 1 ...
Page 35: ...W BOARD TNP8EW002 I C S IC1901 A2 31 1 2 3 A C B ...


