background image

55

Some problems will only occur when viewing DVB channels. Due to the different techniques involved in digital reception, 
DVB signal quality can be poor even if you appear to have a strong signal when viewing analogue programmes.
The DVB system requires a good quality signal to provide the best picture. When viewing analogue pictures, interference 
such as signal re

fl

 ection from nearby buildings or mountains causes ‘ghosting’, but still provides a viewable picture. 

For the DVB system, interference such as this can disrupt the 

fl

 ow of data causing the picture to appear to be made 

up of large blocks, or to freeze intermittently. If the picture disappears completely, this could mean that signal quality 
is very poor. If this happens often, you may need to improve your aerial system to provide a better signal. This TV 
contains a complex microprocessor which enables you to view enhanced digital services. Occasionally this device 
may need to be reset. This can be done by pressing the standby button on your remote control.

Symptoms

Checks

No DVB channels listed in the TV Guide after Auto 
Setup.

Exit

Info

Change display mode
Select channel

Select Programme

Category

Prog. type

+24 Hr

DVB TV Guide

:Landscape

Wed 12/05/04  10:46

Wed  12th

Time:

19:30

20:00

Prog. type

Category

All Services

20:30

21:00

21:30

All  Types

Category

All Services

Check that DVB transmissions are available from the 
transmitter you are currently using. If not, try directing 
the aerial at another local transmitter.

Check analogue transmissions. If picture quality is poor, 
you will need to improve or change your aerial system to 
receive DVB channels. Consult a local installer.

Blocky interference.
Picture freezes intermittently.

Blocky interference indicates that the signal quality is 
poor.
You should consider improving your aerial system.
To check the quality of your signal use the Signal Quality 
feature (see page 26).
Good quality signal – indication is green.
Poor quality signal – indication is red.

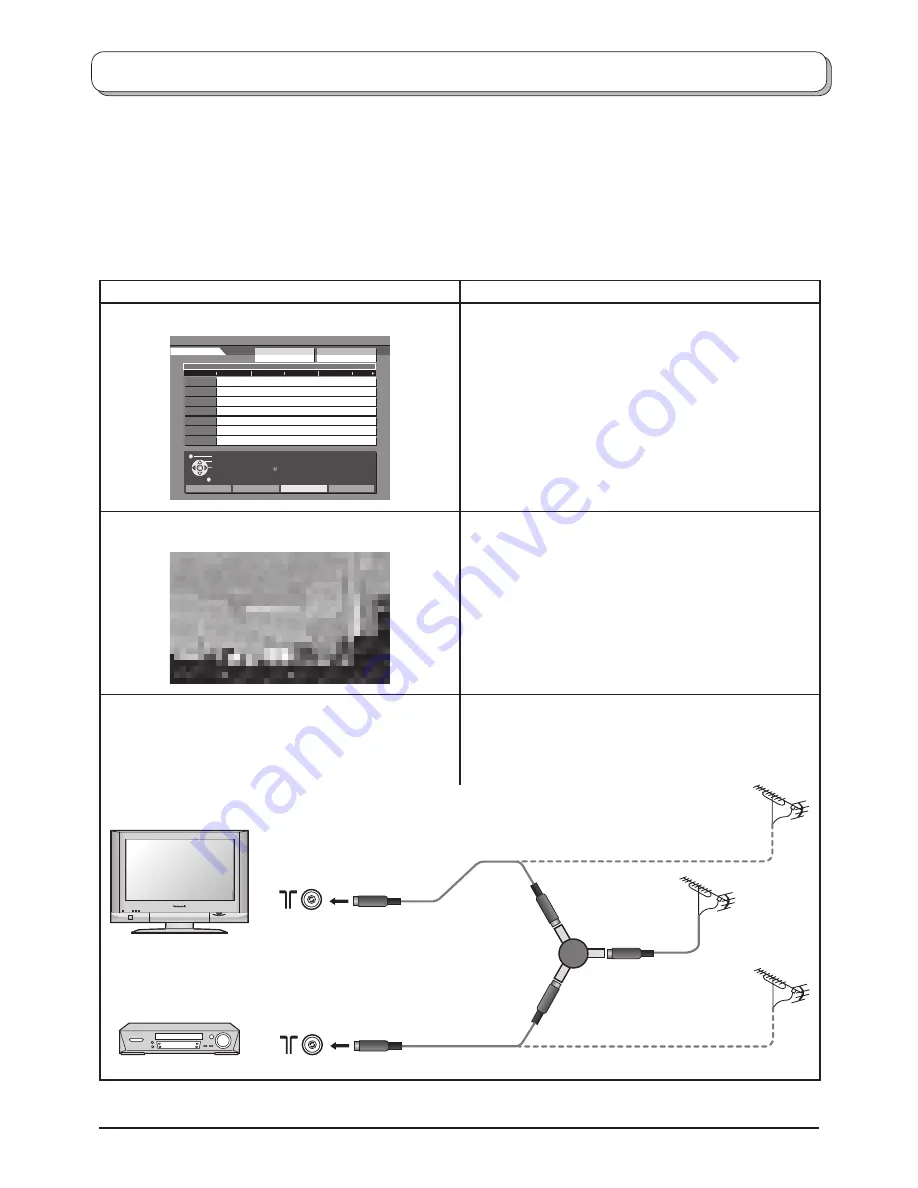
I have a good aerial system, but still cannot receive DVB 
stations.

If you have tried the previous solutions and are still unable 
to receive DVB channels, you may need to provide 
dedicated aerial feeds to the TV and other equipment.
This can be implemented using an aerial splitter or 
separate aerials.

TV

VCR

Aerial 
Input 
terminal

Aerial 
Input 
terminal

Aerial 
Input 
terminal

Separate
Aerial 

Separate
Aerial 

Aerial 
Output

Aerial 
Output

AERIAL
SPLITTER

DVB Troubleshooting

Summary of Contents for TX-26LXD500

Page 1: ...perating your set and retain them for future reference TQB0E0129 1 1 2 3 4 5 6 7 8 9 C 0 OK IDTV English TX 26LXD500 TX 32LXD500 Model No Operating Instructions Digital Progressive LCD TV The image shown is for illustration only U K Standard ...

Page 2: ...ard operations 38 VCR DVD operation 46 Teletext operation 47 Connections 50 How to connect the Headphones AV3 terminals 50 How to connect the Audio Output terminals 51 How to connect the AV1 2 4 Scart terminals 51 How to connect the Component Input terminals 51 How to connect the HDMI Input terminal 52 How to connect the PC Input terminal 53 Troubleshooting 54 DVB Troubleshooting 55 Maintenance 56...

Page 3: ...id exposing the TV set to direct sunlight and other sources of heat To prevent fire never place any type of candle or naked flame on top or near the TV set Ventilation should not be impleded by covering the ventilation openings with items such as newspapers table cloths and curtains FOR YOUR SAFETY PLEASE READ THE FOLLOWING TEXT CAREFULLY This appliance is supplied with a fitted three pin mains pl...

Page 4: ...per TMME203 Fitting remote control batteries Make sure that the batteries are fitted the correct way round Do not mix old batteries with new batteries Remove old exhausted batteries immediately Do not mix different battery types i e Alkaline and Manganese or use rechargeable Ni Cad batteries Pull and hold the hook then open the battery cover Insert batteries note correct polarity and R6 UM3 size R...

Page 5: ... open the front cover Note To avoid interference appearing on the screen do not bundle the RF cable and mains lead together Removal Fitting 1 Push down hooks and pull the cover slightly towards yourself to disengage the claws at 3 points 2 Slowly pull out in the downward direction 1 Insert the claws at 3 points at the bottom end 2 Push until it clicks Raise the lower part of the door labeled PULL ...

Page 6: ...TV s AV1 or AV4 Scart terminal for any DVD Recorder Always use a fully wired Scart cable Use the TV s AV1 or AV4 Scart terminal for Satellite Receiver Always use a fully wired Scart cable RF Connection Connect the RF cable to the Aerial In terminal of the VCR DVD Recorder and an RF cable from the VCR DVD Recorder Aerial Out terminal to the TV Aerial terminal Notes If using a Q Link VCR DVD Recorde...

Page 7: ... or compatible recording device has been connected to a Scart terminal AV2 or AV4 before starting Step 1 programme information will be downloaded to that device Only the analogue programme positions will be downloaded to the recording device in the same order as stored in the TV See page 32 Not all VCRs DVD Recorders support this download of programme information some may require to be started man...

Page 8: ... category press the Yellow button to show a category The chosen category name is shown on screen For example if you select Free TV and press the OK button only free to air stations will be listed you can view any of these now If you select Pay TV and press the OK button only subscription stations will be listed you will need to contact the service provider to find out how to subscribe to these sta...

Page 9: ...on see page 35 TIMER On Off button Switches Timer recording On or Off The default setting is Off see page 23 SD Record button see page 40 Sound mute On Off SD button Access Card operations see page 38 45 Switch between viewing TV or AV input see page 50 Cursor buttons to make selections and adjustments Exit the mode Text Hold Picture Still button see page 34 47 Text Index button see page 49 Progra...

Page 10: ...ct menus The left and right cursor buttons are used to access menus adjust levels or to select from a range of options The OK button is used with a number of features to store settings after adjustments have been made or options have been set The EXIT button is used to exit the menu system and return to the normal viewing screen An On Screen Help box is displayed whenever a menu is displayed on th...

Page 11: ...ill affect all signal sources RF AV1 AV2 AV3 AV4 Component PC HDMI and Card operations Changes will be stored automatically By analysing and processing the incoming picture all four modes feature automatic enhancement Contrast Brightness Colour Sharpness Increase or decrease the levels of these options according to your personal preference Tint With an NTSC signal source connected to the TV the pi...

Page 12: ...ion Select Off for FM Mono sound output If Nicam Mono is being transmitted select either FM Mono Off Nicam Mono I M1 or Nicam Mono II M2 The options depend upon the signal being transmitted If reception deteriorates it is advisable to switch to FM Mono Off Mode Sound quality can be improved when watching music scene or drama by selecting the appropriate Music or Speech mode Ambience Ambience provi...

Page 13: ...ng Programme edit and Auto setup See page 15 17 DVB Setup Menu Provides access to setup the DVB operations See page 21 Owner ID Allows you to enter a security code and address information See page 19 Shipping condition Allows you to clear all tuning information and reset all control levels back to factory settings See page 20 Volume correction During AV PC and HDMI mode Volume correction is displa...

Page 14: ...order to customize your programme settings e g adding or deleting a programme position See page 15 16 Auto setup Allows you to automatically retune the TV Useful if you move house and wish to retune your TV to the local stations See page 17 Manual tuning Allows individual programme positions to be tuned manually See page 18 MENU EXIT OK In Analogue mode Delete Add Move Download Programme edit Prog...

Page 15: ...og Chan Name Lock 1 2 3 4 5 CH44 CH51 CH41 CH47 CH37 Off Off Off Off Off ABC XYZ FTP 123 456 Move the cursor to the programme to be deleted or added Press the Green button to add a programme channel to the programme position or the Red button to delete one Press the same button again to confirm your decision Adding deleting a programme channel Confirm Cancel Programme edit Prog Chan Name Lock 1 2 ...

Page 16: ... Press the OK button to store the new setting You can copy programme information to a compatible recording device connected to AV2 AV4 See page 51 for connection information Press the Download Blue button Programme data will now be sent to the recording device s This might take a few seconds depending on the number of stations stored If the message Feature not available appears on the screen the t...

Page 17: ...tings can be stored If you exit the procedure after this point and before Auto setup is complete no station information will be stored Restart and complete the Auto setup procedure so that the TV is retuned IDTV 1 2 3 4 5 6 7 8 9 C 0 OK All analogue tuning data will be erased WARNING Exit Return Start Auto Setup AUTO SETUP IN PROGRESS SEARCHING PLEASE WAIT 21 68 CH44 Exit Return MENU OK In Analogu...

Page 18: ...access Tuning mode Press the TV AV button to move between Change programme and Search Press the or button to change programme position or start search When the desired station is found press the STR button to store The programme position will flash Repeat above procedure to tune additional programme positions Press the F button at any time to go back to watching TV Note If your VCR is connected to...

Page 19: ...e you sure If you wish to check the personal details already entered into the TV except your PIN number press the F button Front panel and hold for 6 seconds initially the volume level function will appear as you continue to hold down the F button it will disappear again and the Owner ID information will appear The details already entered are displayed on screen and will disappear after a few seco...

Page 20: ...will probably want the TV to tune itself to your new local stations Note Owner ID information will not be affected by this function This can be done either through the Shipping condition menu or through the Auto setup menu The Shipping condition menu will reset all data except Owner ID information clearing all DVB and Analogue tuning information and resetting all control levels back to factory set...

Page 21: ...e 27 Multi Audio Multi audio which will only appear when a DVB programme is selected allows you to select an alternative sound track The number of options available depends on each broadcast Press the MENU button Move to Setup menu Access Setup menu Move to DVB Setup Menu Access DVB Setup Menu Move to menu option Adjust chosen option or access chosen menu Press the EXIT button at any time to go ba...

Page 22: ...ogress press GUIDE then EXIT You may not be able to cancel recording just before it starts Use the recording device to cancel it Notes To delete a timer programme select the recording with the cursor bar and press the Red button To edit a previously entered timer programme select it with the cursor bar and press the OK button Timer programmes can also be entered from the TV Guide See page 30 Two m...

Page 23: ...timer programme data overlaps any part of an existing timer programme a warning message will appear The TV set must be On or in Standby mode for the DVB programme signals to be output to the recording device Exit Return Change date Select Store timer Delete DVB Timer Programming Thu 05 08 04 18 49 1 3 40 33 92 46 18 5 BBC1 ITV1 BBC News 24 Boomerang Kerrang The Community Channel The Hits Five 6 8 ...

Page 24: ...the Blue button to add all the channels to the profile list Press the OK button to store your Profile list Edit the Profile list When the profile list is highlighted Press the Red button to edit the profile name Press the Green button to move the channel Press the Yellow button to delete the channel Press the Blue button to delete the all channels Press the MENU button to return to the DVB Setup M...

Page 25: ...n you wish to watch a locked channel If the unit is turned off it will be necessary to input the PIN number again to access any locked channels Change the PIN number In Child Lock menu Move to Change PIN Access Change PIN Create a 4 digit new password Enter the password again to confirm Press the MENU button Move to Setup menu Access Setup menu Move to DVB Setup Menu Access DVB Setup Menu Move to ...

Page 26: ...he best picture When viewing analogue pictures interference such as signal reflection from nearby buildings or mountains causes ghosting but still provides a viewable picture For the DVB system interference such as this can disrupt the flow of data causing the picture to appear to be made up of large blocks or to freeze intermittently If the picture disappears completely this could mean that signa...

Page 27: ... Module System Update DVB System Setup Access Display Timeout Preferred Subtitles Timer Programming Child Lock DVB Setup menu Multi Audio Access DVB System Setup eng DVB Tuning Menu Profile Edit Common Interface Module The Common Interface Module menu provides access to functions contained on a Common Interface Module inserted into the CI slot located at the rear of the TV See page 28 Preferred Su...

Page 28: ...he viewing card into the reader If no module is inserted the message No module inserted will be displayed If you have inserted a module check that it is fully inserted The features that now appear on screen are dependent on the contents of the selected Common Interface Module Refer to the instructions supplied with the card or contact the vendor In all cases it is possible to navigate the pages us...

Page 29: ...tton to download the new version The TV will begin download of the new software version This can take up to about 20 minutes Press the EXIT button to exit without download Please do not switch off the TV or press any buttons while this download is in progress The TV will reset after the software download is complete Set to On to search for new software and update automatically in Standby mode This...

Page 30: ...1 2 BBC2 44 Channel4 444 SC4 Exit Select Enter Category Prog type 24 Hr 24 Hr DVB TV Guide Landscape Wed 12 05 04 10 46 BBC1 BBC2 ITV1 Channel4 five ITV2 SC4 Eastender Hot Wars Emmerdal 10 O clock me Panoroma I m A Celebr Rugby Red Cap The Bill Good bye Terminator News The Bill So Hell The Wed 12th D C S 1 20 00 21 00 Time 19 30 2 Coronation Steet We open in the Battersdy s Prog type All Services ...

Page 31: ...Now and Next can also be used in this mode While the banner appears Press the button to display an extended banner showing any information available on the current selected programme Press the button while in extended banner mode to return to normal banner view To clear the banner from the screen while in extended banner mode press the EXIT button Viewing Category Press the Blue button while in th...

Page 32: ... and leave the device recording in the normal way The tape or disc may have been write protected missing or may be damaged The device may already be recording Refer to the device s instruction book Recording DVB stations If you press the DIRECT TV REC button while watching a DVB station the recording device will automatically switch to its AV input to record the DVB signal from the TV via the SCAR...

Page 33: ...n WIDE will appear in the top left corner of the screen and picture aspect changes accordingly in any aspect modes if a widescreen identification signal WSS is detected or a control signal is found through a Scart terminal Automatic aspect ratio adjustment by WSS signal is not available for progressive and high definition component signals input The Widescreen TV will allow you to enjoy viewing th...

Page 34: ... fill the whole screen The 4 3 picture will be stretched horizontally so that the image fills the screen this is done in such a way that the stretching is only obvious at the left and right edges of the screen Just 4 3 will display a 4 3 picture at its standard 4 3 size with no aspect distortions 4 3 4 3 4 3 14 9 will display a 14 9 picture at its standard 14 9 size without any stretching 14 9 14 ...

Page 35: ...ol to select a TV channel or an AV source to appear in the main window Picture out of picture Allows two pictures to be viewed at the same time as picture in picture does The difference is how the two pictures are displayed in Picture in picture the smaller window appears within the main picture in Picture out of picture the smaller window appears to the right of the main picture Press the Yellow ...

Page 36: ...MENU button Move to Picture menu Access Picture menu Move to menu option Adjust chosen option or access chosen menu Press the EXIT button at any time to exit Picture menu Viewing mode Contrast Brightness Sharpness Colour balance About settings see page 11 Advanced setting Access to adjust to the fine picture at a professional level R Gain G Gain B Gain Gamma Adjusts the white balance for red areas...

Page 37: ...ise occurs carry out adjustments to reduce the noise to the lowest level H pos Adjust the horizontal position V pos Adjust the vertical position Clock phase Eliminate the flickering and distortion Carry out this adjustment after adjusting Clock Adjust to reduce noise to the most inconspicuous level Sync H V To synchronize by the horizontal and vertical signals from your PC On G To synchronize by t...

Page 38: ...on Note If the card adapter is used remove it together with the adapter miniSD Card requires miniSD adapter This function is not compatible with card type hard disk Micro Drive Mobile type hard disk etc Memory cards are not supplied with this television When both SD card and PC card are inserted in the slot SD card has the priority You can change the priority See page 43 Note Suitable SD Memory Ca...

Page 39: ...geable image file format 2 0 2 1 2 2 or JFIF JPEG file interchange format in addition to the DCF design rule for Camera File system format MPEG4 view can only show moving pictures recorded by this unit Panasonic DVD recorder DIGA or mobile camera D snap When recording in MPEG4 format the SD card with this unit The card may not operate properly if formatted with different equipment Memory cards mus...

Page 40: ...e data being recorded and other data stored on the SD card may become unreadable SD recording may not be fully compatible or playable in some PC software or PDA devices When two pictures are shown on the same screen as Multi window functions the main window is the one that is recorded The picture can be switched for the sub window If the signal system is changed during recording it cannot be recor...

Page 41: ...EXIT button To exit Card operation During the SD card menu is displayed press the SD button to return to normal picture MPEG4 view The moving pictures recorded by this unit DIGA or D snap will be played back This function is supported by SD cards only Press the SD button Move to MPEG4 view Access MPEG4 view The thumbnail screen is displayed Select the file Press the OK button The moving picture st...

Page 42: ...on Main menu Picture menu Viewing setup Sound menu Lock Unlock the file Select the file you want to lock in the thumbnail Press the Blue button to lock the file Press again to unlock Delete the file Select the file you want to delete in the thumbnail Press the Red button to delete the file Press again to confirm your decision Note If the file is locked it is not possible to delete Viewing setup Pr...

Page 43: ...eration guide is displayed Inserted card displayed this does not appear for a card which is not selected Press to skip the previous view Press to display the thumbnail Press to rotate the view Each press rotates the view ninety degrees Press to skip the next view Press the Red button to zoom the view During zoom mode you can move the position by using the cursor buttons Viewing setup Press the MEN...

Page 44: ...picture can be changed The recordable time will be changed by Rec mode Notes Multi Media Cards do not support the Extra fine and Super fine recording mode If the recording is started in these status recording will automatically be performed in the Fine mode The quality of audio is not changed Rec time No setting 5min 10min 15min 30min 60min 90min 120min or 180min Set the recording time before reco...

Page 45: ...e card is inserted Broken file Cannot display image The file is broken Memory full The card memory is full Not enough memory The card does not have enough memory to operate Cannot read file The file is not readable Unrecordable source SD recording is stopped It is not possible on restricted channels Error Check card Re insert the card If the error persists format the card Card recording in progres...

Page 46: ...the VCR DVD or DVD recorder to Standby mode Press again to switch back on Play Press to playback the tape or DVD Stop Press to stop the tape or DVD Skip Fast Forward Cue VCR Press to fast forward the tape In Play mode press to view the picture rapidly forward Cue DVD Press to skip to the next track or title Press and hold to search forward Skip Rewind Review VCR Press to rewind the tape In Play mo...

Page 47: ... button the page numbers will change to white indicating that the page is stored HOLD HOLD To hold the Teletext page when viewing multi page information Press again to return to automatic page update Teletext features may vary depending on the Broadcasting Companies and is only available if the channel selected is transmitting Teletext Pressing the MENU button whilst in Teletext operation will dis...

Page 48: ...u require As each sub page is found its number is displayed at the top of the page so that you may select it as more sub pages are picked up the display at the top of the page changes so that you are always offered the most recently transmitted selection of sub pages In Teletext operation use the following procedure to access sub pages If the sub page you want to look at is not yet available press...

Page 49: ...e OK VCR 1 2 3 4 5 6 7 8 9 0 TEXT DVB teletext services DVB teletext services differ greatly from analogue teletext When you switch to a DVB teletext service the images you see can contain graphics and text laid out and controlled in a manner decided by the broadcaster In all cases it is possible to navigate the pages using buttons on the remote control but because the commands available must appl...

Page 50: ...ill disappear after a few seconds If you want to select an input when the keys are not shown press any one of the coloured buttons and the keys will reappear Notes The volume level of the headphones can be adjusted by selecting Headphone volume from the Sound menu Additional equipment and cables shown are not supplied with this TV set Notes You can also select an AV source using the TV AV button o...

Page 51: ...t the Component Input terminals How to connect the Audio Output terminals How to connect the AV1 2 4 Scart terminals Amplifier to Speaker System To bundle the cables with the clamper Note Do not put the RF cable and the mains lead together to avoid noise To tighten To loosen Pull Pull Keep the knob pressed Example Example Example AV4 VCR S VIDEO VCR Q Link COMPATIBLE VCR SET TOP BOX DVD PLAYER DVD...

Page 52: ...matted to view on your display If the external devices have the aspect adjustment set to 16 9 For applicable HDMI signals information see page 57 Compatible sampling frequency of AUDIO signal through HDMI L PCM 48 kHz 44 1 kHz 32 kHz Notes This HDMI connector is Type A If you connect equipment without a digital output terminal connect to the COMPONENT S VIDEO or VIDEO input terminal on the TV so y...

Page 53: ...dots of LCD panel is used for display Some PC models cannot be connected to the set There is no need to use an adapter for computers with DOS V compatible D sub 15P terminal The computer shown in the illustration is for example purposes only Additional equipment and cables shown are not supplied with this set Do not set the horizontal and vertical scanning frequencies for PC signals which are abov...

Page 54: ...ion may have deteriorated Switch NICAM setting Sound menu in Analogue only to Off until reception improves There may be red spots blue spots and green spots on the screen Normal Sound This is a characteristic of liquid crystal panels and is not a problem The liquid crystal panel is built with very high precision technology giving you fine picture details Occasionally a few non active pixels may ap...

Page 55: ...y mode Select channel Select Programme Category Prog type 24 Hr DVB TV Guide Landscape Wed 12 05 04 10 46 Wed 12th Time 19 30 20 00 Prog type Category All Services 20 30 21 00 21 30 All Types Category All Services Check that DVB transmissions are available from the transmitter you are currently using If not try directing the aerial at another local transmitter Check analogue transmissions If pictu...

Page 56: ...in Red earth Green in Green earth Blue in Blue earth Audio out L Audio out R CVBS in video RGB status earth Status RGB Earth Status CVBS Audio in L Audio earth Audio in R AV1 Scart terminal RGB VIDEO Suitable inputs for AV1 include RGB Red Green Blue AV2 Scart terminal VIDEO S VIDEO Q Link AV2 Pins 15 and 20 are dependent on AV2 S VHS VIDEO switching Chrominance in Luminance in Chrominance earth L...

Page 57: ... Hz 37 50 75 00 852 480 60 Hz 31 47 59 94 800 600 60 Hz 37 88 60 32 800 600 75 Hz 46 88 75 00 800 600 85 Hz 53 67 85 06 1 024 768 60 Hz 48 36 60 00 1 024 768 70 Hz 56 48 70 07 1 024 768 75 Hz 60 02 75 03 1 024 768 85 Hz 68 68 85 00 1 280 1 024 60 Hz 63 98 60 02 1 366 768 60 Hz 48 36 60 00 Macintosh13 640 480 35 00 66 67 Macintosh16 832 624 49 72 74 54 Macintosh21 1 152 870 68 68 75 06 Notes Signal...

Page 58: ...ecter 21 Pin terminal Audio Video in Audio Video out RGB in AV2 Scart connecter 21 Pin terminal Audio Video in Audio Video out S Video in Q Link AV3 VIDEO RCA PIN Type 1 S VIDEO Mini DIN 4 pin AUDIO L R RCA PIN Type 2 AV4 Scart connecter 21 Pin terminal Audio Video in Audio Video out RGB in S Video in Q Link Others COMPONENT Y PB PR HDMI TYPE A Connector PC HIGH DENSITY D SUB 15PIN AUDIO L R RCA P...

Page 59: ...ng public holidays Or go on line through our Internet Accessory ordering application at www panasonic co uk Most major credit and debit cards accepted All enquiries transactions and distribution facilities are provided directly by Panasonic UK Ltd It couldn t be simpler Also available through our Internet is direct shopping for a wide range of finished products take a browse on our website for fur...

Page 60: ...n on Disposal for Users of Waste Electrical Electronic Equipment private households This symbol on the products and or accompanying documents means that used electrical and electronic products should not be mixed with general household waste For proper treatment recovery and recycling please take these products to designated collection points where they will be accepted on a free of charge basis A...

Reviews: