background image

Advanced

Menu

Item

Adjustments / Confi gurations (alternatives)

Setup

AV Colour System

Selects optional colour system based on video signals in AV mode 

(Auto / PAL / SECAM / M.NTSC / NTSC)

DVB Profi le Edit

Creates list of favourite programmes (p. 25)

DVB Service List

Skips the unwanted DVB channels (p. 25)

Q-Link Settings

Q-Link

Selects which AV terminal is to be used for data communication between this TV and a 
compatible recording equipment 

(AV1 / AV2)

 (p. 32)

AV1 / AV2 out

Chooses the signal to be transmitted from the TV to Q-Link 

(Analogue / DVB / AV1 / AV2 / AV3 / Monitor)

Monitor: Image displayed on screen 

Component, PC and HDMI signals cannot be outputted

Download

Downloads analogue channel information to a Q-Link compatible equipment connected 
to the TV

Child Lock

Locks a programme channel to prevent access to it (p. 25)

T

uning Menu

Auto Setup

Automatically sets the channels received in the area (p. 27)

Analogue
Programme Edit

Edits analogue channels (p. 27)

DVB Manual 
Tuning

Sets the DVB channels manually (p. 28)

Analogue
Manual Tuning

Sets the analogue channels manually (p. 28)

Add New DVB 
Services

Adds new DVB services (p. 28)

New Service 
Message

Selects whether to give a notifi cation message when a new DVB service is found 
(p. 28)

DVB Signal 
Condition

Checks the DVB signal condition (p. 28)

Off Timer

Sets the time the TV automatically turns Off 

(Off / 15 / 30 / 45 / 60 / 75 / 90 minutes)

Language

OSD Language

Changes language for on-screen displays

Teletext 
Language

Selects teletext language 

(West / East1 / East2)

West: English, French, German, Greek, Italian, Spanish, Swedish, Turkish

East1: Czech, English, Estonian, Lettish, Rumanian, Russian, Ukrainian

East2: Czech, Hungarian, Lettish, Polish, Rumanian

Preferred Subtitles

Selects the preferred language for DVB subtitles (depending on the broadcaster)

To display subtitles 

 p. 13

Teletext

Teletext display mode 

(TOP (FLOF) / List)

 (p. 16)

Shipping Condition

Resets all settings, for example, when moving house (p. 29)

Common Interface

Uses to watch pay-TV (p. 23)

System Update

Downloads new software to TV (p. 23)

Input Labels

Labels or skips each input terminals (p. 30)

Banner Display 
Timeout

Sets how long the information banner (p. 13) stays on screen

0 (No display) to 10 sec. in 1-sec. increments

VIERA Link

Sets to use VIERA Link functions 

(Off / On)

 (p. 34)

Time Zone

Adjusts the time data (p. 23)

Software License

Displays the software licence information

System Information

Displays the system information of this TV

21

How to Use Menu Functions

(picture, sound quality

, etc.)

Ŷ

Menu list

A different menu will be displayed while PC is used.

 (p. 31)

Only available items can be selected.
Summary of Contents for TX-26LMD70FA

Page 1: ...6 5 7 9 8 0 REC VCR DVD TEXT STTL INDEX HOLD Operating Instructions LCD Television English Please read these instructions before operating your set and retain them for future reference The images shown in this manual are for illustrative purposes only Model No TX 26LMD71FA TX 32LMD71FA ...

Page 2: ...related to DVB Digital Video Broadcasting will work in areas where DVB T MPEG2 digital terrestrial broadcasting are received Consult your local Panasonic dealer with coverage areas DVB functions may not be available in some countries This TV has the capability for DVB specifications But future DVB services cannot be guaranteed ...

Page 3: ...sound quality etc DVB Settings DVB 22 pay TV software update time adjustment Editing Channels 24 Tuning Channels 26 Restore Settings 29 Input Labels 30 Displaying PC Screen on TV 31 Q Link Functions 32 HDMI Functions 33 HDMI terminal VIERA Link External Equipment 36 Basic Features Watching TV 12 Watching Videos and DVDs 14 Viewing Teletext 16 Enjoy your TV Technical Information 38 FAQs 41 Specifica...

Page 4: ...aged lead may cause fire or electrical shock Do not move the TV with the lead plugged in the socket outlet Do not place a heavy object on the lead or place the lead near a high temperature object Do not twist the lead bend it excessively or stretch it Do not pull on the lead Hold onto the mains plug body when disconnecting lead Do not use a damaged mains plug or socket outlet Warning Do not expose ...

Page 5: ...e TV s surfaces to detergent A liquid inside the TV could lead to product failure Use care not to subject surfaces to bug repellent solvent thinner or other volatile substances this may deteriorate the surface by peeling the paint Do not allow the cabinet to make contact with a rubber or PVC substance for a long time Electronic equipment In particular do not place video equipment too close the TV ...

Page 6: ...he TV To loosen Clamper Standard accessory Clamper that bundle mains lead Bundle the cables Hook the clamper Tight Lock Optional accessories Wall hanging bracket TY WK32LR2W WARNING Failure to use a Panasonic bracket or choosing to mount the unit yourself will be done at the risk of the consumer Any damage resulting from not having a professional installer mount your unit will void your warranty A...

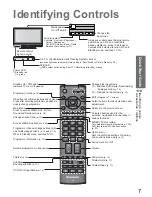
Page 7: ...Standby On Off switch Switches TV On or Off standby Sound mute On Off Changes aspect ratio p 13 Selects programmes in sequence Teletext p 16 OK button to confirm selections and choices Press after selecting programme positions to quickly change programme VCR DVD operations p 15 Volume Programme Information p 13 Teletext Index p 17 Coloured buttons used for the selection navigation and operation of ...

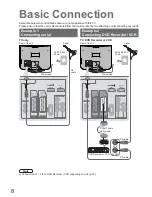
Page 8: ... cable Aerial Aerial Rear of the TV Rear of the TV External equipment and cables shown are not supplied with this TV Please ensure that the unit is disconnected from the mains socket before attaching or disconnecting any leads Example 1 Connecting aerial Example 2 Connecting DVD Recorder VCR RF cable RF cable TV only TV DVD Recorder or VCR AC 220 240 V 50 Hz AC 220 240 V 50 Hz Note Connect to AV1 ...

Page 9: ...T RF IN RF IN Basic Connection DVD Recorder or VCR SCART cable fully wired RF cable Aerial Mains lead Rear of the TV Set top box Example 3 Connecting DVD Recorder VCR and Set top box AC 220 240 V 50 Hz RF cable RF cable TV DVD Recorder VCR and Set top box SCART cable fully wired SCART cable fully wired RF cable ...

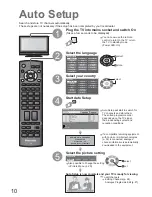
Page 10: ... Dansk Norsk Español Viewing Mode Dynamic Normal Cinema Auto Plug the TV into mains socket and switch On Takes a few seconds to be displayed 1 Auto Setup Search and store TV channels automatically These steps are not necessary if the setup has been completed by your local dealer Auto Setup is now complete and your TV is ready for viewing You can now use the remote control to turn On the TV or turn...

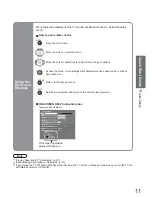
Page 11: ...or adjust levels select from a range of options Access the menu store settings after adjustments have been made or options have been set Many features available on this TV can be accessed via the On Screen Display menu Note If tuning have failed Auto Setup p 27 If downloading have failed Download p 21 If you turned the TV Off during Standby mode last time the TV will be in Standby mode when you tu...

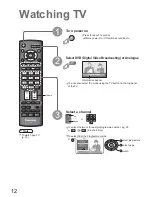
Page 12: ... 3 4 Select Connect programme EXIT Page up down RETURN VCR 1 3 2 4 6 5 7 9 8 0 To select the two or three digit programme number e g 39 Watching TV up down or 9 in a short time 3 Select a channel 3 2 Select DVB Digital Video Broadcasting or Analogue Information banner Mains power On Off switch should be On Press for about 1 second 1 You can also select the mode using the TV button on the top panel...

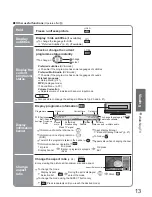
Page 13: ...subtitles Preferred Multi Audio DVB mode Possible if the programme has some languages of sounds Teletext Language Setup Menu p 21 MPX Analogue mode Sound Menu p 20 Volume Correction Adjusts volume of individual channel or input mode Note Also possible to change the settings in Menu list p 20 and p 21 select change Display information banner 1 BBS 23 35 Corontation Street Bad Signal Encrypted 45 20...

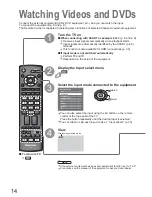
Page 14: ...our local dealer ŶTo return to TV Displays the selected mode 1 Turn the TV on ŶWhen connecting with SCART as example 2 or 3 p 8 and p 9 Receives input signals automatically when playback starts Input signals are automatically identified by the SCART pin 8 terminal This function is also available for HDMI connections p 35 ŶIf input mode is not switched automatically Perform and You can also select t...

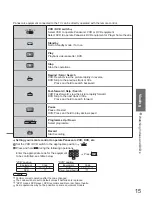
Page 15: ...o play at slow speed PROGRAMME Programme Up Down Select programme REC Record Start recording Panasonic equipment connected to the TV can be directly operated with the remote control Note Confirm correct operation after the code changed The codes will be reset to default values if batteries are replaced DVD means DVD player DVD recorders and Recorder home theatre Some operations may not be possible ...

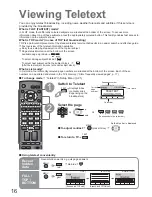
Page 16: ...ubjects shown What is List mode In List mode four differently coloured page numbers are situated at the bottom of the screen Each of these numbers can be altered and stored in the TV s memory Store frequently viewed pages p 17 ŶTo change mode Teletext in Setup Menu p 21 ŶTo adjust contrast MENU press thrice As the blue bar is displayed Reveal hidden data MENU red Re hide red Reveal hidden words e ...

Page 17: ...ange the channel Teletext automatically updates itself when new information becomes available The news page provides a function that indicates arrival of latest news News Flash Changes to TV screen temporarily View the updated page View the TV picture while searching for a teletext page Call up a favourite pages STTL Call up the page stored in blue Factory setting is P103 Analogue mode only View i...

Page 18: ...u Functions Display the menu 3 2 4 Various menus allow you to make settings for the picture sound and other functions Displays the functions that can be set varies according to the input signal Note To initialize all settings Shipping Condition p 29 ŶTo return to TV at any time EXIT ŶTo return to the previous screen RETURN Select the menu Select the item example Picture Menu Adjust or select examp...

Page 19: ...nu MPX Stereo Preferred Multi Audio English 1 2 p 20 1 2 AV Colour System Auto Q Link Settings Access Child Lock Access Tuning Menu Off Timer Off Language Teletext TOP Access Access Setup Menu DVB Profile Edit Access DVB Service List Access 2 2 Shipping Condition Access Input Labels Banner Display Timeout 3 seconds VIERA Link Software License Access System Information Access On Access Setup Menu T...

Page 20: ...only Not valid on RGB S Video components PC and HDMI Reset to Default Press the OK button to reset the present Picture Mode to the default settings Sound Mode Basic sound mode Music Speech Bass Adjusts the output level of deep bass Treble Adjusts the output level of high pitch shrill sound Balance Adjusts volume level of right and left speakers Headphone Volume Adjusts the volume of the headphones...

Page 21: ...a new DVB service is found p 28 DVB Signal Condition Checks the DVB signal condition p 28 Off Timer Sets the time the TV automatically turns Off Off 15 30 45 60 75 90 minutes Language OSD Language Changes language for on screen displays Teletext Language Selects teletext language West East1 East2 West English French German Greek Italian Spanish Swedish Turkish East1 Czech English Estonian Lettish ...

Page 22: ...n Setup Menu Time Zone Auto RETURN GUIDE 1 2 3 4 5 6 7 8 9 0 VCR REC VCR DVD PROGRAMME TEXT STTL INDEX HOLD ASPECT OPTION DIRECTTV REC TV EXIT MENU OK INPUT MENU 22 DVB Settings Select Setup Select Common Interface System Update or Time Zone Set ŶTo return to TV EXIT DVB mode DVB Settings provide access to various advanced features 4 3 5 1 2 access select access select Display the menu If in Analo...

Page 23: ... example On screen operation guide may not correspond to the remote control buttons Caution Turn Off Mains power On Off switch whenever inserting or removing the CI module If a view card and a card reader come as a set first insert the card reader then insert the view card into the card reader Do not insert the module up side down The features that appear on screen are dependent on the contents of ...

Page 24: ...C PROGRAMME REC VCR DVD TEXT STTL INDEX HOLD TV EXIT MENU OK VCR 1 3 2 4 6 5 7 9 8 0 INPUT MENU 24 Editing Channels Select Setup Select DVB Profile Edit DVB Service List or Child Lock Set You can make your favourite channel lists skip unwanted channels and control channel audience ŶTo return to TV EXIT Select DVB or Analogue DVB Profile Edit and DVB Service List are available in DVB mode only 4 3 5 ...

Page 25: ...ervice List Change PIN Access Wed 12 05 04 10 46 Child Lock Service List BBC One Wales DVB Service Name Lock Type 1 BBC THREE 7 E4 14 CBBC Channel 70 Cartoon Nwk 72 BBCi 105 BBC Radio Wales 719 BBC Radio Cymru 720 VCR 1 3 2 4 6 5 7 9 8 0 ŶTo change the PIN number Select Change PIN in and enter a new PIN number twice You can lock specific channels and control who watches them When a channel is selec...

Page 26: ...ual Tuning Access Add New DVB Services Access Access New Service Message DVB Signal Condition Access On MENU 26 Set 6 Tuning Channels Select Setup Select Tuning Menu Display the menu Select a function You can re tune all TV channels when moving house or search for new services which may have recently started broadcasting ŶTo return to TV EXIT Select DVB or Analogue DVB Manual Tuning Add New DVB Se...

Page 27: ...t Analogue Programme Edit 1 CH33 2 CH21 3 CH21 4 CH60 5 CH21 Prog Chan Name 1 2 3 X Y Z F T P 4 5 6 SC1 Auto SC1 Auto SC1 Auto SC1 Auto SC1 Auto Sound Sys Colour Sys ŶTo change sound system based on signals Select the Sound Sys field Select sound system SC1 PAL B G H SECAM B G SC2 PAL I SC3 PAL D K SECAM D K F SECAM L L Analogue Programme Edit 1 CH33 2 CH21 3 CH21 4 CH60 5 CH21 Prog Chan Name 1 2 3...

Page 28: ...ency set where the level of Signal Quality becomes the maximum select channel search DVB Manual Tuning Signal Quality Stopped 0 10 Signal Strength 0 10 Frequency MHz CH21 474 00 Prog Channel Net ID Quality TS ID Service Name All services found will be added to the DVB Service List p 25 automatically Add DVB channel automatically Add New DVB Services Any new services found will be added to the DVB ...

Page 29: ...Follow the on screen instructions Auto Setup will automatically start p 10 ŶTo re tune TV channels only e g after moving house Auto Setup p 27 3 2 4 Select Setup Select Shipping Condition Display the menu Set ŶTo return to TV EXIT Restore Settings Shipping Condition Restore Settings Resets the TV to its original condition i e no channels tuned in All settings channels picture sound quality etc are...

Page 30: ...els Display the menu Select a input terminal and set ŶTo return to TV EXIT For easier identification and selection of the input mode you can label each input terminals or skip terminal that is not connected to any equipment To select the input mode p 14 1 The labels you set will be displayed in Input Selection menu p 14 or banner If Skip is selected you cannot select the mode set select access sele...

Page 31: ...e occurs Sync Chooses another synchronous signal if the image is distorted H V On G H V by the horizontal and vertical signals from your PC On G by the green signal from your PC if available EXIT GUIDE ASPECT RETURN OPTION DIRECTTV REC MENU VCR 1 2 3 4 5 6 7 8 9 0 OK INPUT Input Selection AV1 AV2 AV2S AV3 AV3S COMPONENT PC HDMI1 HDMI2 TV 31 Displaying PC Screen on TV Input Labels ŶTo return to TV ...

Page 32: ...SCART cable p 36 Q Link terminal setup in Setup menu Q Link AV1 AV2 out p 21 DATA LOGIC a trademark of Metz Corporation Megalogic a trademark of Grundig Corporation Easy Link a trademark of Philips Corporation SMARTLINK a trademark of Sony Corporation Read the manuals of the equipment too ŶDownload analogue channel settings Perform Auto Setup p 27 When first using this TV see Auto Setup p 10 Perfor...

Page 33: ...t connect to the HDMI1 terminal via a DVI to HDMI adapter cable 2 When the DVI to HDMI adapter cable is used connect the audio cable to the audio input terminal HDMI1 use COMPONENT AUDIO terminals Audio settings can be made on the HDMI1 Input menu screen p 20 Applicable audio signal sampling frequencies 2ch L PCM 48 kHz 44 1 kHz 32 kHz HDMI2 terminal is for digital audio signal only Use with a PC ...

Page 34: ...ng operation Easy control only with VIERA remote control p 35 These features are limited to models incorporating Panasonic s HDAVI Control and VIERA Link The operations with other manufacturer s equipment cannot be guaranteed Refer to individual manuals for compatibility information About applicable equipment consult your local Panasonic dealer VIERA Link ControlTM 4 HDMI Functions ŶHDMI cable Thi...

Page 35: ...nd of TV speakers is mute When the equipment is turned off TV speakers will be active VIERA Link Control Speaker Selection VIERA Link Menu Home Cinema Recorder select set Easy control only with VIERA remote control You can control some functions of the connected Panasonic equipment with this TV remote control point the remote control at the TV s signal receiver If you cannot access the menu check ...

Page 36: ...UT A U D I O V I D E O L R COMPONENT HDMI 1 HDMI 2 36 These diagrams show our recommendations for how to connect the TV to your various equipment For other connections consult the instructions for each piece of equipment the table below and the specifications p 43 Recommended Connection ŶTypes of connectable equipment to each connector External Equipment VIDEO or S VIDEO AUDIO Headphones Camcorder ...

Page 37: ...ic Player theatre HD Video Camera Use fully wired HDMI compliant cable Read the manuals of the equipment too VIERA Link p 34 Speaker system Computer Amplifier with speaker system PC Viewing Listening To listen with speakers Conversion adapter if necessary Set top box DVD Recorder VCR SCART cable RF cable SCART cable To watch satellite broadcasts To record playback To watch DVDs DVD player Viewing L...

Page 38: ...four step process to determine if the picture being viewed is a widescreen picture Just 14 9 16 9 Zoom3 Zoom2 Zoom1 Directly displays the image at 16 9 without distortion anamorphic Displays a 16 9 letterbox or 4 3 image without distortion Displays the image at the standard 14 9 without enlargement Displays a 16 9 letterbox anamorphic image full screen without distortion Displays a 4 3 image full ...

Page 39: ... an update available a notification banner is displayed To download new software press OK Downloading approx 20 min If you choose not to download press EXIT Update system software regularly to ensure that you have latest version software If there is an update available a notification banner is displayed when the channel has the update information Updating the software system DVB mode To download new...

Page 40: ...24 60 Hz 63 98 60 02 1 366 768 60 Hz 48 39 60 04 Macintosh13 640 480 35 00 66 67 Macintosh16 832 624 49 73 74 55 Macintosh21 1 152 870 68 68 75 06 Mark Applicable input signal COMPONENT Y PB PR HDMI PC D sub 15P Pin No Signal Name Pin No Signal Name Pin No Signal Name R GND Ground NC not connected G GND Ground NC not connected B GND Ground HD NC not connected NC not connected VD GND Ground GND Gro...

Page 41: ...r nearest dealer An error message appears Follow the message s instructions If the problem persists contact the authorized Service Centre Direct TV record Q Link functions not recording Please confirm SCART cable and connection Also please set AV1 AV2 out in the Setup Menu p 21 There may be red spots blue spots green spots and black spots on the screen This is a characteristic of liquid crystal pan...

Page 42: ...and equipment then turn them On again Check an input signal from the equipment p 40 Use an equipment compliant with EIA CEA 861 861B Unusual image is displayed Turn off the TV with Mains power On Off switch then turn it on again TV goes into Standby mode Off Timer function is activated The TV enters Standby mode about 30 min after broadcasting ends The remote control does not work Are the batterie...

Page 43: ...ved in some areas Aerial Rear VHF UHF Operating Conditions Temperature 0 C 35 C Humidity 20 80 RH non condensing Teletext pages 1000 Connection Terminals AV1 Scart terminal 21 Pin terminal Audio Video in Audio Video out RGB in Q Link AV2 Scart terminal 21 Pin terminal Audio Video in Audio Video out RGB in S Video in Q Link AV3 VIDEO RCA PIN Type 1 1 0 V p p 75 S VIDEO Mini DIN 4 pin Y 1 0 V p p 75...

Page 44: ...an Union If you wish to discard this product please contact your local authorities or dealer and ask for the correct method of disposal Licence Trademark Credits DVB is a trademark of the DVB Digital Video Broadcasting Project 1991 to 1996 VGA is a trademark of International Business Machines Corporation Macintosh is a registered trademark of Apple Computer USA S VGA is a registered trademark of t...

Reviews: