background image

Q-Link
AV1 out

Monitor

AV2

VIERA Link

AV2 out

Off timer

Tuning menu
Owner ID

Setup menu 

On

Monitor

Off

Power on preference

TV

Access

Teletext

FASTEXT

Shipping condition

Programme edit 
Auto setup 
Manual tuning 
Fine tuning 

Tuning menu 

Access

TV

EXIT

MENU

OK

MENU

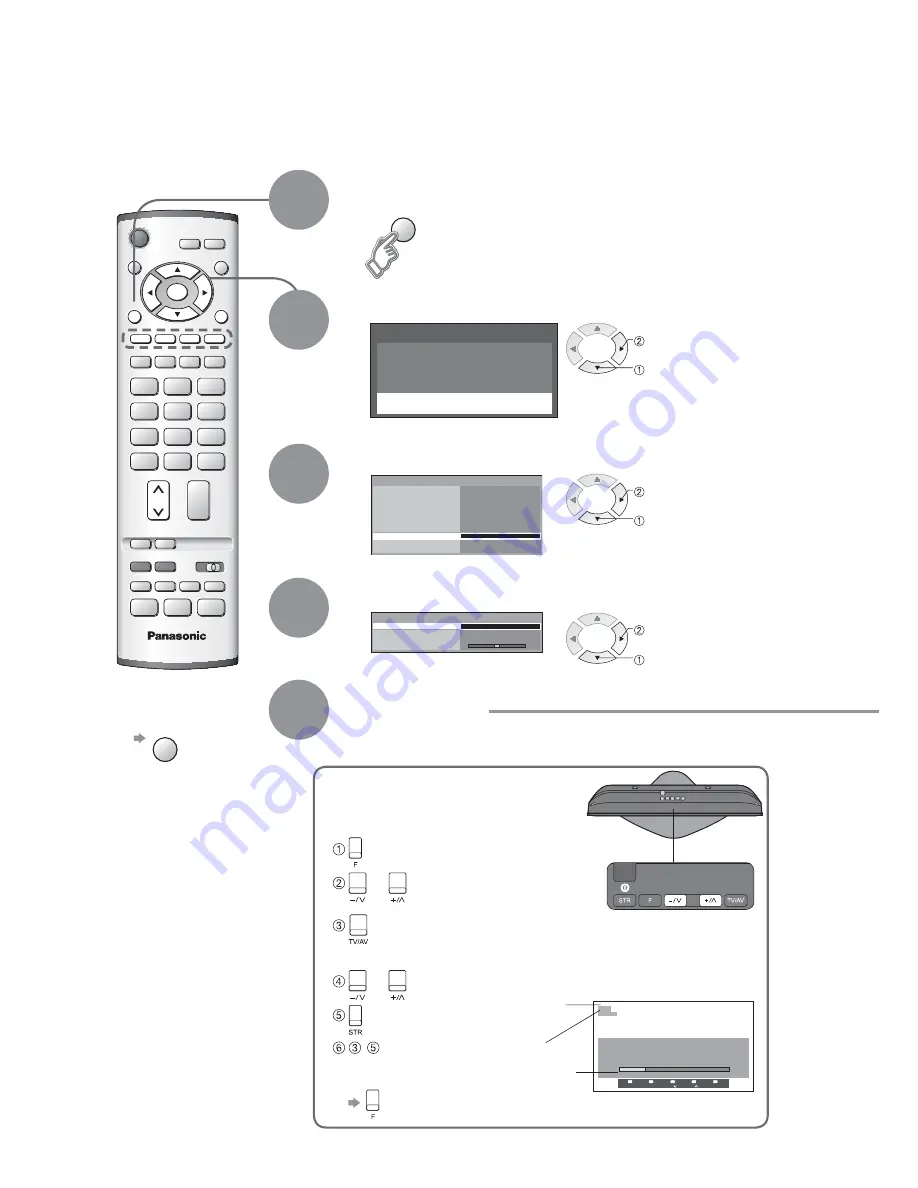
(Press repeatedly until "Tuning mode" appears)

 or 

 (Access "Manual tuning")

 (Select programme position or channel number)

Selected item will fl ash.

 or 

(Change programme position or start searching channels)

 (Store)

-  (Repeat)

Editing and Setting Channels

Select "Setup menu"

Select "Tuning menu"

3

1

2

Select the function

4

Display the menu

5

How to set

For Manual tuning, using the buttons

on the unit 

("Manual tuning" on p. 7)

The channel settings can be changed according to your needs and reception conditions. 

Ŷ

To return to TV

Ŷ

To return to TV

EXIT

 access

 select

 access

 select

 access

 select

ST R

F

- / 

+ / 

TV / A V 

CH12

1

Manual tuning 

01                            99:21              41

-, + 

:  Search 

TV / AV  :  Move  cursor 
STR : 

To 


store 

F : 

To 


exit 

Programme
position (fl ash)

Channel
number (fl ash)

M a i n   m e n u

P i c t u r e   m e n u

S o u n d   m e n u

S e t u p   m e n u

Channel

(Manual tuning screen)

18

Summary of Contents for TX-26LE7LA

Page 1: ...0 PROGRAMME DIRECT TV REC ASPECT MENU OK Operating Instructions LCD Television English Please read these instructions before operating your set and retain them for future reference The images shown in this manual are for illustrative purposes only Model No TX 26LM70LA TX 32LM70LA ...

Page 2: ...tre Experience an amazing level of multi media excitement Sharp pictures with HDMI terminal Control DVD recorder VCR via TV with Q Link connection p 22 Create home theatre and DVD recorder link ups with VIERA Link without complicated settings ...

Page 3: ...nd quality etc Editing and Setting Channels 18 Restore Settings 20 Owner ID 21 Q Link Functions 22 HDMI Functions 23 External Equipment 26 Basic Features Watching TV 11 Viewing Teletext 12 Watching VCR DVD and Satellites 14 Enjoy your TV Technical Information 28 FAQs 30 On screen messages 31 Index 32 Licence 32 Specifications 33 FAQs etc Accessories Options 6 Identifying Controls 7 Basic Connection...

Page 4: ... of the three pin mains plug marked with the letter E or the earth symbol How to replace the fuse For plug type shown in example 1 Lift out the removable fuse compartment with a screwdriver and replace the fuse then refit securely into the mains plug see example 1 For plug type shown in example 2 Lift open the fuse compartment in the mains plug with a screwdriver and replace the fuse then press the...

Page 5: ... dry cloth evenly wipe the surface clean until it is dry Daily care Wipe the surface clean using a soft dry cloth Detail Dampen a soft cloth with clean water or water containing a small amount of neutral detergent Then wring the cloth and wipe the surface clean with it Finally wipe the surface clean with a dry cloth Wipe the mains plug with a dry cloth at regular intervals Moisture and dust may le...

Page 6: ...ay cause battery leakage and corrosion resulting in damage to the remote control unit Do not mix old and new batteries Do not mix different battery types such as alkaline and manganese batteries Do not use rechargeable Ni Cd batteries Do not burn or breakup batteries see page 36 Attaching the clamper Do not bundle the RF cable and mains lead together could cause distorted image Fix cables with cla...

Page 7: ... to store tuning and other function settings On Off switch AV3 S V V L R Switches TV to On or Standby On Off switch in On position Sound mute On Off Changes aspect ratio p 11 Normalizes p 16 Resets settings Selects programmes in sequence Direct channel access During normal TV viewing or when in the Tuning Programme edit or Manual tuning menus press and then enter channel number using the numeric b...

Page 8: ... Choose between these three video formats depending on personal preference and equipment requirement RGB Red Green and Blue VCR Video Cassette Recorder External equipment and cables shown are not supplied with this TV Please ensure that the TV is disconnected from the mains socket before attaching or disconnecting any leads Ex 1 Connecting aerial TV only Ex 2 Connecting DVD Recorder VCR TV DVD Rec...

Page 9: ... DVD Recorder or VCR SCART cable fully wired RF cable Aerial Mains lead supplied Rear of the TV Set top box Basic Connection SCART cable fully wired Ex 3 Connecting DVD Recorder VCR and Set top box TV DVD Recorder VCR and Set top box AC 220 240 V 50 Hz SCART cable fully wired RF cable RF cable RF cable ...

Page 10: ...is now complete and your TV is ready for viewing ŶWhen inputting owner ID later EXIT You can now use the remote control to turn On the unit or turn the unit to standby mode Power lamp On 2 If you input the ID later Owner ID p 21 If a compatible recording equipment with Q Link or similar technologies p 22 is connected channel information is automatically downloaded to the equipment Auto Setup will ...

Page 11: ...ation Display hide status information Displays information for a few seconds Change aspect ratio or 14 9 ASPECT While the bar is displayed red green Programme Guide Prog Name Chan VCR 1 2 3 4 5 6 7 8 9 10 11 12 CH21 CH44 CH51 CH41 CH47 CH23 CH26 CH58 BBC1 BBC2 ITV Prog Name Chan 13 14 15 16 17 18 19 20 21 22 23 24 select page 1 CH_ _ ŶTo select a channel inputting the channel number e g 39 C ĺ 3 ĺ...

Page 12: ... answers ŶUsing teletext MENU green TOP BOTTOM Normal FULL Expand the BOTTOM half You can enjoy news weather forecasts and subtitles etc depending on the broadcaster What is FASTEXT mode default In FASTEXT mode four differently coloured subjects are situated at the bottom of the display To access more information about one of these subjects press the appropriately coloured button This facility ena...

Page 13: ... mode only hold down As page is displayed The number changes to white Corresponding colour button ŶTo change stored pages VCR 1 2 3 4 5 6 7 8 9 0 OK hold down Enter new page number Colour button you want to change 0 0 0 Enter the 4 digit number example P6 Appears at upper left corner of the screen ŶTo view specific sub page MENU blue Sub pages The number of sub pages varies depending on the broadca...

Page 14: ...VD VCR setup Terminal AV1 AV2 AV3 Component HDMI1 HDMI2 Manual input selection AV1 AV2 AV2S S video input AV3 AV3S S video input Component HDMI1 HDMI2 Auto input selection EC1 RGB AV1 RGB RGB input EC2 RGB AV2 RGB RGB input ʊ ʊ HDMI1 HDMI2 Screen display VCR DVD switch Select VCR to operate Panasonic VCR or DVD equipment Select DVD to operate Panasonic DVD equipment or Player theatre Standby Set t...

Page 15: ...t Auto setup Manual tuning Tuning menu Access Access Access Fine tuning Delete Add Move Download Programme edit Prog Chan Name Lock 1 2 3 4 5 CH44 CH51 CH41 CH47 CH37 ABC XYZ FTP 123 456 Off Off Off Off Off Off timer Tuning menu Setup menu AV1 out Monitor AV2 out Monitor Off Access Power on preference Teletext List Volume correction Owner ID Shipping condition Access Access TV Q Link AV2 VIERA Lin...

Page 16: ...ys the functions that can be set varies according to the input signal Note To initialize all settings Shipping condition p 20 ŶTo return to TV at any time EXIT ŶTo return to the previous screen MENU Select the menu Select the item example Picture menu select select Adjust or select change example Picture menu example Picture menu Changed Number and positions of alternatives Moved ŶChoose from amon...

Page 17: ...ts the volume of the headphones NICAM NICAM Near Instantaneous Companded Audio Multiplex A format for digital sound over television Reproduces stereo sound Off On Off if reception is poor FM monaural sound Mode Sound quality can be improved when watching music scene or drama Music Speech Ambience Provides a dynamic enhancer to simulate improved spatial effects Off On HDMI1 input Select to fit the i...

Page 18: ...sition or start searching channels Store Repeat Editing and Setting Channels Select Setup menu Select Tuning menu 3 1 2 Select the function 4 Display the menu 5 How to set For Manual tuning using the buttons on the unit Manual tuning on p 7 The channel settings can be changed according to your needs and reception conditions ŶTo return to TV ŶTo return to TV EXIT access select access select access ...

Page 19: ...hange the name of the broadcaster displayed when selecting channels Cursor Usable characters Select the Name field Select the character To next character Repeat Select the Lock field Select On Start Auto setup start Settings are made automatically Select the programme position and search through the channel Store search Programme position Channel Repeat and Select the channel to edit Note If a VCR i...

Page 20: ...return to TV EXIT Restore Settings Check the message and initialise Follow the on screen instructions Auto Setup will automatically start when MAINS power On Off switch is next turned On p 10 ŶTo re tune TV channels only e g after moving house Auto setup p 19 All tuning data will be erased Shipping condition Exit Return Start Shipping condition Restore Settings OK set Resets the TV to its original...

Page 21: ...ber is not displayed Enter the PIN number 0 9 Owner ID Restore Settings Select character To next character store OK VIERA Link AV2 out Off timer Setup menu Off Power on preference TV Tuning menu Access Teletext FASTEXT Monitor Q Link AV2 AV1 out Monitor On Shipping condition Owner ID 3 4 Select Owner ID How to set ŶTo return to TV EXIT Entry of the security code PIN number and personal information...

Page 22: ...logic or SMARTLINK Connect the equipment to this unit s AV1 or AV2 terminal via a fully wired SCART cable p 28 Q Link terminal setup in Setup menu Q Link AV1 AV2 out p 18 DIRECT TV REC DIRECT TV REC Direct TV Recording Recording the current programme in VCR DVD recorder immediately When Direct TV Recording is performed the recording equipment is automatically turned on if it is in Standby mode The...

Page 23: ...sed connect the audio cable to the audio input terminal Audio settings can be made on the HDMI1 input menu screen p 17 Applicable audio signal sampling frequencies 2ch L PCM 48 kHz 44 1 kHz 32 kHz HDMI2 terminal is for digital audio signal only Use with a PC is not assumed If the connected equipment has an aspect adjustment function set the aspect ratio to 16 9 These HDMI connectors are type A An ...

Page 24: ...fully wired cable Non HDMI compliant cables cannot be utilized Consult your local Panasonic dealer or refer to the URL for applicable equipment www panasonic co uk VIERA Link Control Preparations For the first time When adding new equipment reconnecting equipment or changing setup After connection turn the equipment on and then switch the TV unit on Select the input mode to HDMI1 or HDMI2 p 14 p 17...

Page 25: ... Home theatre or TV speaker ŶHome theatre Adjustment for equipment automatically turned on if it is in Standby mode When selecting Home theatre the sound of TV speakers is mute When the equipment is turned off TV speakers will be active Volume up down Mute ŶTV speaker TV speakers are active Main menu Picture menu Sound menu Setup menu Home theatre HDMI Functions Setup the equipment to enable this ...

Page 26: ...corder To watch DVDs DVD player To watch camcorder images Video camera To watch satellite broadcasts Set top box To play games Game equipment Q Link Direct TV Recording VIERA Link Types of connectable equipment to each connector Connections overview AUDIO VIDEO Headphones Camcorder Game equipment M3 plug Set top box DVD Recorder VCR SCART cable To watch satellite broadcasts To record playback To w...

Page 27: ...AUDIO L R Fully wired HDMI compliant cable COMPONENT PR PB Y 1 2 Recommended Connection VIERA Link p 24 DIGA or Panasonic Amplifier Computer PC Listening When using HDMI2 terminal as VIERA Link select the external input to HDMI2 for the first time p 14 17 RF cable or To listen with speakers Amplifier with speaker system ...

Page 28: ...f the picture being viewed is a widescreen picture If Auto aspect detects a widescreen signal it switches into the appropriate 16 9 or 14 9 widescreen mode If Auto aspect does not detect a widescreen signal then this advanced TV set enhances the picture for optimum viewing pleasure The text shown on the screen indicates how Auto aspect determined which ratio to use WIDE appears in the top left of ...

Page 29: ...t video CVBS earth Red in S C in Red earth Green in Green earth Blue in Blue earth Audio out L Audio out R CVBS in video RGB status earth Status RGB Earth Q Link data Status CVBS Audio in L Audio earth Audio in R 21 19 17 15 13 11 9 7 5 3 1 20 18 16 14 12 10 8 6 4 2 Luminance in Chrominance earth Luminance earth ŶAV3 S VIDEO 4 pin terminal ŶAV2 SCART terminal RGB VIDEO S VIDEO Q Link Suitable inpu...

Page 30: ...e details Occasionally a few non active pixels may appear on the screen as a fixed point of red green blue or black Please note this does not affect the performance of your LCD Problem Actions Screen S Video black and white picture Using TV AV button please confirm your selection is S Video I e AV2 S Video or AV3 S Video p 14 On Screen messages I e AV1 EC1 You can simply clear these by pressing Pres...

Page 31: ...erased No recording Check Tape or Disc Shipping condition will erase all tuning data No recording UNKNOWN REASON Recording stopped TV source changed Are you sure DOWNLOAD IN PROGRESS PLEASE WAIT Feature not available Incorrect PIN Number Make sure the operation is with your desire Q Link channel download is in progress Check the Q Link connection and setting p 22 The impossible source Component HD...

Page 32: ...7 RGB 8 Sales and Support Information 36 Satellite receiver 9 14 26 SCART 8 29 Shipping condition 20 Specifications 33 Sub page 13 S Video 8 29 Teletext 12 TV speaker 25 Video 8 14 VIERA Link 24 26 Viewing mode 17 WSS 28 Zoom 11 28 A C D E F H I L M O P Q R S T V W Z N Trademark Credits VGA is a trademark of International Business Machines Corporation Macintosh is a registered trademark of Apple Co...

Page 33: ...or NTSC disc playback from DVD player and recorder M NTSC Playback from M NTSC Video recorders VCR NTSC AV input only Playback from NTSC Video recorders VCR Aerial Rear VHF UHF Operating Conditions Temperature 5 C 35 C Humidity 5 90 RH non condensing Teletext Pages 500 Connection Terminals AV1 Scart terminal 21 Pin terminal Audio Video in Audio Video out RGB in Q Link AV2 Scart terminal 21 Pin ter...

Page 34: ...34 ...

Page 35: ...35 ...

Page 36: ...earest designated collection point Penalties may be applicable for incorrect disposal of this waste in accordance with national legislation For business users in the European Union If you wish to discard electrical and electronic equipment please contact your dealer or supplier for further information Information on Disposal in other Countries outside the European Union This symbol is only valid i...

Reviews: