background image

English

   - 24 -

Green button (Rotate/Duration):

 Rotate the image / 

Set the interval between the slides.

Yellow button (Zoom/Effect):

 Zoom in on the image 

/ Apply various effects to the slide show.

Pro:

 Switch to next file.

Programme -:

 Switch to previous file.

Back/Return:

 Return to the media player screen.

Text Files
When you press the 

OK

 button slide show will start 

and 

all text files in the current folder or in the storage 

device, depends on the viewing style, will be displayed 

in order. If the 

Repeat

 option is set to 

None

 only the 

files

 between the highlighted one and the last listed 

one will be displayed. The slide show will stop after 

the last listed file is displayed.

Info:

 Display the info bar. Press twice to display the 

extended information.

Play/pause:

 Pause and resume the slide show.

Pro:

 Switch to next file.

Programme -:

 Switch to previous file.

Directional buttons (Down or Right / Up or Left):


Switch to next page. / Switch to previous page.

Back/Return:

 Stop the slide show and return to the 

media player screen.
Menu Options
Press the 

Menu

 button to see available options while 

playing back or displaying media files. The content of 

this menu differs depending on the media file type.

Pause/Play:

 Pause and resume the playback or the 

slide show.

Repeat:

 Set the repeat option. Highlight an option and 

press 

OK

 to change the setting. If 

Repeat One

 option is 

selected the current media file will be repeatedly played 

back or displayed. If the 

Repeat All

 option is selected 

all media files of the same type in the current folder or 

in the storage device, depends on the viewing style, 

will be repeatedly played back or displayed.

Shuffle On/Off:

 Turn the shuffle option on or off. Press 

OK

 to change the setting.

Duration:

 Set the interval between the slides. Highlight 

an option and press 

OK

 to change the setting. You can 

also press the 

Green

 button to set. This option will not 

be available if the slide show is paused.

Rotate:

 Rotate the image. The image will be rotated 

90 degrees clockwise each time you press 

OK

. You 

can also press the 

Green

 button to rotate. This option 

will not be available if the slide show is not paused.

Effect: 

Apply various effects to the slide show. 

Highlight an option and press 

OK

 to change the setting. 

You can also press the 

Yellow

 button to set. This option 

will not be available if the slide show is paused.

Zoom: 

Zoom in on the image that is currently being 

displayed. Highlight an option and press 

OK

 to change 

the setting. You can also press the 

Yellow

 button to 

zoom in. This option will not be available if the slide 

show is not paused.

Font:

 Set the font options. Size, style and colour can 

be set according to your preferences. 

Show Info:

 Display the extended information.

Photo Frame Image:

 Set the currently displayed 

image as photo frame image. This image will be 

displayed if the 

One Photo mode

 is selected instead 

of the connected storage device while activating the 

photo frame feature. Otherwise all files will be played 

back as a slide show when photo frame feature is 

activated.

Hide/Show Spectrum:

 Hide or show the spectrum 

if available.

Lyric Options:

 Display lyric options if available.

Picture Off:

 Open the power menu of your TV. You 

can use the 

Picture off

 option here to turn the screen 

off. P

ress a button on the remote or on the TV to turn 

the screen on again.

Picture Settings:

 Display the picture settings menu.

Sound Settings:

 Display the sound settings menu.

Audio Settings:

 Set the soundtrack option if more 

then one available.

Last Memory:

 Set to 

Time

 if you want to resume the 

playback from the position where it was stopped next 

time you open the same video file. If set to 

Off

 the 

playback will start from the beginning. Highlight an 

option and press 

OK

 to change the setting.

Seek:

 Jump to a specific time of the video file. Use 

the numeric and directional buttons to enter the time 

and press 

OK

.

Subtitle:

 Set your subtitle preference if any available. 

Set to 

Off

 to turn the subtitles off.

Subtitle Encoding:

 Display subtitle encoding options 

if available.

From USB Connection

IMPORTANT!

 Back up the files on your USB storage devices 

before connecting them to the TV. Manufacturer will not be 

responsible for any file damage or data loss. Certain types 

of USB devices (e.g. MP3 Players) or USB hard disk drives/

memory sticks may not be compatible with this TV. The TV 

supports  FAT32  disk  formatting.  FAT32  formatted  devices 

with a storage capacity larger than 192TB are not supported.

You can view your photos, text documents or play your 

music and video files installed on a connected USB 

storage device on the TV. Plug in the USB storage 

device to one of the USB inputs on the TV. 
On the main media


player screen select the desired 

media type. On the next screen, highlight a file name 

from the list of available media files and press the 

OK


Summary of Contents for TX-24LS480B

Page 1: ...X 24LS480B LED TV You can find instructions for your TV s features in the E Manual To access the E Manual enter Settings menu select Manuals and press OK For quick access press Home Menu button and th...

Page 2: ...date 17 Channel Update Message 17 Parental Controls 17 Audio Channel 17 Audio Language 17 Second Audio Language 17 Open Source Licenses 17 Version 17 Accounts Sign In 17 Apps 17 Recently opened apps 1...

Page 3: ...other cords When damaged it must be replaced this should only be done by qualified personnel Do not expose the TV to dripping or splashing of liquids and do not place objects filled with liquids such...

Page 4: ...t is going to be retained and relocated the same considerations as above should be applied Apparatus connected to the protective earthing of the building installation through the MAINS connection or t...

Page 5: ...rt 1 First clean the dust from the surface 2 Dampen a soft cloth with clean water or diluted neutral detergent 1 part detergent to 100 parts water 3 Wring out the cloth firmly Please note do not let l...

Page 6: ...ming system Manual tuning Sleep timer On Off timer Switch off timer Picture off function No signal auto power off function VGA input Ethernet LAN for Internet connectivity and service 802 11 a b g n a...

Page 7: ...of dark shadows and sunlight with full clarity colour and detail HDR HLG contents are supported via native and market applications HDMI USB inputs and over DVB broadcasts Antenna Connection Connect th...

Page 8: ...le To enable VGA YPbPr audio you will need to use the back audio inputs with a VGA YPbPr audio cable for audio connection When using the wall mounting kit contact your dealer to purchase one if not su...

Page 9: ...ndby On functions of the TV Note The position of the control switch may differ depending on the model To change channel in Live TV mode Press the centre of the control switch in the information banner...

Page 10: ...to previous menu screen goes one step back closes open windows closes teletext in Live TV Teletext mode 10 Netflix Launches the Netflix application 11 Freeview Play Connects to the Freeview Play platf...

Page 11: ...wired connection 5 Network Connection You will be directed to the next step automatically if you connect your TV to internet via Ethernet at this point If not available wireless networks will be searc...

Page 12: ...can skip the scan at some later stage of the installation wizard If you skip this step you can perform a channel search later using the related Channels menu options The next step is the selection of...

Page 13: ...lected Following options will be available Scan Mode and Channels You can choose to perform a full scan or a network scan Set the Scan Mode accordingly If you are going to perform a network scan make...

Page 14: ...s Add to My Favourites Add the channel that is currently being watched to the previously selected favourite list Programme Guide Open the electronic programme guide Refer to the Programme Guide sectio...

Page 15: ...Set your subtitle track preference if any available Digital Subtitle Language Set one of the listed language options as first digital subtitle language preference Second Digital Subtitle Language Set...

Page 16: ...lable Channel Scan Type Set your scan type preference Channel Store Type Set your store type preference Favourite Network Select Select your favourite network This menu option will be active if more t...

Page 17: ...hannel by pressing Left Right directional buttons Press OK to store the new frequency for that channel Press Back to cancel This item may not be visible depending on whether or not the last watched ch...

Page 18: ...may not be visible depending on whether or not the last watched channel was analogue Audio Language Set one of the listed language options as first audio language preference This item may not be visi...

Page 19: ...Options menu for more power related functions Sleep Timer Define an idle time after which you want your TV to enter sleep mode automatically Picture off Select this option and press OK to turn the sc...

Page 20: ...ress OK to turn this function on Reset to Default Reset the video settings to factory default settings Note Depending on the currently set input source some menu options may not be available Sound Sys...

Page 21: ...c information and anonymous usage data to ensure your device operates properly Accessibility Configure Visually Impaired Capti ons settings and or turn Audio Description Hearing Impaired Spoken subtit...

Page 22: ...ent schedule of the currently installed channels on your channel list It depends on the related broadcast whether this feature is supported or not In order to access the Electronic Programme Guide you...

Page 23: ...one and press OK to connect For more information refer to Network Internet section under the title of Settings 1 1 Broadband ISP connection A network with hidden SSID can not be detected by other dev...

Page 24: ...press OK the image that you set as photo frame image earlier will be displayed when photo frame feature is activated If you select the USB storage device option the first file in Recursive Parser mod...

Page 25: ...t be available if the slide show is paused Zoom Zoom in on the image that is currently being displayed Highlight an option and press OK to change the setting You can also press the Yellow button to zo...

Page 26: ...re that all CEC settings are properly set up on the connected CEC device The CEC functionality has different names on different brands CEC function might not work with all devices If you connect a dev...

Page 27: ...e control to interact with the user When an HbbTV application is launched the control of some buttons are owned by the application For example numeric channel selection may not work on a teletext appl...

Page 28: ...do not notice the flickering the batteries may be exhausted Replace the batteries If the remote is still not working the remote control might be broken and needs to be checked This method of checking...

Page 29: ...x1050 59Hz 21 1400x1050 60Hz 22 1400x1050 75Hz 23 1440x900 60Hz 24 1440x900 75Hz 25 1600x1200 60Hz 26 1680x1050 59Hz 27 1680x1050 60Hz 28 1920x1080 60Hz AV and HDMI Signal Compatibility Source Support...

Page 30: ...ream ts trp tp MPEG program stream DAT VOB MPG MPEG Sorenson H 263 1920x1080 60fps 40Mbps FLV flv AVI avi H 263 1920x1080 60fps 40Mbps FLV flv MP4 mp4 mov 3GPP 3gpp 3gp AVI avi ASF asf WMV wmv H 264 1...

Page 31: ...bps 384Kbps MP3 mp3 AVI avi ASF asf WMV wmv MKV mkv mka WebM webm 3GPP 3gpp 3gp MP4 mp4 mov m4a MPEG transport stream ts trp tp MPEG program stream DAT VOB MPG MPEG FLV flv WAV wav OGM ogm MPEG1 2 2 5...

Page 32: ...3gp MP4 mp4 mov VORBIS Up to 48KHz Up to 2 MKV mkv mka WebM webm 3GPP 3gpp 3gp MP4 mp4 mov m4a Ogg ogg WMV wmv ASF asf AVI avi Supports stereo decoding only DTS Up to 48KHz Up to 5 1 1 5Mbps Pure DTS...

Page 33: ...mka WebM webm AMR NB 8KHz 1 4 75 12 2Kbps 3GPP 3gpp 3gp MP4 mp4 mov m4a AMR WB 16KHz 1 6 6 23 85Kbps 3GPP 3gpp 3gp MP4 mp4 mov m4a Picture Image Photo Resolution width x height JPEG Base line 15360x86...

Page 34: ...txt TMPlayer Supported DVI Resolutions When connecting devices to your TV s connectors by using DVI converter cable DVI to HDMI cable not supplied you can refer to the following resolution information...

Page 35: ...2400 2483 5 MHz CH1 CH13 100 mW 5150 5250 MHz CH36 CH48 200 mW 5250 5350 MHz CH52 CH64 200 mW 5470 5725 MHz CH100 CH140 200 mW Country Restrictions The Wireless LAN equipment is intended for home and...

Page 36: ...or performance from usage of such other maker s peripheral devices Licences The terms HDMI HDMI High Definition Multimedia Interface and the HDMI Logo are trademarks or regis tered trademarks of HDMI...

Page 37: ...requi rements and other relevant provisions of the Directive 2014 53 EU and Radio Equipment Regulations 2017 If you want to get a copy of the original DoC of this TV please visit the following website...

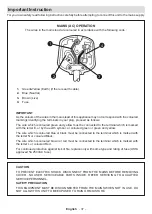
Page 38: ...terminal which is marked with the letter E or by the earth symbol or coloured green or green and yellow The wire which is coloured blue or black must be connected to the terminal which is marked with...

Page 39: ......

Reviews: