background image

16

Tuning --- Owner ID

Owner ID allows you to enter a security code and address information so that in the unfortunate event
of theft it will help the Police to determine the owner.
If the Owner ID information was not entered after Auto setup or it is necessary to alter some of the ID
information it can be re

--

accessed via the Tuning menu.
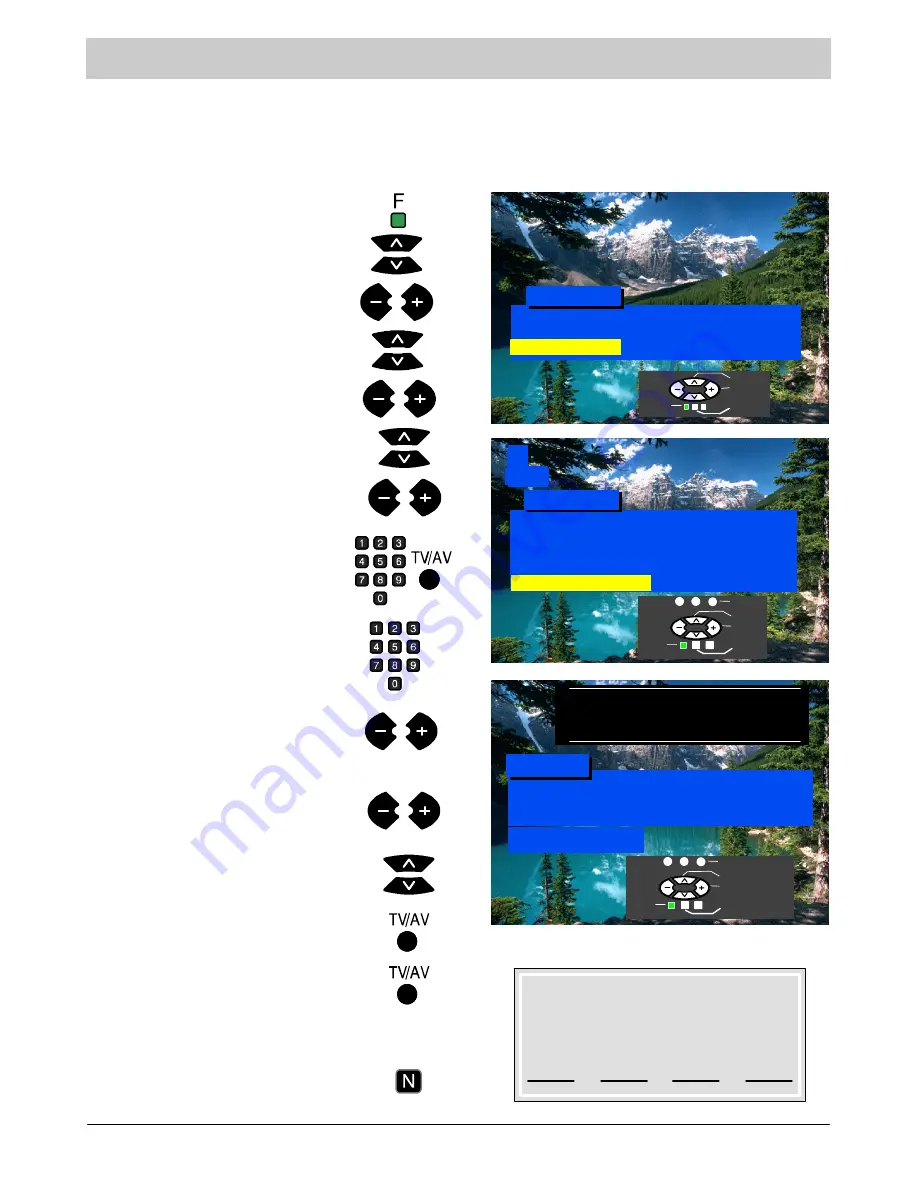
Press the

F

button.

Select

Setup menu.

Select

Tuning menu.

Select

Owner ID

.

Access

Setup menu.

Access

Tuning menu.

Access

Owner ID.

If the Owner ID has previously been

set, enter the

PIN NUMBER

(using 0

to 9 on the remote control) followed by

TV/AV

to proceed, this will take you to

the

NAME

option

If no Owner ID has previously been

set, enter the required 4 digit Owner ID

PIN NUMBER

(using 0 to 9 on the

remote control).

If a 4 digit

PIN NUMBER

was entered

above, you will be taken automatically

to the

NAME

line.

If not, move to the

NAME

line.

Change character.

Select character position.

Repeat above until

NAME, HOUSE

NUMBER

and

POSTCODE

are

entered.

Press again, to confirm when asked

“Are you sure ?”

The Tuning menu will be displayed.

Press the

N

button to exit

Press

TV/AV

to store the details.

1

CH44

For future reference,

write your PIN Number here :

Owner ID

PIN NUMBER : 1 2 3 4

NAME:

K

K

K

K

K

K

K

K

K

K

K

K

K

K

HOUSE NO :

K

K

K

K

K

K

K

K

K

K

K

POSTCODE :

K

K

K

K

K

K

K

K

K

K

K

ABCDEFGHIJKLMNOPQRST

--

. 0123456789

You now have the opportunity

to enter your details and

help the police crack crime

see instruction book

Setup Menu

Auto
Normal

Access

Colour Balance

Tuning Menu

Aspect

Manual Tuning

Programme Swap

Auto Setup

Tuning Menu

Off

Access

Child Lock

Shipping Condition

Owner ID

Select

Access

Exit

Return

Select

Access

Return

Exit

Store

Select character

Change character

Return

Exit

Store owner ID

Summary of Contents for TX-21CK1

Page 1: ...ic Panaso nic Panasonic Panasonic Panasonic Panasonic Panasoni c Panasonic Panasonic Panasonic Panasonic Panasonic Panasonic Panasonic Panasonic Panasonic Panasonic Pa nasonic Panasonic Panasonic Panasonic Panasonic Pana sonic Panasonic Panasonic Panasonic Panasonic Panaso nic Panasonic Panasonic Panasonic Panasonic Panasoni c Panasonic Panasonic Panasonic Panasonic Panasonic Panasonic Panasonic P...

Page 2: ...and Precautions 3 D Accessories 4 D Inserting the Remote Control Batteries 4 D Basic Controls 5 D Quick Start Guide 6 D Main Menu Flow Chart 8 D On Screen Displays 8 D Main menu 9 D Sound menu 10 D Setup menu 11 D Tuning menu 12 D Tuning Auto Setup 13 D Tuning Manual Tuning 14 D Tuning Shipping Condition 15 D Tuning Owner ID 16 D Swap Programme swapping 17 D Other Features D AV selection AV mode 1...

Page 3: ... refitted when the fuse is replaced If you lose the fuse cover the plug must not be used until a replacement cover is obtained Replacement fuse covers can be purchased through your local Panasonic dealer The plug fitted to this appliance incorporates a mains filter circuit If this is removed or replaced with a non filtered plug this television will no longer meet the European standards for Electro...

Page 4: ...mbly Instructions are included in stand packaging n AV cover TKK8E037 INSERTING THE REMOTE CONTROL BATTERIES Replace the cover 1 2 3 Slide off the battery cover Insert batteries note correct polarity and Notes D Make sure that the batteries are fitted the correct way round D Do not mix old batteries with new batteries Remove old exhausted batteries immediately D Do not mix different battery types ...

Page 5: ...ion has been selected adjusts the volume Function select Press to select On Screen Menus see page 8 Recalls the settings stored with the STR button on the TV front panel Numeric keys to change programmes directly select channels teletext page Direct channel access press then select the channel on the numeric buttons If you want to select a channel on HYPERBAND cable TV press the direct channel acc...

Page 6: ... of TV to VCR and Satellite receiver using Scart and RF cables SATELLITE RECEIVER VCR Scart socket TV Scart socket Aerial Input socket Aerial Output socket AV Scart socket VCR Mains Socket Mains Socket Aerial Input socket Aerial Output socket Aerial Input socket AV Scart socket TV Mains Socket RF Connections Connect an RF cable to the Aerial In socket of the Satellite Receiver Connect an RF cable ...

Page 7: ...ed Press TV AV to store the details Press TV AV again when you are asked Are you sure For further information on Owner ID see page 16 A space is provided on page 16 to write down the PIN NUMBER for future reference Mains Socket 1 If after AutoSetup is complete the programme position of the digital satellite receiver is not toyour preference you can re arrange the programme position with the Swap f...

Page 8: ...ensive menu system for tuning and selection of levels Contrast Brightness Colour Sharpness C A T S Tint NTSC only Sound menu Setup menu Main Menu Menu title Sub menu Selection bar Instructions Level indicator Press the F button to enter the menu Press the N button to exit the menu The cursor buttons are used to navigate the menu system and to select levels Select Adjust Exit Some selections such a...

Page 9: ...vels can be adjusted to suit your own preferences You can revert to the factory set levels at any time by pressing the N button The Tint adjustment will only appear as a menu item if you have an NTSC signal source connected to the TV and will allow adjustment of the hue Sharpness Colour Brightness Tint C A T S Contrast Automatic Tuning System Automatically adjusts the contrast to match any changes...

Page 10: ...utput volume Contrast Brightness Colour Sharpness C A T S Tint NTSC only Sound Menu Setup Menu Main Menu Access Volume Bass Treble Balance Balance affects the sound level between the left and right speakers Adjustment can be made so that the level from the speakers suits your listening position NICAM Mode NICAM stereo signal is received and reproduced automatically if transmitted If not the NICAM ...

Page 11: ...l with the correct aspect ratio 16 9 When viewing with the TV in 16 9 aspect mode you may observe a horizontal line above the picture This is not a malfunction The TV uses the line for technical purposes Contrast Brightness Colour Sharpness C A T S Tint NTSC only Sound Menu Setup Menu Main Menu Access Colour Balance Tuning Menu Aspect Select Access Exit Select Adjust Exit Return Colour Balance Col...

Page 12: ...F button Select Setup menu Select Tuning menu Access Setup menu Access Tuning menu Move to your choice Allows you to swap programme positions See page 17 Locks the programme position to prevent access Contrast Brightness Colour Sharpness C A T S Tint NTSC only Sound Menu Setup Menu Main Menu Access Setup Menu 4 3 Normal Access Colour Balance Tuning Menu Aspect Shipping Condition Owner ID Allows yo...

Page 13: ...ate and sort into order your local stations As soon as this operation is completed programme position 1 will be displayed on the screen 1 CH44 Press the F button Select Setup menu Select Tuning menu Access Setup menu Access Tuning menu Press the F button to return to the Tuning Menu and the N button to exit TV stations will be located sorted into order and stored ready for use according to the tab...

Page 14: ...e changes Repeat the above procedure to tune in additional programmes or finish the tuning by pressing the F button F 1 CH44 21 68 Notes If you know the channel numbers of your broadcasting stations you may use direct channel selection by using button C on the remote control unit to save the channels quickly enter Manual Tuning menu set the programme number press the C button set the channel numbe...

Page 15: ...your VCR or programme position 0 VCR after operating the Shipping Condition menu refer to page 19 Press the F button Select Setup menu Select Tuning menu Select Shipping Condition Access Setup menu Access Tuning menu Access Shipping Condition Switch TV off and wait for a few seconds Switch TV on again Auto setup will begin stations will be located sorted and stored ready for use See page 13 Press ...

Page 16: ...PIN NUMBER was entered above you will be taken automatically to the NAME line If not move to the NAME line Change character Select character position Repeat above until NAME HOUSE NUMBER and POSTCODE are entered Press again to confirm when asked Are you sure The Tuning menu will be displayed Press the N button to exit Press TV AV to store the details 1 CH44 For future reference write your PIN Numb...

Page 17: ...corner of the TV screen regardless of the selected programme position TV tuner is ignored This TV may automatically switch over to the AV mode if the connected device sends a switch signal to the SCART cable connector In this case a signal from the connected audio video device will be displayed and EC or EC RGB when an RGB signal is input will appear in the upper left corner of the screen The outp...

Page 18: ...h back on VCR Standby Press to playback the tape Play Press to stop the tape Stop Press to fast forward the tape In Play mode press to view the picture rapidly forward Cue Fast Forward Cue Press to rewind the tape In Play mode press to view the picture rapidly in reverse Review Rewind Review Press in playback mode the picture will pause Press again to restart play Pause Still Press to increase or ...

Page 19: ... the VCR Switch on the VCR insert and play a pre recorded tape with known content Press the F button Select Setup menu Access Setup menu Select Tuning menu Access Tuning menu Select Manual tuning Access Manual tuning Select programme position 0 VCR Start searching for the VCR playback of the known content tape When the VCR playback is found press TV AV to store Press the N button to exit See below...

Page 20: ...NDEX REVEAL F T B Hold HOLD Reveal Press to reveal hidden words e g crossword or quiz page answers can also display VPS PDC codes Full Top Bottom Teletext information viewing on the screen Press to hold the current page Press again to cancel the hold Press this button to return to the main index page Depending on the way information is transmitted you may have to press a few times to return to the...

Page 21: ...s to mix together VCR CAMCORDER SATELLITE RECEIVER Audio video AV inputs are designed to connect a VCR a Satellite Receiver and other compatible audio video equipment VCR Headphones socket Headphones with 3 5mm male jack L R audio input socket V video input socket 2x RCA audio cables RCA video cable Front AV panel 21 19 17 15 13 11 9 7 5 3 1 20 18 16 14 12 10 8 6 4 2 Socket Earth CVBS out video CV...

Page 22: ...trol No picture No sound TV set to AV mode Not plugged into A C outlet Not switched on Picture Sound controls set at minimum levels Check if in standby mode No colour Normal sound Colour controls set at minimum levels Poor or Distorted Picture Weak or no sound Retune channel s Coloured patches Normal sound Magnetic interference from unshielded equipment Receiver moved while switched ON switch TV o...

Page 23: ... speech Brightness Bass Colour Treble L R balance Standby mode Status H Sleep feature If the set is not switched off when the TV station stops transmitting it will automatically go to standby mode after 30 minutes This function will not operate when the TV is in AV mode SPECIFICATIONS Model TX 28CK1 TX 25CK1 TX 21CK1 Power source 220 240 V 50Hz A C Power consumption 66W 64W 60W Standby consumption...

Page 24: ...nd debit cards accepted S All enquiries transactions and distribution facilities are provided directly by Panasonic UK Ltd S It couldn t be simpler S Also available through our Internet is direct shopping for a wide range of finished products take a browse on our website for further details S For UK customers 08705 357357 S For Republic of Ireland customers 01 289 8333 S Visit our website for prod...

Reviews: