background image

19

Display Rotation

1

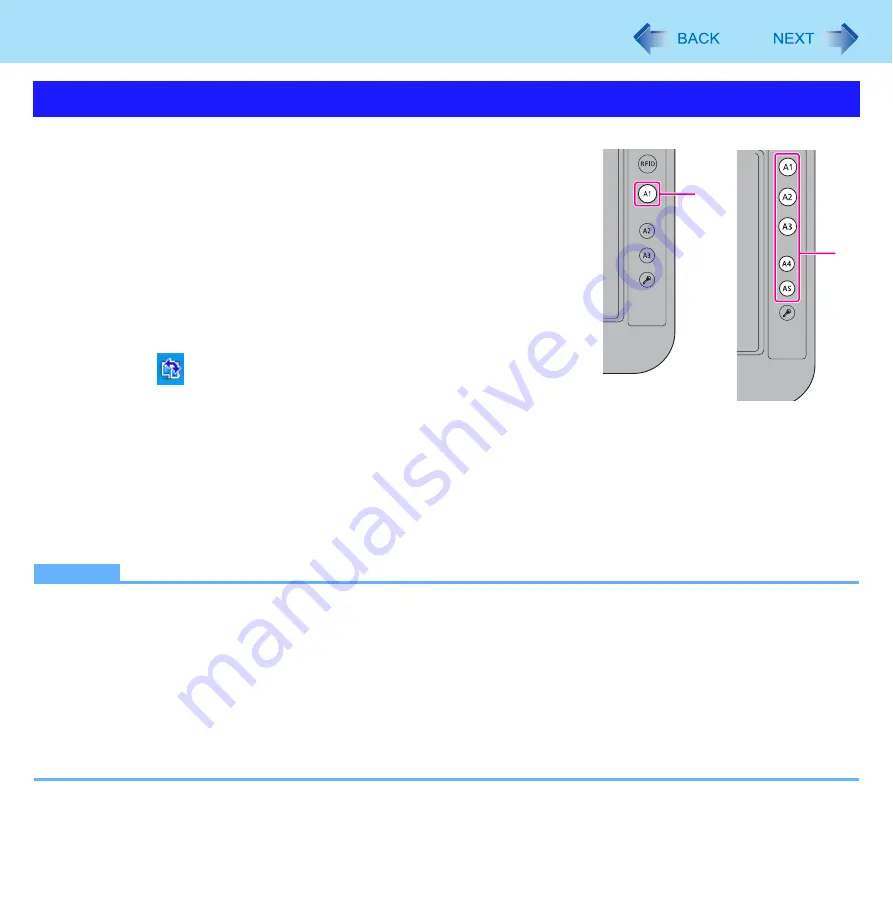
<Healthcare model>


Press the application button [A1] (A).


<Field model>


Press the application button to which [Display Switch] is 
assigned

*1

.

Each time you press the button, the screen display rotates counter-clock-
wise by 90°

*2

.

When the computer is set to the Cradle, the screen display does not 
rotate. If you want to rotate the screen display even if the computer is set 
to the Cradle, follow the step below.

A

Click 

 on the notification area and click one of the display angles.

*1

To check to see or change the setting of application buttons, use the Applica-
tion Button Setting function (

Î


page 16

).

*2

You can change the order of the display rotation. (

Î


page 20

)

NOTE

z

Alternatively you can rotate the display by the following procedure.


Click [start] - [Control Panel] - [mobile PC] - [Change screen orientation].

z

While the display is rotated:
• Do not use the Extended Desktop. The touchscreen or digitizer may not work properly.
• Do not set the resolution larger than that of the internal LCD.
• The computer's performance is slightly lowered.

z

When the display is rotated, the motion video may not be displayed correctly or the sound may be distorted. Return the 
display angle to [Primary Landscape].

z

When you start up Windows and rotate the display right after logging on, the display may return to the previous state in 
approximately 1 minute. In this case, rotate the display again.

Rotating the Display

A

A

<Healthcare 
model without 
Barcode Reader>

<Field model>

Summary of Contents for Toughbook CF-H1CSLFZ6M

Page 1: ...Reference Manual Personal Computer Model No CF H1 Series We recommend that this Reference Manual be printed 1...

Page 2: ...also perform Right click by pressing and holding the button of the digitizer pen and then tapping the object start All Programs Click start and then click All Programs Only when connected to Cradle a...

Page 3: ...old with the digitizer pen NOTE z The operation by touching the screen does not work in the Setup Utility z Touch the screen with the digitizer pen included or your finger When touching the screen use...

Page 4: ...slower in low temperature environments The screen may respond to operations more slowly when using the computer in temperatures less than 5 C but this is not a malfunction Response time will return t...

Page 5: ...carry out sterilization by boiling If the LCD gets wet wipe the surface lightly with the soft cloth While wiping the LCD display the computer must be turned off Digitizer Calibration To calibrate the...

Page 6: ...Field model with RFID Reader Healthcare model without Barcode Reader Healthcare model with Barcode Reader Field model RFID Application Buttons RFID Camera Security Barcode RFID Application Buttons Ba...

Page 7: ...isplayed z The Hardware buttons may not work immediately after Windows is started up or the Windows logon screen or the Welcome screen is displayed z The Hardware buttons may not work after time zone...

Page 8: ...nasonic boot screen is displayed You can configure the button to function as buttons F1 to F12 while you start up the computer 1 Start up the Setup Utility page 79 2 Select Main 3 Select SAS Button an...

Page 9: ...se the numeric keypad NOTE z You cannot uninstall Tablet PC Input Panel When you enter text select either the Software Keyboard or Tablet PC Input Panel 1 Log on to Windows as an administrator 2 Click...

Page 10: ...B Moves the software keyboard to a corner of the screen C One tap Works as shortcut key Ctrl C etc Two taps Works as the key D Works as a right click Same function as the key E Switches between QWERTY...

Page 11: ...mized on the notification area will be restored when you change the input mode This may not work on some applications z Always On Top The software keyboard appears on the top z Transparent The softwar...

Page 12: ...Panel Date Time Language and Regional Options Regional and Language Options Regional Options Customize Currency Currency symbol z After changing the currency symbol click A and then change the size o...

Page 13: ...A 2 You can also start Panasonic dashboard by clicking icon on the notification area and click Settings Panasonic Dashboard starts up 1 You can change the setting of application button page 16 2 To ch...

Page 14: ...his when you place the palm on the screen and touch the screen by using the digitizer pen This setting is stored for each user Software buttons G You can start the application software which you regis...

Page 15: ...signment L You can register the executable files or the applications to the buttons displayed on Panasonic Dashboard screen A Click any button B Select the application from Action You can select Displ...

Page 16: ...pplication Button Setting You can also start up Application Button Setting Utility from Panasonic Dashboard page 13 2 Make the settings You can register the execute files of the applications NOTE z On...

Page 17: ...ed to application buttons A1 A2 and A3 respec tively on models that include these functions These actions cannot be changed For the remaining application buttons you can select none Dashboard Display...

Page 18: ...ion area and click Exit Panasonic Hand Writing and then restart Panasonic Hand Writing z Panasonic Hand Writing may not work properly if another application software is active In this case close the a...

Page 19: ...the order of the display rotation page 20 NOTE z Alternatively you can rotate the display by the following procedure Click start Control Panel mobile PC Change screen orientation z While the display...

Page 20: ...n to Windows as an administrator B When a check mark for Allow all users to use setting dialog is added each user can choose the order C When a check mark for This setting affects all users is added t...

Page 21: ...lfunction of the computer To stabilize computer operation restart Windows regularly about once a week without using standby or hibernation z Save the necessary data z Close files you have opened from...

Page 22: ...nks green Hibernation The power indicator B goes off z To enter standby you can click start Turn Off Computer Stand By instead of pressing the power switch 1 If the speakers are muted beeps do not sou...

Page 23: ...is complete After the display is resumed wait approximately 30 seconds normally or 60 seconds when the computer is on a network Touch the screen hardware buttons or power switch Use an external mouse...

Page 24: ...tailed settings such as reducing the time entered in the Turn off monitor setting z Reduce LCD brightness by using Panasonic Dashboard Reducing internal LCD brightness will reduce power consumption z...

Page 25: ...onfirm New Password and press Enter 6 In Setup Notice press Enter 7 Press F10 and then select Yes and press Enter CAUTION z Do not forget your password If you forget your Supervisor Password you will...

Page 26: ...when the hard disk is returned to the original computer 1 Select Enabled in Hard Disk Lock in the Security menu of the Setup Utility page 84 CAUTION z For the data being read written on the original c...

Page 27: ...ttery cover with the battery pack already inserted You can check the battery level by blinking times Except for the operations stated above In high temperature mode the battery pack is discharging the...

Page 28: ...5 second The battery cover is open If you remove the battery pack in this case the power supply is cut off and the computer is shut down Close the battery cover immediately Blinking orange The batter...

Page 29: ...ns red The indicator lights orange and the display shows 99 for a long time Low battery warning appears soon after a short time of use This can occur when the computer is in standby for a long time wi...

Page 30: ...switching from Normal Temperature to High Temperature or vice versa the remaining battery capacity will not be displayed correctly until the battery pack is completely discharged or fully charged z I...

Page 31: ...he battery level is low z The computer enters hibernation Charge the battery Connect the AC adaptor or replace the battery to start up the computer z Connect the AC adaptor immediately If you do not h...

Page 32: ...s click Yes The battery recalibration starts After the battery pack is fully charged discharging starts When the discharging is completed the power goes off automatically After the battery recalibrati...

Page 33: ...uter Checking the battery pack that can be replaced removed Remove replace the battery pack under the right conditions according to the chart below because if the computer is mistak enly shut down thi...

Page 34: ...dicator page 28 2 Pull the tab to remove the battery pack 3 Insert the new battery pack until it securely fits the connec tor 4 Close the battery cover A Close the battery cover B Slide the battery co...

Page 35: ...ct Place the card in very hot location for a long time Remove the card immediately after inserting it To insert the card 1 Open the cover A Slide the cover to the direction of the arrow B Open the cov...

Page 36: ...ard To remove the card 1 Open the cover 2 Press the eject button C so the card comes out of the slot 3 Draw the card straight out NOTE z When a Smart Card is inserted RFID reading time page 48 becomes...

Page 37: ...displayed The device does not appear in the list in step A 2 Remove the USB device NOTE z You may need to install the driver for the USB device Follow the on screen instructions or refer to the instr...

Page 38: ...38 USB Devices To deactivate USB ports You can deactivate USB ports on the Cradle Select Disabled in Cradle USB Port of the Advanced menu of the Setup Utility page 82...

Page 39: ...window is displayed 3 Healthcare model Press the Camera button A to take a picture Field model with Camera Press the application button A1 A to take a picture A picture is displayed in the window z Sa...

Page 40: ...k OK Follow the on screen instructions Start up the Panasonic Camera Utility to take pictures and videos 1 Click start All Programs Panasonic Panasonic Camera Utility NOTE z If you use this utility an...

Page 41: ...e Light Zoom In Take Photo Functions to an Application Button z The light turns off automatically after a certain period of time Click Control Camera Light Settings to set your lighting duration prefe...

Page 42: ...d the camera image as a picture 1 Adjust the direction of camera zoom See above picture quality page 43 etc 2 Click or click Photos Take photo z While taking photos the icon changes to indicating the...

Page 43: ...eferred settings and click OK z When the following boxes are checked Box A only Select to save or cancel after the photo is taken Save and delete icons will appear after the photo is taken Photo will...

Page 44: ...eo 1 Click or click Video Start Recording While recording the icon changes to 2 Click or click Video Stop Recording NOTE z You cannot zoom or display the date time stamp while recording z When the dis...

Page 45: ...Name box that appears after stopping the video Video can be deleted by selecting cancel Boxes A and B Select to save or cancel after the video is recorded Name the recorded video Save and delete icon...

Page 46: ...olution for the Image 1 Click Settings Video Format z Color Space Compression Set the compressed data format for the image z Output Size Set the image resolution NOTE z Make sure the image resolution...

Page 47: ...m parameter box shutter When assigning the Name function page 43 In the Program location box c program files panasonic panasonic camera utility pcam exe In the Program parameter box shutter_name 3 Cli...

Page 48: ...cation tags NOTE z RFID Reader is typically used with specialized applications For further information ask the system administrator 1 Aim the RFID Reader A at the center of RFID tag 2 Press the RFID b...

Page 49: ...time becomes longer To prevent unintended operation If you press the RFID button on the handle accidentally the computer may operate in a manner that you do not intend You can set the RFID button so...

Page 50: ...Barcode Reader A at the barcode 2 Press one of the Barcode Reader buttons B The LED lights red to indicate the reading position To prevent unintended operation If you press the Barcode Reader button...

Page 51: ...away when reading a larger barcode and closer in when reading a smaller barcode or a thinner barcode z Perform reading so that the entire symbol falls within the center of the red LED light z The read...

Page 52: ...Trigger Mode to Software to set the computer to the software mode or Hardware to set the computer to the hardware mode 6 Press Enter 7 Press F10 and then select Yes and press Enter If the computer is...

Page 53: ...led Please end the barcode related application and then retry appears Exit the running barcode related application program and click Retry If the problem still persists restart the computer z If Initi...

Page 54: ...Click start All Programs Intel MCA Plat form Driver MCA Configuration Editor 2 In the MCA Configuration Editor screen select the desired item read the explanation that appears and change the setting...

Page 55: ...u can slide your finger from both sides z When the fingerprint sensor does not enroll or authenticate your fingerprint properly You slid your finger too fast or too slow Your finger was soiled or it h...

Page 56: ...Module to increase the secu rity level of your computer To access the online manual This manual describes Step 2 3 and the initial part of Step 4 For further information refer to the UPEK Protector Su...

Page 57: ...uch an interaction 1 TPM Installation Refer to the Installation manual of Trusted Platform Module TPM z Click start Run enter c util drivers tpm readme pdf and click OK 2 Fingerprint Utility Installat...

Page 58: ...Enrollment to the hard disk All enrolled fingerprints are stored on the hard disk Hardware protection of the user data is not possible but multiple users can enroll their fingerprints z When the Fini...

Page 59: ...ord You have to register the Supervisor Password to proceed to the next step If you have already registered the Supervisor Password you can skip this step and move on to step 2 If you have not done th...

Page 60: ...vable disk or network drive because the benefit of Fingerprint authentication security can be reduced if you keep the file in the internal hard disk drive The backup password described below is necess...

Page 61: ...tions which do not use standard Windows controls and draw controls by their own This includes any Java based application 1 For information of these functions refer to the software s online manual page...

Page 62: ...n security using fingerprints and click OK D Click Fingerprints and click Enroll or Edit Fingerprints User Enrollment wizard starts Follow the on screen instructions E When the User s Fingers screen a...

Page 63: ...rely remove all of the fingerprints 3 Uninstall Protector Suite Performed by the Computer Administrator A Log on to Windows as an Administrator B Close all programs C Click start Control Panel Add or...

Page 64: ...ancel fingerprint dialog and you will be prompted for a password If you do not use Advanced Security enter your Windows log on password Otherwise enter your Advanced Security backup password CAUTION z...

Page 65: ...ction 2 Connect the AC adaptor to the DC IN jack on the Cradle 3 Insert the computer to the Cradle from the top facing the LCD panel to your side CAUTION z Hot or warm docking undocking is not possibl...

Page 66: ...mmend you to switch the output destination by pressing A1 button z When you use the external display only set the suitable number of colors resolution or refresh rate separately from when you use the...

Page 67: ...ate Connecting disconnecting an external display during computer operations 1 Healthcare model Press A1 button 1 Field model 1 Press the application button to which Display Switch is assigned 2 Each t...

Page 68: ...Do not use standby or hibernation function 2 Connect the AC adaptor to the DC IN jack A on the Cradle 3 Set the computer to the Cradle 4 Connect the LAN port B and the network sys tem server HUB etc...

Page 69: ...anged in Device Manager page 74 the display will be changed accordingly z You can check the wireless LAN communication status in Intel PROSet Wireless Software Perform either of the fol lowing procedu...

Page 70: ...an administrator 2 Click start and input c util wdisable setup exe in Start Search and press Enter 3 Follow the on screen instructions to install the Wireless Connection Disable Utility Checking the...

Page 71: ...ity does not monitor the LAN port status the Wireless Switch Utility has not been started or LAN is disabled in the device manager Menu Right clicking the utility icon in the notification area opens a...

Page 72: ...use wireless LAN set Wireless LAN to Enabled default in the Advanced Wireless Configuration menu of the Setup Utility page 82 To turn on off wireless LAN page 69 Disabling Enabling Wireless Communicat...

Page 73: ...Enter the profile name and WiFi Network Name SSID and make other necessary changes then click Next 5 Make necessary settings and click OK 6 Select the profile you set and click Connect 7 Click Close...

Page 74: ...nd Maintenance System Hardware Device Manager B Double click Network adapters and double click Intel R WiFi Link 5100 C Click Advanced and then select Wireless Mode in Property D Remove the check mark...

Page 75: ...ooth set Bluetooth to Enabled default in the Advanced Wireless Configuration menu of the Setup Utility page 82 z The transmission rate will be lower when a microwave oven is used near by To turn on of...

Page 76: ...y pop ups scroll the screen or use other functions to display the hidden items z The Icon Enlarger setting affects the website characters displayed by Internet Explorer and the e mail characters in Ou...

Page 77: ...z To hide the loupe window click the Hide button B Alternatively you can click any part out of the loupe window or press and hold Alt and right click z To change the loupe window size drag the bottom...

Page 78: ...use in combination with the key s selected in step B above z When using the keyboard A Click Keyboard B Click the text box and then press the key used for the shortcut e g Alt Z Ctrl Alt Z etc NOTE W...

Page 79: ...d is displayed input your password When you start the Setup Utility with Supervisor Password z You can make the settings of all items of the Setup Utility When you start the Setup Utility with User Pa...

Page 80: ...Language English Japanese Product Information Computer information cannot be changed Model No Serial No System Information Processor Type Processor Speed Memory Size Available Memory Hard Disk BIOS In...

Page 81: ...rt up process When an external display is not connected the information appears on the internal LCD even though the External Monitor is selected External Monitor Internal LCD Battery Charging Indicato...

Page 82: ...ecute Disable Bit Capability Disabled Enabled Hyper Threading Technology Disabled Enabled Intel R Virtualization Technology Disabled Enabled Peripheral Configuration Legacy USB Support Disabled Enable...

Page 83: ...ons with the original boot device that existed before at the position When you select Disabled in the following menu the disabled Boot Option is ignored and the boot device in the next Boot Option ope...

Page 84: ...Boot Prompt Configuration Setup Utility Prompt When Setup Utility Prompt is set to Disabled the message Press F2 for Setup 5 is not dis played on Panasonic boot screen However F2 F12 6 and Del will w...

Page 85: ...e system without saving the changes Save Options Save Current Values Save the changes for all Setup options Load Previous Values Load previous values for all Setup options Load Default Values Load def...

Page 86: ...the Cradle z CPU Systems check CPU z RAM XXX MB check Memory z HDD XXX GB check Hard Disk z Video check Video Controller z Sound 1 z Wireless LAN z Wireless WAN 2 z Bluetooth z GPS 3 z Touchscreen 1 W...

Page 87: ...on or restart the computer and press F2 or Del while Panasonic boot screen is dis played The Setup Utility starts up z If the password is requested enter the Supervisor Password z If you are using th...

Page 88: ...Not running diagnostic check Alternating blue and yellow Currently running diagnostic check The interval of the alternating colors differs depending on the type of diagnostic check currently running D...

Page 89: ...ch hardware component is displayed as red and contact Panasonic Technical Support If the display is green and the message Check Result TEST PASSED is displayed the computer s hardware is operating nor...

Page 90: ...eripherals except for the CD DVD drive the keyboard and mouse z Connect the AC adaptor and do not remove it until hard disk data erase is complete z Use the external keyboard and the mouse to operate...

Page 91: ...res input the Supervisor Password or the User Password 7 Click Erase the whole data on the Hard Disk for security and click Next 8 At the confirmation message click YES 9 Click Continue 10 Click Conti...

Page 92: ...e settings to the default values and then change the settings as necessary z If the problem persists the internal clock battery may need to be replaced Contact Panasonic Technical Support System CMOS...

Page 93: ...to the latest patches and service packs for Windows with the following menus Click start All Programs Windows Update Do not apply Driver Updates even if a message to update a driver appears If a driv...

Page 94: ...twork using wireless LAN function select the profile and connect to the access point page 73 z If you do not use wireless LAN function turn off wireless LAN function page 69 If you use wireless LAN fu...

Page 95: ...device Wireless LAN Bluetooth Wireless WAN to Enabled in the Advanced menu of the Setup Utility page 82 z Disable the Wireless Communication Disable Utility page 70 z Restart the computer Access poin...

Page 96: ...the device and remove the check mark for Allow the computer to turn off this device to save power in Power Management This item may be unavailable for some types of devices USB floppy disk drive does...

Page 97: ...resulting from the CPU power saving function but not for other causes e g noise generated by high CPU load such as video playback The above remedy slightly reduces the battery operation time Normally...

Page 98: ...t finger for registration or authentication Treat your finger with a hand cream when it is rough skin or dry z Clean the fingerprint sensor For further information refer to Handling Main tenance page...

Page 99: ...nt fingerprint In this case we recommend either to wait until your finger is usable again e g the injury heals or to delete the pass port Use Delete wizard and then reenroll new fingerprints Please no...

Page 100: ...using Protector Suite QL If you acciden tally uninstalled Protector Suite QL you have to reinstall it If passport data was not removed during uninstallation everything will work automatically includin...

Page 101: ...ation once more If the problem persists restart the computer Screen Saver Could not find any compatible Direct3D devices appears z Do not use a 3D screen saver Others No response z Press button to ope...

Page 102: ...radle then operate by using the external keyboard z If the external keyboard and the Cradle are not available as an emergency countermeasure you can use the buttons that function as keys on the key bo...

Page 103: ...Viewer and click OK z If you have not logged on with the administrator authority some information will be displayed as Not Found z As long as it is activated the PC Information Viewer will appear in f...

Page 104: ...the shortcut D Click OK Only for flash memory model Windows automatically processes defragment to speed up in accessing files etc However this process is not always necessary because you can access fi...

Page 105: ...vanced 4 Click Deactivate automatic defragmentation z To return the setting to the previous value click Activate automatic defragmentation Windows standard 5 When the screen shows the display to chang...

Page 106: ...ration of the United States and or other countries Intel Core and PROSet are either registered trademarks or trademarks of Intel Corporation Adobe the Adobe logo and Adobe Reader are either registered...

Reviews: