background image

5

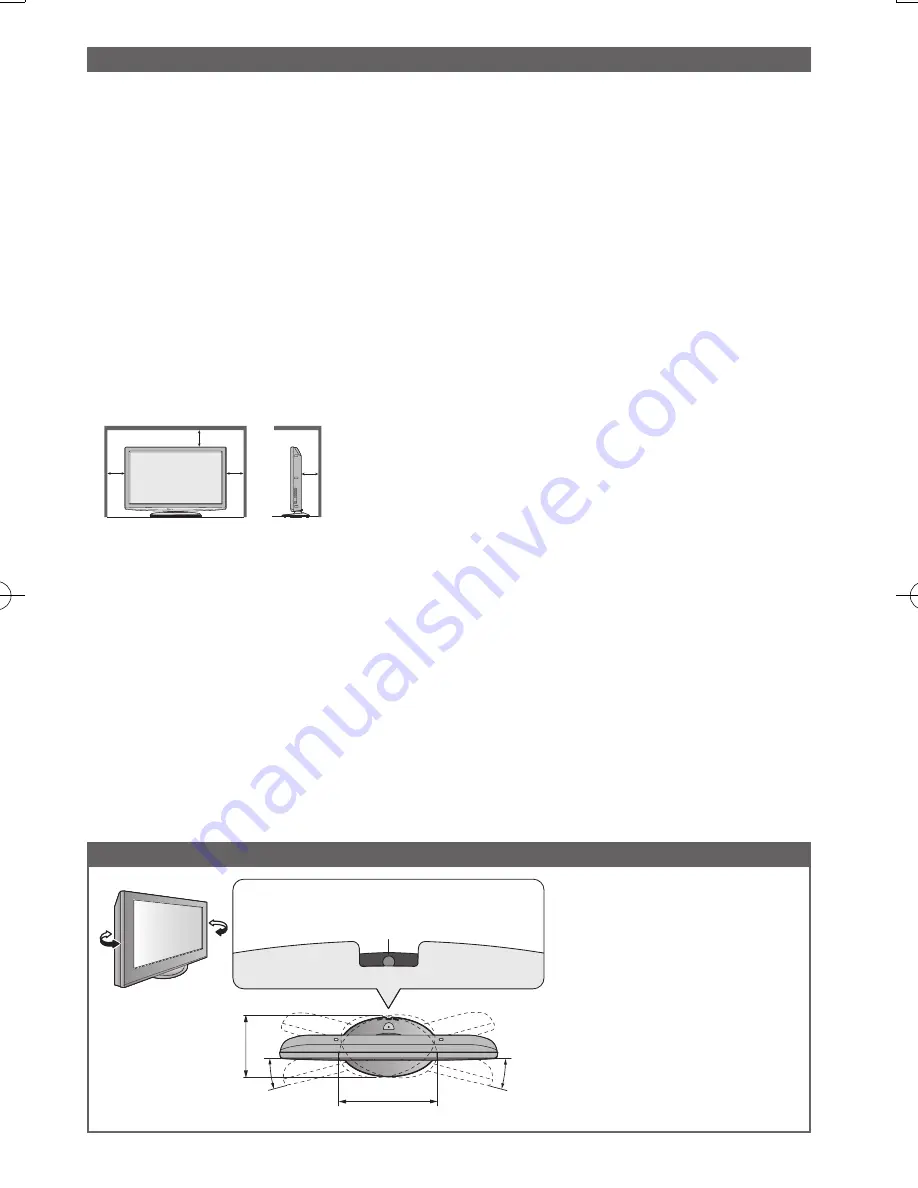
Ensure that the pedestal does 


not hang over the edge of the 

base even if the TV swivels to 

the full rotation range.

Do not place any objects or 


hands within the full rotation 

range.

15°

358 mm 

230 mm

15°

Set the mark at the centre as illustrated, 

to have the swivel positioned at the centre 

of the rotation angle.

[View from the top]

Adjust the LCD panel to your desired angle

10

(cm)

Minimum distance

10

10

10


Install TV on a stable surface

If a television is not positioned in a sufficiently stable location, it can be potentially hazardous due to
falling. Many injuries, particularly to children, can be avoided by taking simple precautions such as:

Using cabinets or stands recommended by the manufacturer of the television.


Only using furniture that can safely support the television.


Ensuring the television is not overhanging the edge of the supporting furniture.


Not placing the television on tall furniture (for example, cupboards or bookcases) without 


anchoring both the furniture and the television to a suitable support.

Not standing the televisions on cloth or other materials placed between the television and 


supporting furniture.

Educating children about the dangers of climbing on furniture to reach the television or its 


controls.


When cleaning the TV, remove the mains plug

Cleaning an energized TV may cause electrical shock.


When the TV is not going to be used for a long period of time, remove the mains plug

This TV will still consume some power even in the Off mode, as long as the mains plug is still 


connected to a live socket outlet.


Transport only in upright position


Allow sufficient space around the TV for radiated heat

Important Installation Notices

When using the pedestal, keep a space between the bottom 


of the TV and the surface where the TV is set.

If using a wall-hanging bracket, refer to its manual.


Do not block the rear air vents

Blocked ventilation by newspapers, table cloths, curtains, etc. may cause overheating, fire or 


electrical shock.


Do not apply strong force or impact to the display panel.

This may cause damage resulting in injury.


Do not expose your ears to excessive volume from the headphones

Irreversible damage can be caused.


Auto power standby function

If no signal is received and no operation is performed in Analogue TV mode for 30 minutes, the 


TV will automatically go to standby mode.


Keep the TV away from these types of equipment

Electronic equipment


In particular, do not place video equipment near the TV. Electromagnetic interference may distort

images / sound.

Equipment with an infrared sensor


This TV also emits infrared rays. This may affect operation of other equipment.

Summary of Contents for TH-L32X20A

Page 1: ...U TQB4GC0373 Thank you for purchasing this Panasonic product Please read these instructions before operating your set and retain them for future reference The images shown in this manual are for illustrative purposes only ...

Page 2: ...d non commercial use of a consumer to i encode video in compliance with the AVC Standard AVC Video and or ii decode AVC Video that was encoded by a consumer engaged in a personal and non commercial activity and or was obtained from a video provider licensed to provide AVC Video No license is granted or shall be implied for any other use Additional information may be obtained from MPEG LA LLC See h...

Page 3: ...le Ni Cd batteries Do not burn or breakup batteries Batteries must not be exposed to excessive heat such as sunshine fire or the like Do not disassemble or modify the remote control Standard accessories Quick Start Guide Accessories Options 6 Basic Connection 8 Identifying Controls 10 Auto Tuning 12 Basic Features Watching TV 13 Using TV Guide Digital TV mode 16 Viewing Teletext 17 Watching Extern...

Page 4: ...edestal or other fixtures may make the TV unstable risking injury Be sure to ask your local Panasonic dealer to perform setup Use approved pedestals p 6 wall hanging brackets p 7 Do not allow children to handle SD Card As with any small object SD Cards can be swallowed by young children Please remove SD Card immediately after use and store out of reach of children Power source Installation This TV...

Page 5: ...he television or its controls When cleaning the TV remove the mains plug Cleaning an energized TV may cause electrical shock When the TV is not going to be used for a long period of time remove the mains plug This TV will still consume some power even in the Off mode as long as the mains plug is still connected to a live socket outlet Transport only in upright position Allow sufficient space aroun...

Page 6: ... strong enough to support the TV and it might fall over and become damaged and personal injury may result Ensure that the TV does not fall over If the TV is knocked or children climb onto the pedestal with the TV installed the TV may fall over and personal injury may result Two or more people are required to install and remove the TV If two or more people are not present the TV may be dropped and ...

Page 7: ...e plastic cabinet parts Take care when fixing wall brackets to the wall Always ensure that there are no electrical cables or pipes in the wall before hanging bracket To prevent fall and injury remove the TV from its fixed wall position when it is no longer in use Rear of the TV View from the side Holes for wall hanging bracket installation Depth of screw minimum 10 mm maximum 12 mm Screw for fixin...

Page 8: ... the correct cable 75 Ω coaxial and the correct terminating plug are required If a communal aerial system is used you may require the correct connection cable and plug between the wall aerial socket and the TV Your local Television Service Centre or dealer may be able to assist you in obtaining the correct aerial system for your particular area and the accessories required Any matters regarding ae...

Page 9: ...Quick Start Guide Basic Connection Connecting DVD Recorder VCR AC 220 240 V 50 60 Hz Rear of the TV Aerial Mains lead RF cable RF cable DVD Recorder or VCR RCA cable TV DVD Recorder or VCR 9 ...

Page 10: ... various functions 18 Exit Returns to the normal viewing screen 17 Stereo Bilingual Sound Selection p 48 Changes the sound track when more than two choices are available Digital TV mode p 14 15 Input mode selection TV switches Digital TV Analogue TV mode p 13 AV switches to AV input mode from Input Selection list p 19 16 Off Timer p 13 Sets the time the TV automatically turns off 21 Return Returns...

Page 11: ...mote control signal receiver Do not place any objects between the TV remote control signal receiver and remote control 6 C A T S Contrast Automatic Tracking System sensor Senses brightness to adjust picture quality when Eco Mode in the Picture Menu is set to On p 24 7 Power LED Standby red On green When using the remote control indicates the TV has received a command 8 Function Select Volume Backl...

Page 12: ...uning is complete set select Auto Scan Type Digital TV Channels only All Channels select access Auto Tuning starts Auto Tuning This will take about 6 minutes 6 H C Digital TV Scan 69 62 y t i l a u Q e p y T e m a N l e n n a h C RF Ch 0 1 l e n n a h C C B B C 0 1 s e l a W o i d a R C B B 2 6 0 1 4 E 2 6 0 1 k w N n o o t r a C 2 6 Digital TV 4 Analogue TV 2 Searching 0 H C Analogue TV Scan 75 A...

Page 13: ...rmation banner p 14 When the remaining time is within 3 minutes the remaining time will flash on screen 1 Turn power on POWER 2 Select Digital TV or Analogue TV mode TV 3 Select a channel up down or Mains power On Off switch should be On p 11 Also possible to select the mode pressing the TV button repeatedly on the remote control or side panel of the TV p 11 The selected mode is displayed For deta...

Page 14: ...treet Rating PG 45 11 00 pm 11 55 pm Now All Digital Channels Select favourites 11 35 pm Software update Channel position and name Programme Start Finish time Programme Current time Example Digital TV mode To confirm another tuned channel name To watch the programme listed in the banner Information on the next programme Digital TV mode To select a favourite list Digital TV mode B To set display ti...

Page 15: ...o 16 9 when Viewing Mode is set to Game in the Picture Menu Not available in teletext mode Aspect mode can be memorized separately for each SD Standard definition and HD High definition signals except in Digital TV mode To change the mode using the ASPECT button only ASPECT Press repeatedly until you reach the desired mode store select While the list is displayed select the mode Enjoy viewing the ...

Page 16: ...ve junction Drama NEWS Sports The Bill Good bye Red Cap Coronation Street DIY SOS GUIDE 24 hours 11 00am am pm pm 11 30 12 00 12 30 01 00 pm TV Guide date Programme Landscape Displays by channel Current date and time Example Channel position and name TV Guide time 11 Home 16 World 84 Pearl 81 Jade View Select programme Select channel RETURN Page down 24 hours EXIT Page up Favourites Info Portrait ...

Page 17: ...select next subject within the subject block After the last subject it moves to the next subject block Y What is List mode In List mode four differently coloured page numbers are situated at the bottom of the screen Each of these numbers can be altered and stored in the TV s memory Store frequently viewed pages p 18 Functions Teletext mode Stop automatic updating If you wish to hold the current pa...

Page 18: ... 4 digit number Sub pages The number of sub pages varies depending on the broadcasters It may take some time for searching during which time you can watch TV example P6 The news page provides a function that indicates arrival of latest news News Flash View the TV picture while searching for a teletext page Teletext automatically updates itself when new information becomes available P108 Appears wh...

Page 19: ...ing the AV button on the remote control or the side panel of the TV p 11 Press the button repeatedly until the desired input is selected You can label or skip each input mode Input Labels p 33 Skipped inputs will not be displayed when the AV button is pressed Example AV2 Example PC Input Selection AV1 AV2 AV3 PC HDMI1 HDMI2 HDMI3 TV Input Selection AV1 AV2 AV3 PC HDMI1 HDMI2 HDMI3 TV 16 9 PC 640X4...

Page 20: ...s TV remote control How to change the code for each equipment Each type of Panasonic equipment has its own remote control code Please change the code for each equipment you want to operate If you operate the connected equipment in VIERA Link p 41 select the code 73 Press and hold POWER during the following operations Enter the appropriate code see table below Press Type of equipment Code DVD Recor...

Page 21: ...ERA TOOLS function To return to TV EXIT or 1 Display icons of the feature select access 2 Select a feature VIERA Link Control 3 Follow the operation of each feature 1 VIERA Link Control VIERA Link Control p 44 2 Pause Live TV Pause Live TV p 43 3 Photo Photo mode p 37 4 Video Video mode p 38 5 Music Music mode p 40 When two or more compatible equipments are connected a selection screen will be dis...

Page 22: ... settings To reset the picture settings only Reset Picture Defaults in Picture Menu p 24 To reset the sound settings only Reset Sound Defaults in Sound Menu p 26 To reset all settings Shipping Condition p 34 in Setup Menu Choose from among alternatives Adjust using the slide bar Go to the next screen Enter characters by free input menu Colour Balance Normal Changed Number and positions of alternat...

Page 23: ...s Access Analogue TV tuning Menu Access Access Access Access Access Auto Standby Power Save 16 9 Overscan Region Select NSW ACT Off Off On Video Preview DVI Input Setting Normal On Daylight Saving Time Auto Other Settings Input Labels Banner Display Timeout Playing Time Display Teletext TOP Access 3 seconds On Display Settings Software Licence System Information Shipping Condition Access System Up...

Page 24: ...ion only Colour Balance Allows you to set the overall colour tone of the picture Cool Normal Warm Vivid Colour Automatically adjusts colours to vivid ones Off On Not valid on PC signal Eco Mode Automatically adjusts the screen brightness appropriately as the surrounding light level lowers to reduce the power consumption Off On Not available in shop mode Dynamic picture mode P NR Picture Noise Redu...

Page 25: ...cer of width to simulate improved spatial effects V Audio Surround Provides a dynamic enhancer of width and depth to simulate improved spatial effects Switching is also possible by the Surround button on the remote control p 10 Volume Correction Adjusts the volume of individual channel or input mode Speaker Distance to Wall Adjusts the low frequency sound Over 30cm Up to 30cm If the back space bet...

Page 26: ...o the default Off Timer Sets the time the TV automatically goes to Standby mode Off 15 30 45 60 75 90 minutes p 13 Child Lock Locks a channel AV input to prevent access to it p 32 Tuning Menu Favourites Edit Creates list of favourite channels Digital TV mode p 29 Channel List Skips the unwanted channels or edits channels p 29 31 Auto Tuning Sets all Digital TV or Analogue TV channels automatically...

Page 27: ...unction Automatic input switching with the connected equipment affects this function and time count will be reset The notification message will appear 3 minutes before going to Standby mode Power Save Reduces brightness of picture to economise on power consumption Off On 16 9 Overscan Selects the screen area for displaying the image Off On On Enlarges the image to hide the edge of the image Off Di...

Page 28: ... Settings Setup Menu Off Timer Off Access Child Lock Digital TV Tuning Menu Display Settings VIERA Link Settings System Menu Other Settings Digital TV Tuning Menu Analogue TV Tuning Menu access select For details p 31 For details p 29 30 Analogue TV Tuning Menu Auto Tuning Manual Tuning Channel List Access Access Access Digital TV Tuning Menu Auto Tuning Manual Tuning Update Channel List New Chann...

Page 29: ...e select reveal hide skip To reveal all channels Y To retune each channel Manual Tuning p 30 R To edit channels You can also edit each channel in Channel List Select a channel and reveal hide To move the channel position if available G Select the new position Store G Digital TV Tuning Menu Favourites Edit List favourite channels To name the Favourites R To display another Favourites G To add all c...

Page 30: ...ning Analogue Scan 21 68 w e N Type e m a N l e n n a h C o N Digital TV 0 Stopped Signal Strength 0 10 0 y t i l a u Q l a n g i S 10 Physical Channel 522 50 CH27 MHz Update Channel List Update channels automatically You can add new channels delete duplicated channels update channel name and position automatically to Channel List Channel List is updated with keeping your settings in Favourites Ed...

Page 31: ...logue TV tuning data will be erased Analogue TV Auto Tuning EXIT RETURN Start Auto Tuning Analogue TV Auto Tuning e m a N l e n n a h C RF Ch Analogue TV 0 Searching This will take about 3 minutes Scan CH0 75 All the previous tuning settings are erased When the operation is completed the channel at channel position 1 will be displayed Search begins in the order from the lower channels to the highe...

Page 32: ...ren Child Lock PIN Entry Please enter PIN for access PIN Child Lock Change PIN Child Lock List Parental Rating Access No Block Child Lock List TV and AV k c o L t u p n I e m a N Type Digital TV Digital TV Digital TV Lock Digital TV Digital TV Lock Digital TV E4 14 Digital TV Lock Digital TV Digital TV Lock Digital TV AV1 External Lock AV AV2 BBC1 1 2 BBC THREE 7 BBC 1 Wales 101 External Lock AV s...

Page 33: ...t Display Settings Setup Menu Digital TV Tuning Menu Display Settings VIERA Link Settings System Menu Off Timer Off Child Lock Other Settings Access The labels you set will be displayed in Input Selection menu p 19 or banner If Skip is selected you cannot select the mode access select select set access select 4 Select Input Labels Input Labels Banner Display Timeout Playing Time Display Teletext T...

Page 34: ...picture sound settings etc Shipping Condition Reset Settings To return to TV EXIT 3 Select System Menu Setup Menu Digital TV Tuning Menu Display Settings VIERA Link Settings System Menu Off Timer Off Access Child Lock Other Settings 1 Display the menu MENU 2 Select Setup access select select access 5 Set see below 4 Select Shipping Condition System Menu Software Licence System Information Shipping...

Page 35: ...rch in Standby to Off Every time you set the TV automatically performs a search in standby and downloads an update if any software updates are available The automatic updating is performed at 3 00 AM and 5 00 AM every morning under the following conditions Standby TV turned Off with the remote control Direct TV Recording is not in progress Set Auto Update Search in Standby to On Select System Upda...

Page 36: ...r When these functions are used the audio signal is output from audio output terminals but video signals are not output Date shows the date on which the recording was made by the digital camera digital video camera or digital recorder is displayed for files that do not have the date recorded For details on SD Cards p 51 To return to TV EXIT or SD CARD To return to the previous screen RETURN Using ...

Page 37: ...lour Effect Transition Effect Screen Mode Off Fade Normal Frame Off Interval Normal Repeat On Picture and Sound Menu p 24 p 26 Insert the SD Card and then select Photo mode p 36 Menu Item Adjustments Configurations alternatives Photo Setup Back Ground Music Selects the background music played during Photo mode Off Type1 Type2 Type3 Auto User Type1 2 3 Pre installed music tracks Auto Plays music in...

Page 38: ... Play RETURN Trip1_8 Trip1_1 Trip1_2 Trip1_3 Trip1_4 Trip1_5 Trip1_6 Trip1_7 Media Player Video Select Video mode supports AVCHD and MPEG2 file formats Access to Video mode p 36 Thumbnail Scene view When a title is highlighted preview starts if the title supports previewing To turn preview off Video Setup p 39 Video mode Thumbnails of video titles in the SD Card are displayed When a title is highl...

Page 39: ...p Video Setup Music Setup select access Sound Menu 1 2 Mode Music Bass Treble Balance Headphone Volume Off Surround Volume Correction Speaker Distance to Wall Over 30cm SPDIF Selection Auto 0 11 0 0 0 select set Menu Item Adjustments Configurations alternatives Sound SPDIF Selection SPDIF Standard audio transfer file format Selects the initial setting for digital audio output signal from DIGITAL A...

Page 40: ...Select Info EXIT Play RETURN Media Player Select Music 01 Music1 02 Music2 03 Music3 04 Music4 05 Music5 06 Music6 07 Music7 08 Music8 09 Music9 10 Music10 11 Music11 12 Music12 13 Music13 14 Music14 15 Music15 16 Music16 17 Music17 18 Music18 19 Music19 20 Music20 21 Music21 select access Playback starts Thumbnail All Folder To display hide the operation guide INFO To operate the playback The inf...

Page 41: ...ed and added As such its operation with other manufacturers equipment that supports HDMI CEC cannot be guaranteed Please refer to individual manuals for the equipment About applicable Panasonic equipment consult your local Panasonic dealer 1 HDMI Connection only 2 HDMI and Audio out connections 3 available with the equipment which has HDAVI Control 2 or later function 4 available with the equipmen...

Page 42: ...Power on Link p 27 When the connected equipment starts playback or direct navigator function menu for the equipment are activated the TV is automatically turned on Only when the TV is in Standby mode Set Power off Link On in Setup Menu to use this function Power off Link p 27 When the TV is set to Standby mode the connected equipment is also automatically set to Standby This function will work eve...

Page 43: ...TV Yes Stop Pause Live TV No select stop TV Select Yes To operate Pause Live TV To return to Live TV stop playback of Pause Live TV cancel pause Operations may be different depending on the recorder In this case follow the operation guide or read the manual of the recorder If you stop playback or cancel pause the recorded programme will be deleted from HDD start select VIERA Link Menu Pause Live T...

Page 44: ...ecorder theatre Other means Tuner set top box The menu of the accessed equipment Input mode will be changed automatically Operate the connected equipment 1 Set the remote control code to 73 p 20 2 Follow the operation guide To display the operation guide Move the cursor select the menu Move the cursor access adjust OPTION RETURN Store set access Return to the previous menu EXIT Exit the menu When ...

Page 45: ...perate check the settings and the equipment Summary of features Connection Preparations p 41 42 Display VIERA Link Menu Select Speaker Selection VIERA Link Menu Pause Live TV Start Direct TV Rec VIERA Link Control Speaker Selection Start Recorder Home Cinema select set Set to Home Cinema or TV If you wish to enjoy the multi channel sound e g Dolby Digital 5 1ch via an Amplifier connect with HDMI c...

Page 46: ...has ARC Audio Return Channel function External Equipment These diagrams show our recommendations for how to connect the TV to your various equipment For other connections consult the instructions for each piece of equipment the table below and the specifications p 55 Viewing Listening PC Headphones Viewing Listening To adjust volume Headphone Volume in the Sound Menu p 25 Conversion adapter if nec...

Page 47: ...e but N C on device 12 TMDS Clock 10 TMDS Clock 8 TMDS Data0 Shield 6 TMDS Data1 4 TMDS Data1 2 TMDS Data2 Shield HDMI terminal To watch satellite broadcasts Set top box To record playback DVD Recorder VCR Fully wired HDMI compliant cable or RF cable To watch DVDs DVD player HDMI equipment DVD Recorder HDMI connection p 41 49 Fully wired HDMI compliant cable Viewing Satellitedish Satellite cable L...

Page 48: ...are not optimum or if STEREO MONO automatic switching occurs it is recommended you switch from STEREO to MONO Even when the contents of the receiving signal undergo changes selection mode is kept intact When the receiving conditions deteriorate listening will be easier if the mode is set to the MONO position using the stereo bilingual sound selection button DUAL also known as DUAL MONO or as BILIN...

Page 49: ...ings are memorized for each HDMI terminals and input signals Audio settings can be made on the HDMI1 2 3 Input in the Sound Menu p 26 If the connected equipment has an aspect adjustment function set the aspect ratio to 16 9 These HDMI connectors are type A These HDMI connectors are compatible with HDCP High Bandwidth Digital Content Protection copyright protection An equipment having no digital ou...

Page 50: ... 852 480 60 Hz 31 44 59 89 1 024 768 60 Hz 48 36 60 00 1 024 768 70 Hz 56 48 70 07 1 024 768 75 Hz 60 02 75 03 1 024 768 85 Hz 68 68 85 00 1 280 1 024 60 Hz 63 98 60 02 1 280 768 60 Hz 47 70 60 00 1 366 768 60 Hz 48 39 60 04 Macintosh13 640 480 35 00 66 67 Macintosh16 832 624 49 73 74 55 Macintosh21 1 152 870 68 68 75 06 PC from HDMI terminal Applicable input signal for PC is basically compatible ...

Page 51: ...ove it together with the adapter Check the latest information on the card type at the following website English only http panasonic jp support global cs DCF Design rule for camera file system Unified standard established by Japan Electronics and Information Technology Industries Association JEITA Format the card with the recording equipment The picture may not appear correctly on this TV depending...

Page 52: ...d by the electronics of the TV to produce the picture Whilst Panasonic maintains the highest standards in manufacturing technology and processes in the construction of these panels there are a number of allowable pixel sub pixel failures that still allow the panel to be defined as a good panel It is not possible to guarantee absolutely no pixel loss First remove the mains plug from the socket outl...

Page 53: ...ires high quality robust DTV signals which can only be achieved when using a TV antenna and cabling designed for digital TV reception Further reading please visit http www digitalready gov au publications aspx where you can download The Digital TV Antenna Systems for Homes Handbook information pdf file For your safety the antenna and cabling should be inspected installed by a licenced installer th...

Page 54: ...ind etc may cause picture to break up and or audio to mute distort momentarily Impulse noise interference from an infrequently used electrical appliance or a passing vehicle or lawn mower with a noisy ignition system Older style antenna cabling loose fitting corroded wall socket connections terminals etc Other TV goes into Standby mode Auto power function is activated The TV enters Standby mode ab...

Page 55: ... Standard Belling Lee connector Operating Conditions Temperature 0 C 35 C Humidity 20 80 RH non condensing Connection Terminals AV1 Input AUDIO L R RCA PIN Type 2 0 5 V rms VIDEO RCA PIN Type 1 1 0 V p p 75 Ω COMPONENT Y PB CB PR CR 1 0 V p p including synchronization 0 35 V p p AV2 Input AUDIO L R RCA PIN Type 2 0 5 V rms VIDEO RCA PIN Type 1 1 0 V p p 75 Ω AV3 Input AUDIO L R RCA PIN Type 2 0 5 ...

Page 56: ... cover a Internet and or DLNA connection setup related problems b Access fees and or charges incurred for internet connection c The use of incompatible software or software not specifically stipulated in the product operations manual and d Any indirect or consequential costs associated with the incorrect use or misuse of the hardware its connection to the internet or any other device 6 If warranty...

Reviews: