background image

5

A

R

D

L

D

B

 Accessories / Options


Securing the TV

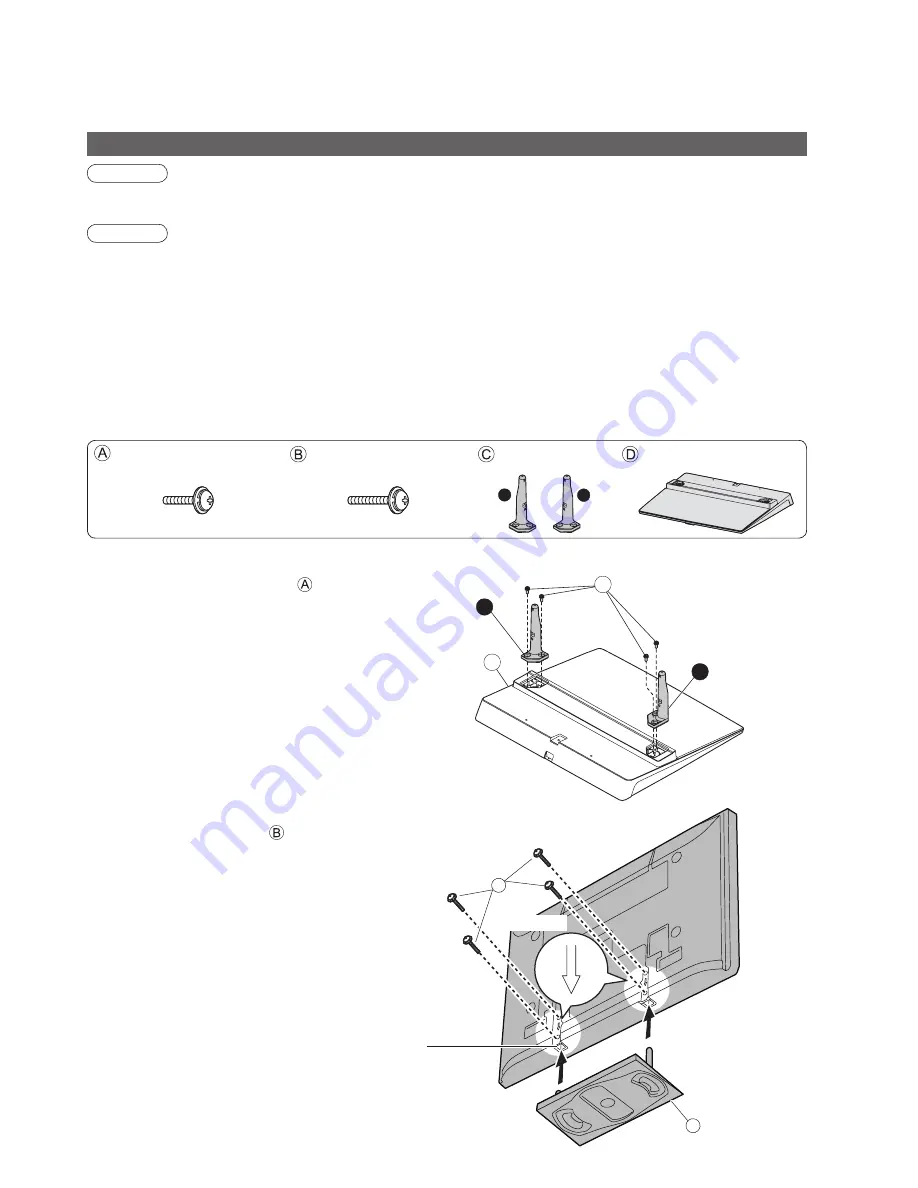
Use the assembly screws   to fasten securely.

• 

Make sure that the screws are securely tightened.

• 

Carry out the work on a horizontal and level surface.

View from the bottom


Assembling the pedestal

Use the four assembly screws   to fasten the left and 

right poles to the base securely.

• 

Make sure that the screws are securely tightened.

• 

Forcing the assembly screws the wrong way will 

strip the threads.

• 

“L” or “R” mark is stamped on the bottom of the pole.

Front

Arrow mark

Hole for pedestal installation 

Attaching the pedestal

Warning

Do not disassemble or modify the pedestal.

• 

Otherwise the TV may fall over and become damaged, and personal injury may result.

Caution

Do not use any other TV and displays.

• 

Otherwise the TV may fall over and become damaged, and personal injury may result.

Do not use the pedestal if it becomes warped or physically damaged.

• 

If you use the pedestal while it is physically damaged, personal injury may result. Contact your nearest 

Panasonic dealer immediately.

During set-up, make sure that all screws are securely tightened.

• 

If insuf

fi

 cient care is taken to ensure screws are properly tightened during assembly, the pedestal will not be 

strong enough to support the TV, and it might fall over and become damaged, and personal injury may result.

Ensure that the TV does not fall over.

• 

If the TV is knocked or children climb onto the pedestal with the TV installed, the TV may fall over and personal 

injury may result.

Two or more people are required to install and remove the TV.

• 

If two or more people are not present, the TV may be dropped, and personal injury may result.

  Assembly screw (4)

(silver)

  Assembly screw (4)

(black)

  Pole (2)

 Base

M5 × 18

M5 × 25

L

R

Summary of Contents for TH-D42PF82E

Page 1: ...e under MANUAL PDF manually to view the instructions Please read these instructions before operating your set and retain them for future reference The images shown in this manual are for illustrative purposes only Please refer to Pan European Guarantee Card if you need to contact your local Panasonic dealer for assistance Operating Instructions Plasma Television Model No TH 42PZ80E TH 46PZ80E TH 5...

Page 2: ...t expose to direct sunlight and other sources of heat Avoid exposing the TV to direct sunlight and other sources of heat To prevent fire never place any type of candle or naked flame on top or near the TV Power source This TV is designed to operate on 220 240 V 50 60 Hz AC Do not place foreign objects inside the TV Do not allow any objects to drop into the TV through the air vents fire or electric...

Page 3: ... follow the manual of it Do not block the rear air vents Blocked ventilation by newspapers table cloths curtains etc may cause overheating fire or electrical shock Do not expose your ears to excessive volume from the headphones Irreversible damage can be caused Maintenance First remove the mains plug from the socket outlet Display panel Regular care Gently wipe the surface clean of dirt by using a...

Page 4: ...TY S42PZ80W TH 42PZ80E TY S46PZ80W TH 46PZ80E TY S50PZ80W TH 50PZ80E Wall hanging bracket vertical TY WK42PV3W TY WK42PV4W angle TY WK42PR3W TY WK42PR4W Caution In order to maintain the unit s performance and safety be absolutely sure to ask your dealer or a licenced contractor to secure the wall hanging brackets Carefully read the instructions accompanying the plasma TV stand or pedestal and be a...

Page 5: ... the TV may fall over and become damaged and personal injury may result Do not use the pedestal if it becomes warped or physically damaged If you use the pedestal while it is physically damaged personal injury may result Contact your nearest Panasonic dealer immediately During set up make sure that all screws are securely tightened If insufficient care is taken to ensure screws are properly tighte...

Page 6: ...per in a hole Attach the clamper Bundle the cables Keep pushing the knob knob hooks To remove from the TV hole Adjust the panel to your desired angle Ensure that the pedestal does not hang over the edge of the base even if the TV swivels to the full rotation range Do not place any objects or hands within the full rotation range a b c c View from the top Set the mark at the centre as illustrated to...

Page 7: ...ain Menu Press to access VIERA Link Picture Sound and Setup Menus Subtitles Displays subtitles Input mode selection TV switches DVB Analogue mode AV switches to AV input mode from Input Selection list SD Card Switches to SD Card viewing mode Return Returns to the previous menu Hold Freeze unfreeze picture Holds the current teletext page teletext mode Normalize Resets picture and sound settings to ...

Page 8: ...n disconnecting the mains lead be absolutely sure to disconnect the mains plug at the socket outlet first Example 1 Connecting aerial Example 2 Connecting DVD Recorder VCR Mains lead supplied Mains lead supplied SCART cable fully wired DVD Recorder or VCR Aerial Aerial Rear of the TV Rear of the TV RF cable TV only TV DVD Recorder or VCR AC 220 240 V 50 60 Hz AC 220 240 V 50 60 Hz Note Connect to ...

Page 9: ... RF OUT RF IN RF IN RF OUT RF IN DVD Recorder or VCR Fully wired HDMI compliant cable Aerial Mains lead supplied Rear of the TV Set top box AC 220 240 V 50 60 Hz RF cable RF cable SCART cable fully wired SCART cable fully wired RF cable RF cable To remove from the TV Push until both side tabs click Press both tabs and pull on mains connector to release tabs Make sure that the mains lead is securel...

Page 10: ...ease select your viewing environment Home Shop Plug the TV into mains socket and switch On Takes a few seconds to be displayed 1 Auto Setup Auto Setup is now complete and your TV is ready for viewing You can now use the remote control to turn On the TV or turn the TV to standby mode Power LED On 4 Start Auto Setup If Q Link VIERA Link or similar technology compatible recorder is connected programm...

Page 11: ...ing the On Screen Displays MENU Open the main menu Move the cursor select the menu Move the cursor adjust levels select from a range of options Access the menu store settings after adjustments have been made or options have been set RETURN Return to the previous menu EXIT Exit the menu system and return to the normal viewing screen Note If tuning has failed Auto Setup p 15 If downloading has faile...

Page 12: ...lour Balance Warm Colour Management Off x v Colour Auto Picture Menu change store or access Required by some functions example Picture Menu Choose from among alternatives To reset the settings To reset the picture settings only Reset to Default in Picture Menu p 14 To reset the sound settings only Reset to Default in Sound Menu p 14 To reset the picture and sound settings together N Also volume le...

Page 13: ...ur Sharpness Tint Colour Balance Warm Colour Management Off x v Colour Auto Picture Menu 2 2 3D COMB Off Reset to Default Set Picture Menu P NR Off p 14 Mode Music Bass Treble Balance Headphone Volume Surround Off Volume Correction Sound Menu MPX Stereo Speaker Distance to Wall Over 30cm 1 2 2 2 Reset to Default Set Sound Menu HDMI1 Input Auto p 14 1 3 AV Colour System Auto Child Lock Access Tunin...

Page 14: ...ot valid on PC signal 3D COMB Occasionally whilst viewing still or slow moving pictures colour patterning may be seen Set to On to display sharper and more accurate colours Off On For PAL or NTSC signal reception only Not valid on RGB S Video Component PC HDMI and SD Card Reset to Default Press the OK button to reset the present Picture Mode to the default settings Sound Mode Basic sound mode Musi...

Page 15: ...15 30 45 60 75 90 minutes Language OSD Language Changes language for on screen displays Preferred Audio 1 2 Selects the preferred language for DVB multi audio depending on the broadcaster Preferred Subtitles 1 2 Selects the preferred language for DVB subtitles depending on the broadcaster Preferred Teletext Selects the preferred language for DVB teletext service depending on the broadcaster Telete...

Page 16: ...er information Information on Disposal in other Countries outside the European Union This symbol is only valid in the European Union If you wish to discard this product please contact your local authorities or dealer and ask for the correct method of disposal Printed in Czech Republic Matsushita Electric Industrial Co Ltd Web Site http www panasonic europe com 2008 Matsushita Electric Industrial C...

Reviews: