


20
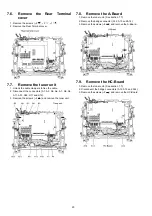
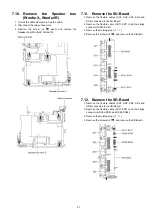
7.6.
Remove the Rear Terminal
cover
1. Remove the screws (
×
2 ,
×
3 ,
×
1 ).
2. Remove the Rear Terminal cover.
7.7.
Remove the tuner unit
1. Unlock the cable clampers to free the cable.
2. Disconnect the connectors (A1, A3, A5, A6, A7, A8, A9,
A11, A51, A53, H11 and H12).
3. Remove the screws (
×
4
) and remove the tuner unit.
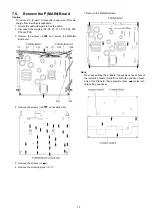
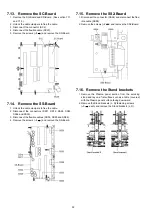
7.8.
Remove the A-Board
1. Remove the tuner unit. (See section 7.7.)
2. Remove the bridge connector (A12, A13 and A14).
3. Remove the screws (
×
8
) and remove the A-Board.
7.9.
Remove the HC-Board
1. Remove the tuner unit. (See section 7.7.)
2. Disconnecct the bridge connectors (A12, A13 and A14).
3. Remove the screws (
×
2
) and remove the HC-Board.
Summary of Contents for TH-50PY850H
Page 6: ...6 3 2 Applicable signals ...
Page 16: ...16 6 4 No Picture ...
Page 29: ...29 8 1 4 Adjustment Volume Location 8 1 5 Test Point Location ...
Page 30: ...30 ...
Page 38: ...38 10 4 Wiring 3 ...
Page 39: ...39 10 5 Wiring 4 10 6 Wiring 5 ...
Page 40: ...40 ...
Page 41: ...41 11 Schematic Diagram 11 1 Schematic Diagram Note ...
Page 114: ...114 ...
Page 116: ...116 13 1 2 Packing ...
Page 121: ...121 13 2 Electrical Replacement Parts List 13 2 1 Replacement Parts List Notes ...