background image

69

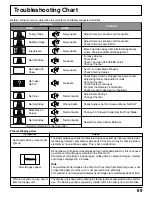
Troubleshooting Chart

Before calling for service, determine the symptoms and follow suggested solutions.

AUDIO

VIDEO

Solutions

Symptoms

Intermittent Remote Control Operation

Snowy Video

Multiple Image

Interference

Normal Video

No Video with
Snow

No Video /
No PIP

No Color

Normal Video

Black Box on
Screen

Normal Video

Noisy Audio

Noisy Audio

Noisy Audio

No Audio

Noisy Audio

No Audio

Normal Audio

Wrong Audio

Normal Audio

Normal Audio

Adjust Antenna Location and Connection

Adjust Antenna Location and Connection
Check Antenna Lead-in Wire

Move Television away from Electrical Appliances,
Lights, Vehicles and Medical Equipment

Increase Volume
Check Mute
Check Television SPEAKERS on/off
Change Channel

Set TV or Cable Mode Properly
Check Antenna Cables

Check Power Cord is Plugged into Active Outlet
Adjust Brightness and Audio Controls
Change Channel
Check Cable Connections
Program the Remote Control Again
Check Second Video Source Operation

Adjust Color Settings
Change Channel

Check Audio Is Set To Stereo or Mono, Not SAP

Change CC (Closed Captioning) from Text Mode

Replace Remote Control Batteries

Symptoms

VIDEO

AUDIO

Solutions

Symptoms

Some parts of the screen do not
light up.

After-images appear

Whirring sounds can be heard
from the display unit.

Plasma Display panel

Check

The plasma display panel is manufactured using an extremely high level of precision
technology, however, sometimes some parts of the screen may be missing picture
elements or have luminous spots. This is not a malfunction.

Do not allow a still picture to be displayed for an extended period, as this can cause
a permanent after-image to remain on the Plasma TV.
Examples of still pictures include logos, video games, computer images, teletext
and images displayed in 4:3 mode.

Note:

The permanent after-image on the Plasma TV resulting from fixed image use is not
an operating defect and as such is not covered by the Warranty.
This product is not designed to display fixed images for extended periods of time.

The display unit is fitted with a cooling fan to dissipate heat generated during normal
use. The whirring sound is caused by rotation of the fan and is not a malfunction.

Summary of Contents for TH 50PX20U P - 50" Plasma TV

Page 1: ...nic com Puerto Rico For assistance please call 1 800 561 5505 or visit us at www panasonic ca Canada Before connecting operating or adjusting this product please read these instructions completely Please keep this manual for future reference A CTIO N 1 2 3 4 5 6 7 8 0 9 TV DTV CBL AUX DVD VC R DB S RC VR POWER CH CH VOL VOL R TUNE PROG GUIDE RECALL SAP PAGE EXIT PIP SPLIT MOVE SWAP STOP PAUSE REC ...

Page 2: ...parts inside Refer servicing to qualified service personnel The lightning flash with arrow head within a triangle is intended to tell the user that parts inside the product are a risk of electric shock to persons The exclamation point within a triangle is intended to tell the user that important operating and servicing instructions are in the papers with the appliance WARNING RISK OF ELECTRIC SHOC...

Page 3: ...ot defeat the safety purpose of the polarized or grounding type plug A polarized plug has two blades with one wider than the other A grounding type plug has two blades and a third grounding prong The wide blade or the third prong are provided for your safety If the provided plug does not fit into your outlet consult an electrician for replacement of the obsolete outlet 10 Protect the power cord fr...

Page 4: ...the model number and serial number of your set in the space provided on the back cover of these instructions Visit our Panasonic Web Site for USA www panasonic com for Puerto Rico www panasonic com for Canada www panasonic ca For assistance please call 1 888 VIEW PTV 843 9788 or send e mail to consumerproducts panasonic com or visit us at www panasonic com U S A For assistance please call 787 750 ...

Page 5: ...UTION To assure continued compliance and possible undesirable interference the provided ferrite cores must be used when connecting this plasma display to video equipment and maintain at least 40cm spacing to other peripheral devices Refer to instructions on pages 10 Pursuant to 47CFR Part 15 21 of the FCC rules any changes or modifications to this TV not expressly approved by Matushita Electric Co...

Page 6: ...te Control Battery Installation 9 Accessories 10 Cable Connection 11 Connecting the Aerial cable to the RF In Terminal 12 Antenna Connection 12 Connecting Headphones Earphones 12 Front Control Panel 13 Optional Equipment Connections 13 Cable Box Connection 13 VCR Connection 14 VCR and Cable Box Connection 15 Digital TV Set Top Box DTV STB or DVD Connection 16 Amplifier Connection TO AUDIO AMP 16 P...

Page 7: ...enerated which could cause fire If the plug is damaged or the wall socket plate is loose they should not be used Do not handle the power cord plug with wet hands Doing so may cause electric shocks Do not do anything that might damage the power cable When disconnecting the power cable hold the plug not the cable Do not make any modifications place heavy objects on place near hot objects heat bend t...

Page 8: ...es infrared rays therefore it may affect other infrared communication equipment Install your infrared sensor in a place away from direct or reflected light from your Plasma TV Cleaning and maintenance The front of the display panel has been specially treated Wipe the panel surface gently using only a cleaning cloth or a soft lint free cloth If the surface is particularly dirty soak a soft lint fre...

Page 9: ...es for longer life Helpful Hints The Video Audio connection between components can be made with shielded video and audio cables For best performance video cables should utilize 75 ohm coaxial shielded wire Cables are available from your dealer or electronic supply store Before you purchase any cables be sure you know what type of output and input connectors your various components require Also det...

Page 10: ... List F Type Antenna Adapter for 3C 2V 2 for 5C 2V 2 large size 6 TH 42PX20 7 TH 50PX20 Clamper 2 Winding the cable around the ferrite core Pull back the tabs in two places Open Close the ferrite core 1 2 3 Passing the cable through the ferrite core Pull back the tabs in two places Open Close the ferrite core 1 2 3 Installing the ferrite core Operating Instruction book Remote Control Transmitter E...

Page 11: ...ing Loosening Clamper Ferrite core large size supplied Pull off Keep the knob pressed 1 Insert the power plug into the main body 2 Fasten with the power cable fastening band 3 Bundle the cable with the cable fastening clamper Fastening method of power cable For other cables attach the band on the installation hole and fasten them Front AV terminal see page 13 From EXTERNAL monitor terminal on Comp...

Page 12: ...k with your local Cable company for its compatibility requirements Incoming Cable from Home Antenna Incoming Cable from Cable Company 75 Ohm VHF UHF on back of TV For proper reception of VHF UHF channels an external antenna is required For best reception an outdoor antenna is recommended Antenna Mode must be set to TV Incoming Cable from Home Antenna Connect home antenna to ANT1 connection on back...

Page 13: ...LIED Push to open the front panel of the television to use the TV without remote control or to use the Audio Video input jacks for optional equipment Note The S VIDEO connection provides higher quality picture It overrides other VIDEO connections Use INPUT 3 AUDIO L and R with S VIDEO connection A second VCR video disc player video game equipment and DSS equipment can also be connected to the vide...

Page 14: ...2 Tune the television to Channel 3 or 4 depending on your VCR 3 Using the VCR tune to the television program you would like to record 4 Begin recording Option B Recording one program while viewing another program 1 Select ANT1 in the SET UP menu 2 Press the TV VIDEO button on the remote control to select the video input VIDEO 1 VIDEO 2 etc connected to your VCR 3 Using the VCR tune to the televisi...

Page 15: ...television to a program except another premium cable channel Procedure 1 Select ANT2 in the SET UP menu 2 Tune the television to Channel 3 or Channel 4 3 Using the cable box tune to the premium cable channel you would like to view Viewing a premium scrambled cable channel Procedure 1 Select ANT2 in the SET UP menu 2 Press the TV VIDEO button on the remote control to select the video input VIDEO 1 ...

Page 16: ...tal lines venetian blind effect associated with interlaced TV pictures Use this diagram to connect the Panasonic DTV STB Digital TV Set Top Box or DVD Player to the back of your TV Note There are 2 sets of three video inputs Y PB and PR Separated component color inputs provide luminance and color separation Furthermore the L left and R right audio inputs must be used Amplifier Connection TO AUDIO ...

Page 17: ...N Please refer to page 24 The HDMI terminal of this equipment is TYPE A If the external device has DVI output only use a DVI to HDMI adaptor cable 3 to connect to the HDMI jack Also connect the Audio out signal from the external device Set Top Box or DVD player to theAUDIO IN 4 jacks side the HDMI input This model support following format Please adjust the format of connecting equipment 1080i 480P...

Page 18: ...terminal 5 The computer shown in the illustration is for example purposes only 6 Additional equipment and cables shown are not supplied with this set 7 Do not set the horizontal and vertical scanning frequencies for PC signals which are above or below the specified frequency range S VIDEO PC VIDEO INPUT 3 L AUDIO R COMPUTER Conversion adapter if necessary RGB D sub 15p Stereo plug PC cable Connect...

Page 19: ...to turn the TV on Red Press the POWER button on the remote control to turn the TV off No light standby How to Turn the Power On POWER Remote Control senser Power indicater CH 3 SAP JUST VIVID A CTIO N T V DTV CBL AUX DVD VCR DBS RCVR CH CH VOL VOL RECALL SAP PC MENU M UTE ASPECT TV VIDEO LIGH T POWER POWER Menu Language Selection In SET UP Menu Select IDIOMA LANGUE to change menu language to ENGLI...

Page 20: ...nd UHF Power switch Remote control sensor Operation can be done from the TV set Channel selectors Volume adjusters T V POWER A CTIO N CH CH VOL VOL A CTIO N CH CH VOL VOL 1 2 3 4 5 6 7 8 0 9 DTV AUX DVD VCR DBS RCVR RECALL PC MENU R TUNE PROG GUIDE SAP PAGE EXIT PIP SPLIT MOVE SWAP STOP PAUSE REC PIP MAX FF PIP MIN REW FREEZE TV VCR PIP CH VCR CH SEARCH OPEN CLOSE M UTE ASPECT TV VIDEO LIGH T POWE...

Page 21: ...X on and select the desired volume level Press while pointing the remote control towards the CABLE BOX Note The remote control code number is set for Panasonic products When peripheral equipment does not operate reset code See page 62 63 Operate the CABLE BOX and select the desired volume level POWER CBL 1 2 3 Press CBL to confirm ANTENNA TERMINAL ON THE BACK OF THE TV CABLE BOX To Antenna Input I...

Page 22: ...ction for Remote Control TV Mode Selection for Remote Control Digital Broadcasting Satellite for Remote Control Receiver Amplifier Mode Selection for Remote Control Digital TV Mode Selection for Remote Control Cable TV Mode Selection for Remote Control PIP or SPLIT FREEZE TV VCR Switch TV DBS Switch PIP or SPLIT CH up down VCR CH up down TV DBS CH up down PIP Search OPEN CLOSE TV VCR CABLE DBS DVD...

Page 23: ...s SAP button Selects Audio mode See page 33 Page up down for DBS skip for DVD CD Swap pictures in Split Screen and Picture in Picture operation See page 48 51 PROG dash button Program dash channel numbers for DTV and DBS PROG Move PIP frame in Picture in Picture Operation See page 49 Split Screen see page 50 Picture in Picture Operation see page 48 COMPONENT 2 HDMI TV COMPONENT 1 VIDEO 3 VIDEO 1 V...

Page 24: ... BRIGHTNESS PICTURE SHARPNESS NORMAL OTHER ADJ VIVID EXIT SUB MENU SET PICTURE PIC MODE COLOR TINT BRIGHTNESS PICTURE SHARPNESS NORMAL OTHER ADJ VIVID PRESS ACTION FOR MAIN MENU SET PICTURE PIC MODE COLOR TINT BRIGHTNESS PICTURE SHARPNESS NORMAL OTHER ADJ VIVID PRESS ACTION FOR MAIN MENU NO PRESS ACTION TO RETURN 35 COLOR PICTURE PIC MODE COLOR TINT BRIGHTNESS PICTURE SHARPNESS NORMAL OTHER ADJ PR...

Page 25: ...ION TO RETURN PRESET CAPTION ABC CBS FOX NBC PBS CNN ESPN HBO PRESS FOR MORE CHANNELS CHANNELS ENTER CHANNEL 10 ENTER CAPTION PRESS ACTION TO RETURN MANUAL CAPTION TO MOVE CURSOR TO SELECT CHANNEL CHANNELS COMPONENT1 COMPONENT2 HDMI VIDEO1 VIDEO2 VIDEO3 PRESS ACTION TO RETURN INPUT LABEL TO MOVE CURSOR TO SELECT LEBEL NO TIMER SLEEP TIMER1 TIMER2 CLOCK SET PRESS ACTION FOR MAIN MENU MON FRI NO TIM...

Page 26: ... a black background It allows the viewer to read the dialogue of a television program or other information cc ON MUTE Activates the On Screen Closed Caption feature when the MUTE button on the Remote Control is pressed To deactivate press the MUTE button again Note This feature functions when the Closed Caption Mode is in the OFF position The program being viewed must be broadcast with Closed Capt...

Page 27: ... information Another mode which displays information and blanks out a large portion of the picture on the television screen Another mode which displays information and blanks out a large portion of the picture on the television screen Notes 1 Recommended menu Set Up for Closed Caption when using Mute Button cc ON MUTE C1 cc MODE OFF 2 The setting for CC ON MUTE is valid only when the CC MODE is OF...

Page 28: ... Use remote numeric keypad to select desired channel 2 3 A CTIO N CH CH VOL VOL Press to ADD or DELETE the channel MANUAL PROGRAM TO ADD ENTER CHANNEL 3 TO DELETE PRESS ACTION TO RETURN OTHER ADJ SET UP PRESS ACTION TO RETURN CABLE OFF ON MODE AUTO PROGRAM MANUAL PROGRAM AUTO POWER ON CHAN BANNER SIDE BAR BRIGHT POWER SAVE OFF OTHER ADJ SET UP PRESS ACTION TO RETURN CABLE OFF ON MODE AUTO PROGRAM ...

Page 29: ...OWER ON CHAN BANNER SIDE BAR BRIGHT POWER SAVE OFF Do not display a picture in 4 3 mode for an extended period as this can cause an after image to remain on the side bars on either side of the display field To prevent the appearance of such an after image change the brightness of the side bars side bars 4 3 Screen Display after images Press to select the SIDE BAR Press to select OFF DARK MID BRIGH...

Page 30: ...HTNESS PICTURE SHARPNESS NORMAL A CTIO N CH CH VOL VOL Press to select each submenu COLOR TINT BRIGHTNESS PICTURE SHARPNESS NORMAL Press to adjust the desired level by looking at the picture behind the menu Item Function COLOR TINT BRIGHTNESS PICTURE Adjusts desired color intensity Adjusts natural flesh tones Adjusts dark areas of picture SHARPNESS NORMAL Adjusts white areas of picture Adjusts cla...

Page 31: ...er option menu field A CTIO N CH CH VOL VOL 2 Proceed to adjustments Press to select desired option menu PICTURE PIC MODE COLOR TINT BRIGHTNESS PICTURE SHARPNESS NORMAL OTHER ADJ PRESS ACTION FOR MAIN MENU PRESS TO ENTER PICTURE OTHER ADJ NORMAL ON OFF ON SD SPLIT COLOR TEMP NATURAL COLOR VIDEO NR 3D Y C FILTER COLOR MATRIX FREEZE PRESS ACTION FOR MAIN MENU COLOR TEMP Temperature NATURAL COLOR VID...

Page 32: ...ssed during Split Screen the Split Screen will be frozen and the main picture continues action see page 50 2 When FREEZE TV VCR is pressed during PIP Operation the PIP frame will be frozen and the main picture continues action see page 49 Main Picture Split Screen FREEZE PIP frame FREEZE Main Picture PICTURE OTHER ADJ NORMAL ON OFF ON SD SPLIT COLOR TEMP NATURAL COLOR VIDEO NR 3D Y C FILTER COLOR ...

Page 33: ...ss to select desired option menu MODE BASS TREBLE BALANCE NORMAL OTHEAJ AUDIO PRESS ACTION FOR MAIN MENU PRESS TO ENTER OTHER ADJ HDMI IN AI SOUND BBE VIVA 3D BBE SURROUND SPEAKERS ON AUTO ON OFF OFF OFF AUDIO PRESS ACTION TO RETURN OTHER ADJ Selecting option menus in OTHER ADJ Item Effect Function BASS TREBLE BALANCE NORMAL Increase or decrease the bass response Increase or decrease the treble re...

Page 34: ... original while retaining its natural feel The distinguishing feature of BBE VIVA is its maintenance of accurate audio imagery Ordinary 3D surround systems force the sound out to the left and right affecting the center channel As a result it may become hard to hear people s voices or the center audio may completely disappear BBE VIVA reproduces vocals in music and voices in movies accurately and d...

Page 35: ...delete the selected channel A CTIO N CH CH VOL VOL 4 Repeat step 2 to 3 up to 16 favorite channels 2 3 CH SCAN FAVORITES OTHER ADJ ALL CHANNELS ENTER CHANNEL 3 FAVORITE CHANNELS 2 5 8 10 18 25 ADD DELETE PRESS ACTION FOR MAIN MENU CH SCAN FAVORITES OTHER ADJ ALL CHANNELS ENTER CHANNEL 3 FAVORITE CHANNELS 2 5 8 10 18 25 ADD DELETE PRESS ACTION FOR MAIN MENU CH SCAN FAVORITES OTHER ADJ ALL CHANNELS ...

Page 36: ...channel refer to your local TV guide 3 1 Press to select PRESET CAPTION Press to display next menu Note To delete a channel press VOL while channel is highlighted CH SCAN FAVORITES OTHER ADJ CHANNELS PRESS ACTION FOR MAIN MENU PRESS TO ENTER CHANNELS PRESET CAPTION MANUAL CAPTION INPUT LABEL PRESS ACTION TO RETURN OTHER ADJ CHANNELS PRESET CAPTION MANUAL CAPTION INPUT LABEL PRESS ACTION TO RETURN ...

Page 37: ... cursor Press to select desired LABEL Note To skip select LABEL then press VOL or VOL to select SKIP The selected INPUT mode will be skipped when TV VIDEO button is pressed CHANNELS Adjustment CHANNELS PRESET CAPTION MANUAL CAPTION INPUT LABEL PRESS ACTION TO RETURN OTHER ADJ CHANNELS ENTER CHANNEL 10 ENTER CAPTION PRESS ACTION TO RETURN MANUAL CAPTION TO MOVE CURSOR TO SELECT CHANNEL CHANNELS ENT...

Page 38: ...rate the TIMER features A CTIO N CH CH VOL VOL Press to select TIMER1 or TIMER2 Press to enter A CTIO N CH CH VOL VOL Press to select DAY Press to set the day of the week select day or days DAY Set the day of the week A CTIO N CH CH VOL VOL Press to select ON TIME Press to set hours AM or PM A CTIO N CH CH VOL VOL Press to move to minutes position Press to set minutes ON TIME Set the time of day 1...

Page 39: ...e television automatically turns OFF after 90 minutes when turned ON by the TIMER If the OFF time is selected or if a key is pressed the automatic OFF after 90 minutes will be cancelled Turn Off After 90 Minutes The TIMER is active when the television is OFF or ON The television will switch to the selected channel at the selected time set in the TIMER TIMER Activation MON FRI 1 2 0 0 PM 1 3 0 0 PM...

Page 40: ...ER SLEEP TIMER1 TIMER2 CLOCK SET PRESS ACTION FOR MAIN MENU PRESS TO ENTER TIMER CLOCK SET 1 2 0 0 AM SUN PRESS ACTION TO RETURN TIMER CLOCK SET 1 2 3 0 PM SUN PRESS ACTION TO RETURN TIMER CLOCK SET 1 2 3 0 PM SUN PRESS ACTION TO RETURN 3 Press to move to minutes position Press to set minutes 4 Press to move to DAY position Press to select the day of the week DAY Set the day of the week A CTIO N C...

Page 41: ...EATE CODE FIRST Select LOCK SET to prevent video games and VCR tapes from being viewed LOCK SET Press to select LOCK SET OFF ALL CHANNEL GAME A CTIO N CH CH VOL VOL Press to select from the following LOCK SET V CHIP SET HOW LONG CODE PRESS ACTION FOR MAIN MENU LOCK OFF U S MOVIES SETTING 12HOURS BLOCK PROGRAMS CHANGE CODE Function Turns Lock function off Lock CH 3 4 and Video inputs Lock up to fou...

Page 42: ... MPAA MOTION PICTURE and TV PARENTAL GUIDELINES Its function is to block programs by following the rating data in the XDS data packets sent from broadcasting stations The user can select which rating programs should be blocked by using the LOCK MENU options V CHIP SET Press to select V CHIP SET Press to select from the following A CTIO N CH CH VOL VOL U S MOVIES CANADIAN ENGLISH CANADIAN FRENCH U ...

Page 43: ... TY 1 4 V S L D TY MA V S L PRESS ACTION TO RETURN U S TV PROGRAMS VIEW NR PROGRAMS SETTING LOCK ON YES BASIC TY Y TY Y7 FV TY G TY PG V S L D TY 1 4 V S L D TY MA V S L This TV model features the V Chip technology which allows you to use U S TV PROGRAMS Guide ratings to block various types of TV programs PIP will also be blocked automatically A CTIO N CH CH VOL VOL NR Not Rated SEE CUSTOMER CAUTI...

Page 44: ...L VOL Press to select VIEW NR MOVIES Press to select VIEW NR PROGRAMS YES or NO NO YES 3 A CTIO N CH CH VOL VOL Press to move between different ratings Press to select ratings you would like to block RED and unblock GREEN Continue Step 3 for each ratings Note See the U S MOVIES RATINGS CHART Note Some movies are not rated for a variety of reasons Old movies and foreign films are usually not rated ...

Page 45: ...y not be suitable for viewers under the age of 14 Parents are strongly cautioned to exercise discretion in permitting viewing by pre teens and early teens 18 ADULTS ONLY LOCK Feature A CTIO N CH CH VOL VOL 1 Press to select CANADIAN ENGLISH ON or OFF ON OFF A CTIO N CH CH VOL VOL 2 Press to select VIEW E PROGRAMS Press to select VIEW E PROGRAMS YES or NO NO YES Note E Exempt programming includes n...

Page 46: ...supervision strongly suggested 16ANS Programming may not be suitable for children under the age of 16 Contains frequent scenes of violence or intense violence 18ANS 18 ans Programming restricted to adults Contains constant violence or scenes of extreme violence LOCK Feature VIEW E PROGRAMS PRESS ACTION TO RETURN CANADIAN FRENCH LOCK OFF YES G 8 ANS 13 ANS 16 ANS 18 ANS VIEW E PROGRAMS PRESS ACTION...

Page 47: ...played Note Enable PIP functions by setting Lock Set U S TV PROGRAM U S MOVIES CANADIAN ENGLISH and or CANADIAN FRENCH to OFF PIP Blocking Message Split Screen function is available when V Chip is activated If the program being viewed in Split Screen exceeds the set rating limit Split Screen will disappear and a blocking message will be displayed Note Enable Split Screen functions by setting Lock ...

Page 48: ...VCR CH 3 Press to select channel for the Main Picture or Use the remote control numeric keypad Main Picture Picture in Picture Frame 4 Press to view picture source status 5 Press PIP again to cancel the PIP Frame SWAP Press SWAP to switch the PIP and MAIN PICTURE source PIP PIP CH VCR CH A CTIO N CH CH VOL VOL 1 2 3 4 5 6 7 8 0 9 RECALL PIP SWAP A B A B B A DTV AUX DVD VCR DBS RCVR POWER PC MENU P...

Page 49: ...nimum MAX Main Picture FREEZE Main Picture TV VIDEO Button Press when PIP frame is displayed to select desired input mode Main Picture TV VIDEO Picture in Picture Frame CH CH PIP COMPONENT 1 PIP HDMI PIP COMPONENT 2 PIP VIDEO 1 PIP VIDEO 2 PIP VIDEO 3 Search This feature lets you scan through all available channels MOVE SEARCH OPEN CLOSE Press SEARCH OPEN CLOSE to display search frames 1 2 Press S...

Page 50: ...ft screens cannot display the same picture at the same time DTV AUX DVD VCR DBS RCVR POWER PIP MAX FF MOVE RECALL PC MENU PLAY R TUNE PROG GUIDE SAP PAGE EXIT PIP STOP PAUSE REC PIP MIN REW CBL VOL VOL A CTIO N T V 1 2 3 4 5 6 7 8 9 0 CH CH M UTE ASPECT TV VIDEO LIGH T FREEZE TV VCR SWAP SPLIT PIP CH VCR CH SEARCH OPEN CLOSE The previously selected screen appears 1 Main Picture Splitting the scree...

Page 51: ...to switch modes Select channels for the Split Screen by pressing PIP CH VCR CH Press SWAP to switch the SPLIT SCREEN and MAIN PICTURE source SWAP CH10 CH10 CH CH 1 2 3 4 5 6 7 8 0 9 CH10 CH5 CH10 CH5 CH5 CH10 TV VIDEO CH10 VIDEO 1 Searching the other channels press SEARCH OPEN CLOSE to search the other channels SEARCH OPEN CLOSE Press SEARCH OPEN CLOSE again to stop the search This returns the scr...

Page 52: ... display the picture at its maximum size but with slight elongation JUST mode will display a 4 3 picture at its maximum size but with aspect correction applied to the sides of the screen so that elongation is only apparent at the left and right edges of the screen The size of the picture will depend on the original signal Mode Picture Explanation 4 3 NORMAL FULL JUST JUST 4 3 9 16 NORMAL 4 3 FULL ...

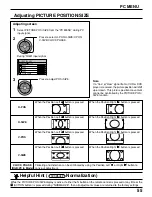
Page 53: ...AX FF PIP MIN REW FREEZE TV VCR PIP CH VCR CH SEARCH OPEN CLOSE M UTE ASPECT TV VIDEO LIGH T POWER CBL CH CH VOL VOL A CTIO N T V PC MENU PC MENU A CTIO N CH CH VOL VOL PICTURE NORMALIZE PICTURE MENU BRIGHTNESS STANDARD 0 COLOR TEMP NORMAL PICTURE 25 3 SHARPNESS NORMAL To PICTURE POS SIZE adjust menu see page 55 NORMAL PICTURE POS SIZE NORMALIZE H POS H SIZE V POS V SIZE CLOCK PHASE To SIGNAL scre...

Page 54: ...n normal levels of BRIGHTNESS and PICTURE CINEMA Ideal for movies Press the left or right button to switch between modes While the PICTURE menu is displayed if either the N button on the remote control is pressed at any time or the ACTION button is pressed during NORMALIZE then all adjustment values are returned to the factory settings Note If you would like to change the picture and color of the ...

Page 55: ...N button is pressed during NORMALIZE then all adjustment values are returned to the factory settings Adjusting screen Select PICTURE POS SIZE from the PC MENU during PC input signal Press to adjust POS SIZE Press to select H POS H SIZE V POS V SIZE CLOCK PHASE During RGB input signal 1 3 2 Note If a Cue or Rew signal from a VCR or DVD player is received the picture position will shift up or down T...

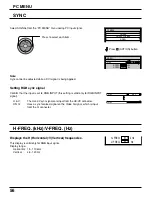
Page 56: ... V The H and V sync signals are input from the HD VD connector ON G Uses a synchronized signal on the Video G signal which is input from the G connector Displays the H Horizontal V Vertical frequencies This display is valid only for RGB input signal Display range Horizontal 15 110 kHz Vertical 48 120 Hz H FREQ kHz V FREQ Hz 31 5 60 0 PC MENU Press ACTION button Note Sync cannot be adjusted while a...

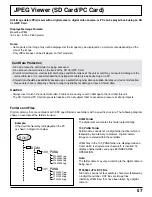
Page 57: ... specifications use folders with a specific structure The following diagram shows an example of the folder structure Caution Always insert card in the correct direction Failure to do so may result in damage to the card and this unit The SD Card and PC Card are precision devices Do not subject them to excessive pressure or strong impacts DCIM Folder The digital camera creates this folder automatica...

Page 58: ...l size file preview DATA FORMAT NOT SUPPORTED is displayed Notes Insert remove Card while Card Menu Screen or No Card is displayed Be sure ACCESS is not displayed before Card insertion removal Fully insert the Card ACCESS is displayed Wait until ACCESS goes out before removing Before reinserting a Card after removing it wait until NO CARD is displayed If there are Cards in both Card Slots wait unt...

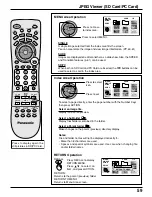
Page 59: ...r Select a Parent folder Make changes to the parent previous directory display Notes File and folder names will not be displayed correctly if More than 8 characters are used Spaces and special symbols are used Use care when changing file and or folder names RETURN Operation Press RECALL to display RETURN MENU Press to select an item and press ACTION RETURN Returns to the parent previous folder RET...

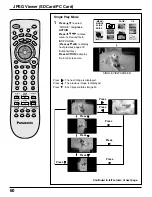
Page 60: ... The previous image is displayed Press Each press rotates image 90 Continued in left column of next page SINGLE VIEW SCREEN MENU PAGE 1 6 SINGLE SLIDE SD PC A CTI O N Press Press Press Press Press Press DTV AUX DVD VCR DBS RCVR POWER PC MENU PLAY R TUNE PROG GUIDE SAP PAGE EXIT STOP PAUSE REC CBL VOL VOL A CTIO N T V 1 2 3 4 5 6 7 8 9 0 CH CH M UTE ASPECT TV VIDEO LIGH T SPLIT RECALL PIP MAX FF PI...

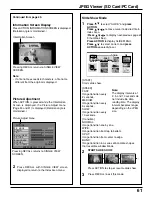
Page 61: ...vious page of 9 thumbnail files Press ACTION to display SLIDE MENU Press to select an item and press ACTION repeatedly to set START Starts slide show SPEED FAST Image transition every 2 seconds MEDIUM Image transition every 5 seconds SLOW Image transition every 10 seconds Transition NORMAL Image transition one by one WIPE Image transition from top to bottom SPLIT Image transition from center to ed...

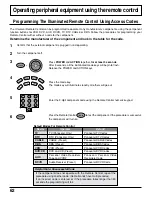
Page 62: ... and ACTION keys Press the mode key The mode key will illuminate steadily all others will go out Enter the 3 digit component code using the Remote Control numeric keypad 6 POWER Press the Remote Control POWER to test the component If the procedure is successful the component will turn on If the component does not operate with the Remote Control repeat the procedure using another code Some brands h...

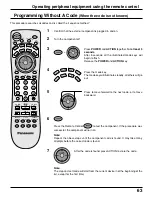
Page 63: ...e Remote Control POWER to test the component If the procedure was successful the component will turn on 5 6 POWER PIP MAX FF RECALL MOVE SPLIT PLAY R TUNE PROG GUIDE SAP PAGE EXIT STOP PAUSE REC PIP MIN REW SEARCH OPEN CLOSE M UTE ASPECT TV VIDEO LIGH T FREEZE TV VCR PIP PIP CH VCR CH CH CH VOL VOL A CTIO N SWAP POWER PC MENU 1 2 3 4 5 6 7 8 0 9 DTV AUX DVD VCR DBS RCVR CBL T V A CTIO N CH CH VOL ...

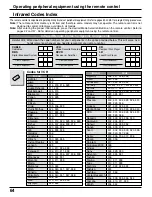
Page 64: ...10 311 324 339 345 Pentax 300 311 345 Philco 320 323 324 326 331 343 Philips 323 324 331 Pioneer 323 Proscan 300 301 302 323 324 331 333 345 346 Quasar 321 322 323 324 Radio Shack 305 309 324 333 336 340 RCA 300 301 302 323 324 331 333 345 346 Realistic 305 309 324 336 340 Samsung 302 304 333 Sansui 320 326 339 352 Sanyo 305 309 313 Scott 301 302 304 309 320 326 338 340 347 348 Sears 300 305 306 3...

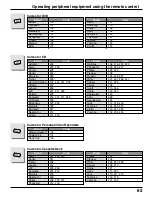
Page 65: ...gnavox 229 232 Marantz 229 McIntosh 221 Nakamichi 210 Onkyo 214 215 Codes for CD DVD Brand Code Optimus 208 218 220 222 Panasonic 224 225 227 Philips 229 230 Pioneer 208 Quasar 224 225 227 RCA 231 237 238 247 Sansui 210 246 Sanyo 205 Scott 210 246 Sharp 242 243 Sherwood 220 Sony 228 Soundesign 244 Teac 212 216 218 Technics 224 225 227 Victor 240 241 245 Yamaha 202 203 204 Brand Code Aiwa 223 224 2...

Page 66: ...3 124 Macom 103 104 105 Magnavox 133 Memorex 130 Movietime 105 132 Oak 102 137 139 Panasonic 109 110 114 Philips 106 107 128 129 130 Pioneer 101 116 Pulsar 105 132 Codes for Cable Box CBL Brand Code Puser 132 RCA 115 Realistic 132 Regal 112 118 140 141 142 145 Regency 134 Rembrandt 105 132 137 Samsung 105 Scientific Atlanta 111 112 113 Slmark 101 105 Sprucer 105 110 Stargate 105 132 Tel eview 101 ...

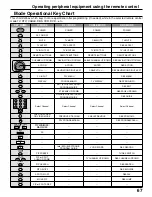
Page 67: ...INPUT DTV MENU DBS MENU DISPLAY PROGRAM INFO TV DISPLAY DBS PROG INFO DBS EXIT STB PAGE UP DOWN DBS PAGE UP DOWN DBS GUIDE Select Channel Select Channel Select Channel Select Channel PREVIOUS STB CHAN CABLE PREVIOUS DBS PREVIOUS DTV PROGRAM DASH DBS PROGRAM DASH SD VCR RECORD DBS RECORD PIP FREEZE TV DBS SWITCH TV CHANNEL UP DOWN DBS CHANNEL UP DOWN PIP SEARCH DBS SEARCH PIP ON OFF DBS M GUIDE SPL...

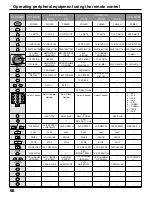
Page 68: ... PLAY PLAY PLAY PLAY PLAY PLAY PAUSE STILL PAUSE PAUSE PAUSE PAUSE PAUSE STOP STOP STOP STOP STOP STOP VCR RECORD DVD RECORD PVR RECORD VCR RECORD TAPE RECORD TV VCR SWITCH TV VCR SWITCH OPEN CLOSE OPEN CLOSE OPEN CLOSE TV CHAN UP DOWN NAVIGATION UP DOWN NEXT PREVIOUS TRACK TV CHANNEL UP DOWN NAVIGATION UP DOWN RCVR VOLUME UP DOWN ONSCREEN VCR DISPLAY ONSCREEN VCR DISPLAY 1 AV1 2 AV2 3 AV3 4 AV4 5...

Page 69: ...Channel Check Audio Is Set To Stereo or Mono Not SAP Change CC Closed Captioning from Text Mode Replace Remote Control Batteries Symptoms VIDEO AUDIO Solutions Symptoms Some parts of the screen do not light up After images appear Whirring sounds can be heard from the display unit Plasma Display panel Check The plasma display panel is manufactured using an extremely high level of precision technolo...

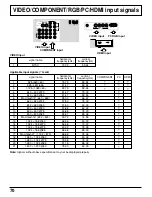
Page 70: ...4 768 75 60 02 75 03 16 1 024 768 85 68 68 85 00 17 Macintosh21 1 152 870 68 68 75 06 18 1 280 1 024 60 63 98 60 02 19 1 280 1 024 75 79 98 75 03 20 1 280 1 024 85 91 15 85 02 21 1 600 1 200 60 75 00 60 00 signal name horizontal vertical frequency kHz frequency Hz 1 NTSC 15 73 59 94 PROG OUT COMPONENT VIDEO INPUT S VIDEO VIDEO Y PB L R ANT 1 ANT 2 SPLIT OUT PR 1 2 1 2 INPUT TO AUDIO AMP VIDEO HPJ ...

Page 71: ...s Temperature 34 F 104 F 0 40 C Humidity 20 80 non condensing Connection Terminals Speaker Woofer φ 80 mm 2 Tweeter 16 mm 73 mm 8 Audio Output Headphone M3 3 5 mm Jack 1 Sound 26 W 5 W 5 W 8 W 8 W 10 THD FEATURES Two screen display fuctions 3D Y C FILTER HDMI BBE VIVA LINEAR PIP JPEG Viewer CLOSED CAPTION V Chip Accessories Supplied Remote control Transmitter EUR7603ZB0 AA Battery 2 Ferrite cores ...

Page 72: ...e event of theft or loss and for Warranty Service purposes Model Number Serial Number Panasonic Consumer Electronics Company Division of Matsushita Electric Corporation of America One Panasonic Way Secaucus New Jersey 07094 Panasonic Sales Company Division of Matsushita Electric of Puerto Rico Inc PSC Ave 65 de Infanteria Km 9 5 San Gabriel Industrial Park Carolina Puerto Rico 00985 Printed in Jap...

Reviews: