background image

English

13


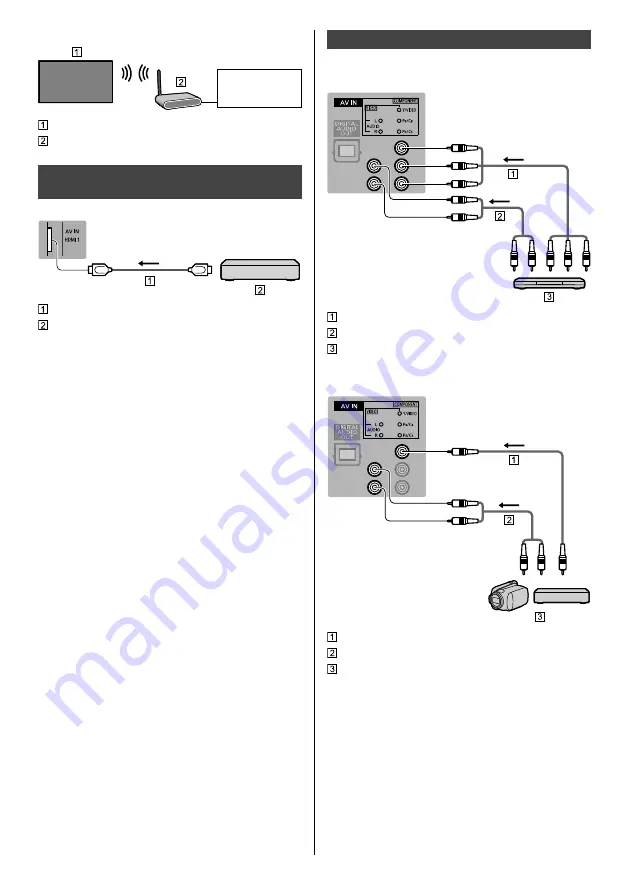
Wireless connection

Internet 

environment

 Built-in wireless LAN
 Access point

  Connections for 4K / HDR compatible 

equipment

TV

  HDMI cable
  4K / HDR compatible equipment

● 

Connect the 4K compatible equipment to HDMI 

terminal using a 4K compatible cable and you can 

watch content in 4K format.

● 

Supporting HDR does not increase the peak 

brightness capabilities of the TV panel.


  [HDMI Auto Setting] (Setup Menu)

Reproduces the image more precisely with the 

expanded colour gamut when connecting the 4K 

compatible equipment. Select the mode depending on 

the equipment.

[Mode1]:

For better compatibility. Set to [Mode1] when the 

image or sound in HDMI input is not played properly.

[Mode2]:

For the 4K compatible equipment that has the 

function to output the image precisely with the 

expanded colour gamut.

● 

To change the mode
1.  Select the HDMI input mode connected to the 

equipment.

2.  Display the menu and select [HDMI Auto Setting] 

(Setup Menu).

● 

For information about the valid format, refer to 

[eHELP] (Search by Purpose > Watching > 4K 

resolution > HDMI Auto Setting).

Other connections**


  DVD Player

TV


(Viewing)

(Listening)

 Component video cable (Shielded)
 Audio cable (Shielded)
 DVD Player


 Camcorder / Game equipment

TV


(Viewing)

(Listening)

 Composite video cable (Shielded)
 Audio cable (Shielded)
 Camcorder / Game equipment

Summary of Contents for TH-49HX900H

Page 1: ...t and retain them for future reference Please carefully read the Safety Precautions of this manual before use The images shown in this manual are for illustrative purposes only Model No TH 49HX900H For more detailed instructions please refer to eHELP Built in Operating Instructions How to use eHELP p 19 Operating Instructions LED TV English FAU ...

Page 2: ...mportant Notice 3 Safety Precautions 5 Accessories 7 Installing the TV 8 Installing the wall hanging bracket 10 Connections 11 Identifying Controls 16 First time Auto Tuning 18 How to Use eHELP 19 FAQs 20 Maintenance 21 Specifications 22 ...

Page 3: ...s are available depending on the country area broadcaster and service provider This TV has the capability for Digital broadcasting specifications But future Digital broadcasting services cannot be guaranteed Internet apps are provided by their respective service providers and may be changed interrupted or discontinued at any time Panasonic assumes no responsibility and makes no warranty for the av...

Page 4: ...aws and regulations involved or contact the owner of the rights in the content you wish to record or playback This product is licensed under the AVC patent portfolio license for the personal use of a consumer or other uses in which it does not receive remuneration to i encode video in compliance with the AVC Standard AVC Video and or ii decode AVC Video that was encoded by a consumer engaged in a ...

Page 5: ...ve the TV Do not insert foreign objects into the TV through the air vents If the TV is used in an area where insects may easily enter the TV It is possible for insects to enter the TV such as small flies spiders ants etc which may cause damage to the TV or become trapped in an area visible on the TV e g within the screen Do not use an unapproved pedestal mounting equipment Be sure to ask your loca...

Page 6: ... impeded by covering the ventilation openings with items such as newspapers tablecloths and curtains Whether you are using a pedestal or not always ensure the vents at the bottom of the TV are not blocked and there is sufficient space to enable adequate ventilation To prevent the spread of fire keep candles or other open flames away from this product at all times Suffocation Choking Hazard Warning...

Page 7: ...rosion and explosion Replace only with the same or equivalent type Do not mix old and new batteries Do not mix different battery types such as alkaline and manganese batteries Do not use rechargeable batteries Ni Cd etc Do not burn or break up batteries Do not expose batteries to excessive heat such as sunshine fire or the like Make sure you dispose of batteries correctly Remove the battery from t...

Page 8: ...ean and soft cloth blanket etc Use a flat and firm table bigger than the TV Do not hold the screen panel part Make sure not to scratch or break the TV Assembling the pedestal Select a method to assemble the pedestal from the following 2 styles Insert the pedestal firmly otherwise it may come off when setting up the TV Do not assemble the pedestal by any method other than those specified below Styl...

Page 9: ...English 9 Style2 1 A 2 A 3 ...

Page 10: ... other wall hanging brackets or installing a wall hanging bracket by yourself have the risk of personal injury and product damage In order to maintain the unit s performance and safety be absolutely sure to ask your dealer or a licensed contractor to secure the wall hanging brackets Any damage caused by installing without a qualified installer will void your warranty Carefully read the instruction...

Page 11: ...eration of other equipment may be affected Please also read the manual of the equipment being connected Removing the terminal cover rear cover from the TV Be sure to remove the terminal cover rear cover before connecting or disconnecting cables When the connections are completed attach the terminal cover rear cover p 15 Terminal cover Rear cover Terminals 2 1 3 4 5 7 8 9 6 1 Model name plate 2 Hea...

Page 12: ...ervice Centre or dealer may be able to assist you in obtaining the correct aerial system for your particular area and the accessories required Any matters regarding aerial installation upgrading of existing systems or accessories required and the costs incurred are the responsibility of you the customer AV devices DVD Recorder Blu ray Recorder etc TV RF cable HDMI cable DVD Recorder Blu ray Record...

Page 13: ...epending on the equipment Mode1 For better compatibility Set to Mode1 when the image or sound in HDMI input is not played properly Mode2 For the 4K compatible equipment that has the function to output the image precisely with the expanded colour gamut To change the mode 1 Select the HDMI input mode connected to the equipment 2 Display the menu and select HDMI Auto Setting Setup Menu For informatio...

Page 14: ... Terminal Output to Headphone TV 3 5 mm stereo mini plug Subwoofer To use the subwoofer set Headphone Terminal Output to Sub Woofer The subwoofer output from the TV is the same for both L and R TV Audio cable 3 5 mm stereo mini plug audio pin plug USB HDD for recording Use USB 1 port for connecting the USB HDD For details refer to eHELP Search by Purpose Recording VIERA Link Use HDMI1 4 for VIERA ...

Page 15: ... option s assembly manual to fix cables Attaching the terminal cover rear cover Be careful not to nip the cables between the TV and the terminal cover rear cover When using USB 2 port USB 3 port HDMI3 terminal or HDMI4 terminal you cannot attach the terminal cover Keep the removed terminal cover for future use When using AV IN terminal and DIGITAL AUDIO OUT you cannot attach the rear cover Keep th...

Page 16: ... 10 Volume Up Down 11 Numeric buttons Changes channel Sets characters When in Standby mode switches TV on 12 eHELP Built in Operating Instructions 13 MY APP 14 Input mode selection TV switches to Digital TV Analogue TV AV switches to AV input mode from Input Selection list 15 Audio Description This button is not used for this model 16 Subtitles 17 EXIT Returns to the normal viewing screen 18 HOME ...

Page 17: ... sensor Senses brightness to adjust picture quality when Ambient Sensor in the Picture Menu is set to On 3 Remote control signal receiver Do not place any objects between the TV remote control signal receiver and remote control 4 Input mode selection Press repeatedly until you reach the desired mode Main Menu Press and hold for about 3 seconds to display main menu OK when in the menu system 5 Chan...

Page 18: ...nt Shop is for shop display To change the viewing environment later on the set will need to have all settings initialised by accessing Shipping Condition Set up the network connection Tick the TV signal mode to tune and then select Start Auto Tuning When you select the analogue TV signal select your area When selecting CATV Other press the OK button and then select the Channel Plan from Indian CAT...

Page 19: ...ast viewed page 2 Select the menu select access To access How to use green Keyword Search Search the content of eHELP in the keyword Search by Purpose Search the content of eHELP for each item Support Access the support information FAQs etc 3 Select the item Example select access To return to the previous screen field To scroll the description if more than 1 page While the description is highlight...

Page 20: ...gain If the problem persists initialise all settings Shipping Condition in System Menu Setup Menu The image or sound from external equipment are unusual when the equipment is connected via HDMI Set HDMI Auto Setting Setup Menu to Mode1 p 13 No sound is produced from the connected HDMI equipment Set the audio output format of the connected HDMI equipment to PCM Intermittent Wi Fi Make sure the TV h...

Page 21: ...he stubborn dirt 5 Finally wipe away all the moisture Caution Do not use a hard cloth or rub the surface too hard otherwise this may cause scratches on the surface Take care not to subject the surfaces to insect repellent solvent thinner or other volatile substances This may degrade surface quality or cause peeling of the paint The surface of the display panel is specially treated and may be easil...

Page 22: ...r x v Colour HDMI2 4K Content Type Audio Return Channel Deep Colour x v Colour This TV supports HDAVI Control 5 function ETHERNET 10BASE T 100BASE TX USB 1 2 3 USB 1 DC 5 V Max 900 mA SuperSpeed USB USB 3 0 USB 2 3 DC 5 V Max 500 mA Hi Speed USB USB 2 0 DIGITAL AUDIO OUT PCM Dolby Digital Fibre optic Receiving systems Band name 7 Systems Function 1 PAL B G H Reception of broadcast transmissions an...

Page 23: ...tandard Compliance Bluetooth 4 2 Frequency Range 2 402 GHz 2 480 GHz 1 The frequency and channel differ depending on the country 2 Not all the Bluetooth compatible devices are available with this TV Up to 5 devices can be used simultaneously Note Design and Specifications are subject to change without notice Mass and Dimensions shown are approximate For information about the open source software r...

Page 24: ...ber label located on side or bottom of the rear panel You should note this serial number in the space provided below and retain this book plus your purchase receipt as a permanent record of your purchase to aid in identification in the event of theft or loss and for Warranty Service purposes Model Number Serial Number Web Site http www panasonic com Panasonic Corporation 2020 English Printed in Ma...

Reviews: