Panasonic TH-43MX800H Operating Instructions Manual Download Page 14

Using the Menu Functions

14

 Using the Menu 
Functions

Using Quick Access Menu

Picture Mode: 

To select the mode of Normal,Dynamic,

                             Filmmaker, Sport,Game and Custom.

Backlight: 

Select the level of 0-100.

ECO Setting: 

To select the Off,Low and High.

Aspect Ratio: 

Displays the [Aspect Ratio] screen. Follow the operation

guide to select the mode. [16:9] / [4:3] / Auto / Original

(Output 1:1 on the screen according to the number of 

pixels entered).

Advanced Setting: 

Color Temperature:To select the Normal,Warm,Cool.

Dynamic Contrast:To select On or Off.
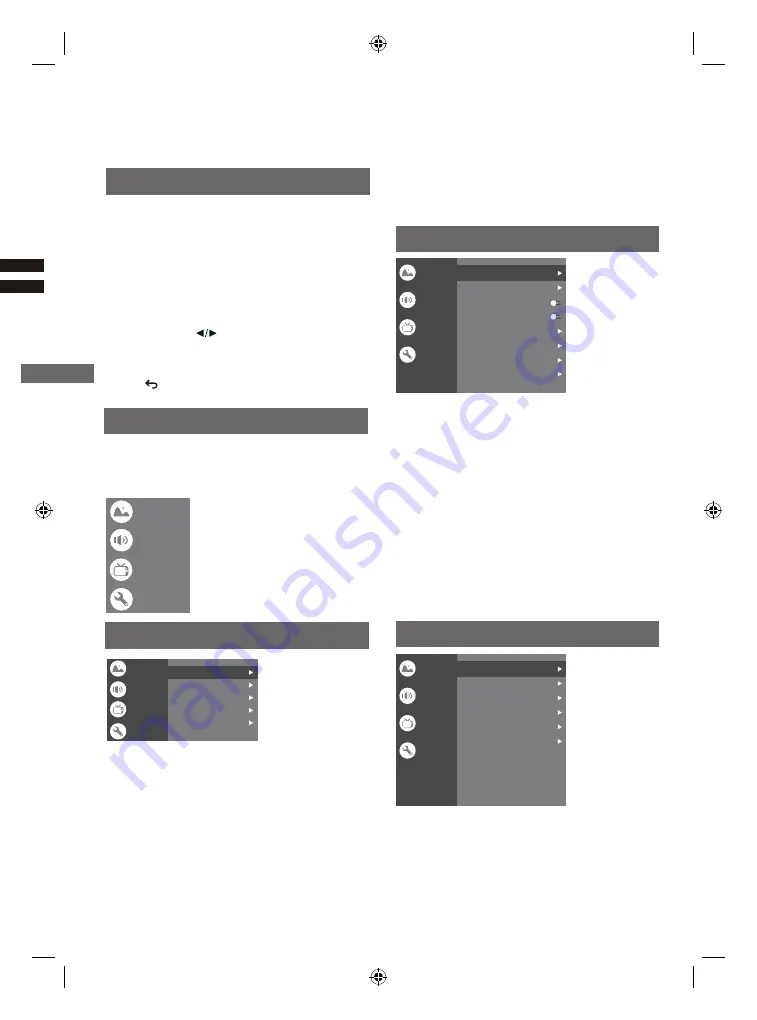
Sound

Menu

Picture

Sound

System

Picture

Sound

System

Channel

Channel

Picture Mode

Normal

100

High

16:9

Backlight
ECO Setting
Aspect Ratio
Advanced Settings

Sound Mode

Surround Mode

Night Mode

Sound Only

Output Device

Digital Output 

Advanced Settings 

Standard

TV Speaker

Off

PCM

HDMI PC/ AV Mode: To select Video,PC,Auto.

Overscan:To select On or Off.

Noise Reduction:To select Off,Low,Middle,High and Auto.

Picture Reset:To reset the picture.

Motion Estimate and Motion Compensation(MEMC): 

To select Off,Low,Middle and High.

Gamma:Select 2.2 or 2.4.

Picture

Sound

System

Channel

Channel

Channel Scan

Digital Channel Setup

EPG

Favorite

Channel Diagnostic

Channel Organizer

Picture

Sound

System

Channel

Dolby Audio Processing

Picture

Sound Mode:

 To select the mode of Standard,Speech, 

                        Music,Stadium and User.

Surround Mode:

 Select Off/ Pure Sound/ Surround.

Dolby Audio Processing:

 Select ON or OFF.

Night Mode: 

Select ON or OFF.

Sound Only:

 Select it and the TV screen will turn off in

                      10 seconds.

Output Device:

 To select the TV Speaker, SPDIF/Optical

                           and HDMI-ARC.

Digital Output:

 Select the PCM/ByPass/Auto.

Advanced Settings: 

1.Dialogue Enhancer 

2.Dialogue Enhancer Level 3.Balance

4.Digital Audio Delay (ms) 

5.Digital Audio Volume

6.eARC

7.Sound Reset

Picture: 

Enter to adjust picture mode or advanced settings.

Sound:

 Select this option to set the sound adjustments.

Channel:

 Select this option to adjust the channel.

System: 

Select this option to adjust the settings.

Note: Some of the functions might be unavailable

in certain sources. And for some models, certain

options are not available.

This section explores the menus and settings of your

TV. Each menu is outlined and detailed to help you get

the most from your TV. To access the menu system:

1. In TV mode, press 

MENU

 on the remote control to

    display the quick access list.

2. Press ▲/▼ to select the desired item, then press


OK

 to open the corresponding submenu.

3. In submenu, use         aand 

OK

 buttons to make

    the adjustments, or use ▲/▼ to select an item, use


OK

 to enter and operate according to the on-screen

    display or guide.

4. Press      to return to the previous menu.

Channel Scan:

Note: This function is only available in TV mode. 

Allows you to scan for all available analog and digital 

channels. 

Summary of Contents for TH-43MX800H

Page 1: ...Operating Instructions 72 43MX8H E51Z1 English image TH 50MX800H TH 43MX800H TH 50MX800H...

Page 2: ...opyright 1992 2022 Dolby Laboratories All rights reserved Damages Excepting cases where responsibility is recognised by local regulations Panasonic accepts no responsibility for malfunctions caused by...

Page 3: ...ther sources of heat To prevent the spread of fire keep candles or other open flames away from this product at all times Dangerous part Small object Warning This product contains possibly dangerous pa...

Page 4: ...articular wireless network for transmission Do not subject the built in wireless LAN to high temperatures direct sunlight or moisture Data transmitted and received over radio waves may be intercepted...

Page 5: ...embly screws from the TV Be sure to remove the pedestal in the following way when using the wall hanging bracket or repacking the TV Removing the pedestal from the TV Pull out the base from the TV 3 N...

Page 6: ...the TV View from the side Screw for fixing the TV onto the wall hanging bracket not supplied Connecting the TV Please ensure the TV is disconnected from the mains socket power point before attaching...

Page 7: ...lity the sound Enjoy the sound of external devices in multichannel sound e g Dolby digital 5 1 CH connect the device to the loudspeaker For connections see the device and the instructions for the loud...

Page 8: ...se and Android device to setup the TV Google Initial Setup llustrations within this publication are provided for reference only English United States Continue Skip Sign In Skip Firstly please select t...

Page 9: ...You can also go back to former step and make any changes by using button Environment Home Country Region HONGKONG Step 1 Step 2 Step 3 Step 4 Step 5 Home Shop 1 2 3 4 5 Next Environment Please choose...

Page 10: ...e menu screen Colour buttons Goes to the YouTube homepage To open the settings menu MENU To enter the picture mode PICTURE To enter the sleep timer OFF TIMER To enter source selection interface INPUT...

Page 11: ...n choose OK button How to Pair Remote Control with the TV This is a Bluetooth remote control and before using it please pair it with the TV firstly The following steps are for your reference Follow th...

Page 12: ...control signal receiver 5 Voice signal receiver White Standby Note Make sure the TV is connected to the Internet before using Voice Please set it to On before using Voice Please log in to your Google...

Page 13: ...l is for common use Figures and illustrations in this User Manual are provided for reference only and may differ from actual product appearance And for some models certain options are not available Yo...

Page 14: ...o select the mode of Standard Speech Music Stadium and User Surround Mode Select Off Pure Sound Surround Dolby Audio Processing Select ON or OFF Night Mode Select ON or OFF Sound Only Select it and th...

Page 15: ...arch process The search may take a few minutes During the process you can press to abort Manual Scan Use to choose Digital Press OK to enter the interface Press to set Channel Number Frequency KHz and...

Page 16: ...n to select your desired file and press OK to play 3 Use OK key to see more option ZOOM ZOOM 4 Press Return key of remote to stop playing Document icon Access Select Photo 1 Select Picture icon then p...

Page 17: ...are the same except for the file extensions If there are more than one subtitles text file inside the same folder they are displayed in the following order of priority srt sub Note Even if these cond...

Page 18: ...ive use the USB HDD port We recommend that you use an exteral hard drive with its own power adapter Certain digital cameras and audio devices may not be compatible with the TV The TV supports the FAT...

Page 19: ...te control directly at the remote control signal receiver of the TV within about 7 m and 30 degree angle Situate the TV away from sunshine or block sources of bright light from shining on the remote c...

Page 20: ...ch model 126 cm 43 inch model 3 840 W 2160 H 50 inch model 3 840 W 2160 H Connection terminals Sound Audio output 20 W 10 W 10 W HDMI 1 2 3 input USB HEADPHONE 3 5 mm stereo mini jack 1 AV in 1120 720...

Page 21: ...ard compliance and Frequency range IEEE 802 11 a b g n ac 2 4 2 5GHz and 5 15 5 825GHz Security Support for WPA WPA2 Built in Bluetooth Bluetooth V5 0 2 4 2 485GHz Digital TV DTMB Standard Aerial inpu...

Page 22: ...istributed in the hope that it will be useful but WITHOUT ANY WARRANTY without even the implied warranty of MERCHANTABILITY or FITNESS FOR A PARTICULAR PURPOSE Please refer to the detailed terms and c...

Page 23: ...onic Entertainment Communication Co Ltd Panasonic Entertainment Communication Co Ltd 2022 Information on Disposal in other Countries outside the European Union Customer s Record Model Number Serial Nu...

Reviews: