background image

Sound: 

Select this option to set the sound adjustments.

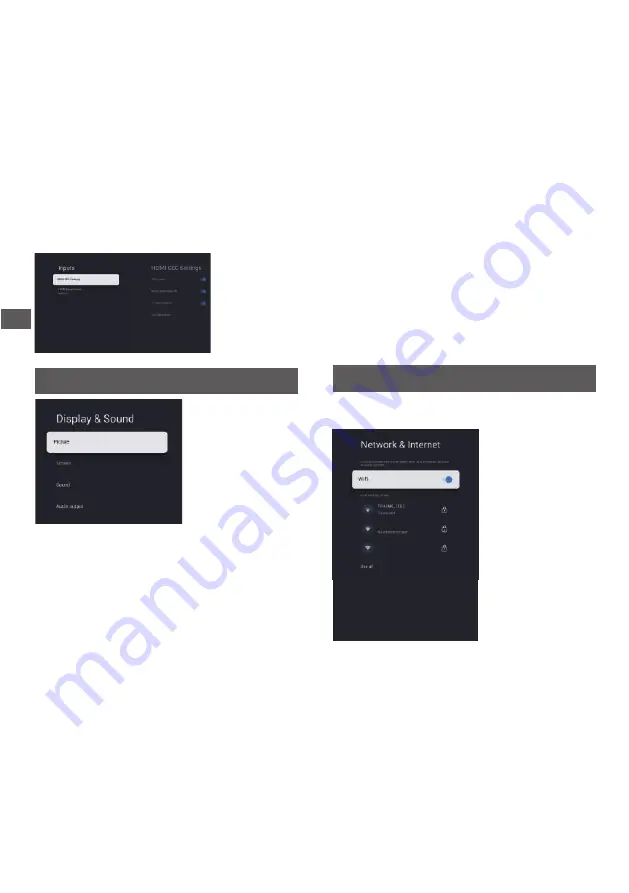
Display & Sound

Picture:

Enter to adjust picture mode or advanced settings. 

Picture Mode: To select Normal, Dynamic, Filmmaker, Sport,

                       Game and Custom.
ECO: To select Off, Low and High. 

Backlight: To select the level of 0-100.
Advanced Settings: 

Color Temperature: To select the Standard, Warm and Cool.

Dynamic Contrast: To select ON or OFF.

HDMI PC/ AV Mode: To select Video, PC and Auto.
Overscan: To select ON or OFF
Noise Reduction: To select Off, Low, Middle, High and Auto.

Picture Reset: To reset the picture.

Motion Estimate and Motion Compensation (MEMC):

To select Off, Low, Middle and High.

Gamma: To select  2.2 or 2.4

.

Screen:


To select this option to adjust the picture size

.

Sound Mode: To select the mode of Standard,Speech,

Dolby Audio Processing:  To select ON or OFF.
Surround Mode: To select Pure Sound or Surround.

Music,Stadium and User.

Night Mode: To select ON or OFF.

Advanced Settings:

To select it and the TV screen will turn off in

10 seconds.

Sound Only:

1. Dialogue Enhancer

2. Dialogue Enhancer Level 1-7

3. Balance

4. Sound Reset


Audio output

Select this option to set the Audio 

adjustments.

Output Device: To select TV Speaker, SPDIF/Optical and

HDMI-ARC.

Digital Output: To select PCM, ByPass and Auto.

Digital Audio Delay(ms): 
Digital Audio Volume: To select the level of 0-100.
eARC: To select Off or Auto.

Network & Internet 

MTC-GUEST

MTC-MES

OTHER OPTIONS

ETHERNET 

Add new network

Not connected

Scanning always available

Proxy settings

IP settings

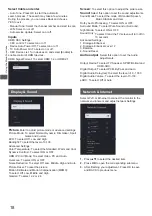
Select Wi-Fi or Ethernet to connect the monitor to the 

network environment and adjust network Settings.

1. 

Press

 to select the desired item. 

2. 

Press 


OK 


to open the corresponding submenu.

▲/▼

3.  

After finishing your adjustment, Press OK to save

and BACK to previous menu.  

Select Cable and enter.

- Manual Tune: Select the channel number and start to scan

- LCN: Select on or off.

- Auto service Update: Select on or off.

- Auto Tune: Press OK to start the automatic

search process. The search may take a few minutes.

During the process, you can press Back and choose

YES to exit .

HDMI CEC Settings: 

- CEC control: To select on or off. 

- Device Auto Power Off: To select on or off. 

- TV Auto Power On: To select on or off. 

- CEC Device List: Turn devices on and select [Enable] to 

enable control of HDMI devices. 

18

Using the Menu Funct

ions

 To select the level of 0 - 1000.

Inputs 

HDMI Signal Format: To select HDMI 1.4 or HDMI 2.1. 

Summary of Contents for TH-43MX650K

Page 1: ...y be different from the actual products Transport only in upright position Model No TH 43MX650K TH 50MX650K TH 55MX650K TH 65MX650K TH 75MX650K 55 inch model 43 inch model 75 inch model Manufactured under license from Dolby Laboratories Dolby Dolby Audio and the double D symbol are trademarks of Dolby Laboratories Licensing Corporation The Adopted Trademarks HDMI HDMI High Definition Multimedia In...

Page 2: ... cannot be guaranteed Even if no special notation has been made of company or product trademarks these trademarks have been fully respected 1 The mains plug appliance coupler is used as disconnect device the disconnect device shall remain readily operable 2 The battery battery or batteries or battery pack shall not be exposed to excessive heat such as sunshine fire or the like 3 To prevent injury ...

Page 3: ...ture This TV must not be exposed to dripping or splashing water and objects filled with liquid such as vases must not be placed on top of or above the TV Do not insert foreign objects into the TV through the air vents Do not use an unapproved pedestal mounting equipment Be sure to ask your local Panasonic dealer to perform the setup or installation of approved wall hanging brackets Do not apply st...

Page 4: ...SSID for which you do not have usage rights Such networks may be listed as a result of searches However using them may be regarded as illegal access SSID is a name for identifying a particular wireless network for transmission Do not subject the built in wireless LAN to high temperatures direct sunlight or moisture Data transmitted and received over radio waves may be intercepted and monitored The...

Page 5: ...5 4 Preparation Illustrations shown may be different between models and countries Note 65 inch model Assembly screws Base M5 25 4 Attaching the pedestal Assemble the pedestal Be sure to remove the pedestal in the following way when using the wall hanging bracket or repacking the TV Removing the pedestal from the TV 1 Lay the TV on a foam mat or thick soft cloth on a table 2 Remove the assembly scr...

Page 6: ...ve off high heat Doing so may warp or damage plastic cabinet parts When installing wall brackets you must ensure the wall bracket is not electrically grounded to metal wall studs Always ensure that there are no electrical cables pipes etc in the wall before you begin the wall bracket installation To prevent fall and injury remove the TV from its fixed wall position when it is no longer in use Warn...

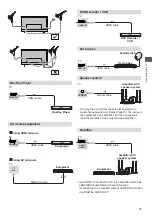
Page 7: ... equipment and amplifier To enjoy the sound from the external equipment in multi channel sound e g Dolby Digital 5 1ch connect the equipment to the amplifier For the connections Amplifier Use HDMI1 to connect the TV to an amplifier which has eARC ARC Audio Return Channel function If connecting to an amplifier without eARC ARC function use DIGITAL AUDIO OUT Optical cable TV Amplifier with speaker s...

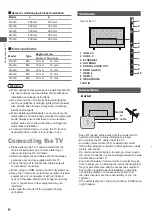
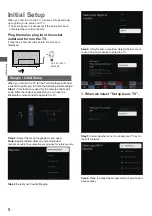
Page 8: ...is function is used for the remote control pair code After the code is successful you can use the Bluetooth remote control to operate the TV Google Initial Setup AC 220 240 V 50 60 Hz Step 2 Select the menu language as you need Step 3 Note English United States is recommended llustrations within this publication are provided for reference only Select your Country Region India Malaysia Step 4 Only ...

Page 9: ...firm and move to next step Step 9 Channel installation Use to select Tuner mode Antenna Cable Type Digital Analogue and All then press OK to confirm and move to next step Step 10 Please check settings When all setup is done the Please check settings interface displays on the screen and press OK to finish the initial setup You can also go back to former step and make any changes by using button 2 W...

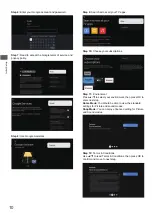
Page 10: ...p 10 Choose your subscriptions Step 11 Environment Your account Your account Step 12 Terms Conditions Use to read Terms Conditions then press OK to confirm and move to next step You Would be able to view the standard You can enjoy enhanced setting for Picture environment then press to Home Mode settings for Picture and sound modes Shop Mode and Sound modes Press to select your enter next step OK N...

Page 11: ...Cable Type Digital Analogue and All then press OK to confirm and move to next step Step 16 Your Google TV experience is ready Step 15 Installing your apps Please notice that this will take some time Note Step 14 Please check settings When all setup is done the Please check settings interface displays on the screen and press OK to finish the initial setup You can also go back to former step and mak...

Page 12: ...ion interface INPUT Goes to the prime video homepage To select the apps Exit the menu and return to the previous menu Mic Available only when the network connection is normal Displays the options menu of selected functions OPTION To enter the Favorite shows To enter the channel list FAV BACK To fast backward To fast forward To play To end the running program To pause Start recording Increases or d...

Page 13: ... or set up a remote control or accessory that s already connected to your TV Follow the on screen instructions to pair it Press hold and for 5 seconds on the new remote Once it is discovered it will appear in the list And then press OK on your old remote to confirm adding this new remote If you want to unpair the Bluetooth remote follow these steps NOTE If you experience difficulties in pairing yo...

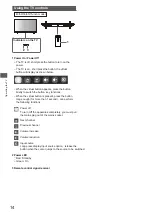
Page 14: ...ction Previous channel Next channel Power off To turn Off the apparatus completely you must pull the mains plug out of the mains socket 1 Power On Power Off The TV is off short press the button to turn on the power The TV is on short press the button the virtual button will display as shown below When the virtual button appears press the button briefly to switch the button key functions When the v...

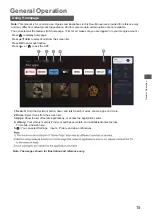
Page 15: ...e Press to select icons from the screen list Press OK to enter each option Press or to exit the APP 1 Search Hold the Assistant button down and talk Search movies shows apps and more 2 Home Select icons from the screen list 3 Apps Show the list of favorite applications or access the application center 4 Library Your Library is empty Find your purchases rentals and watchlistedcontent across TV mobi...

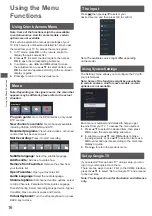
Page 16: ...the menu system 1 In TV mode press OK on the remote control to display the quick access list 2 Press to select the desired item then press OK to open the corresponding submenu 3 In submenu use and OK buttons the adjustments or use to select an item use OK to enter and operate according to the on screen display or guide 4 Press to return to the previous menu Recorded programs View burned videos or ...

Page 17: ... a few minutes During the process you can press Back and choose YES to exit Auto service Update Select On or Off LCN Select on or off Update Scan Include Off and On Country and Region Show your country or region Teletext Setup Press OK and then use to select preferred teletext or Decoding Page Language Press OK to enter the Program Guide menu EPG Setup favorite channel list Favorite Press OK to di...

Page 18: ...elect this option to set the Audio adjustments Output Device To select TV Speaker SPDIF Optical and HDMI ARC Digital Output To select PCM ByPass and Auto Digital Audio Delay ms Digital Audio Volume To select the level of 0 100 eARC To select Off or Auto Network Internet MTC GUEST MTC MES OTHER OPTIONS ETHERNET Add new network Not connected Scanning always available Proxy settings IP settings Selec...

Page 19: ...evice name reset and read the information of TV Date Time To select Automatic date time Set date Set time Set time zone and Use 24 hour format Note Set date and set time are available when Automatic date time is set to OFF Language To select the menu language as you need Keyboard To select Current keyboard Gboard Settings and Manage keyboards Storage Display internal shared storage if there is an ...

Page 20: ...20 Using the Menu Functions Help Feedback Provide feedback to Google or use the web search screen to access the Google Description Center ...

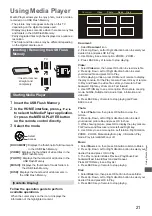
Page 21: ...tion ZOOM ZOOM 4 Document icon Select the mode Access Select Photo 1 Select Photo icon then press OK button to view the picture 2 Press Up Down Left or Right direction button to select your desired picture file and press OK to show 3 While showing picture press OK to display the play console For Previous and Next use remote left and Right key 4 Use OK key to see more option Left rotation Right rot...

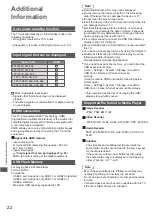
Page 22: ... you need to expand the memory you can format the USB expansion memory Home Settings System Storage VendorCo USB drive Delete and format as device storage If want to restore USB functionality following below format again Home Settings System Storage VendorCo USB drive Erase format as removable storage This operation has the risk of damaging the USB please proceed with caution 22 Additional Informa...

Page 23: ...with a USB extension cable Do not disconnect USB devices while they are transferring files When connecting an external hard drive use the USB HDD port We recommend that you use an external hard drive with its own power adapter Certain digital cameras and audio devices may not be compatible with the TV The TV supports the FAT file systems After sorting files in the Folder view mode the TV can displ...

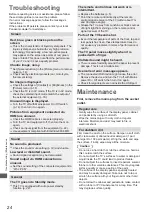
Page 24: ...ate the TV away from sunshine or block sources of bright light from shining on the remote control signal receiver of the TV Parts of the TV become hot Even if the temperature of parts of the front top and rear panels has risen these temperature rises do not cause any problems in terms of performance or quality The TV panel moves slightly when it is pushed with a finger Clattered sound might be hea...

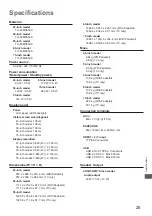
Page 25: ...nection terminals Speaker Output 43 50 55 65 75 inch model Audio output 20 W 10 W 10 W 50 inch model 9 3 kg With Pedestal 9 0 kg TV only 43 inch model 6 8kg With Pedestal 6 6 kg TV only 55 inch model 10 8 kg With Pedestal 10 5 kg TV only 65 inch model 17 2 kg With Pedestal 16 8 kg TV only 75 inch model 24 0 kg With Pedestal 23 1 kg TV only 1111 2 x 702 3 x 247 9 mm With Pedestal 1111 2 x 644 3 x 8...

Page 26: ... Disc Players and Special VCR s or DVD 26 Built in wireless LAN Standard compliance and Frequency range IEEE 802 11 a b g n ac 2 4 2 5GHz and 5 15 5 825GHz Security Support for WPA WPA2 Bluetooth V5 0 Built in Bluetooth 2 4 2 485GHz Digital TV DVB T T2 Standard Aerial input VHF UHF Operating conditions Temperature 0 C 45 C Humidity 20 80 RH non condensing Note Design and Specifications are subject...

Page 27: ... the hope that it will be useful but WITHOUT ANY WARRANTY without even the implied warranty of MERCHANTABILITY or FITNESS FOR A PARTICULAR PURPOSE Please refer to the detailed terms and conditions thereof Settings System Device Preferences Settings OSS License At least three 3 years from delivery of this product Panasonic will give to any third party who contacts us at the contact information prov...

Page 28: ...of theft or loss and for Warranty Service purposes Model Number Serial Number Web Site http www panasonic com Panasonic Entertainment Communication Co Ltd 2023 Panasonic Entertainment Communication Co Ltd English 72 MX650K X51Z1 Printed in China Information on Disposal in other Countries outside the European Union This symbol is only valid in the European Union If you wish to discard this product ...

Reviews: