background image

FAQs, etc.

Frequently Asked 

Questions

Technical Information

40

41

Technical Information

Input signal that can be displayed

Note

• 

Signals other than above may not be displayed properly.

• 

The above signals are reformatted for optimal viewing on your display.

• 

Applicable input signal for PC is basically compatible to VESA standard timing.

• 

PC signal is magni

fi

 ed or compressed for display, so that it may not be possible to show 

fi

 ne detail with suf

fi

 cient 

clarity.

Signal name

COMPONENT

HDMI

525 (480) / 60i

525 (480) / 60p

625 (576) / 50i

625 (576) / 50p

750 (720) / 60p

750 (720) / 50p

1,125 (1,080) / 60i

1,125 (1,080) / 50i

1,125 (1,080) / 60p

1,125 (1,080) / 50p

Signal name

Horizontal frequency (kHz)

Vertical frequency (Hz)

640 × 400 @70 Hz

31.47

70.07

640 × 480 @60 Hz

31.47

59.94

640 × 480 @75 Hz

37.50

75.00

800 × 600 @60 Hz

37.88

60.32

800 × 600 @75 Hz

46.88

75.00

800 × 600 @85 Hz

53.67

85.06

852 × 480 @60 Hz

31.44

59.89

1,024 × 768 @60 Hz

48.36

60.00

1,024 × 768 @70 Hz

56.48

70.07

1,024 × 768 @75 Hz

60.02

75.03

1,024 × 768 @85 Hz

68.68

85.00

1,280 × 1,024 @60 Hz

63.98

60.02

1,366 × 768 @60 Hz

48.39

60.04

Macintosh13” (640 × 480)

35.00

66.67

Macintosh16” (832 × 624)

49.73

74.55

Macintosh21” (1,152 × 870)

68.68

75.06

 Mark: Applicable input signal

COMPONENT

 (Y, P

B

, P

R

), 

HDMI

PC 

(D-sub 15P)

Pin No.

Signal Name

Pin No.

Signal Name

Pin No.

Signal Name

R

GND (Ground)

NC (not connected)

G

GND (Ground)

NC (not connected)

B

GND (Ground)

HD

NC (not connected)

NC (not connected)

VD

GND (Ground)

GND (Ground)

NC (not connected)

1

6

7

8

3

9

4

5

10

15 14 13 12 11

2

PC connection

A PC may be connected to this TV so that the PC screen is displayed and sound is heard from the TV.

• 

PC signals that can be inputted: Horizontal scanning frequency 31 to 69 kHz; vertical scanning frequency 

59 to 86 Hz (more than 1,024 signal lines could result in incorrect display of the image).

• 

A PC adapter is not necessary for the DOS/V-compliant D-sub 15-pin connector.

Note

• 

Some PC models cannot be connected to this TV.

• 

When using PC, set the colour display quality of PC to the highest position.

• 

For details of the applicable PC signals, see below.

• 

Max. display resolution

• 

D-sub 15-pin connector signal

Aspect

4:3

1,440 × 1,080 pixels

16:9

1,920 × 1,080 pixels

FAQs

Before requesting service or assistance, please follow these simple guides to resolve the problem.

If problem still persists, please contact your local Panasonic dealer for assistance.

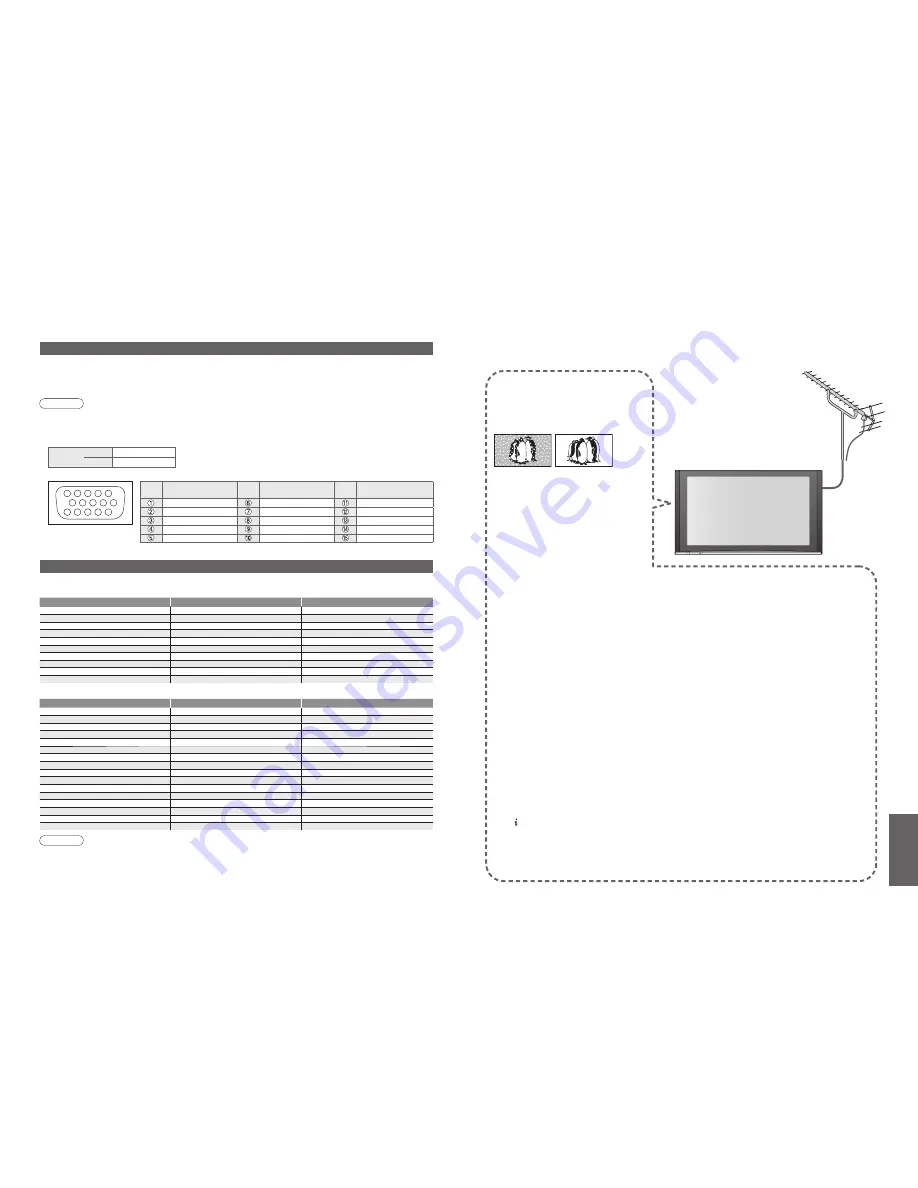
White spots or shadow 

images (noise)


 Check the position, direction, and 

connection of the aerial.

Neither image nor 

sound is produced

• 

Is the TV in “AV mode”?

• 

Is the mains lead plugged into the socket 

outlet?

• 

Is the TV turned On?

• 

Check Picture Menu (p. 22) and volume.

• 

Check all required SCART cables and 

connections are 

fi

 rmly in place.

Auto aspect

• 

Auto aspect is designed to provide you 

with the best aspect ratio to use to 

fi

 ll your 

screen. For user control please see p. 38.

S-Video / black and 

white picture

• 

Using AV button please con

fi

 rm your 

selection is S-Video I.e. AV2/AV2S 

(p. 16).

On Screen messages 

- I.e. EC/AV1

• 

You can simply clear these by pressing 

the   button.

Press again to redisplay.

Direct TV record / Q-Link 

functions not recording

• 

Please con

fi

 rm SCART cable and connection. Also 

please set “AV1 / AV2 out” in the Setup Menu (p. 23).

Permanently lit spots on screen

• 

Due to production process involved in this technology 

this may result in some pixels which are permanently lit 

or unlit. This is not a malfunction.

Contrast is reduced

• 

Contrast is lowered when the following conditions without 

any user operation for a few minutes:

 no signal in AV mode

 selected locked channel

 selected invalid channel

 displayed menu

 Thumbnail or still picture in SD Card mode

Summary of Contents for TH-42PY70P

Page 1: ... electrical and electronic equipment please contact your dealer or supplier for further information Information on Disposal in other Countries outside the European Union This symbol is only valid in the European Union If you wish to discard this product please contact your local authorities or dealer and ask for the correct method of disposal Printed in Czech Republic Matsushita Electric Industria...

Page 2: ...u Functions 20 picture sound quality etc Editing and Setting Channels 24 Control Channel Audience 26 Restore Settings 27 Input Labels 28 Displaying PC Screen on TV 29 Viewing from SD Card Photos 30 Q Link Functions 32 HDMI Functions 33 HDMI terminal VIERA Link External Equipment 36 Basic Features Watching TV 14 Watching Videos and DVDs 16 Viewing Teletext 18 Enjoy your TV Technical Information 38 ...

Page 3: ...till consume some power even in the Off mode as long as the mains plug is still connected to a live socket outlet Do not allow children to handle SD card As with a small object SD card can be swallowed by young children Please remove SD card immediately after use Do not place the TV on sloped or unstable surfaces The TV may fall off or tip over Use only the dedicated stands mounting equipment Usin...

Page 4: ...s may cause product damage Optional accessories Wall hanging bracket vertical TY WK42PV3W angle TY WK42PR2W TY WK42PR3W Rear of the TV Installation of the pedestal Accessories Options Securing the TV Label View from the bottom Arrow mark Hole for pedestal installation Assembling the pedestal Caution Do not use any other TV and displays Otherwise the TV may fall over and become damaged and personal...

Page 5: ...V and attach the clamps to the TV using the removed screws Band 2 Screw 2 Nominal diameter 4 mm 12 Wood screw 2 Clamp 2 Installation of the pedestal Securing to a base Fix pedestal and base together with band Securing to a wall Fix to wall or post with strong commercial wire or chain Remove Attach Attaching the bands for fixing cables To tighten To loosen Preventing the TV from falling over The TV...

Page 6: ...rom the mains socket before attaching or disconnecting any leads When disconnecting the mains lead be absolutely sure to disconnect the mains plug at the socket outlet first Example 1 Connecting aerial Example 2 Connecting DVD Recorder VCR Example 3 Connecting DVD Recorder VCR and Set top box Mains lead supplied Mains lead supplied SCART cable fully wired DVD Recorder or VCR RF cable Aerial Aerial...

Page 7: ...w use the remote control to turn On the TV or turn the TV to standby mode Power LED On 3 To edit channels Editing and Setting Channels p 24 ON SCREEN HELP Instructions box Open the main menu Return to the previous menu Move the cursor select the menu Move the cursor adjust levels select from a range of options Access the menu store settings after adjustments have been made or options have been set...

Page 8: ...ECT Press repeatedly until you reach the desired mode Display Aspect Selection list ASPECT During the list is displayed select the mode Store Display the current programme status OPTION Check or change the current programme status instantly To change Teletext Language Selects teletext language MPX Sound Menu p 22 Volume Correction Adjusts volume of individual channel or input mode Note Also possib...

Page 9: ... Rewind Skip Search VCR Rewind view the picture rapidly in reverse DVD Skip to the previous track or title Press and hold to search backward Fast forward Skip Search VCR Fast forward view the picture rapidly forward DVD Skip to the next track or title Press and hold to search forward Pause Pause Restart DVD Press and hold to play at slow speed Programme Up Down Select programme Record Start record...

Page 10: ...ting To resume HOLD Store frequently viewed pages Store frequently viewed pages in the colour bar List mode only press and hold As page is displayed The number changes to white Corresponding colour button To change stored pages press and hold Enter new page number Colour button you want to change View sub page Sub pages The number of sub pages varies depending on the broadcasters up to 79 pages It...

Page 11: ...r access Required by some functions 1 Displays the next screen Go to the next screen To change menu pages up down select Overview VIERA Link Control Speaker Selection VIERA Link Menu Home Cinema Recorder p 35 Main Menu VIERA Link Picture Sound Setup The menu of the accessed equipment Picture Menu 1 2 Contrast Brightness Colour Sharpness Tint Colour Balance Warm Colour Management Off P NR Off Viewi...

Page 12: ...e to the default settings Menu Item Adjustments Configurations alternatives Setup AV Colour System Selects optional colour system based on video signals in AV mode Auto PAL SECAM M NTSC NTSC Q Link Settings Q Link Selects which AV terminal is to be used for data communication between this TV and a compatible recording equipment AV1 AV2 p 32 AV1 AV2 out Chooses the signal to be transmitted from the...

Page 13: ...ble select programme position 0 store search Search and store Select the channel Select the programme position Edit channels 3 FTP CH05 SC1 PAL Corontation Street Programme Edit 1 CH33 2 CH21 3 CH21 4 CH60 5 CH21 Prog Chan Name 1 2 3 X Y Z F T P 4 5 6 SC1 Auto SC1 Auto SC1 Auto SC1 Auto SC1 Auto Sound Sys Colour Sys To change sound system based on signals Select the Sound Sys field Select sound sy...

Page 14: ...ol channel audience Child Lock Child Lock Service List Change PIN Access Wed 12 05 04 10 46 Child Lock Service List BBC 1 THREE 7 E4 14 CBBC 70 Nwk 72 BBCi 80 Radio 85 Cymru 90 Service Name Lock To change the PIN number Select Change PIN in and enter a new PIN number twice select Appears when the channel is locked Enter the PIN number 4 digits Select Service List To cancel Select the locked channe...

Page 15: ... INPUT EXIT TV RETURN Input Labels AV1 DVD AV2 AV2S AV2 AV2S COMPONENT COMPONENT AV3 AV3S AV3 AV3S PC PC HDMI1 HDMI1 HDMI2 HDMI2 28 29 Displaying PC Screen on TV Input Labels To return to TV Displaying PC Screen on TV Select the external input Select PC 2 The screen of the PC connected to the TV can be displayed on the TV You can also listen to PC sound with the audio cable connected To connect PC...

Page 16: ...card to a high pressure or impact Insert the card in the correct direction otherwise card may be damaged Electrical interference static electricity or erroneous operation may damage the data or card Back up the recorded data at regular intervals in case of deteriorated or damaged data or erratic operation of the TV Panasonic is not liable for any deterioration or damage of recorded data Selected p...

Page 17: ...asy Link a trademark of Philips Corporation SMARTLINK a trademark of Sony Corporation Read the manuals of the equipment too Download channel settings Perform Auto Setup p 24 When first using this TV see Auto Setup p 12 Perform download to the equipment p 23 1 The HDMI logo is displayed on HDMI compliant equipment 2 Enquire at your local digital equipment retailer shop HDMI high definition multimed...

Page 18: ...his function will work even if the TV enters standby mode automatically by Off Timer function or auto power standby function select set Preparations Setup the equipment to enable this function Read the manuals of the equipment About connections see External Equipment p 37 Read the manuals of the equipment too For the first time When adding new equipment reconnecting equipment or changing setup Aft...

Page 19: ...xternal Equipment VIDEO or S VIDEO AUDIO Headphones Camcorder Game equipment To adjust volume Headphone Volume in the Sound Menu p 22 M3 stereo mini plug Computer Amplifier with speaker system PC Viewing Listening To listen with speakers Conversion adapter if necessary Set top box DVD Recorder VCR SCART cable RF cable SCART cable To watch satellite broadcasts To record playback To watch DVDs DVD p...

Page 20: ...ck starts Image or sound may not be available for the first few seconds when Input mode is switched Volume function will be displayed when adjusting the volume of the equipment Easy playback is also available by using the remote control for Amplifier or Player theatre Read the manuals of the equipment If you connect the same kind of equipment at once for example one DIGA to HDMI1 another DIGA to H...

Page 21: ...6 Hz more than 1 024 signal lines could result in incorrect display of the image A PC adapter is not necessary for the DOS V compliant D sub 15 pin connector Note Some PC models cannot be connected to this TV When using PC set the colour display quality of PC to the highest position For details of the applicable PC signals see below Max display resolution D sub 15 pin connector signal Aspect 4 3 1...

Page 22: ...134 mm 641 mm 116 mm TV only 1 323 mm 802 mm 369 mm With Pedestal 1 323 mm 754 mm 99 5 mm TV only Mass 42 0 k Net With Pedestal 35 0 k Net TV only 50 5 k Net With Pedestal 43 0 k Net TV only 42 43 Problem Actions Screen Sound HDMI Other Whirling sound is heard The sound is from built in cooling fan not a sign of faulty operation An error message appears Follow the message s instructions If the pro...

Reviews: