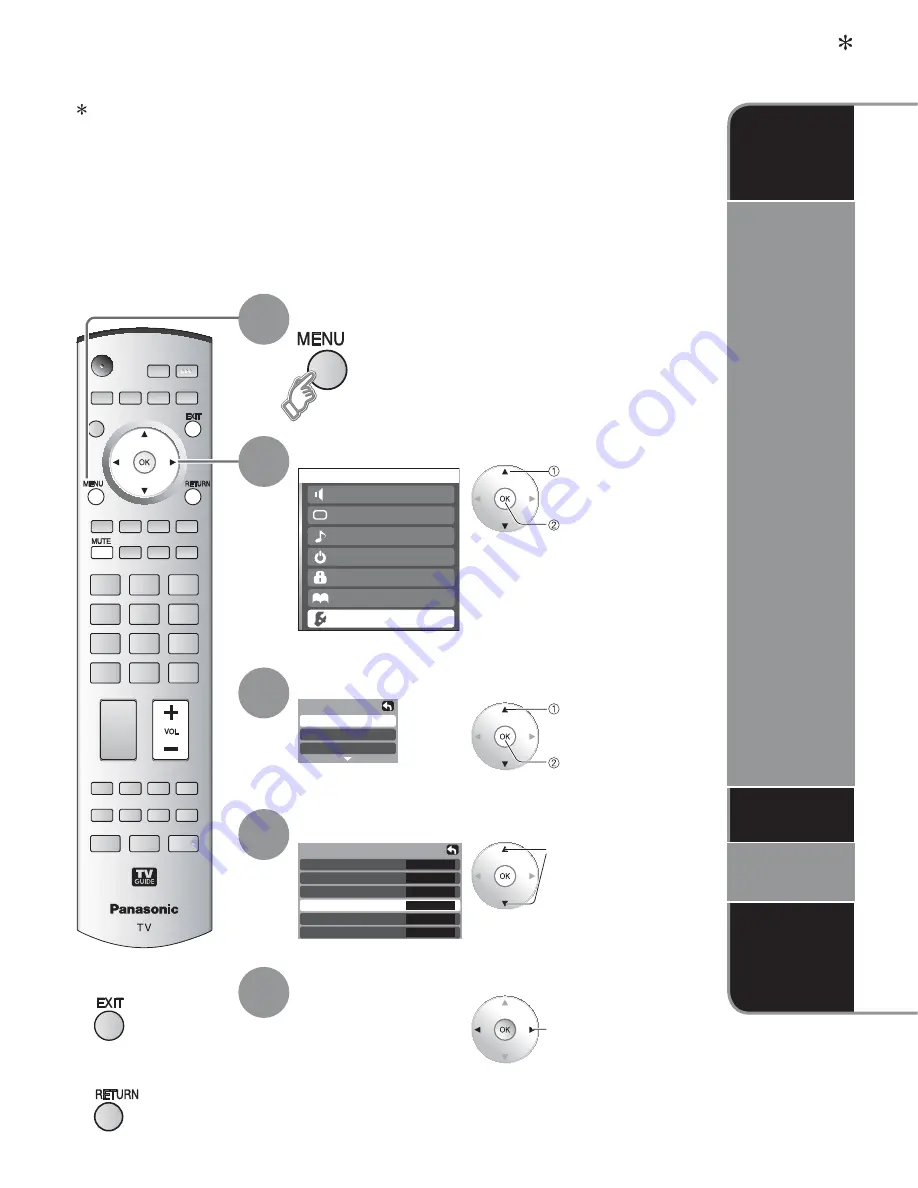
Panasonic TH-42PX600U Operating Instructions Manual Download Page 101

34

-

Ajuste

Otros ajustes

Acerca de

Restaurar

Otros ajustes 

Autoencendido 
 Barra Iateral 

No

No

Para prog-out 

No

Fijar

Fijar

Ctrl con HDMI 

Apaga control 

Prende control 

Menú

Altavoces ext.

Imagen

Audio

Bloqueo

Ajuste

Cronόmetro

TVG/Foto

 Seleccione

 Siguiente

Control con HDMI “HDAVI Control

TM

  Control simultáneo de todos los componentes de Panasonic equipados con “HDAVI 

Control” utilizando un botón de un mando a distancia.

Los productos de audio-vídeo de Panasonic más recientes equipados con conexiones de 
salida HDMI pueden ser controlados utilizando el mando a distancia del televisor. Se encuentra 
disponible un número limitado de características tales como el control del volúmen del sistema 
de cine para casa y el cambio automático a la entrada HDMI del televisor.

Esta función se limita a los modelos que incorporan “Control con HDMI” de Panasonic. Consulte los 
manuales de instrucciones individuales para obtener información relacionada con la compatibilidad.

No se pueden utilizar cables que no cumplan con HDMI.

Se recomienda utilizar un cable HDMI de Panasonic.
Número de pieza recomendada: RP-CDHG15 (1,5 m), RP-CDHG30 (3,0 m), RP-CDHG50 (5,0 m)

Ŷ

Para volver al 
televisor

Ŷ

Para volver a la 
pantalla anterior

Seleccione “Ajuste”.

Seleccione “Otros ajustes”.

3

Seleccione “Ctrl con HDMI”.

4

Seleccione

 Seleccione

 Siguiente

Visualice el menú.

Seleccione “Sí”.

5

Cambie

1

2

 La opción predeterminada es “Sí”. Si no se ha 

conectado un equipo HDMI o si se utiliza un equipo 
HDMI estándar (sin “control con HDMI”), seleccione 
“No”.

Cambio
de entrada 
automático

Altavoces
de cine 
para casa

Prende
control

Apaga
control

Reproducción
de cine para 
casa con un 
toque

Summary of Contents for TH-42PX600U

Page 1: ...u televisor y guárdelas para consultarlas en el futuro Las imágenes mostradas en este manual tienen solamente fines ilustrativos TQB2AA0665 For assistance please call 1 888 VIEW PTV 843 9788 or contact us at www panasonic com contactinfo U S A For assistance please call 787 750 4300 or visit us at www panasonic com Puerto Rico For assistance please call 1 800 561 5505 or visit us at www panasonic ...

Page 2: ... Guide is a registered mark of Transcontinental Inc and is used under license by Gemstar TV Guide International Inc The TV Guide On ScreenTM system is manufactured under license from Gemstar TV Guide International Inc and or one of its affiliates The TV Guide On ScreenTM system is protected by one or more of the following United States patents 4 908 713 6 498 895 6 850 693 6 396 546 5 940 073 6 23...

Page 3: ...Videos and DVDs 29 Displaying PC Screen on TV 30 How to Use Menu Functions picture sound quality etc 32 Control with HDMI HDAVI ControlTM 34 Channel Lock 38 Editing and Setting Channels 40 Input Labels Closed Caption 42 Using Timer 44 Operating Peripheral Equipment 45 Recommended AV Connections 46 Remote Control Operation Code List 48 Ratings List for Channel Lock 51 Technical Information 52 Maint...

Page 4: ... intended to tell the user that important operating and servicing instructions are in the papers with the appliance WARNING To reduce the risk of fire or electric shock do not expose this apparatus to rain or moisture Do not place liquid containers flower vase cups cosmetics etc above the set including on shelves above etc Important Safety Instructions This equipment has been tested and found to c...

Page 5: ...Do not make any modifications to place heavy objects on place near hot objects heat bend twist or forcefully pull the power cable Doing so may cause damage to the power cable which can cause fire or electric shock If damage to the cable is suspected have it repaired at an Authorized Service Center ŶIf problems occur during use If a problem occurs such as no picture or no sound or if smoke or an ab...

Page 6: ...ransmitter EUR7737Z10 ƑCable clamper 2 ƑPedestal ƑAntenna Adapter F Type for 5C 2V ƑIR Blaster ƑOperating Instructions ƑProduct Registration Card U S A ƑCustomer Care Plan Card U S A Accessories Wall hanging bracket angle TY WK42PR3U TH 42PX600U TH 50PX600U Plasma TV stand TY S42PX600W TH 42PX600U TY S50PX600W TH 50PX600U TY S58PX600W TH 58PX600U Check you have all the items shown TBL2AX00061 TH 5...

Page 7: ...nstalled the plasma television may fall over and personal injury may result Two or more people are required to install and remove the television If two people are not present the television may be dropped and personal injury may result 1 Assembling the pedestal Warning Do not disassemble or modify the pedestal Otherwise the unit may fall over and become damaged and personal injury may result A Ass...

Page 8: ... wall or a pillar The plasma TV must be fastened to both the base and the wall Fasten with wood screws in the holes in the back edge of the wood worktop If there are no holes first drill them in the middle of the thickness of the wood worktop and then fasten the strap with wood screws Screws on main body Remove the screws at both top corners on the rear side of the plasma TV and attach the clamps ...

Page 9: ...river to remove the caps at the left and right top on the rear side of the plasma TV and attach the hooks 4 to the plasma TV using the hook securing screws 5 Keep the caps you have removed in a safe place Hook securing screw 5 Securing method ŶSecuring to a base ŶSecuring to a wall For 58 Plasma television M8 x 35 Screw Band Wood screw Hook Hook Use a strong wire or chain which is commercially ava...

Page 10: ...hen S Video cable is connected Connect either S Video cable or Video cable When receiving digital channel signals all digital formats are down converted to composite NTSC video to be output through the PROG OUT terminals Some programs contain a copyright protection signal to prevent VCR recording When the copyright protection program is displayed do not connect the other TV monitor through a VCR V...

Page 11: ...nit Push both side hooks and pull out Cable Binding Instructions ŶAttaching the Cable clampers Pull up while drawing the knob CableCARDTM Connection CableCARDTM allows you to tune digital and high definition cable channels through the cable antenna Consult your cable company on the availability of CableCARDTM 1 Connect the cable antenna to ANT connector 2 Turn the TV on see page 17 3 Set the input...

Page 12: ...p Timer p 18 SPLIT Split Screen p 18 SWAP Swap pictures in SPLIT operation p 18 Power indicator on red off no light Viewing from SD Card p 26 SAP p 19 Exit menus Select OK Change RETURN to previous menu Page scroll on TV Guide Display or remove the channel banner p 18 Operate the Favorite channel list function p 19 Numeric keypad to select any channel p 17 or press to enter alphanumeric input in m...

Page 13: ...lable only when Auto power on p 32 is set to Off Turn the TV On with the POWER button 1 Select your language 2 Adjust the clock 3 Date Adjust the date Press and hold to change the month Time Adjust the time If the button is held the speed of change increases Press to go to previous screen Or select icon then press OK for same results ŶPress to exit Note To change setting Language Clock Auto progra...

Page 14: ...g Auto channel setup 4 Start scanning the channels Select Auto program Select antenna and input modes Confirm registered channels Available channels analog digital are automatically set If OK is not pressed after selecting Apply the channels will not be memorized Note Auto program is not available while the CableCARD is inserted About broadcasting systems Analog traditional TV system Digital new s...

Page 15: ...ource s for which you would like to receive show listings Note If you do not have cable you must select Antenna in order to receive a channel lineup and listings For each service you chose in Step 2 you are asked to select the corresponding input Additional setup screens appear based on the types of service s you selected After you have configured all services you selected in Step 2 you are asked ...

Page 16: ...p VCR control Additional screens ask you to Confirm remote control options Confirm the external connections Select the VCR brand Test and confirm the remote code If you do not want the Guide to control recording to your VCR answer No end setup and go to Step 6 Configure Your VCR 5 The Helpful Information screen is displayed when you successfully complete Guide setup Complete Setup 6 The setup prog...

Page 17: ...ss the button to enter the minor number in a compound channel number To not display TV Guide when turning power On TV Guide open up select Select SETUP Select Change default options and press OK button Select General defaults and press OK button 5 Select auto guide and set off 6 Select done and press OK button Close TV Guide Note Reselect Cable or Antenna in ANT In of Auto program to switch the si...

Page 18: ... JUST 4 3 or ZOOM Change the aspect p 52 Switches the unit OFF in a preset amount of time from 0 to 90 minutes in 30 minute intervals Display or remove the channel banner Channel Ending time Show title Station identifier SAP Aspect ratio Sleep timer remaining time Clock Sleep Timer Information Recall Change aspect ratio Watch in multi window Audio is from Main picture only Split Screen Left window...

Page 19: ...RITE Channel numbers registered in Favorite are displayed on the favorite tune screen Select the desired broadcast station with the cursor or using number keys see below ŶSelect Audio Mode for TV Viewing Digital mode Press SAP to select the next audio track if available when receiving a digital channel Audio track 1 of 1 English Analog mode Press SAP to select the desired audio mode Press the SAP ...

Page 20: ... using TVG Photo ŶTo display program information or HELP ŶTo scroll pages on TV Guide ŶTo exit TV Guide SEARCH SCHEDULE SETUP Clock Service Bar Provides access to the main Guide Services Current Service Label Indented to identify the current Service screen Info Box Provides information for a highlighted item Ad Menu Location where show or product specific information appears Location where on scre...

Page 21: ...nges channels as you navigate the grid channel ID Both both channel logo and number are displayed in the grid Logo only channel logo is displayed in the grid Number only channel number is displayed in the grid edit channels Change the broadcast service that the Guide uses for any channel Edit the channels that appear in the Guide reorder their position in the grid change their tune channel and if ...

Page 22: ...ws the Setup Progress screen Using TV Guide Continued ŶTo check change delete reserved contents SCHEDULE p 24 select select set enter Select the show and display the panel menu Select set recording or set reminder Select the item and set Reserve a show Recording Reminder Note When reserving shows you must make the proper settings on the external recording equipment connected to the unit Also read ...

Page 23: ...e for category and press OK button Select new search and press OK button Make the selections for your search and press OK button type title actor director description all category movies sports series children HDTV all etc sub category action comedy horror all etc Select enter keyword and press OK button 5 Input the keyword 6 Select DONE and press OK button The show list appears To display the des...

Page 24: ...n edit manual recording Changes settings of the recording reservation delete manual reminder Deletes the viewing reservation edit manual reminder Changes settings of the viewing reservation ok select Select HISTORY record results ok select From TO DO press MENU The Schedule Options menu appears You can set sort by new manual recording new manual reminder Current previous record results are listed ...

Page 25: ...d overlaps with a reminder previously set to auto tune Remind and auto tune overlaps another auto tune reminder Remind and auto tune overlaps with a scheduled recording To resolve the conflict you must select one of these options which vary according to the type of conflict Record anyway records the specified show and suspends the existing show recording or auto tune reminder Don t record this sho...

Page 26: ...mode or Select Memory card using TVG Photo select view Thumbnail view Navigation Area Selected picture information is displayed No Image number or file name is displayed Date Date of recording is displayed Pixel Display resolution is displayed Insert the SD Card For cautions and details on SD Cards p 28 and 53 Displayed in slide show Navigation Area ŶPress to return to TV ŶPress to exit ŶPress to ...

Page 27: ... 2 GB Mini SD Card 1 GB requiring mini SD Card adapter To change the view single play mode adjusting images etc ŶTo watch photos in single play mode In ok Insert the card When MENU is pressed the Picture Adjust menu is displayed Mode Set to Single Slide to view single images or perform a slide show Disp time You can set how many seconds each image is displayed in Slide mode Repeat Turn the slide s...

Page 28: ...e back of the card Do not subject the card to a high pressure or impact Insert the card in the correct direction otherwise card may be damaged Electrical interference static electricity or erroneous operation may damage the data or card Back up the recorded data at regular intervals in case of deteriorated or damaged data or erratic operation of the unit Panasonic is not liable for any deteriorati...

Page 29: ... 45 3 With VCR or DVD turned On Switch to external input Press to display the Input select menu 1 2 Select the input mode or select enter example Operate the VCR or DVD with the remote control Note For details see the manual of the equipment or ask your local dealer The terminal and label of the connected device is indicated To change the input label p 42 For other operations see p 48 ŶPress to re...

Page 30: ... on TV The screen of the PC connected to the unit can be displayed on the TV You can also listen to PC sound with the audio cable connected To connect PC p 46 Displays PC screen Select the external input 1 2 Select PC Corresponding signals p 29 ...

Page 31: ... Adjust the horizontal position V position Adjust the vertical position Clock phase Alleviates the problem if the whole picture appears to flicker or is blurred First adjust the Dot Clock to get the best possible picture then adjust the Clock Phase so that a clear picture appears It may not be possible to display a clear picture due to poor input signals Input resolution Switches to wide display I...

Page 32: ...nk Power on link About Reset Menu Picture Audio Lock Setup Memory card Timer TVG Photo No Standard 30 0 0 0 10 Picture 1 2 Normal Pic mode Picture Brightness Color Tint Sharpness No Standard 30 0 0 0 10 Picture 1 2 Normal Pic mode Picture Brightness Color Tint Sharpness ŶPress to return to TV ŶPress to return to the previous screen How to Use Menu Functions Select the menu Select the item 3 2 Adju...

Page 33: ...ch intelligibility and musical realism On Off BBE On Enhances audio response when listening to stereo On Off Off Surround Switch to Off when using external speakers On Off AI sound Surround and Audio leveler do not work if Off is selected On Speakers Selects according to the signal when HDMI is connected Auto Digital Analog Auto Automatically selects Analog Digital signal Auto HDMI1 in Auto HDMI2 ...

Page 34: ... the TV s HDMI input are available This feature is limited to models incorporating Panasonic s Control with HDMI Refer to the individual instruction manuals for compatibility information Non HDMI compliant cables cannot be utilized It is recommended that you use Panasonic s HDMI cable Recommended part number RP CDHG15 1 5 m RP CDHG30 3 0 m RP CDHG50 5 0 m ŶPress to return to TV ŶPress to return to...

Page 35: ...remote volume button The TV will display Home Theater on screen If home theater RAM theater Player theater is currently off selecting the Home theater option will automatically turn the equipment on See Power on link below If home theater Player theater RAM theater power is turned Off speakers automatically switch to the TV Volume up down Mute ŶTV speakers The TV speakers are active change Caution...

Page 36: ... or ŶConnecting this unit to a DVD recorder RAM theater or Player theater Follow the connection diagrams below for HDMI control of a single AV piece of equipment such as a Panasonic DIGA DVD recorder RAM Theater or Player Theater system Refer to page 34 for Setup Menu settings and additional control information Optional HDMI and or optical cables are not provided If connection or setting of equipm...

Page 37: ...er can be operated with this unit Be sure to connect the AV amp between this unit and the DIGA recorder Individual HDMI equipment may require additional menu settings specific to each model Please refer to their respective operating instruction manuals When audio from other equipment connected to this unit via HDMI is output using DIGITAL AUDIO OUT of this unit the system switches to 2CH audio Whe...

Page 38: ...is the first time to enter the password enter the number twice in order to register it Note When you select a locked channel a message will be displayed that allows you to view the channel if you input your password ŶTo change the password In select Change password and press OK button Input the new 4 digit password twice ŶTo cancel the Channel lock Select Off in Off Channel lock not activated All ...

Page 39: ... Canadian English ratings C F L R Canadian French ratings To get other information p 51 Caution The V Chip system that is used in this set is capable of blocking NR programs non rated not applicable and none as per FCC Rules Section15 120 e 2 If the option of blocking NR programs is chosen unexpected and possibly confusing results may occur and you may not receive emergency bulletins or any of the...

Page 40: ... The current channel settings can be changed according to your needs and reception conditions ŶTo reset the settings of Setup menu Select Reset in Setup menu and press OK button Input your 4 digit password with number buttons Select Yes on the confirmation screen and press OK button Set 5 Select Program channel Select the function Check signal strength Signal meter Set automatically Auto Set manua...

Page 41: ...dd next Edit Caption Changes the station identifier Favorite Registers channel to Favorites List Add Adds or deletes channels start select Select Cable or Antenna select next Caption Favorite Add Caption Preset Caption detail Rename maximum 7 characters available Select the number Favorite Favorite Add Press OK button to select Yes add or No delete Select Apply Press to move cursor to Apply Signal...

Page 42: ... Setup CH scan Language Clock Program channel Input labels CC Input Labels Closed Caption Select Setup 2 next select Display menu 1 3 4 ŶPress to exit Set Select Input labels or CC Display labels of external devices Input labels Display Closed Caption CC next select ...

Page 43: ...es a built in decoder that is capable of providing a text display of the audio The program being viewed must be transmitting Closed Captioning CC information p 52 ŶSelect the item and set Size Text size Font Text font Style Text style Raised Depressed etc Foreground Color of text Fore opacity Opacity of text Background Color of text box Back opacity Opacity of text box Outline Outline color of tex...

Page 44: ...ers can be set Timer 1 Timer 5 select set Select the channel CH Select the day Day The time to turn On On time The time to turn Off Off time Timer setting On Off Set ŶTo set Sleep Off Timer Press to set unit to shut itself off after a preselected amount of time ŶPress to exit ŶPress to return to the previous screen Note The TV automatically turns Off after 90 minutes when turned On by the Timer Th...

Page 45: ...devices to the TV and turn Off the external equipment Input the equipment s 4 digit remote control code p 49 50 Confirm the equipment with the remote control The external equipment turns On ŶIf the equipment does not operate with remote control When your equipment has a single code Input the remote control code again When your equipment has multiple codes Change the code with above and test again ...

Page 46: ...nit Digital audio amplifier Theater system IR Blaster Supplied VCR Only VCR G LINK CableCARD Insert a card to watch cable channels serving digital high definition video Consult the cable company for information IR Blaster p 56 You can operate the VCR from the TV remote control or reserve recording with TV Guide Install the light emitting area of the IR Blaster near the signal receiving area for th...

Page 47: ...her adjust of Setup menu to No P 34 to avoid failure for your recording HDMI cable HDMI DVI conversion cable Audio cable or ŶRecommended HDMI Connections p 36 37 F Type Antenna Adapter Note The picture and audio input signals connected to a terminal specified in Prog out stop p 32 cannot be output from OUTPUT terminals However audio output can be obtained from the optical Digital Audio Out termina...

Page 48: ... TV Volume Up Down Sleep Sleep TV VCR Switch TV DBS Switch TV CBL Switch VCR Record PVR Record 1 PVR Record 1 Record Search 1 Search 1 Open Close Skip Reverse Forward Reverse Forward Rewind Fast Forward Stop Stop Pause Pause Play Play 1 Combination type Remote Control Operation Code List Note Operation may not be possible depending on the available memory size of the remote control This remote con...

Page 49: ...0037 0043 1278 1479 Fuji 0033 0035 Funai 0000 Garrard 0000 Gateway 1972 GE 0035 0060 0807 1035 1060 GoldStar 0037 1237 Gradiente 0000 Harley Davidson 0000 Hewlett Packard 1972 Hitachi 0000 0042 0089 Howard Computers 1972 HP 1972 Hughes Network Systems 0042 0739 Humax 0739 Hush 1972 iBUYPOWER 1972 JVC 0067 KEC 0037 Kenwood 0067 Kodak 0035 0037 Linksys 1972 Lloyd s 0000 LXI 0037 Magnasonic 1278 Magn...

Page 50: ... CyberHome 0816 1023 1024 1129 Daewoo 0833 0869 Denon 0490 Disney 0675 DVD2000 0521 Emerson 0591 0675 Enterprise 0591 Funai 0675 Gateway 1158 GE 0522 Go Video 0741 0833 0869 1075 1158 1304 1730 GoldStar 0741 Gradiente 0490 Grundig 0539 Hitachi 0573 0664 Hiteker 0672 Integra 0571 JVC 0558 0623 0867 1164 1275 Kenwood 0490 0534 Lecson 1533 LG 0591 0741 0801 0869 LiteOn 1158 1440 Loewe 0511 Magnavox 0...

Page 51: ...des news sports documentaries and other information programming talk shows music videos and variety programming C Programming intended for children under age 8 No offensive language nudity or sexual content C8 Programming generally considered acceptable for children 8 years and over No profanity nudity or sexual content G General programming suitable for all audiences PG Parental Guidance suggeste...

Page 52: ...digital broadcasting set the aspect ratio to FULL If viewing with H FILL JUST ZOOM or 4 3 characters will be cut off The closed caption is not displayed when you use HDMI connection If analog connected equipment is used for displaying or recording closed caption CC should be set On Off on the connected equipment The CC mode setting of the TV will not affect the analog input If a digital program is...

Page 53: ...g on your DVD player and DVD Audio software the copyright protection function may operate and disable optical output External speakers cannot be connected directly to PROG OUT terminals When ATSC channel is selected the output from the DIGITAL AUDIO OUT jack will be Dolby Digital When NTSC channel is selected the output will be PCM 3 digit folder number 5 digit arbitrary characters 4 digit arbitra...

Page 54: ...he aspect ratio to 16 9 This HDMI connector is type A A device having no digital output terminal may be connected to the input terminal of either COMPONENT S VIDEO or VIDEO to receive analog signals The HDMI input terminal can be used with only the following image signals 480i 480p 720p 1080i and 1080p Match the output setting of the digital device For details of the applicable HDMI signals see be...

Page 55: ...ption and press OK Start setup Begins setup process Remind me to set up later Closes screen and displays reminder next time you power On the TV Don t remind me again Closes screen and does not display reminder next time you power On the TV Press to close the screen Split Screen TV screen RF input cannot be displayed in both main and split frame simultaneously Split function is not available when H...

Page 56: ...esolution Signal Names for D sub 15P Connector IR Blaster connection With the IR Blaster connection scheduled recording can be done easily by using the TV Guide feature in this set Connect the IR Blaster if you wish to send remote control signals from the plasma TV to control the recording of a connected video recorder VCR Position the IR Blaster emitter facing the signal sensor of the video recor...

Page 57: ...cabinet and then wipe it dry with a dry cloth Do not allow any detergent to come into direct contact with the surface of the Plasma TV If water droplets get inside the unit operating problems may result Avoid contact with volatile substances such as insect sprays solvents and thinner otherwise the quality of the cabinet surface may be adversely affected or the coating may peel off Furthermore do n...

Page 58: ...7 Use a device compliant with EIA CEA 861 861B White spots or shadow images noise Check the position direction and connection of the aerial Interference or frozen digital channels intermittent sound Change the direction of antenna for digital channels Check Signal meter p 41 If the signal is weak check the antenna and consult your local dealer Before requesting service or assistance please follow ...

Page 59: ...ss any key to return moves on the screen Screen One spot remains dark Chaotic image noisy No image can be displayed Only spots are displayed instead of images Neither image nor sound is produced The function to prevent after image is activated Not a faulty symptom The screen saver is activated if the TV unit is not operated for a certain time in SD mode after image p 5 A pixel or luminescent spot ...

Page 60: ...ow is set in the list p 24 Check the position of IR Blaster p 46 Unable to receive the reserved broadcast Check Schedule if the show is set in the list p 24 Check the installation of IR Blaster p 46 No show list appears in TV Guide Has it been 24 hours since completing the initial setup of TV Guide Some time is required for list downloading After initial setting it takes a week to display the enti...

Page 61: ... R RCA PIN Type 2 0 5 V rms COMPONENT VIDEO INPUT 1 2 Y 1 0 V p p including synchronization PB PR 0 35 V p p AUDIO L R RCA PIN Type 2 0 5 V rms HDMI 1 2 TYPE A Connector AUDIO L R RCA PIN Type 2 0 5 V rms PC D SUB 15PIN R G B 0 7 V p p 75 ȍ HD VD 1 0 5 0 V p p high impedance AUDIO L R Stereo Mini Jack Ɏ3 5 mm 1 IR Blaster G LINK Jack 1 Card slot SD CARD slot 1 CableCARD slot 1 AV PROG OUT VIDEO RC...

Page 62: ...ages which occurred in shipment or failures which are caused by products not supplied by the warrantor or failures which result from accidents misuse abuse neglect bug infestation mishandling misapplication alteration faulty installation set up adjustments misadjustment of consumer controls improper maintenance power line surge lightning damage modification or commercial use such as in a hotel off...

Page 63: ...day 9 am 9 pm Saturday Sunday 10 am 7 pm EST ŶFor hearing or speech impaired TTY users TTY 1 877 833 8855 Purchase Parts Accessories and Instruction Books on line for all Panasonic Products by visiting our Web Site at http www pasc panasonic com or send your request by E mail to npcparts us panasonic com You may also contact us directly at 1 800 332 5368 Phone 1 800 237 9080 Fax Only Monday Friday...

Page 64: ...AL INDIRECT OR CONSEQUENTIAL DAMAGES In certain instances some jurisdictions do not allow the exclusion or limitation of incidental or consequential damages or the exclusion of implied warranties so the above limitations and exclusions may not be applicable In home service requires clear complete and easy access to the product by the Authorized Servicentre and does not include removal or re instal...

Page 65: ...65 FAQs etc Limited Warranty for Canada Note ...

Page 66: ...66 Note ...

Page 67: ...67 Note ...

Page 68: ... QVWUXFFLRQHV HQ VSDxRO 7HOHYLVRU GLJLWDO FRQ SDQWDOOD GH 1 PHUR GH PRGHOR 7 3 8 7 3 8 SODVPD GH DOWD GHILQLFLyQ 7 3 8 ...

Page 69: ...Guide es una marca registrada de Transcontinental Inc y se utiliza bajo licencia de Gemstar TV Guide International Inc El sistema TV Guide On ScreenTM se fabrica bajo licencia de Gemstar TV Guide International Inc y o una de sus compañías afiliadas El sistema de Guía de TV en Pantalla está protegido por una o varias de las siguientes patentes estadounidenses 4 908 713 6 498 895 6 850 693 6 396 546...

Page 70: ...y precauciones 28 Para ver vídeo y DVDs 29 Visualización de la pantalla del PC en el televisor 30 Cómo utilizar las funciones de los menús imagen sonido calidad etc 32 Control con HDMI HDAVI ControlTM 34 Bloqueo de canales 38 Edición y configuración de canales 40 Títulos de entradas Subtítulos 42 Utilización del temporizador 44 Operación del equipo periférico 45 Conexiones AV recomendadas 46 Opera...

Page 71: ... servicio importantes en el material impreso que acompaña al aparato ADVERTENCIA Para reducir el riesgo de que se produzca un incendio ó de sufrir una descarga eléctrica no exponga este aparato a la lluvia ni a la humedad No ponga encima del aparato incluyendo estanterías que se encuentren encima del mismo etc recipientes con agua floreros tazas cosméticos etc Instrucciones de seguridad importante...

Page 72: ...ni coloque objetos pesados encima ni coloque cerca de objetos que desprendan calor no tuerza ni tire excesivamente del mismo Esto puede provocar un fuego ó descarga eléctrica Si el cable eléctrico está dañado solicite la reparación en su tienda local de Panasonic ŶSi se producen problemas durante el uso Si se produce un problema por ejemplo falta la imagen ó sonido ó si sale humo ó hay olores no n...

Page 73: ...de antena Tipo F para 5C 2V ƑIR Blaster ƑManual de instrucciones ƑTarjeta del cliente para EE UU ƑTarjeta para el plan de asistencia al cliente para EE UU Accesorios Abrazadera de suspensión de pared Anglado TY WK42PR3U TH 42PX600U TH 50PX600U Soporte para televisor de pantalla de plasma TY S42PX600W TH 42PX600U TY S50PX600W TH 50PX600U TY S58PX600W TH 58PX600U Compruebe que ha recibido todos los ...

Page 74: ...lasma instalada el televisor con pantalla de plasma puede caerse pudiendo causar daños a las personas Es necesaria la ayuda de dos o más personas para instalar y desmontar el televisor Si no tiene la ayuda de otra persona el televisor puede caerse pudiendo causar daños a las personas 1 Montaje del pedestal Advertencia No desarme ni modifique el pedestal De lo contrario la unidad podría caerse y da...

Page 75: ...lasma deberá apretarse a la base y a la pared Apriete con tornillos para madera en los agujeros del borde trasero de la encimera de madera Si no hay agujeros taládrelos primero en medio de la encimera de madera y luego apriete la correa con los tornillos para madera Tornillos en el cuerpo principal Quite los tornillos de ambas esquinas del lado trasero del televisor con pantalla de plasma y coloqu...

Page 76: ...ituadas en la cara posterior del televisor con pantalla de plasma y coloque los ganchos 4 en el televisor de pantalla de plasma usando los tornillos de fijación de ganchos 5 Guarde las tapas que haya quitado en un lugar seguro Tornillo de fijación de gancho 5 Método de aseguramiento ŶSi se asegura a la base ŶSi se asegura a una pared Para televisor con pantalla de plasma de 58 M8 x 35 Tornillo Ban...

Page 77: ...eciba señales de canales digitales todos los formatos digitales serán convertidos en sentido descendente en vídeo NTSC compuesto que saldrá a través de los terminales de salida de programas Algunos programas contienen una señal de protección de derechos de autor para impedir la grabación con una videograbadora Cuando se visualiza el programa de protección de los derechos de autor no conecte el otr...

Page 78: ... extremos y tire hacia fuera Instrucciones para sujetar los cables ŶColocación de las abrazaderas de cables Presione hacia abajo y tire al mismo tiempo Conexión de CableCARDTM CableCARDTM le permite sintonizar canales de cable digitales y de alta definición mediante la antena de cable Consulte a su concesionario en lo que se refiere a la disponibilidad de CableCARDTM 1 Conecte la antena de televis...

Page 79: ...antalla dividida pág 18 SWAP Cambia imágenes en la pantalla dividida pág 18 Indicador de alimentación conectada rojo desconectada apagado Visión de imágenes de tarjetas SD pág 26 SAP pág 19 Menús de salida Selección OK Cambio RETURN para volver al menú anterior Desplazamiento de páginas en la Guía de TV Visualiza ó elimina la bandera de canal pág 18 Controla la función de la lista de canales favor...

Page 80: ...toencendido pág 32 está en No Encienda el televisor con el interruptor POWER 1 Seleccione su idioma 2 Ajuste el reloj 3 Fecha Ajuste la fecha Cambie el mes con una pulsación larga Hora Ajuste la hora Cambie la hora rápidamente con una pulsación larga Pulse para ir a la pantalla anterior ó seleccionar un icono y luego pulse OK para obtener el mismo resultado ŶPara salir Nota Para cambiar la configu...

Page 81: ...Configuración automática de canales 4 Inicie la exploración de los canales Seleccione Programa auto Seleccione la antena y los modos de entrada Confirme los canales registrados Los canales disponibles analógicos digitales se establecen automáticamente Si no se pulsa OK después de seleccionar Aceptar los canales no se memorizarán Nota Programa auto no se encuentra disponible mientras está insertada...

Page 82: ...que usted quiere recibir listas de programas Nota Si no tiene televisión por cable tendrá que seleccionar Antenna para recibir listas de programas y grupos de canales Para cada servicio que usted elija en el paso 2 se le pedirá seleccionar la entrada correspondiente Aparecerán pantallas de configuración adicionales basadas en los tipos de servicio que usted seleccione Después de configurar todos l...

Page 83: ...rán lo siguiente Confirmar las opciones de control remoto Confirmar las conexiones externas Seleccionar la marca de la videograbadora Probar y confirmar el código remoto Si no quiere que la guía controle la grabación en su videograbadora conteste No end setup No terminar la configuración y vaya al paso 6 Configure su videograbadora 5 La pantalla Helpful Information se visualiza cuando usted ha ter...

Page 84: ...ara introducir el número menor en un número de canal complejo Para no visualizar la guía de TV cuando se conecta la alimentación Abra la guía de TV Seleccionar Seleccione SETUP CONFIGURACIÓN Seleccione Change default options Cambiar opciones predeterminadas y pulse el botón OK Seleccione General defaults Preconfiguraciones generales y pulse el botón OK 5 Seleccione auto guide autoguía y elija off ...

Page 85: ...de tiempo de 0 a 90 minutos que puede ajustarse a intervalos de 30 minutos Visualice ó elimine la bandera de canales Canal Hora de finalización Título del programa Identificador de emisora SAP Relación de aspecto Tiempo restante del temporizador para acostarse Reloj Cronómetro de apagado Recuperación de información Cambio de la relación de aspecto Para ver en múltiples pantallas El sonido correspo...

Page 86: ...de sintonización de favoritos Seleccione la emisora deseada con el cursor ó usando las teclas de números vea debajo ŶSeleccione el modo de audio para ver la televisión Modo digital Pulse SAP para seleccionar la siguiente pista de audio si está disponible cuando se recibe un canal digital Pista de audio 1 de 1 Ingles Modo analógico Pulse SAP para seleccionar el modo de audio como se describe a cont...

Page 87: ...ara visualizar información de programas o ayuda ŶPara desplazar páginas en la guía de TV ŶPara salir de la guía de TV SEARCH BUSCAR SCHEDULE PROGRAMACIÓN SETUP CONFIGURACIÓN Reloj Barra de servicio Proporciona acceso a los servicios de guía principales Etiqueta de servicio actual Indentada para indicar el servicio actual visualizado Cuadro de información Proporciona información para un elemento re...

Page 88: ...ed el vídeo va cambiando de canal según usted va navegando por la cuadrícula channel ID Both el logotipo y el número del canal se visualizan en la cuadrícula Logo sólo el logotipo del canal se visualiza en la cuadrícula Number sólo el número del canal se visualiza en la cuadrícula edit channels Cambia el servicio de emisión que la guía usa para cada canal Edite los canales que aparecen en la guía ...

Page 89: ...talla del progreso de la configuración Utilización de la guía de TV Continuación ŶPara comprobar cambiar eliminar el contenido reservado SCHEDULE pág 24 Seleccione Seleccione Establezca Introducir Seleccione el programa y visualice el menú del panel Seleccione set recording establecer grabación o set reminder establecer recordatorio Seleccione un elemento y establézcalo Reserva de un programa Reco...

Page 90: ...ra la categoría y pulse el botón OK Seleccione new search nueva búsqueda y pulse el botón OK Haga las selecciones para su búsqueda y pulse el botón OK tipo título actor director descripción todo categoría películas deportes series niños TV de alta definición todo etc sub categoría acción comedia horror todo etc Seleccione enter keyword introducir palabra clave y pulse el botón OK 5 Introduzca la p...

Page 91: ...manual Cambia la configuración de la reserva de grabación delete manual reminder eliminar recordatorio manual Elimina la reserva de visión edit manual reminder editar recordatorio manual Cambia la configuración de la reserva de visión ok Seleccione Seleccione HISTORY Resultado de la grabación Aceptar Seleccione Desde TO DO pulse MENU Aparece el menú Schedule Options Puede establecer la clasificaci...

Page 92: ...tica se superponen con otro recordatorio de sintonización automática Cuando un recordatorio y sintonización automática se superponen con una grabación programada Para solucionar el conflicto tendrá que seleccionar una de las opciones siguientes las cuales cambian según el tipo de conflicto Record anyway Grabar de todas formas graba el programa especificado y suspende la grabación del programa exis...

Page 93: ...s 1 2 Seleccione el modo SD ó Seleccione Trjt Memoria utilizando TVG Foto Seleccione Ver Vista de imagen miniatura Área de navegación Se visualiza información de la imagen seleccionada Num Se visualiza el número de la imagen ó el nombre del archivo Fecha Se visualiza la fecha de la grabación Pixel Se visualiza la resolución de la visualización Inserte la tarjeta SD Para precauciones y detalles rel...

Page 94: ...a SD 1 GB se requiere adaptador para minitarjeta SD Para cambiar la vista modo de reproducción sencilla ajuste de imágenes etc ŶPara ver fotos en el modo de reproducción sencilla En Aceptar Inserte la tarjeta Cuando se pulse MENU se visualizará el menú de ajuste de imagen Modo Ponga Individual Diapositiva para ver imágenes individuales ó hacer diapositivas Tiempo desp Puede ajustar los segundos qu...

Page 95: ... No ejerza sobre la tarjeta una presión fuerte ni la golpee Inserte la tarjeta en el sentido correcto de lo contrario la tarjeta podría dañarse La interferencia eléctrica la electricidad estática ó el funcionamiento erróneo pueden dañar los datos ó la tarjeta Haga una copia de seguridad de los datos grabados a intervalos regulares por si estos se deterioran ó se dañan ó por si la unidad funciona d...

Page 96: ...terna Pulse para visualizar el menú de selección de entrada 1 2 Seleccione el modo de entrada ó Seleccione Introducir ejemplo Utilice la videograbadora ó DVD con el mando a distancia Nota Para conocer detalles vea el manual del equipo ó pregunte a su concesionario local La terminal y la etiqueta del dispositivo conectado se indican Para cambiar la etiqueta de entrada pág 42 Para hacer otras operac...

Page 97: ... La pantalla del PC conectado a la unidad se podrá visualizar en el televisor También podrá escuchar el sonido del PC con el cable de audio conectado Para conectar el PC pág 46 Visualiza la pantalla del PC Seleccione la entrada externa 1 2 Seleccione PC Señales correspondientes pág 29 ...

Page 98: ... horizontal Posición Vert Ajusta la posición vertical Fase de Reloj Alivia el problema si toda la imagen parece que parpadea o está borrosa Ajuste primero el reloj de puntos para obtener una imagen tan buena como sea posible y luego ajuste la fase de reloj para que aparezca una imagen clara Tal vez no sea posible visualizar una imagen clara debido a que las señales de entrada no son buenas Resoluc...

Page 99: ...ca de Restaurar Menú Ajuste Audio Bloqueo Cronόmetro Imagen TVG Foto Si Estándar 30 0 0 0 10 Imagen 1 2 Normal Modo Contraste Brillo Color Tinte Nitidez Standard Si Estándar 30 0 0 0 10 Imagen 1 2 Normal Modo Contraste Brillo Color Tinte Nitidez ŶPara volver al televisor ŶPara volver a la pantalla anterior Cómo utilizar las funciones de los menús Seleccione el menú Seleccione el elemento 3 2 Ajust...

Page 100: ... la presencia para entender mejor las palabras habladas y dar más realismo a la música Sí No BBE Sí Mejora la respuesta de audio cuando se escucha sonido estéreo Sí No No Envolvente Cambia a No cuando se utilizan altavoces externos Sí No Sonido IA Envolvente y Norm de audio no funcionan si se selecciona No Si Altavoces Selecciona según la señal cuando está conectado HDMI Auto Digital Análogo Auto ...

Page 101: ...y el cambio automático a la entrada HDMI del televisor Esta función se limita a los modelos que incorporan Control con HDMI de Panasonic Consulte los manuales de instrucciones individuales para obtener información relacionada con la compatibilidad No se pueden utilizar cables que no cumplan con HDMI Se recomienda utilizar un cable HDMI de Panasonic Número de pieza recomendada RP CDHG15 1 5 m RP CD...

Page 102: ...tavoces ext en la pantalla Si el equipo de cine para casa equipo de cine para casa RAM reproductor de cine para casa está apagado al seleccionar la opción Altavoces ext el equipo se encenderá automáticamente Vea Prende control más abajo Si el equipo de cine para casa reproductor de cine para casa equipo de cine para casa RAM está apagado los altavoces cambiarán automáticamente al televisor Subida ...

Page 103: ...ra DIGA DVD un equipo de cine para casa RAM ó un reproductor de cine para casa de Panasonic Consulte la página 34 para conocer la configuración del menú Ajuste e información de control adicional Los cables HDMI y u ópticos no son suministrados Si se cambia la conexión o configuración del equipo compatible con el control HDMI desconecte la alimentación de esta unidad y vuelva a conectarla mientras ...

Page 104: ...amplificador AV y un equipo DIGA Asegúrese de conectar el amplificador AV entre esta unidad y el equipo DIGA Los equipos HDMI individuales tal vez requieran configuraciones de menús específicas adicionales para cada modelo Consulte sus manuales de instrucciones respectivos Cuando el audio de otro equipo conectado a esta unidad a través de HDMI salga utilizando DIGITAL AUDIO OUT de esta unidad el s...

Page 105: ...ódigo y pulse el botón OK Introduzca dos veces la nueva contraseña de 4 dígitos ŶPara cancelar Bloqueo de canal Seleccione Apagado en Apagado Bloqueo de canal no se activa All Bloquea todos los canales y las entradas externas Game Bloquea los canales 3 y 4 y las entradas externas CNL Bloquea canales especificados analógicos digitales Cada vez que visualice el menú Bloqueo se le pedirá que introduz...

Page 106: ...ulas de los EE UU ŶPara desactivar la grabación del programa bloqueado Seleccione Salida a monitor en el menú de bloqueo de programas MPAA Calificaciones para películas de los EE UU U S TV Calificaciones para programas de televisión de los EE UU C E L R Calificaciones para el inglés de Canadá C F L R Calificaciones para el francés de Canadá Para obtener otra información pág 51 Precaución El sistem...

Page 107: ... según sus necesidades y las condiciones de la recepción Establezca 5 Seleccione Programa canal Seleccione la función Siguiente Seleccione Siguiente Seleccione Siguiente Seleccione ŶPara restablecer los ajustes del menú Ajuste Seleccione Restaurar en el menú Ajuste y pulse el botón OK Introduzca su contraseña de 4 dígitos con los botones de números Seleccione Sí en la pantalla de confirmación y pu...

Page 108: ... Encendido apagado de sintonía secuencial Inicie Seleccione Seleccione Siguiente Títulos Favoritos Agregar Títulos Predeterminado Título manual Cambio de nombre máximo de 7 caracteres disponibles Seleccione el número Favoritos Favoritos Agregar Pulse el botón OK para seleccionar Sí agregar ó No eliminar Seleccione Aceptar Pulse para mover el cursor a Aceptar Seleccione el canal Aceptar Utilice est...

Page 109: ...al Títulos de entradas CC Títulos de entradas Subtítulos Seleccione Ajuste 2 Siguiente Seleccione Visualice el menú 1 3 4 ŶPara salir Establezca Seleccione Títulos de entradas ó CC Siguiente Seleccione Etiquetas de visualización de dispositivos externos Títulos de entradas Visualización de subtítulos CC ...

Page 110: ... un decodificador incorporado capaz de proporcionar una visualización de texto del audio El programa que esté siendo transmitido deberá tener información de subtítulos ocultos CC pág 52 ŶSeleccione el elemento y establézcalo Tamaño Tamaño del texto Letra Fuente del texto Estilo Estilo del texto Elevado Deprimido etc Frente Color del texto Opacidad frontal Opacidad del texto Fondo Color de la caja ...

Page 111: ... en la fecha y a la hora designadas El reloj deberá estar puesto en hora antes de hacer los ajustes de la hora de encendido apagado pág 13 0 30 60 90 minutos ŶPara establecer Cronómetro 1 5 Temporizador de encendido apagado Seleccione el elemento y establézcalo Se apaga automáticamente Apagado Se enciende automáticamente Se pueden establecer 5 temporizadores Cronómetro 1 Cronómetro 5 ŶPara salir Ŷ...

Page 112: ...o a distancia de 4 dígitos pág 49 50 Confirme el equipo con el mando a distancia El dispositivo externo se enciende ŶSi el equipo no funciona con mando a distancia Cuando su dispositivo tenga un solo código Introduzca de nuevo el código de mando a distancia Cuando su dispositivo tenga múltiples códigos Cambie el código con más arriba y pruebe de nuevo pág 49 50 Después del paso de más arriba cambi...

Page 113: ...ol remoto del televisor o reservar la grabación con guía de TV Instale el área emisora de luz del IR Blaster cerca del área receptora de señales para el control remoto en la videograbadora Zona emisora de señales del control remoto Área receptora de señales del control remoto Estante superior del soporte del televisor VCR Monte empleando cinta con adhesivo en ambos lados Área emisora de señales Ca...

Page 114: ...rol bajo Otros ajustes del menú Ajuste en No pág 34 para evitar fallos en su grabación Cable HDMI Cable de conversión HDMI DVI Cable de audio ó ŶConexiones HDMI recomendadas pág 36 37 Adaptador de antena tipo F Nota Las señales de entrada de imagen y sonido conectadas a un terminal especificado en Para prog out pág 32 no pueden salir por los terminales OUTPUT Sin embargo la salida de audio se pued...

Page 115: ...l volumen del televisor Subida bajada del volumen del televisor Subida bajada del volumen del televisor Subida bajada del volumen del televisor Modo para acostarse Modo para acostarse Conmutador TV VCR Conmutador TV DBS Conmutador TV CBL Grabación de videograbadora Grabación PVR 1 Grabación PVR 1 Grabación Búsqueda 1 Búsqueda 1 Abertura Cierre Salto hacia adelante atrás Retroceso Avance Retroceso ...

Page 116: ...nic 0037 Emerex 0032 Emerson 0000 0037 0043 1278 1479 Fuji 0033 0035 Funai 0000 Garrard 0000 Gateway 1972 GE 0035 0060 0807 1035 1060 GoldStar 0037 1237 Gradiente 0000 Harley Davidson 0000 Hewlett Packard 1972 Hitachi 0000 0042 0089 Howard Computers 1972 HP 1972 Hughes Network Systems 0042 0739 Humax 0739 Hush 1972 iBUYPOWER 1972 JVC 0067 KEC 0037 Kenwood 0067 Kodak 0035 0037 Linksys 1972 Lloyd s ...

Page 117: ... 1024 1129 Daewoo 0833 0869 Denon 0490 Disney 0675 DVD2000 0521 Emerson 0591 0675 Enterprise 0591 Funai 0675 Gateway 1158 GE 0522 Go Video 0741 0833 0869 1075 1158 1304 1730 GoldStar 0741 Gradiente 0490 Grundig 0539 Hitachi 0573 0664 Hiteker 0672 Integra 0571 JVC 0558 0623 0867 1164 1275 Kenwood 0490 0534 Lecson 1533 LG 0591 0741 0801 0869 LiteOn 1158 1440 Loewe 0511 Magnavox 0503 0539 0646 0675 M...

Page 118: ...ica y contenido sexual explícito E Exenta La programación exenta incluye noticias deportes documentales y otros programas de información entrevistas vídeos musicales y programas de variedades C Programación para niños menores de 8 años Sin lenguaje ofensivo desnudos ni contenido sexual C8 Programación considerada generalmente aceptable para niños de 8 años y menos Sin blasfemias desnudos ni conten...

Page 119: ...ntalmente la imagen 4 3 hasta los bordes laterales de la pantalla Recomendada para la imagen anamórfica Alarga para justificar la imagen 4 3 a las cuatro esquinas de la pantalla Recomendada para la emisión de televisión normal H LLENO 4 3 H LLENO Amplía horizontalmente la imagen 4 3 hasta los bordes laterales de la pantalla Los bordes laterales de la imagen se recortan Estándar Tenga en cuenta que...

Page 120: ...edente de la toma DIGITAL AUDIO OUT será Dolby Digital Cuando se seleccione un canal NTSC la salida será PCM Número de carpeta de 3 dígitos Caracteres arbitrarios de 5 dígitos Caracteres arbitrarios de 4 dígitos Número de archivo de 4 dígitos Caracteres que se pueden utilizar 1 byte a to z A to Z 0 a 9 y _ Control con HDMI HDAVI ControlTM Las conexiones HDMI a algunos equipos Panasonic le permiten...

Page 121: ... interfaz AV completamente digital del mundo para el consumidor que cumple con un estándar de no compresión Si el dispositivo externo sólo tiene una salida DVI conecte al terminal HDMI mediante un cable adaptador DVI a HDMI 2 Cuando se utiliza el cable adaptador DVI a HDMI conecte el cable de audio al terminal de entrada de audio Los ajustes de audio se pueden hacer en la pantalla del menú Ent HDM...

Page 122: ...el proceso de configuración Remind me to set up later Cierra la pantalla y visualiza un recordatorio la próxima vez que se enciende el televisor Don t remind me again Cierra la pantalla y no visualiza un recordatorio la próxima vez que se enciende el televisor Pulse para cerrar la pantalla Pantalla dividida La pantalla de TV entrada RF no se puede visualizar simultáneamente en el cuadro principal ...

Page 123: ...xión del IR Blaster Con la conexión del IR Blaster la grabación programada podrá realizarse fácilmente utilizando la función GUÍA DE TV en este aparato Conecte el IR Blaster si desea enviar señales de control remoto desde el televisor de plasma para controlar la grabación de una grabadora de vídeo conectada Videograbadora Coloque el emisor del IR Blaster mirando hacia el sensor de señales de la gr...

Page 124: ...tando con un paño seco No permita que el detergente entre en contacto directo con la superficie del televisor de plasma Si las gotas de agua entran en el interior del aparato pueden surgir problemas en el funcionamiento Evite el contacto con sustancias volátiles tales como rociadores de insecticida disolventes y diluyentes de pintura debido a que puede verse afectada la superficie del mueble y pue...

Page 125: ...equipos externos de otros fabricantes registro los códigos de mando a distancia pág 45 La imagen se ve distorsionada cuando el equipo se conecta a través de HDMI Está conectado correctamente el cable HDMI pág 36 37 46 47 Apague el televisor y el equipo y luego vuelva a encenderlos Compruebe una señal de entrada procedente del equipo pág 36 37 46 47 Utilice un dispositivo que cumpla con la norma EI...

Page 126: ...sar se mueve en la pantalla Imagen Un punto permanece oscuro Imagen desordenada y ruidosa No se puede visualizar imagen Sólo se visualizan puntos en lugar de imágenes No se produce imagen ni sonido La función para impedir la imagen remanente está activada No es un síntoma de fallo El salvapantallas está activado si el televisor no funciona durante cierto tiempo en el modo SD Imagen remanente pág 5...

Page 127: ...ma está en la lista pág 24 Compruebe la posición del IR Blaster pág 46 No se puede recibir la emisión reservada Compruebe Schedule si el programa está en la lista pág 24 Compruebe la instalación del IR Blaster pág 46 No aparece lista de programas en la guía de TV Han pasado 24 horas desde que terminó la configuración inicial de la guía de TV Algunas veces resulta necesario descargar la lista Despu...

Page 128: ... p 75 ȍ C 0 286 V p p 75 ȍ AUDIO L R Tipo RCA PIN 2 0 5 V rms COMPONENT VIDEO INPUT 1 2 Y 1 0 V p p incluyendo sincronización PB PR 0 35 V p p AUDIO L R Tipo RCA PIN 2 0 5 V rms HDMI 1 2 Conector tipo A AUDIO L R Tipo RCA PIN 2 0 5 V rms PC D SUB DE 15 R G B 0 7 V p p 75 ȍ HD VD 1 0 5 0 V p p alta impedancia AUDIO L R 1 minitoma estéreo de 3 5 mm Ɏ IR Blaster 1 toma de G LINK Ranura de tarjeta 1 r...

Page 129: ...127 6 ...

Page 130: ...W 2T3 CANADA 2006 Panasonic Corporation of North America Tous droits réservés Imprimé aux ÉTATS UNIS Enregistrement du client Le numéro de modèle et le numéro de série de ce produit sont marqués sur son panneau arrière Veuillez noter ce numéro de série dans l espace ci dessous et conservez ce manuel d utilisation et votre reçu d achat comme preuve définitive de votre achat afin de faciliter la pro...

Reviews: