background image

F

AQs, etc.

T

echnical Information

43

Data format for Card browsing

Note

A JPEG image modifi ed with a PC may not be displayed.

 Images imported from a PC must be compatible with EXIF (Exchangeable Image File) 2.0, 2.1, and 2.2.

Partly degraded fi les might be displayed at a reduced resolution.

Only “.JPG” extension can be read by this TV.

The folder and fi le names may be different depending on the digital camera used.

Do not use two-byte characters or other special codes.

The card may become unusable with this TV if the fi le or folder names are changed.

Photo    

:  Still images recorded with digital still cameras compatible with JPEG files of DCF

 and EXIF 

standards

Data format 

: Baseline JPEG (Sub-sampling 4:4:4, 4:2:2 or 4:2:0)

Max. number of files : 9,999
Image resolution 

: 160 × 120 to 10,000,000

Compliant card type (maximum capacity): SDHC Card (16 GB), SD Card (2 GB), Multi Media Card (128 MB),
miniSD Card (1 GB) (requiring miniSD adapter)

If miniSD Card is used, insert / remove it together with the adapter.

Check the latest information on the card type at the following website. (English only)
http://panasonic.co.jp/pavc/global/cs/

DCF (Design rule for camera file system): Unified standard established by Japan Electronics and Information Technology Industries Association (JEITA).

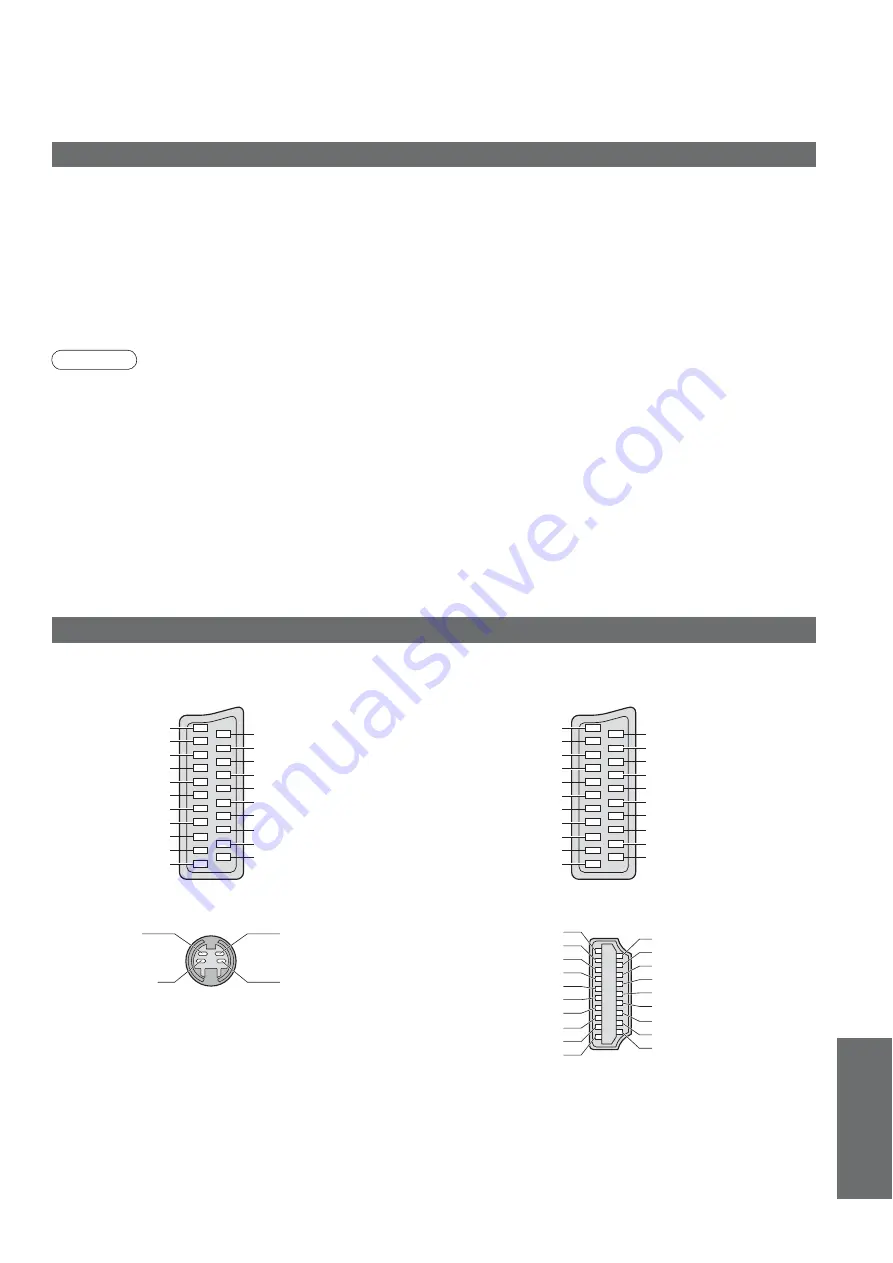
SCART, S-VIDEO and HDMI terminal information

Ŷ

AV1 

SCART terminal 

(RGB, VIDEO, Q-Link)

Suitable inputs for AV1 include RGB (Red / Green / Blue).

Chrominance in

Luminance in

Chrominance earth

Luminance earth

Ŷ

AV3 

S-VIDEO 4 pin terminal

Ŷ

HDMI

terminal

Ŷ

AV2 

SCART terminal 

(RGB, VIDEO, S-VIDEO, Q-Link)

AV2 - Pins 15 and 20 are dependent on AV2 S-VHS / 
VIDEO switching.

20  CVBS in (video)
18  RGB status earth
16 Status RGB
14 Earth
12 --
10 Q-Link data
8 Status 

CVBS

Audio in (L)

4 Audio 

earth

Audio in (R)

Socket Earth 

21

CVBS out (video)  19
CVBS earth 

17

Red in 

15

Red earth 

13

Green in 

11

Green earth 

9

Blue in 

7

Blue earth 

5

Audio out (L) 

3

Audio out (R) 

1

20  CVBS in (video)
18  RGB status earth
16 Status RGB
14 Earth
12 --
10 Q-Link data
8 Status 

CVBS

Audio in (L)

4 Audio 

earth

Audio in (R)

Socket Earth 

21

CVBS out (video)  19
CVBS earth 

17

Red in, S.C. - in 

15

Red earth 

13

Green in 

11

Green earth 

9

Blue in 

7

Blue earth 

5

Audio out (L) 

3

Audio out (R) 

1

18 +5V Power
16 SDA
14 Reserved (in cable but N.C. on device)
12 TMDS Clock

í

10 TMDS Clock+

TMDS Data0 Shield

6 TMDS 

Data1

í

4 TMDS 

Data1+

TMDS Data2 Shield

Hot Plug Detect 

19

DDC/CEC Ground  17
SCL 15
CEC 13
TMDS Clock Shield 11
TMDS Data0

í


9

TMDS Data0+ 

7

TMDS Data1 Shield 5
TMDS Data2

í


3

TMDS Data2+ 

1

Summary of Contents for TH-42PV80P

Page 1: ...ision Please read these instructions before operating your set and retain them for future reference The images shown in this manual are for illustrative purposes only Please refer to Pan European Guarantee Card if you need to contact your local Panasonic dealer for assistance ...

Page 2: ...2 Turn your own living room into a movie theatre Experience an amazing level of multi ...

Page 3: ...tions 20 picture sound quality etc Editing Programmes 24 Tuning Programmes 26 Control Programme Audience 28 Restore Settings 29 Input Labels 30 Displaying PC Screen on TV 31 Viewing from SD Card Photos 32 Link Functions 34 Q Link VIERA Link External Equipment 40 Enjoy your TV Basic Features Watching TV 14 Viewing Teletext 16 Watching Videos and DVDs 18 FAQs etc Technical Information 42 FAQs 45 Spe...

Page 4: ...ot expose to direct sunlight and other sources of heat Avoid exposing the TV to direct sunlight and other sources of heat To prevent fire never place any type of candle or naked flame on top or near the TV Power source This TV is designed to operate on 220 240 V 50 60 Hz AC Do not place foreign objects inside the TV Do not allow any objects to drop into the TV through the air vents fire or electrical...

Page 5: ...st remove the mains plug from the socket outlet Display panel Regular care Gently wipe the surface clean of dirt by using a soft cloth Major contamination Wipe the surface clean using a soft cloth dampened with clean water or diluted neutral detergent 1 part detergent to 100 parts water Then using a soft dry cloth evenly wipe the surface clean until it is dry Caution The surface of the display pan...

Page 6: ...all hanging brackets Carefully read the instructions accompanying the pedestal and be absolutely sure to take steps to prevent the TV from tipping over Handle the TV carefully during installation since subjecting it to impact or other forces may cause product damage Optional accessories Wall hanging bracket vertical TY WK42PV3W TY WK42PV4W angle TY WK42PR3W TY WK42PR4W Batteries for the Remote Con...

Page 7: ...ay result Contact your nearest Panasonic dealer immediately During set up make sure that all screws are securely tightened If insufficient care is taken to ensure screws are properly tightened during assembly the pedestal will not be strong enough to support the TV and it might fall over and become damaged and personal injury may result Ensure that the TV does not fall over If the TV is knocked or ...

Page 8: ...n a function is already displayed press to increase or decrease the selected function When in Standby mode switches TV On Changes the input mode Function select Volume Contrast Brightness Colour Sharpness Tint NTSC mode Bass Treble Balance Auto Setup p 27 Headphones jack p 40 AV3 terminals p 40 SD Card slot p 33 Accessories Options Identifying Controls Mains power On Off switch Switch On to turn o...

Page 9: ...rmal viewing screen Direct TV Recording p 35 and p 37 Records programme immediately in DVD Recorder VCR with Q Link or VIERA Link connection Numeric buttons Changes programme and teletext pages When in Standby mode switches TV On VIERA Link Menu p 37 Press to access VIERA Link Menu directly Aspect p 15 Changes aspect ratio from Aspect Selection list Also possible by pressing this button repeatedly...

Page 10: ...ensure that the unit is disconnected from the mains socket before attaching or disconnecting any leads When disconnecting the mains lead be absolutely sure to disconnect the mains plug at the socket outlet first Example 1 Connecting aerial Example 2 Connecting DVD Recorder VCR RF cable TV only TV DVD Recorder or VCR AC 220 240 V 50 60 Hz AC 220 240 V 50 60 Hz Note Connect to AV1 AV2 for a DVD Recor...

Page 11: ...Connecting DVD Recorder VCR and Set top box TV DVD Recorder VCR and Set top box DVD Recorder or VCR Fully wired HDMI compliant cable Aerial Mains lead supplied Rear of the TV Set top box AC 220 240 V 50 60 Hz RF cable RF cable SCART cable fully wired SCART cable fully wired RF cable RF cable To remove from the TV Keep pushing both side snaps Push until both side tabs click snaps tabs ...

Page 12: ...tup is now complete and your TV is ready for viewing You can now use the remote control to turn On the TV or turn the TV to standby mode Power LED On To edit programmes Editing Programmes p 24 4 Start Auto Setup If Q Link VIERA Link or similar technology p 34 compatible recorder is connected programme language country region settings are automatically downloaded to the recorder Auto Setup will sta...

Page 13: ...g the On Screen Displays MENU Open the main menu Move the cursor select the menu Move the cursor adjust levels select from a range of options Access the menu store settings after adjustments have been made or options have been set RETURN Return to the previous menu EXIT Exit the menu system and return to the normal viewing screen Note If tuning has failed Auto Setup p 27 If downloading has failed ...

Page 14: ...s Display the selectable settings for the current programme OPTION Check or change the current programme status instantly To change Teletext Character Set Sets the teletext language Setup Menu p 23 MPX Sound Menu p 22 Volume Correction Adjusts volume of individual programme or input mode Note Also possible to change the settings in Menu list p 22 and p 23 select change select programme watch To se...

Page 15: ...etching is only noticeable at the left and right edges 4 3 4 3 Full Displays the image at the standard 4 3 without distortion Displays a 4 3 image enlarged horizontally to fit the screen HD signal only Zoom1 Zoom2 Displays a 16 9 letterbox or 4 3 image without distortion Displays a 16 9 letterbox anamorphic image full screen without distortion Zoom3 Displays a 2 35 1 letterbox anamorphic image full...

Page 16: ...ottom of the screen To access more information about one of these subjects press the appropriately coloured button This facility enables fast access to information on the subjects shown What is TOP mode in case of TOP text broadcasting TOP is a particular improvement of the standard teletext service that results in an easier search and effective guide Fast overview of the teletext information avai...

Page 17: ...on ŶTo change stored pages press and hold Enter new page number Colour button you want to change View sub page Sub pages The number of sub pages varies depending on the broadcasters up to 79 pages It may take some time for searching during which time you can watch TV Enter the 4 digit number example P6 Appears at top of the screen ŶTo view specific sub page MENU blue View sub page Only when teletex...

Page 18: ...isplay the Input select menu Displays the selected mode 1 Turn the TV on ŶWhen connecting with SCART as example 2 or 3 p 10 and p 11 Receives input signals automatically when playback starts Input signals are automatically identified by the SCART pin 8 terminal This function is also available for HDMI connections p 40 ŶIf input mode is not switched automatically Perform and Dependant on the setup o...

Page 19: ...o play at slow speed Programme Up Down Select programme Record Start recording Panasonic equipment connected to the TV can be directly operated with the remote control Setting your remote control to operate Panasonic VCR DVD etc Set the VCR DVD switch to the appropriate position Press and hold during the following operations Enter the appropriate code for the equipment to be controlled see table b...

Page 20: ...lect the menu Select the item example Picture Menu access select Adjust or select change example Picture Menu example Picture Menu store or access Required by some functions 1 select Changed Number and positions of alternatives Moved ŶChoose from among alternatives ŶAdjust using the slide bar Displays the next screen ŶGo to the next screen ŶTo reset the settings To reset the picture settings only ...

Page 21: ...n Sound Menu MPX Stereo Speaker Distance to Wall Over 30cm 1 2 2 2 Reset to Default Set Sound Menu HDMI1 Input Auto p 22 Link Settings Power off Link Set Power on Link Set Download Access Q Link AV2 AV2 out TV VIERA Link On p 23 Tuning Menu Auto Setup Access Manual Tuning Access p 26 Only available items can be selected 1 2 AV Colour System Auto Child Lock Access Tuning Menu Off Timer Off OSD Lang...

Page 22: ...low moving pictures colour patterning may be seen Set to On to display sharper and more accurate colours Off On For PAL or NTSC signal reception only Not valid on RGB S Video Component PC HDMI and SD Card Reset to Default Press the OK button to reset the present Picture Mode to the default settings Sound Mode Basic sound mode Music Speech Bass Increases or decreases level to enhance or minimise lo...

Page 23: ...ge for on screen displays Teletext Teletext display mode TOP FLOF List p 16 Teletext Character Set Selects teletext language West East1 East2 West English French German Greek Italian Spanish Swedish Turkish etc East1 Czech English Estonian Lettish Rumanian Russian Ukrainian etc East2 Czech Hungarian Lettish Polish Rumanian etc Shipping Condition Resets all settings for example when moving house p ...

Page 24: ...SD Language Shipping Condition Teletext Character Set Off Service List Edit Access West OPTION SDCARD INPUT EXIT TV RETURN MENU 24 Editing Programmes Select Setup Select Service List Edit 3 2 Display the menu You can skip unwanted programmes or edit programmes ŶTo return to TV EXIT 1 access select access select 4 Set ...

Page 25: ... add delete add delete select To retune each programme Manual Tuning red p 27 BBC1 Service List Editor 1 2 3 4 5 6 7 select Programme position Name Edit ŶTo change the name displayed when selecting programmes Select Rename green Set characters Edit Service Name Name A B C D E F G H I J K L M N U V W X Y Z 0 1 2 3 4 5 6 a b c d e f g h i j k l m n u v w x y z _ O P Q R S T 7 8 9 o p q r s t set sel...

Page 26: ... Setup Menu OPTION SDCARD INPUT EXIT TV RETURN Tuning Menu Auto Setup Access Manual Tuning Access MENU 26 Tuning Programmes Select Setup 2 Select Tuning Menu 3 Display the menu Select a function 4 You can retune all the TV programmes when moving house or search for new services which may have recently started broadcasting ŶTo return to TV EXIT 1 access select access select access select 5 Set ...

Page 27: ... in the area If a Child Lock PIN number p 28 has been set it must be entered To return to TV ŶFor Auto Setup using the buttons on the front of the TV p 8 Press repeatedly until Auto Setup appears Access Auto Setup Start Auto Setup Set programme manually Manual Tuning 1 BBC1 CH33 Manual Tuning Sound System Manual Tuning 2 78 41 1 Fine Tuning SC1 Colour System Auto CH33 ŶFine Tuning Use to make smal...

Page 28: ...k PIN Entry Please enter new PIN PIN Child Lock Child Lock List Change PIN Access Child Lock List Services and AV VCR Name BBC1 1 2 3 4 5 AV1 AV2 S Lock TV TV TV TV TV TV AV AV Type ŶTo change the PIN number Select Change PIN in and enter a new PIN number twice Appears when the programme input is locked Enter the PIN number 4 digits Select Child Lock List To cancel Select the locked programme inpu...

Page 29: ...hen Mains power On Off switch is next turned On p 12 ŶTo retune TV programmes only e g after moving house Auto Setup p 27 3 2 4 Select Setup Select Shipping Condition Display the menu Set ŶTo return to TV EXIT Restore Settings Resets the TV to its original condition i e no programmes tuned in All settings programmes picture sound quality etc are reset 1 access select All tuning data will be erased...

Page 30: ...nd set ŶTo return to TV EXIT For easier identification and selection of the input mode you can label each input terminals or skip terminal that is not connected to any equipment To select the input mode p 18 set select 1 The labels you set will be displayed in Input Selection menu p 18 or banner If Skip is selected you cannot select the mode access select access select ŶUser input You can name each...

Page 31: ...t after Clock adjustment Set to the minimum level if noise occurs Sync Chooses another synchronous signal if the image is distorted H V On G H V by the horizontal and vertical signals from your PC On G by the green signal from your PC if available Reset to Default Press the OK button to reset to the default Setup settings Other items p 22 and p 23 OPTION SDCARD EXIT RETURN INPUT Input Selection AV...

Page 32: ... Rotate 90 anti clockwise To the next photo Rotate 90 clockwise 1 2 Enter SD mode Photo View Mode select view Operation guide Thumbnail Caution During the operation no signals are output from the monitor output terminals ŶTo return to TV EXIT or SDCARD Error display images that could not be loaded etc Selected photo information is displayed The maximum number of characters for Filename is 8 The ph...

Page 33: ...n step or ŶSlide show settings operate in step or Slide show Select the photo for the first view Start Slide show Display the menu Select Viewing Setup Select the items and set access Picture Menu p 22 Menu Item Adjustments Configurations alternatives Viewing Setup Interval Select slide show interval 5 10 15 30 60 90 120 seconds Repeat Slide show repeat Off On set select To pause To return to Sing...

Page 34: ...ink SCART cable DVD Recorder VCR with Q Link function Connect the DVD Recorder VCR supporting Q Link to the TV s AV1 or AV2 terminal via a fully wired SCART cable ŶVIERA Link SCART cable HDMI cable DIGA Recorder HD Video Camera with VIERA Link function Connect the equipment supporting VIERA Link to the TV s AV1 AV2 HDMI1 HDMI2 or HDMI3 terminals via fully wired SCART and HDMI cables together Some ...

Page 35: ...galogic or SMARTLINK Q Link connection p 34 Set up the DVD Recorder VCR Read the manual of the equipment Q Link terminal setup in Setup Menu Q Link p 23 AV1 AV2 out p 23 Download preset programme language country region setting Preset download Download p 23 or Auto Setup p 27 or Auto Setup when first using the TV p 12 ŶFeatures available Some recorders are not applicable Read the manual of the rec...

Page 36: ...might be required For details read the manual of the recorder Download preset programme language country region setting Preset download Download p 23 or Auto Setup p 27 or Auto Setup when first using the TV p 12 Set VIERA Link On in Setup Menu VIERA Link p 23 Set up the TV After connection turn the equipment on and then switch the TV on Select the input mode to HDMI1 HDMI2 or HDMI3 p 18 and make s...

Page 37: ...ct resume Pause Live TV programme HDAVIControl3 and RecorderwithHDD Pause Live TV Direct TV Recording What you see is What you record HDAVI Control 3 Direct TV Rec Recording the current programme in DIGA Recorder immediately This function is available with DIGA Recorder which has HDAVI Control 3 function Connect DIGA Recorder with both HDMI and SCART cables to use this function If you cannot opera...

Page 38: ...played But you cannot access it Use its own remote control to operate the equipment Direct TV Rec VIERA Link Menu Start VIERA Link Control Speaker Selection Home Cinema Others Pause Live TV When the equipment of other types or manufacturers is connected Others Others is displayed You cannot access it Use its own remote control to operate the equipment Direct TV Rec VIERA Link Menu Start VIERA Link...

Page 39: ...or the first few seconds when Input mode is switched Volume function will be displayed when adjusting the volume of the equipment Easy playback is also available by using the remote control for Amplifier or Player theatre Read the manual of the equipment About HDMI cable for connecting Panasonic HD Video Camera read the manual of the equipment If more than one equipment of the same type are connecte...

Page 40: ...TV Recording AV3 40 External Equipment These diagrams show our recommendations for how to connect the TV to your various equipment For other connections consult the instructions for each piece of equipment the table below and the specifications p 47 VIDEO or S VIDEO AUDIO Headphones Camcorder Game equipment ŶTo adjust volume Headphone Volume in the Sound Menu p 22 M3 stereo mini plug Amplifier with...

Page 41: ...IN Y PB PR L R L R 41 External Equipment Computer PC Viewing Listening Conversion adapter if necessary Set top box DVD Recorder VCR SCART cable RF cable SCART cable To watch satellite broadcasts To record playback DVD Recorder Fully wired HDMI compliant cable Viewing Listening or Fully wired HDMI compliant cable HDMI equipment RCA cable ...

Page 42: ... 60p O O O 625 576 50i O O O O 625 576 50p O O O O HD 750 720 50p O O O 750 720 60p O O O 1125 1080 50i O O O 1125 1080 60i O O O 1125 1080 50p O O O 1125 1080 60p O O O 1125 1080 24p O O O HDMI connection HDMI high definition multimedia interface allows you to enjoy high definition digital images and high quality sound by connecting the TV and the equipment HDMI compatible equipment 1 with an HDMI ...

Page 43: ...ystem Unified standard established by Japan Electronics and Information Technology Industries Association JEITA SCART S VIDEO and HDMI terminal information ŶAV1 SCART terminal RGB VIDEO Q Link Suitable inputs for AV1 include RGB Red Green Blue Chrominance in Luminance in Chrominance earth Luminance earth ŶAV3 S VIDEO 4 pin terminal ŶHDMI terminal ŶAV2 SCART terminal RGB VIDEO S VIDEO Q Link AV2 Pi...

Page 44: ... 768 75 Hz 60 02 75 03 1 024 768 85 Hz 68 68 85 00 1 280 1 024 60 Hz 63 98 60 02 1 366 768 60 Hz 48 39 60 04 Macintosh13 640 480 35 00 66 67 Macintosh16 832 624 49 73 74 55 Macintosh21 1 152 870 68 68 75 06 PC connection A PC may be connected to this TV so that the PC screen is displayed and sound is heard from the TV PC signals that can be inputted Horizontal scanning frequency 31 to 69 kHz verti...

Page 45: ...creen messages I e EC AV1 You can simply clear these Press again to redisplay An error message appears Follow the message s instructions If the problem persists contact the authorized Service Centre Q Link function does not work Please confirm SCART cable and connection Also please set AV1 AV2 out in the Setup Menu p 23 VIERA Link function does not work and an error message appears Confirm the conne...

Page 46: ...quipment compliant with EIA CEA 861 861B Sound is unusual Set the sound setting of the connected equipment to 2ch L PCM Check the HDMI1 Input setting in the Sound Menu p 22 If digital sound connection has a problem select analogue sound connection p 42 Sound level is low or sound is distorted Sound signal reception may be deteriorated Set MPX p 22 in the Sound Menu to Mono No sound is produced Is ...

Page 47: ...ar VHF UHF Operating Conditions Temperature 0 C 35 C Humidity 20 80 RH non condensing Connection Terminals AV1 Scart terminal 21 Pin terminal Audio Video in Audio Video out RGB in Q Link AV2 Scart terminal 21 Pin terminal Audio Video in Audio Video out RGB in S Video in Q Link AV3 VIDEO RCA PIN Type 1 1 0 V p p 75 S VIDEO Mini DIN 4 pin Y 1 0 V p p 75 C 0 286 V p p 75 AUDIO L R RCA PIN Type 2 0 5 ...

Page 48: ...ormation Information on Disposal in other Countries outside the European Union This symbol is only valid in the European Union If you wish to discard this product please contact your local authorities or dealer and ask for the correct method of disposal Printed in Czech Republic Matsushita Electric Industrial Co Ltd Web Site http www panasonic europe com 2008 Matsushita Electric Industrial Co Ltd ...

Reviews: