background image

16

Tuning menu – Programme edit
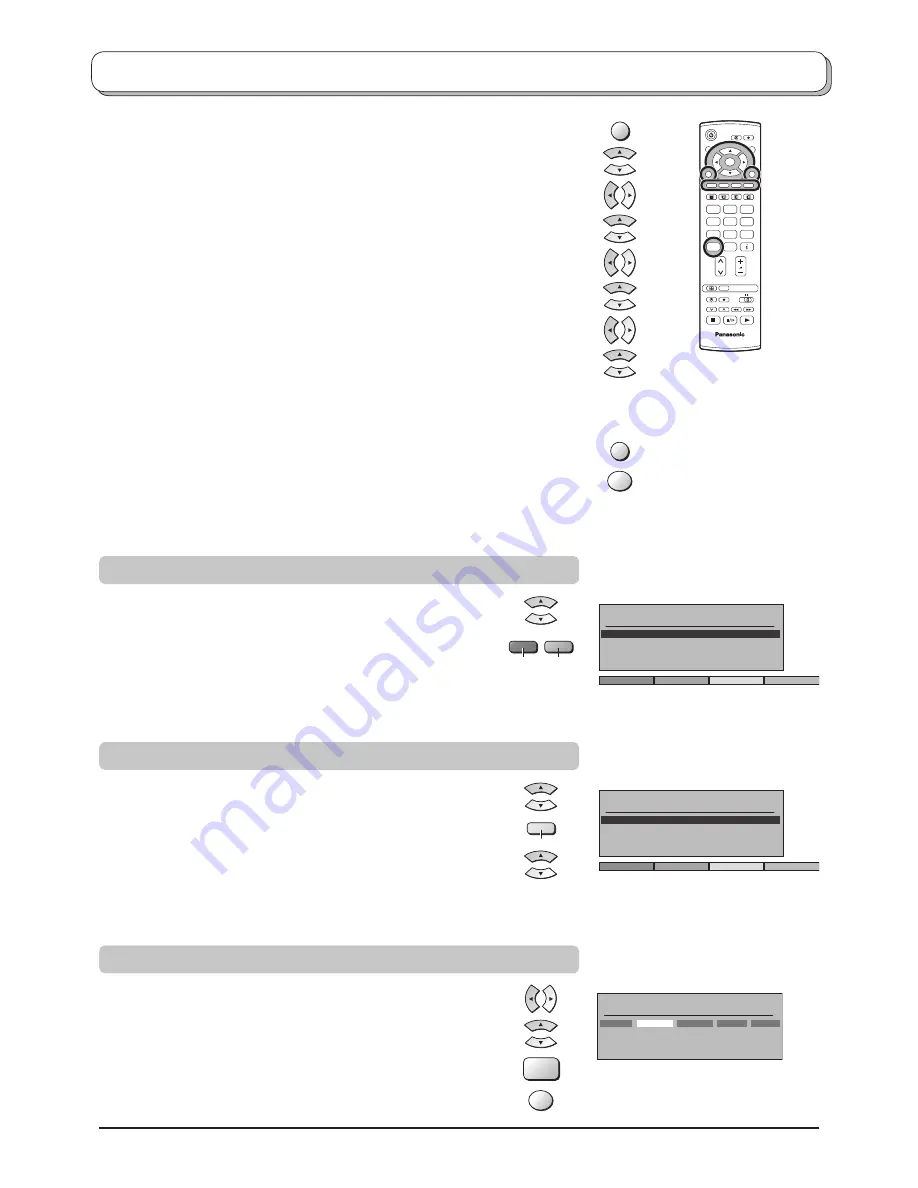
Press the 

MENU

 button.

Move to choose 

Setup menu

.

Access 

Setup menu

.

Move to choose 

Tuning menu

.

Access 

Tuning menu

.

Move to choose 

Programme edit

.

Access 

Programme edit

.

Move to choose programme position (e.g., Prog. 3).

Make required change, e.g., moving a programme channel (see the 
relevant procedure below).

Press the 

EXIT

 button at any time to go back to watching TV.

Press the 

OK

 button after having adjusted some features to store the 

new settings.

TV

N

1

2

3

4

5

6

7

8

9

0

OK

C

Add

Cancel

Programme edit

Prog.

Chan.

Name

Lock

Sys

1

    :

2    :
3    :
4    :
5    :

CH44

CH51
CH41
CH47
CH37

Off

Off
Off
Off
Off

SC1

SC1
SC1
SC1
SC1

ABC

XYZ
FTP
123
456

Move the cursor to the programme to be deleted or added.

Press the 

Green

 button to add a programme channel to the 

programme position, or the 

Red

 button to delete one.

Press the same button again to con

fi

 rm your decision.

Adding / deleting a programme channel

Confirm

Cancel

Programme edit

Prog.

Chan.

Name

Lock

Sys

1

    :

2    :
3    :
4    :
5    :

CH44

CH51
CH41
CH47
CH37

ABC

XYZ
FTP
123
456

Off

Off
Off
Off
Off

SC1

SC1
SC1
SC1
SC1

Move the cursor to the programme to be moved.

Press the 

Yellow

 button.

Choose the new position for the programme channel.

Press the 

Yellow

 button again to con

fi

 rm your decision.

Moving a programme channel

Programme edit

Prog.

Chan.

Name

Lock

Sys

1    :
2    :
3    :
4    :
5    :

CH44
CH51
CH41
CH47
CH37

ABC
XYZ
FTP
123
456

Off
Off
Off
Off
Off

SC1
SC1
SC1
SC1
SC1

Move to the 

Chan.

 column.

Increase or decrease the programme channel number (you will 
see the TV retune to the new number as you change it) or use the 

C

 button for Direct Channel Ac cess. See page 10.

Press the 

OK

 button to store this change.

Tuning a programme channel

MENU

EXIT

OK

Green

Red

Yellow

OK

C

Summary of Contents for TH-42PA50E

Page 1: ...them for future reference TQB0E0167U 2 1 2 3 4 5 6 7 8 9 0 OK C TV N The illustration shown is an image Pedestal stand shown above is optional extra English TH 37PA50E TH 42PA50E TH 37PA40E TH 42PA40E...

Page 2: ...e control 10 Using the On Screen Displays 11 Picture menu 12 Sound menu 13 Setup menu 14 Tuning menu overview 15 Tuning menu Programme edit 16 Adding deleting a programme channel 16 Moving a programme...

Page 3: ...electromagnetic fields 2 If a static electricity discharge occurs inside the front cover the screen may momentarily flicker This is not a malfunction The screen will return to normality in a short whi...

Page 4: ...r keep video equipment away from this product Keep unneeded small parts and other objects out of the reach of small children These objects can be accidentally swallowed Also be careful about packaging...

Page 5: ...power cord plug the resultant humidity can damage the insulation which could result in fire Pull the power cord plug out from the wall outlet and wipe the mains lead with a dry cloth This Plasma TV ra...

Page 6: ...that the batteries are fitted the correct way round Do not mix old batteries with new batteries Remove old exhausted batteries immediately Do not mix different battery types i e Alkaline and Manganes...

Page 7: ...able clampers left and right fitted to the plasma television Bind all cables to the plasma television with the cable clamper For TH 42PA50E TH 42PA40E For TH 37PA50E TH 37PA40E Cable clamper Attach th...

Page 8: ...ds RF cable Not supplied 1 2 OR Plug in aerial and connect ancillary equipment Connect the mains plug to the wall socket Press the switch on the TV set to turn the set on To switch the TV set to Stand...

Page 9: ...uction book If Q Link is not operating correctly check the following The Scart cable is connected to the TV s Scart terminal AV2 or AV3 and correctly setup in the menu The Scart cable is connected to...

Page 10: ...page 12 14 Press to confirm selections and choices Coloured buttons used for the selection navigation and operation of various functions Teletext button see page 24 26 Text F P button see page 25 Dir...

Page 11: ...ange of options The OK button is used with a number of features to store settings after adjustments have been made or options have been set The EXIT button is used to exit the menu system and return t...

Page 12: ...Viewing mode offers you up to a maximum of three separate settings for each signal source RF AV1 AV2 AV3 and Component Changes will be stored automatically By analysing and processing the incoming pi...

Page 13: ...o service Music Off Bass Treble Balance MPX Mode Ambience Sound menu No service Music Off Bass Increase or decrease level to enhance or minimise lower deeper sound output Treble Increase or decrease l...

Page 14: ...er save By reducing the brighness of picture power consumption can be lowered Tuning menu Provides access to many other features including Programme edit and Auto setup See page 15 19 OSD language Whe...

Page 15: ...o setup Manual tuning Fine tuning Colour system Volume correc Decoder AV2 Tuning menu Auto Access Off Programme edit Access in order to customize your programme settings e g adding or deleting a progr...

Page 16: ...e channel to the programme position or the Red button to delete one Press the same button again to confirm your decision Adding deleting a programme channel Confirm Cancel Programme edit Prog Chan Nam...

Page 17: ...ion information Press the Blue button Programme data will now be sent to the recording device s This might take a few seconds depending on the number of stations stored If the message Feature not avai...

Page 18: ...now stored on programme position 1 Press the EXIT button at any time to go back to watching TV please read the Notes in the above procedure Notes If you proceed with the next step all tuning data will...

Page 19: ...ton to access Tuning mode Press the TV AV button to move between Change programme Search and Change TV system Press the or button to change programme position or start search When the desired station...

Page 20: ...in Standby mode the TV will automatically switch on and select the correct AV input so that you can view the content Recording device Auto Power Standby When the TV is switched into Standby mode the r...

Page 21: ...rol of your VCR requires adjustment your VCR instruction book will contain adjustment details The widescreen aspect ratios of different films and programmes can vary If these are wider than a standard...

Page 22: ...the left and right sides of the picture The 4 3 picture will be stretched horizontally so that the image fills the screen this is done in such a way that the stretching is only obvious at the left and...

Page 23: ...e DVD equipment or VCR Play Press to playback the tape or DVD Stop Press to stop the tape or DVD Skip Fast Forward Cue VCR Press to fast forward the tape In Play mode press to view the picture rapidly...

Page 24: ...he OK button the page numbers will change to white indicating that the page is stored HOLD HOLD To hold the Teletext page when viewing multi page information Press again to return to automatic page up...

Page 25: ...re As each sub page is found its number is displayed at the top of the page so that you may select it as more sub pages are picked up the display at the top of the page changes so that you are always...

Page 26: ...the page Regardless of how many pages are found pressing the Yellow button will take you to the sub page which you requested Press the TEXT button to return to normal TV operation INDEX INDEX When in...

Page 27: ...Video S Video Scart terminal Yellow button AV3 Video S Video Scart terminal Blue button Component terminals The on screen selector keys that appear clear after a few seconds If you want to select an...

Page 28: ...not connect a computer with TTL output 5V to this set For Scart terminal wiring information see page 30 DVD PLAYER How to connect the Component Input terminals How to connect the Audio Output termina...

Page 29: ...ck Some parts of the screen do not light up The plasma TV panel is manufactured using an extremely high level of precision technology however sometimes some parts of the screen may be missing picture...

Page 30: ...endent on AV2 S VHS VIDEO switching Socket Earth CVBS out video CVBS earth S C in Earth Earth Earth Audio out L Audio out R CVBS in video Earth Earth Q Link data Status CVBS Audio in L Audio earth Aud...

Page 31: ...CAM D K VHF R1 R2 VHF R3 R5 VHF R6 R12 UHF E21 E69 PAL 525 60 Playback of NTSC tape from some PAL Video recorders VCR M NTSC Playback from M NTSC Video recorders VCR NTSC AV input only Playback from N...

Page 32: ...to designated collection points where they will be accepted on a free of charge basis Alternatively in some countries you may be able to return your products to your local retailer upon the purchase...

Reviews: