background image

1/2

SIGNAL

SCREENSAVER

PC

OFF

STANDBY SAVE

OFF

POWER MANAGEMENT

OFF

AUTO POWER OFF

OFF

OSD LANGUAGE

ENGLISH (US)

COMPONENT/RGB-IN SELECT

RGB

INPUT LABEL
POWER SAVE

SET UP

3D Y/C FILTER (NTSC)
COLOR SYSTEM

SIGNAL

ON

AUTO

3 : 2 PULLDOWN
Panasonic AUTO (4 : 3)

OFF

4:3

[ VIDEO ]

NOISE REDUCTION

OFF

REFRESH RATE

100 Hz

3 : 2 PULLDOWN

SIGNAL

OFF

[ Digital ] 

NOISE REDUCTION

OFF

REFRESH RATE

100 Hz

H-FREQ.

V-FREQ.

kHz

Hz

63.98

60.02

SIGNAL FORMAT 1280×1024/60

3 : 2 PULLDOWN

SIGNAL

OFF

 [ COMPONENT ]

XGA MODE

1024 × 768

NOISE REDUCTION

OFF

REFRESH RATE

100 Hz

H-FREQ.

V-FREQ.

kHz

Hz

63.98

60.02

SIGNAL FORMAT 1280×1024/60

SYNC

SIGNAL

H-FREQ.

V-FREQ.

kHz

Hz

63.98

60.02

SIGNAL FORMAT 1280×1024/60

[ RGB ]

3 : 2 PULLDOWN
XGA MODE

NOISE REDUCTION

OFF

REFRESH RATE

100 Hz

AUTO

OFF

1024 × 768

3D Y/C FILTER (NTSC)

ON

31

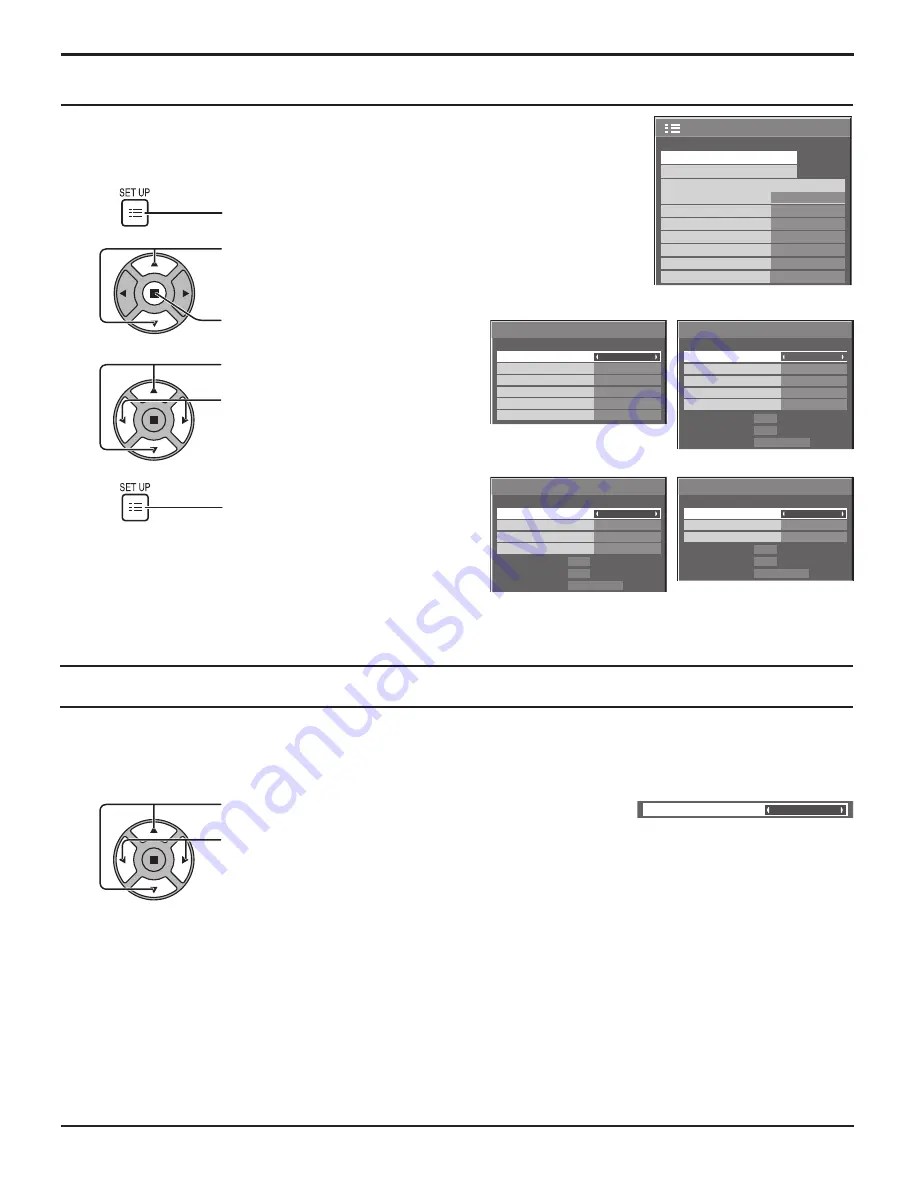
Press to select the menu to adjust.

Press to adjust the menu.

Press to exit from adjust mode.

Note: 

“SIGNAL” setup menu displays a different setting condition for each input signal.

3

4

SET UP for Input Signals

SIGNAL menu

For VIDEO (S VIDEO)

3D Y/C FILTER 

– For NTSC AV images

Select “SIGNAL” from the “SET UP” menu during VIDEO (S VIDEO) input signal mode.
(“SIGNAL [VIDEO]” menu is displayed.)

Note:

When ON, this setting only affects NTSC input signals.

Press to select the “3D Y/C FILTER (NTSC)”.

Press to set ON / OFF.

Press to display the SET UP menu.

Press to select the “SIGNAL”.

Press to display the SIGNAL menu.

2

1

For RGB

For COMPONENT

For Digital

Summary of Contents for TH-37PR11UK

Page 1: ...UK TH 42PR11UH Model No N mero de modelo TQB2AA0784 Antes de conectar utilizar o ajustar este producto lea completamente este manual de instrucciones y gu rdelo para consultarlo en el futuro en caso d...

Page 2: ...et contact an electrician Do not defeat the purpose of the grounding plug This video monitor is designed to display television content from a separate TV tuner Full power analog TV broadcasting in the...

Page 3: ...nt of the obsolete outlet 10 Protect the power cord from being walked on or pinched particularly at plugs convenience receptacles and the point where they exit from the apparatus 11 Only use attachmen...

Page 4: ...ols 14 ASPECT Controls 16 MULTI PIP 17 Advanced PIP 18 Digital Zoom 19 On Screen Menu Displays 20 Adjusting POS SIZE 21 PICTURE Adjustments 22 ADVANCED SETTINGS 23 SOUND Adjustment 24 PRESENT TIME SET...

Page 5: ...nce received including interference that may cause undesired operation FCC CAUTION To assure continued compliance follow the attached installation instructions and use only shielded interface cables w...

Page 6: ...dry cloth This Plasma Display radiates infrared rays therefore it may affect other infrared communication equipment Install your infrared sensor in a place away from direct or reflected light from you...

Page 7: ...sport only in upright position Transporting the unit with its display panel facing upright or downward may cause damage to the internal circuitry If using the pedestal optional accessory leave a space...

Page 8: ...ies Supplied Check that you have the Accessories and items shown Operating Instruction book AC cord The remote control is not included with this set Available for purchase separately Object model N2QA...

Page 9: ...there is sufficient slack in cables to minimize stress especially in the power cord firmly bind all cables with the supplied fixing band To tighten To loosen Pull Pull Push the catch Note Make sure th...

Page 10: ...r for computers with DOS V compatible Mini D sub 15P terminal The computer shown in the illustration is for example purposes only Additional equipment and cables shown are not supplied with this set D...

Page 11: ...C1 C2 C3 P1 P2 P3 P4 P5 ETX Notes If multiple commands are transmitted be sure to wait for the response for the first command to come from this unit before sending the next command If an incorrect com...

Page 12: ...Plasma Display to turn the set on Power On Power Indicator Green Press the button on the remote control to turn the Plasma Display off Power Indicator Red standby Press the button on the remote contro...

Page 13: ...als will change as follows Notes Selecting is also possible by pressing the INPUT button on the unit Input terminal will not be selected if the terminal board is not installed into the SLOT Select to...

Page 14: ...wer Indicator The Power Indicator will light Power OFF Indicator not illuminated The unit will still consume some power as long as the power cord is still inserted into the wall outlet Standby Red Pow...

Page 15: ...he Volume Up or Down button to increase or decrease the sound volume level R button see page 20 Press the R button to return to previous menu screen OFF TIMER button The Plasma Display can be preset t...

Page 16: ...ssed During MULTI PIP Operations Picture and Picture Picture in Picture 4 3 FULL Others Aspect switching is not possible from the unit Note When selecting an input slot that attaches BNC Dual Video Te...

Page 17: ...o move the sub picture Each time the location of the sub picture will be moved Notes This button is effective only in the picture in picture The sub picture may be hidden by the on screen display depe...

Page 18: ...ending on the 2 picture display mode Due to the small dimensions of the sub pictures these sub pictures cannot be shown in detail Computer screen picture is displayed in a simplified format and it may...

Page 19: ...Multi viewer Picture in Picture Picture out Picture Picture and Picture operation see page 17 When SCREENSAVER except for NEGATIVE IMAGE is running see page 26 While Digital Zoom is in operation Adju...

Page 20: ...E OF DAY 99 99 99 99 MON PRESENT TIME SETUP PRESENT TIME OF DAY MON 99 99 SET PRESENT TIME OF DAY DAY 0 00 0 00 SET UP TIMER POWER OFF FUNCTION POWER OFF TIME POWER ON TIME POWER ON FUNCTION OFF OFF P...

Page 21: ...en exiting the mode the screen will return to a former adjustment While the POS SIZE display is active if either the N button on the remote control is pressed at any time or the ACTION button is press...

Page 22: ...CTURE menu see next page PICTURE Adjustments 1 ADVANCED SETTINGS ON Enables fine picture adjustment at a professional level see next page ADVANCED SETTINGS OFF Displays images with settings of the PIC...

Page 23: ...ORMALIZE then all adjustment values are returned to the factory settings Helpful Hint NORMALIZE Normalization Item Effect Adjustments PICTURE Less More Adjusts the proper picture contrast BRIGHTNESS D...

Page 24: ...button on the remote control is pressed at any time or the ACTION button is pressed during NORMALIZE then all adjustment values are returned to the factory settings Helpful Hint NORMALIZE Normalizatio...

Page 25: ...nges PRESENT TIME OF DAY 1 minute Pressing or button continuously changes PRESENT TIME OF DAY by 15 minutes Press to select SET Press to store PRESENT TIME SETUP Notes SET cannot be selected unless PR...

Page 26: ...in unit Note When the display is turned off the SCREENSAVER will be deactivated Press to select the MODE Press to select each mode items SCREENSAVER For preventing image retention Setup of SCREENSAVER...

Page 27: ...d time the screen may become slightly darker see page 40 Press to select WOBBLING or PEAK LIMIT Press to select ON1 ON2 or OFF WOBBLING ON or OFF PEAK LIMIT Reduces screen image retention SIDE BAR ADJ...

Page 28: ...r so seconds during PC IN signal input Power is turned off standby the power indicator lights up orange The power is not turned off when the SYNC ON G sync signal has been detected When pictures sync...

Page 29: ...Optional Terminal Board connected to Slot 1 Slot 2 and Slot 3 the Input label will depend on each Optional Terminal Board INPUT LABELS for Slot 1 Slot 2 Slot 3 and Mini D sub Slot1 Input INPUT1 VIDEO1...

Page 30: ...isplay the SET UP menu Press to select the COMPONENT RGB IN SELECT Press to select the desired mode COMPONENT RGB Press to exit from adjust mode Notes Selection may not be possible depending on which...

Page 31: ...GNAL H FREQ V FREQ kHz Hz 63 98 60 02 SIGNAL FORMAT 1280 1024 60 RGB 3 2 PULLDOWN XGA MODE NOISE REDUCTION OFF REFRESH RATE 100 Hz AUTO OFF 1024 768 3D Y C FILTER NTSC ON 31 Press to select the menu t...

Page 32: ...table turn the setting to OFF Notes When ON this setting only affects the following signal input NTSC PAL signal input during VIDEO S VIDEO input signal 525i 480i 625i 575i 1125 1080 60i signal input...

Page 33: ...be adjusted while a HD signal is being applied REFRESH RATE SET UP for Input Signals Press to select REFRESH RATE Press to adjust This function sets the refresh rate of the display This menu is displ...

Page 34: ...UTO The H and V sync or synchronized signal are automatically selected If both input it is selected the H and V sync ON G Uses a synchronized signal on the Video G signal which is input from the G con...

Page 35: ...nal board is attached A or B is displayed depending on the selected input signal Ex INPUT1A INPUT1B Initial VOL level Press button to adjust the volume when the unit is turned on Off On Off Sets norma...

Page 36: ...When INPUT lock is On you cannot use all the two screen display functions buttons are unavailable during Advanced PIP mode operation Off timer function Enable Enables the Off timer function Disable Di...

Page 37: ...to the board Clock Display Off Not display the clock On Display the clock The clock is displayed at the lower left of the screen when button is pressed 10 00 Note When PRESENT TIME SETUP is not set t...

Page 38: ...ay timer programming by setting time and command Note Before setting Weekly Command Timer set PRESENT TIME SETUP see page 25 Press to select Function Press to select On Note When Function is set to On...

Page 39: ...the ENTER button till the SHIPPING menu is displayed 4 Press the Volume Up or Down button to select YES 5 Press the ENTER button and wait for 10 sec Note Press the R button to return to SET UP menu wh...

Page 40: ...dicative of malfunctioning This Plasma Display uses special image processing Hence a slight time lag may occur between image and audio depending on the type of input signal However this is not a malfu...

Page 41: ...areas around the left and right edges of the screen is slightly elongated 4 3 4 3 Pictures with a 4 3 aspect ratio are displayed with their original aspect ratio Side panels are displayed at the left...

Page 42: ...1 080 30p 33 75 30 00 74 25 1 13 1 125 1 080 25p 28 13 25 00 74 25 1 14 1 125 1 080 24p 27 00 24 00 74 25 1 15 1 250 1 080 50i 31 25 50 00 74 25 3 16 640 400 70 Hz 31 46 70 07 25 17 17 640 480 60 Hz...

Page 43: ...e Picture in Picture 36 DWA POP Dual Picture mode Picture out Picture 37 DWA SWP Swap main picture and sub picture when PIP mode 38 DWA TWN Dual Picture mode Picture and Picture 39 IMS PC1 Input selec...

Page 44: ...A XGA SXGA UXGA compressed Horizontal scanning frequency 15 110 kHz Vertical scanning frequency 48 120 Hz VGA SVGA XGA SXGA UXGA compressed Horizontal scanning frequency 15 110 kHz Vertical scanning f...

Page 45: ...r damage which occur in shipment or failures which are caused by products not supplied by the warrantor or failures which result installation set up adjustments improper antenna inadequate signal pick...

Page 46: ...age period Proof of product purchase is a condition of warranty service The owner must produce the product purchase receipt or other satisfactory evidence of date of original purchase This warranty do...

Page 47: ...47...

Page 48: ...48 Note...

Page 49: ...49 Note...

Page 50: ...egion 6226 Abington Way Houston TX 77008 713 802 2726 No CA Northwest Region 5870 Stone Ridge 3 Pleasanton CA 925 416 5108 Government Marketing Department 52 West Gude Drive Rockville MD 20850 301 738...

Reviews: