Panasonic TH-32LRT12A Operating Instructions Manual Download Page 8

8

Preparation for Wall-hanging

Accessories

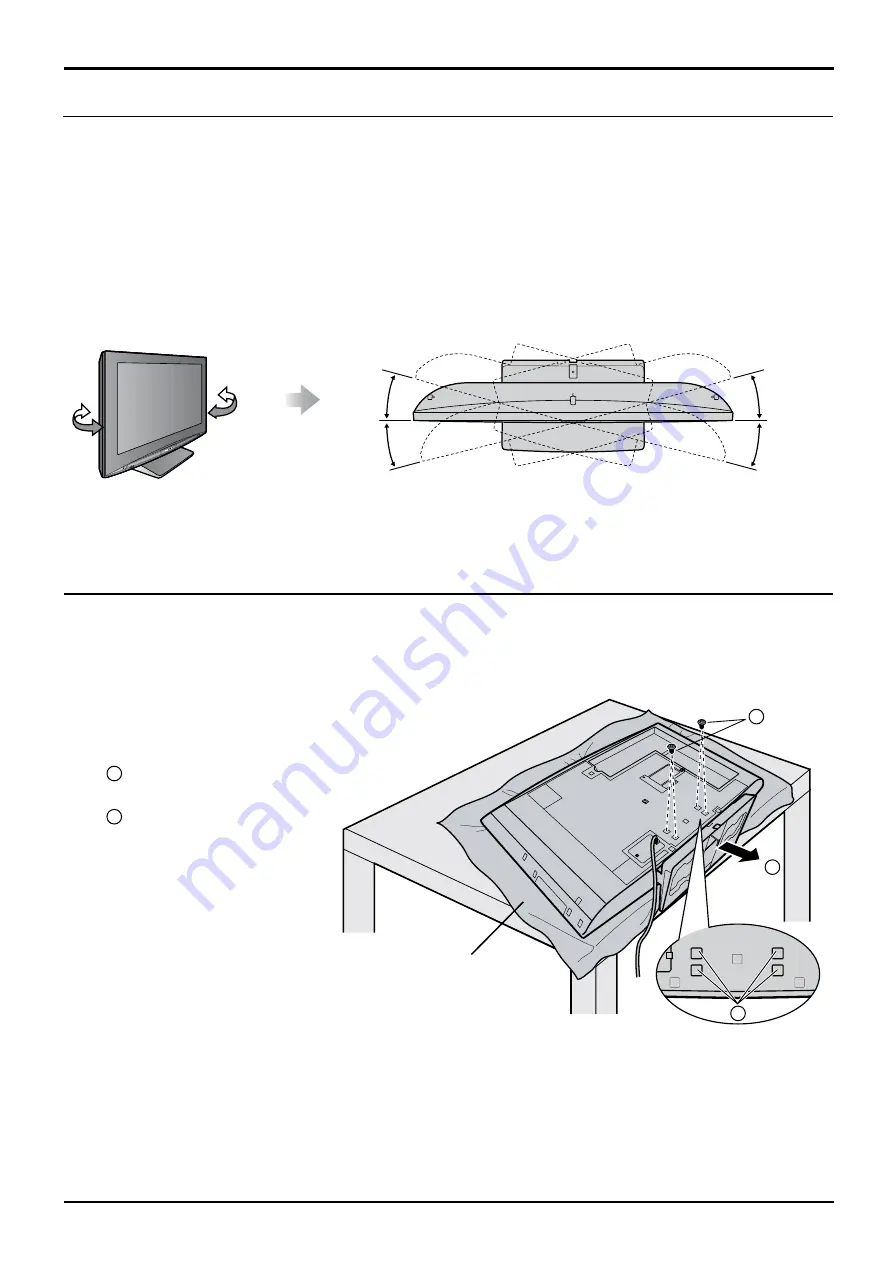
Before mounting the display on the wall, you must remove the pedestal from the display.

Follow the steps below:

1

Disconnect all the cables from the display.

2

Remove the pedestal.

A

 Remove the four screws.

B

 Pull out the pedestal.

WARNING

• 

Failure to use a Panasonic bracket or choosing to mount the unit yourself will be done at the risk of the consumer.

  Any damage resulting from not having a professional installer mount will void your unit’s warranty.

• 

Always be sure to ask a qualified technician to carry out set-up.

  Incorrect fitting may cause equipment to fall, resulting in injury and product damage.

• 

Do not mount this LCD display directly below ceiling lights (such as spotlights, floodlights, or halogen lights) which 

typically give off high heat. Doing so may warp or damage plastic cabinet parts.

• 

To prevent foreign objects from entering the Display, place the enclosed sticker label on the lower area of the 

Display to cover  the holes. 

Place the display at a comfortable distance for viewing. Avoid placing it where sunlight or other bright light (including 

reflections) will fall on the screen.

Use of some types of fluorescent lighting can reduce remote control transmitter range.

Adequate ventilation is essential to prevent an internal component failure. Keep away from areas of excessive heat 

or moisture.

How to use the pedestal

Adjust the stand to your desired angle.

The stand angle can be rotated 15 ° to the right / left.

Location

(View from above)

LCD panel side

15

°

15

°

Foam mat or thick 

soft cloth

B

A

A

Summary of Contents for TH-32LRT12A

Page 1: ...ing operating or adjusting this product please read these instructions completely Please keep this manual for future reference TH 32LRT12A TH 37LRT12A Model No Operating Instructions High Definition Hospitality LCD Display English TQB4CM173 123456789 ...

Page 2: ...s or stands recommended by the manufacturer of the display Only using furniture that can safely support the display Ensuring the display is not overhanging the edge of the supporting furniture Not placing the display on tall furniture for example cupboards or bookcases without anchoring both the furniture and the display to a suitable support Not standing the displays on cloth or other materials p...

Page 3: ...ents Important Safety Instructions 2 Table of Contents 3 Safety Precautions 4 Accessories 7 Accessories Supplied 7 Remote Control Batteries 7 Location 8 Preparation for Wall hanging 8 Connections 9 AV connection 10 Component YPbPr connection 10 PC Input Terminals connection 11 HDMI connection 12 Audio Out connection 12 Serial Terminals connection 13 Power ON OFF 14 Using the Power Switch 14 Using ...

Page 4: ...es The LCD Display may fall off or tip over Do not place any object on top of the LCD Display If water spills onto the LCD Display or foreign objects get inside it a short circuit may occur which could result in fire or electric shock If any foreign objects get inside the LCD Display please consult your local Panasonic dealer Transport only in upright position Transporting the unit with its displa...

Page 5: ...ric shocks Securely insert the power supply plug as far as it will go If the plug is not fully inserted heat may be generated which could cause fire If the plug is damaged or the wall socket is loose they shall not be used Do not handle the power supply plug with wet hands Doing so may cause electric shocks Do not do anything that may damage the power cable When disconnecting the power cable pull ...

Page 6: ...ay from direct or reflected light from your LCD Display Cleaning and maintenance The front of the display panel has been specially treated Wipe the panel surface gently using only a cleaning cloth or a soft lint free cloth If the surface is particularly dirty wipe with a soft lint free cloth which has been soaked in pure water or water in which neutral detergent has been diluted 100 times and then...

Page 7: ...ays be replaced as a pair Always use new batteries when replacing the old set 2 Do not combine a used battery with a new one 3 Do not mix battery types example Zinc Carbon with Alkaline 4 Do not attempt to charge short circuit disassemble heat or burn used batteries 5 Battery replacement is necessary when the remote control acts sporadically or stops operating the Plasma Display 6 Do not burn or b...

Page 8: ...ay directly below ceiling lights such as spotlights floodlights or halogen lights which typically give off high heat Doing so may warp or damage plastic cabinet parts To prevent foreign objects from entering the Display place the enclosed sticker label on the lower area of the Display to cover the holes Place the display at a comfortable distance for viewing Avoid placing it where sunlight or othe...

Page 9: ...ction see page 10 Component YPbPr connection see page 10 PC input terminals connection see page 11 Serial Terminals connection see page 13 Audio out connection see page 12 HDMI connection see page 12 Lift door to open AV connection see page 10 ...

Page 10: ...put signal is the priority source Example of input signal source Component YPbPr connection Example of input signal source Note Additional equipment and cables shown are not supplied with this set S VIDEO VCR CAMCORDER VCR S VIDEO OUT VIDEO OUT AUDIO OUT L R Back side Front side AUDIO OUT Y PB PR OUT PR PB Y L R DVD Digital TV SET TOP BOX DTV STB COMPONENT VIDEO OUT ...

Page 11: ... DDC2B compatible If the computer being connected is not DDC2B compatible you will need to make setting changes to the computer at the time of connection Some PC models cannot be connected to the set There is no need to use an adapter for computers with DOS V compatible Mini D sub 15P terminal The computer shown in the illustration is for example purposes only Additional equipment and cables shown...

Page 12: ...wn are not supplied with this set 2 HDMI Version 1 2 DVD Player or SET TOP BOX HDMI compatible machines only HDMI cable Connections Audio Out connection Note Additional equipment and cables shown are not supplied with this set AUDIO OUT R L Audio equipment HDMI AV OUT ...

Page 13: ...nd back to the computer Basic format for control data The transmission of control data from the computer starts with an STX signal followed by the command the parameters and lastly an ETX signal in that order If there are no parameters then the parameter signal does not need to be sent STX C1 C2 C3 P1 P2 P3 P4 P5 ETX Start 02h 3 character command 3 bytes Colon Parameter s 1 5 bytes End 03h Communi...

Page 14: ... Display off Power Indicator Red POWER Power Indicator Power Switch Remote Control Sensor 1 Press the Power switch on the Display to turn the set on Power On 2 Power Indicator Green Using the Power Switch When the Display is on press the Power switch on the Display to turn the set off Power Indicator Red Standby Note The Display will still consume power as long as the AC cord is connected to the w...

Page 15: ...anguage Setup Menu Language Movie Mode English On 4 Select your preferred language English Français Español Press repeatedly until the desired input source signal is displayed on the screen Input signals will change as follows INPUT AV1 AV2 HDMI1 HDMI2 AV3 YPbPr HDMI3 PC DISPLAY POWER INPUT MUTE RETURN OFF TIMER RECALL ASPECT CH VOL MENU TNQ4CM051 INPUT TH 32LRT12A TH 37LRT12A POWER INPUT MUTE RET...

Page 16: ...H 32LRT12A Channel Adjustment Press to change to the next or previous channel Lift the door to open TH 37LRT12A INPUT button see page 15 Volume Adjustment Press toincreasevolumeorpress to reduce volume MENU Screen ON see page 19 This button is locked by initial setting INPUT button see page 15 Channel Adjustment Press to change to the next or previous channel Volume Adjustment Press to increase vo...

Page 17: ...h to standby mode after a fixed period Each time the button is pressed the timer is changed with an interval of 10 minutes POSITION buttons Sound mute On Off Press this button to mute the sound Press again to reactivate sound Sound is also reactivated when power is turned off or volume level is changed RETURN button Press the RETURN button to return to previous menu screen 20 30 60 40 120 10 OFF 5...

Page 18: ...is slightly elongated Pictures with a 4 3 aspect ratio are enlarged horizontally so that the picture distortion is minimized The left and right edges of the pictures are cut off The display of the areas around the left and right edges of the screen is slightly elongated 4 3 Pictures with a 4 3 aspect ratio are displayed with their original aspect ratio Side panels are displayed at the left and rig...

Page 19: ... Main Menu Picture Menu Sound Menu Setup Menu 1 Press the CH buttons to select the menu 2 Press the MENU button 3 Select the item Press the CH or buttons to select the item Picture Menu Picture Mode Standard Contrast Brightness Color Tint Sharpness 32 32 32 00 12 User Off Example Picture Menu 4 Adjust or select Press the VOL or buttons 32 Contrast 5 Exit the menu RETURN Press to return to the prev...

Page 20: ...Brightness Color Tint Sharpness 32 32 32 00 12 Vivid Off see page 21 Picture Menu Standard Contrast Brightness 32 32 Off Sound Menu 00 00 00 Sound Mode Sound AI Standard Bass Treble Balance MPX Dynamic Off Off Stereo see page 22 During AV YPbPr and HDMI input signal Setup Menu Language Movie Mode English On see page 23 During PC input signal Setup Menu 00 00 00 32 Auto H Pos V Pos Dot_Clock Clock_...

Page 21: ...ed for normal viewing conditions with subdued room lighting User Customizes each item according to the user s preference During AV YPbPr HDMI input signal 2 Select Picture Menu Press to select the menu to adjust Press to enter menu 3 1 MENU Press to display the menu screen Contrast Brightness Color Tint Sharpness Depending on the selected Picture Mode these items have preset settings To adjust eac...

Page 22: ...p sounds Music Stresses the sense of sharp sounds Normal Emits the original sound Dynamic Normal Music Sound AI Off On Select On to equalize overall volume levels across all external inputs Press the or buttons to adjust settings Bass 00 Standard Off On Select On to reset Bass Treble and Balance settings to factory defaults Bass Adjusts low pitch sounds Treble Adjusts pitch sounds Balance Adjusts ...

Page 23: ...een Setup Menu Language Movie Mode English On During AV YPbPr and HDMI input signal Movie Mode Off On When On the display attempts to reproduce a more natural interpretation of sources such as movie pictures which are recorded at 24 frames per second If the picture is not stable turn this setting to Off Press the or buttons to switch between menu languages English Español Français 4 RETURN Press r...

Page 24: ...ms are grayed out As you scroll through the settings the TV display changes synchronously Press to select the item 4 Adjust the setting Press the or buttons to adjust settings On Off Select On to automatically adjust H Pos V Pos Dot_Clock and Clock_Phase H Pos Adjust the horizontal position V Pos Adjust the vertical position Dot_Clock Periodic striped pattern interference noise may occur when a st...

Page 25: ...ed settings Main Menu Picture Menu Sound Menu Setup Menu Setup Menu Language Movie Mode English On Press to select the item Press to adjust settings Setup Menu Initial Input Onscreen Display Initial VOLLevel MaximumVOLLevel Input Lock Button Lock RemoconUserLevel Off On Off Off Off Menu Off The Hotel Mode is a special function which allows users to configure settings to suit certain locations or a...

Page 26: ...tting which is higher than the Maximum VOL Level setting Maximum VOL Level Used to set the volume level so that it will not exced the maximum setting Off No restrictions are placed on the volume level 0 to 63 The volume is restricted to the selected level Note It is not possible to select a Maximum VOL Level setting which is lower than the Initial VOL Level setting Input Lock Off RF AV1 AV2 AV3 YP...

Page 27: ...a video software program such as a cinema size program with a screen wider than one in the 16 9 mode blank areas separate from the images are formed at the top and bottom of the screen This LCD Display uses special image processing Hence a slight time lag may occur between image and audio depending on the type of input signal However this is not a malfunction LCD Display panel Symptoms Check It ta...

Page 28: ... 640 x 480 72 Hz 37 86 72 81 31 5 3 640 x 480 75 Hz 37 50 75 00 31 5 4 800 x 600 56 Hz 35 16 56 25 36 0 5 800 x 600 60 Hz 37 88 60 32 40 0 6 800 x 600 72 Hz 48 08 72 19 50 0 7 800 x 600 75 Hz 46 88 75 00 49 5 8 1024 x 768 60 Hz 48 36 60 00 65 0 9 1024 x 768 70 Hz 56 48 70 07 75 0 10 1024 x 768 75 Hz 60 02 75 03 78 75 Note Signals without the above specifications may not be displayed properly ...

Page 29: ...N RCA PIN JACK x 3 1 0 Vp p 75 Ω S VIDEO IN MINI DIN 4PIN x 3 Y 1 0 Vp p 75 Ω C 0 286 Vp p 75 Ω AUDIO IN RCA PIN JACK x 3 0 5 Vrms YPBPR Y RCA PIN JACK x 1 1 0 Vp p 75 Ω PB PR RCA PIN JACK x 1 0 7 Vp p 75 Ω AUDIO IN RCA PIN JACK x 1 0 5 Vrms PC IN HIGH DENSITY MINI D SUB 15PIN G 0 7 Vp p 75 Ω B 0 7 Vp p 75 Ω R 0 7 Vp p 75 Ω HD VD 1 0 5 0 Vp p high impedance AUDIO IN M3 JACK 0 5 Vrms HDMI1 HDMI3 TY...

Page 30: ...ote this serial number in the space provided below and retain this book plus your purchase receipt as a permanent record of your purchase to aid in identification in the event of theft or loss and for Warranty Service purposes Model Number Serial Number Printed in Taiwan Panasonic Taiwan Co Ltd Made in Taiwan ...

Reviews: