background image

25

Lock Feature

In the United States, the V-CHIP consists of two rating systems, which are MPAA
(MOTION PICTURE) and TV PARENTAL GUIDELINES. Its function is to block programs
by the rating data in the XDS data packets sent from broadcasting stations. The user
can select which rating programs should be blocked by the LOCK MENU options.

MENU

ADJUST

SET  UP

LANGUAGE

PROGRAM  CH

LOCK

CLOSED  CAPTION

INPUT  LABEL

OTHER  ADJUST

LOCK

BLOCK  PROGRAMS

STATUS

U. S.  TV PROGRAMS

CHANGE  SETTING

CHANGE CODE

OFF  

ON

LOCK

BLOCK  PROGRAMS

STATUS

U. S.   MOVIES

CHANGE  SETTING

ENTER  CODE  FIRST

OFF  

ON

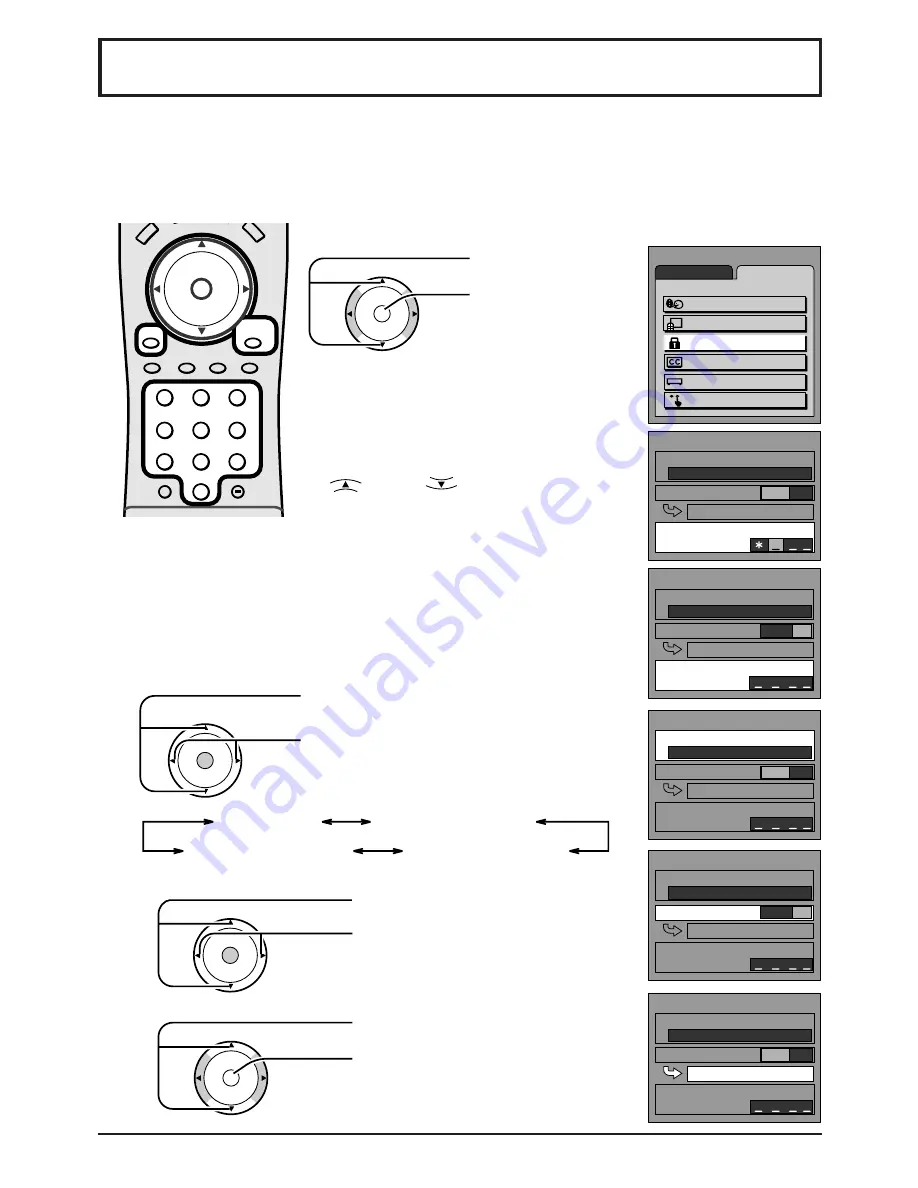
Press the MENU button to display the MENU screen and select SET UP.

Input code
Enter any 4-digit number as a password.
These numbers will be needed when
deactivating the LOCK function.

While entering a code, by pressing the
up 

 or down 

 buttons you can

input a new code again.

CH

CH

VOL

VOL

O K

Press to select LOCK.

Press to display the
LOCK screen.

1

Selecting broadcasts to lock.

Press to select BLOCK PROGRAMS.

Press to select U.S MOVIES, U.S. TV
PROGRAMS, CANADIAN ENGLISH
or CANADIAN FRENCH.

CH

CH

VOL

VOL

O K

U.S. MOVIES

CANADIAN ENGLISH

CANADIAN FRENCH

U.S. TV PROGRAMS

2

Press to select STATUS.

Press to select ON or OFF.

CH

CH

VOL

VOL

O K

Press to select CHANGE SETTING.

Press to display the next screen.

3

LOCK

BLOCK  PROGRAMS

STATUS

U. S.  TV PROGRAMS

CHANGE  SETTING

CHANGE CODE

OFF

  ON

LOCK

BLOCK  PROGRAMS

STATUS

U. S.  TV PROGRAMS

CHANGE  SETTING

CHANGE CODE

OFF  

ON

CH

CH

VOL

VOL

O K

After entering your secret code for the first time, the onscreen
display will change to CHANGE CODE. And you can change the
Input code.

Note: Use a code that is easy to remember and record it in a
safe place.

LOCK

BLOCK  PROGRAMS

STATUS

U. S.  TV PROGRAMS

CHANGE  SETTING

CHANGE CODE

OFF

  ON

DV

D

1

2

3

4

5

6

7

8

0

9

RETURN
EXIT

MENU

R-TUNE

SLEEP

PROG

GUIDE

RECALL

MUTE

TV/VIDEO

CH

CH

VOL

VOL

A

CTION

TV

1

2

3

4

5

6

7

8

0

9

RETURN
EXIT

MENU

R-TUNE

CH

CH

VOL

VOL

O K

Summary of Contents for TC22LH1 - 22" WIDE LCD CLR TV

Page 1: ... manual for future reference English Model No TC 22LH1 For assistance please call 1 800 211 PANA 7262 or send e mail to consumerproducts panasonic com or visit us at www panasonic com U S A For assistance please call 787 750 4300 or visit us at www panasonic com Puerto Rico For assistance please call 1 800 561 5505 or visit us at www panasonic ca Canada ...

Page 2: ...nstructions Slots and Openings in the cabinet are provided for ventilation and to ensure reliable operation of the product and to protect it from overheating The openings should never be blocked by placing the product on a bed sofa rug or other similar surface 8 Do not install near any heat sources such as radiators heat registers stoves or other apparatus including amplifiers that produce heat Th...

Page 3: ...ubstitutions may result in fire electric shock or other hazards 19 WARNING TO REDUCE THE RISK OF FIRE OR ELECTRIC SHOCK DO NOT EXPOSE THIS APPARATUS TO RAIN OR MOISTURE DO NOT PLACE LIQUID CONTAINERS FLOWER VASES CUPS COSMETICS ETC ABOVE THE SET INCLUDING ON SHELVES ABOVE ETC 20 CAUTION TO PREVENT ELECTRIC SHOCK DO NOT USE THIS PLUG WITH A RECEPTACLE OR OTHER OUTLET UNLESS THE BLADES CAN BE FULLY ...

Page 4: ...tructions may cause harmful interference to radio communications However there is no guarantee that interference will not occur in a particular installation If this equipment does cause or receive interference which can be determined by turning equipment off and on the user is encouraged to try to correct the interference by one or more of the following measures Reorient or relocate the TV antenna...

Page 5: ...PUT labels 30 OTHER ADJUST 30 Operating peripheral equipment using the remote control 31 Programming The Illuminated Remote Control Using Access Codes 31 Programming Without A Code When the code is not known 32 Infrared Codes Index 33 IMode Operational Key Chart 35 Troubleshooting 46 Specifications 47 Manual de instrucciones Resumen Preparación 36 Instalación de las pilas en el control remoto 36 C...

Page 6: ...m your dealer or electronic supply store Before you purchase any cables be sure you know what type of output and input connectors your various components require Also determine the length of cable you ll need For optimum quality picture When the LCD is exposed to light from outdoors or lighting fixtures high contrast pictures may not be displayed clearly Turn off florescent lamps near the LCD and ...

Page 7: ...replace the batteries Refer to the label on back of the remote control for directions on replacing batteries Requires two AA batteries 1 Open the battery cover 2 Install the batteries as shown in the battery compartment Polarity or must match the markings in the compartment 3 Replace the cover Replacing batteries Replace batteries by following the steps below Installation Remote control battery in...

Page 8: ...nnels A cable converter box is required for proper reception Check with your local Cable company for its compatibility requirements Antenna Cable Connection Antenna cover removal and fitting 1 Removal 1 Push up hooks and pull the cover slightly towards yourself to disengage the claws at 4 points 2 Slowly pull out in the downward direction ANT VHF UHF on the Back of the TV F Type Antenna Adapter su...

Page 9: ...R Y Y L R L R VIDEO VIDEO AUDIO AUDIO PB PB PR PR 1 2 1 2 AUDIO OUT HPJ COMPONENT VIDEO INPUT L R L R VIDEO VIDEO AUDIO AUDIO INPUT ANT OUTPUT S VIDEO VIDEO L AUDIO R C o n n e c t t h e cable from the Antenna Output terminal on the back of the VCR to the Antenna terminal ANT or VHF UHF on the back of the TV Connect the cable from the Output terminal on the back of the Cable Box to the Antenna Inp...

Page 10: ...O S VIDEO L R Y Y L R L R VIDEO VIDEO AUDIO AUDIO PB PB PR PR 1 2 1 2 AUDIO OUT HPJ COMPONENT VIDEO INPUT L R L R VIDEO VIDEO AUDIO AUDIO INPUT 1 2 S VIDEO S VIDEO L R Y Y L R L R VIDEO VIDEO AUDIO AUDIO PB PB PR PR 1 2 1 2 AUDIO OUT HPJ COMPONENT VIDEO INPUT L R L R VIDEO VIDEO AUDIO AUDIO INPUT 1 2 S VIDEO S VIDEO L R Y Y L R L R VIDEO VIDEO AUDIO AUDIO PB PB PR PR 1 2 1 2 AUDIO OUT HPJ COMPONEN...

Page 11: ... Audio OUT L R Notes When connecting video cables priority is given to the S Video cable when the S Video input terminal and the video input terminal are connected at the same time The volume control output of the LCD TV will be fixed SOUND ADJUST VOLUME UP DOWN and SURROUND ON OFF are not functional for output signals from the AUDIO OUT terminals Super VHS VCR Connect the S VIDEO or VIDEO Termina...

Page 12: ...on 3 HDMI DVI conversion cable part no TY SCH03DH available on Panasonic Website USA only www panasonic com 4 AUDIO IN Please refer to page 24 HDMI IN If the external device has DVI output only use a HDMI DVI conversion cable 3 to connect to the HDMI jack on the LCD Also connect the Audio out signal from the external device Set Top Box or DVD player to the AUDIO IN 4 jacks beside the HDMI input Th...

Page 13: ...d for a while after the TV is turned on setting condition is an example Press the POWER button on the remote control to turn the TV off Red standby Press the POWER button on the remote control to turn the TV on Green POWER ZOOM VCR DVD RETURN EXIT MENU SAP POWER CH CH VOL VOL DBS CBL T V O K 2 1 3 CH 6 STEREO SAP MONO Note The TV will still consume some power as long as the power cord is still plu...

Page 14: ...oadcasting Satellite for Remote Control Cable TV Mode Selection for Remote Control Digital Video Disc Mode Selection for Remote Control R TUNE Location of Controls DBS CBL VCR TV DVD TV VCR Switch STB ASPECT Open Close VCR CH up down PAGE up down Slow VCR CABLE DBS DVD VCR CABLE DBS DVD VCR REW FF Skip Search REW FF PLAY PLAY VCR RECORD Pause Pause STOP STOP Buttons Buttons Device Buttons Buttons ...

Page 15: ...for DBS The input mode changes each time this button is pressed PROG dash button SLEEP TIMER button Program dash channel numbers for DTV and DBS Sleep timer MINUTES SLEEP PROG Reduces volume Moves cursor to the left during menu mode Displays menu Press to access TV DTV DBS or DVD menus Changes to the next channel down Moves cursor downward during menu mode Increases volume Moves cursor to the righ...

Page 16: ...CK CLOSED CAPTION INPUT LABEL OTHER ADJUST MENU selection or Press to display MENU screen press again to clear 1 MENU ADJUST PICTURE AUDIO SET UP PICTURE ADJUST POSITION SIZE AUDIO ADJUST MENU ADJUST PICTURE AUDIO SET UP PICTURE ADJUST POSITION SIZE AUDIO ADJUST An On Screen Help box is displayed whenever a menu is displayed on the TV This Help box indicates which keys on the remote control are us...

Page 17: ...ss to display each adjustment screen LOCK BLOCK PROGRAMS STATUS U S MOVIES CHANGE SETTING ENTER CODE FIRST OFF ON TO LOCK selection screen See page 25 TO AUDIO ADJUST menu See page 24 AUDIO ADJUST NORMAL 10 8 0 DYNAMIC OFF ON AUTO MODE BASS TREBLE BALANCE SURROUND STEREO SAP MONO HDMI IN POSITION SIZE NORMAL NORMALIZE SIZE 1 RETURN LANGUAGE ENGLISH LANGUAGE TO LANGUAGE Allows you to select the lan...

Page 18: ...ss to display the confirmation screen 5 Press to select YES Press to select NO Press to run AUTO PROGRAM Press the MENU button to display the MENU screen and select SET UP CH CH VOL VOL O K CH CH VOL VOL O K CH CH VOL VOL O K CH CH VOL VOL O K Channels will automatically advance until all channels have been scanned Channel numbers with a video signal present will be stored in the Channel Scan Memo...

Page 19: ...y Channel number turns blue Press to delete channels from memory Channel number turns yellow 4 Repeat steps 2 and 3 to continue adding or deleting channels CH CH VOL VOL O K CH CH VOL VOL O K Press to exit from the MENU screen This returns the set to the normal viewing condition MENU Tuning channels Manual channel programming Use this setting when changing setting of receiving channels or changing...

Page 20: ...4 3 size ZOOM mode magnifies the central section of the picture FULL will display the picture at its maximum size but with slight elongation JUST mode will display a 4 3 picture at its maximum size but with aspect correction applied to the sides of the screen so that elongation is only apparent at the left and right edges of the screen The size of the picture will depend on the original signal Mod...

Page 21: ...ht is adjusted Selects proper brightness and density for the room Adjusts for easier viewing of dark pictures such as night scenes Adjusts the level of color Adjusts for flesh tone color Adjusts the degree of sharpness Displays black and white colors more clearly when turned ON Increase or decrease WARM red and COOL blue colors to suit personal preference To reset to standard setting CH CH VOL VOL...

Page 22: ...hter Noise unique to DVD STB etc will be reduced Picture Adjustments OFF ON COOL COOL PICTURE ADJUST PAGE 1 2 NORMALIZE PIC MODE BACK LIGHT PICTURE BRIGHTNESS COLOR TINT SHARPNESS AI PICTURE OFF ON STANDARD 20 20 0 1 0 0 NORMAL 8 8 0 BLACK EXTENSION WHITE CHAR CORR MPEG NR ADVANCED ADJUST Press to select the menu to adjust Select the desired level by looking at the picture behind the menu NORMAL i...

Page 23: ...ntrol Press to move picture vertically for the best view It will work for NORMAL and JUST mode only Picture Size Adjustment Press to select size 1 reduced black bar size 2 widened black bar ZOOM Size1 Size2 CH CH VOL VOL O K To return to previous screen RETURN EXIT Press to return To reset to standard setting Press OK MENU ADJUST PICTURE AUDIO SET UP PICTURE ADJUST POSITION SIZE AUDIO ADJUST CH CH...

Page 24: ...our personal preference Function Adjusts low sounds Adjusts high sounds Adjusts left and right volume To enjoy a concert hall effect turn SURROUND to ON when a stereo signal is available AUDIO ADJUST NORMAL 10 8 0 DYNAMIC OFF ON AUTO MODE BASS TREBLE BALANCE SURROUND STEREO SAP MONO HDMI IN MENU ADJUST PICTURE AUDIO SET UP PICTURE ADJUST POSITION SIZE AUDIO ADJUST STANDARD DYNAMIC AUTO MODE STEREO...

Page 25: ...VOL VOL O K Press to select LOCK Press to display the LOCK screen 1Selecting broadcasts to lock Press to select BLOCK PROGRAMS Press to select U S MOVIES U S TV PROGRAMS CANADIAN ENGLISH or CANADIAN FRENCH CH CH VOL VOL O K U S MOVIES CANADIAN ENGLISH CANADIAN FRENCH U S TV PROGRAMS 2 Press to select STATUS Press to select ON or OFF CH CH VOL VOL O K Press to select CHANGE SETTING Press to display...

Page 26: ...elow this rating are selected When options within an option field are selected ratings below this rating within the same field are selected Ratings displayed in green are unlocked and those displayed in red are blocked programs 1 Ratings for children These ratings are divided into ranks as follows 2 Ratings for teenagers These ratings can be created out of these major categories to form various co...

Page 27: ... Press to select VIEW NR PROGRAMS Press to select NO or YES NO Cannot view programs with NR signals YES Can view programs with NR signal 2 Press to select rating Press to lock or unlock the rating Lock Red Unlock Green CANADIAN FRENCH VIEW E PROGRAMS NO YES G 8 ANS 13ANS 16ANS 18ANS CANADIAN ENGLISH VIEW E PROGRAMS NO YES C C8 G PG 14 18 Rating G General audience PG Parental guidance suggested PG ...

Page 28: ...ence or scenes of extreme violence CANADIAN FRENCH RATINGS CHART General Programming intended for audience of all ages Contains no violence or the violence content is minimal or is depicted appropriately Programming may not be suitable for children under the age of 13 Contains either a few violent scenes or one or more sufficiently violent scenes to affect them Adult supervision strongly suggested...

Page 29: ... VOL O K MENU ADJUST SET UP LANGUAGE PROGRAM CH LOCK CLOSED CAPTION INPUT LABEL OTHER ADJUST 3 Press to select from the following CC MODE Activates the On Screen Closed Caption feature When activated this feature will remain on until OFF is selected in this menu CLOSED CAPTION MODE OFF ON MUTE NO OFF C1 C2 CH CH VOL VOL O K Press to select CC MODE CAPTION OFF CAPTION C1 CAPTION C2 Recommended mode...

Page 30: ...O K VIDEO1 VIDEO2 HDMI COMPONENT2 COMPONENT1 OTHER ADJUST VIDEO NR OFF ON 3D Y C COLOR MATRIX OFF ON POWER SAVE STANDARD SD HD Each INPUT LABEL has the following choices INPUT LABEL COMPONENT1 COMPONENT2 VIDEO1 VIDEO2 HDMI COMPONENT1 COMPONENT2 VIDEO1 VIDEO2 HDMI VIDEO NR Reduce video noise in the picture Selection condition 3D Y C FILTER Minimizes noise and cross color in the picture Not availabl...

Page 31: ...de using the Remote Control numeric keypad 6 POWER VCR DVD DBS CBL T V 1 2 3 4 5 6 7 8 0 9 POWER Press the Remote Control POWER to test the component If the procedure is successful the component will turn on If the component does not operate with the Remote Control repeat the procedure using another code Some brands have multiple codes If an incorrect code is entered or if the procedure takes long...

Page 32: ...mote control Programming Without A Code When the code is not known Press POWER and OK together for at least 5 seconds After 5 seconds all the illuminated mode keys will begin to flash Release the POWER and OK key CH CH VOL VOL O K CH CH VOL VOL O K POWER VCR DVD DBS CBL T V RETURN EXIT MENU PLAY R TUNE SLEEP PROG GUIDE RECALL MUTE TV VIDEO STOP T V PAUSE REC FF REW ASPECT TV VCR VCR DBS CH SAP CH ...

Page 33: ...2 323 324 Radio Shack 305 309 324 333 336 340 RCA 300 301 302 323 324 331 333 345 346 Realistic 305 309 324 336 340 Samsung 302 304 333 Sansui 320 326 339 352 Sanyo 305 309 313 Scott 301 302 304 309 320 326 338 340 347 348 Sears 300 305 306 307 308 Sharp 335 336 Shintom 317 Signature 2000 335 Singer 317 Sony 328 329 330 Sylvania 323 324 331 Tashiro 306 Tatung 310 311 339 Teac 310 311 339 Technics ...

Page 34: ...102 137 139 Panasonic 109 110 114 Philips 106 107 128 129 130 Pioneer 101 116 Pulsar 105 132 Codes for Cable Box Brand Code Puser 132 RCA 115 Realistic 132 Regal 112 118 140 141 142 145 Regency 134 Rembrandt 105 132 137 Samsung 105 Scientific Atlanta 111 112 113 Slmark 101 105 Sprucer 105 110 Stargate 105 132 Tel eview 101 105 Texscan 144 Tocom 135 Toshiba 104 Unika 125 132 Universal 122 132 Video...

Page 35: ...V VCR SWITCH OPEN CLOSE PAGE UP DOWN SLOW Operating peripheral equipment using the remote control Mode Operational Key Chart This chart defines which keys are operational after programming if needed while in the selected remote control mode TV DTV CABLE DBS VCR DVD etc PREVIOUS CHAN OR VIDEO MODE POWER SAP MUTE TV VIDEO MENU RECALL RETURN EXIT GUIDE R TUNE SLEEP PROG FF REW PLAY PAUSE STOP ASPECT ...

Page 36: ...cesitan dos pilas AA 1 Abra la cubierta de las pilas 2 Instale las pilas como se muestra en el compartimiento de las pilas Las polaridades y deber á n coincidir con las marcas correspondientes del compartimiento 3 Vuelva a colocar la cubierta Preparación Estimado cliente de Panasonic Bienvenido a la familia de clientes de Panasonic Esperamos sinceramente que disfrute durante muchos años de su nuev...

Page 37: ...an un ruido seco 2 Instalación Ganchos S VIDE O S VIDE O Y Y L R L R VIDEO VIDEO AUDIO AUDIO PB PB PR PR 1 2 1 2 COMPO NENT VIDEO INPUT L R L R VIDEO VIDEO AUDIO AUDIO INPUT 2 1 Antena de VHF Antena de UHF Cable coaxial de 75 ohmios Mezclador Terminal de antena ANT o VHF UHF Clavija de antena coaxial Cable entrante de 75 ohmios procedente de la antena del hogar compañía de televisión por cable Not...

Page 38: ...el cable S VIDEO S VIDEO L R Y Y L R L R VIDEO VIDEO AUDIO AUDIO PB PB PR PR 1 2 1 2 AUDIO OUT HPJ COMPONENT VIDEO INPUT L R L R VIDEO VIDEO AUDIO AUDIO INPUT 1 2 S VIDEO S VIDEO L R Y Y L R L R VIDEO VIDEO AUDIO AUDIO PB PB PR PR 1 2 1 2 AUDIO OUT HPJ COMPONENT VIDEO INPUT L R L R VIDEO VIDEO AUDIO AUDIO INPUT 1 2 Reproducción en una videograbadora o en otro equipo periférico Como conectar el tér...

Page 39: ...era pulse el interruptor POWER principal del televisor para apagarlo POWER OFF Apagado Ejemplo La pantalla de abajo se visualiza durante un rato después de encenderse el televisor La condición de ajuste es un ejemplo Pulse el botón POWER del mando a distancia para apagar el televisor Rojo espera Pulse el botón POWER del mando a distancia para encender el televisor Verde Cómo conectar la alimentaci...

Page 40: ...do de videograbadora para el control remoto Satélite de emisión digital para el control remoto Selección del modo de televisión por cable para el control remoto Selección del modo de disco de vídeo digital para el control remoto Ubicación de los controles Botón ASPECT Cambia el tamaño de la pantalla consulte la página 20 DBS CBL VCR TV DVD Control remoto iluminado Videograbadora CABLE DBS DVD Vide...

Page 41: ... Mueve el cursor hacia la izquierda durante el modo del menú Visualiza el menú Presione para acceder a los menús DTV DBS o DVD Cambia al siguiente canal inferior Mueve el cursor hacia abajo durante el modo del menú Aumenta el volumen Mueve el cursor hacia la derecha durante el modo del menú Cambia al siguiente canal superior Mueve el cursor hacia arriba durante el modo del menú Presione para volve...

Page 42: ...lizar la pantalla MENU y púlselo de nuevo para cancelarla MENU Ajuste Imagen Sonido Configu Ajuste Imagen Ajuste Sonido MENU Ajuste Configu MENU Ajuste Imagen Sonido Configu Ajuste Imagen Ajuste Sonido MENU Ajuste Configu MENU Ajuste Imagen Sonido Configu Ajuste Imagen Ajuste Sonido o El cuadro de ayuda en pantalla se visualiza siempre que aparece un menú en la pantalla Este cuadro de ayuda indica...

Page 43: ... visualizaciones en pantalla Menú Prog Canales Menú Ponga Títulos Menú Otro Ajuste Pantalla e ajuste Subtítulos CH CH VOL VOL O K No MODO Si EN MUDO Subtitulos Idioma Idioma Ajuste Imagen Normalizar Imagen Luz de Atras CONTRASTE BRILLO COLOR TINTE NITIDEZ Imagen IA Normal No Si 20 20 0 1 0 0 Bloqueo Programas Activado Modificar INGRESAR CLAVE No Si Ajuste Sonido Normal Sonido BAJOS ALTOS BALANCE S...

Page 44: ...a Prog Canales 2 3 Pulse para seleccionar MODO Pulse para seleccionar TV o CABLE 4 Pulse para seleccionar PROGRAMAAUTO Pulse para visualizar la pantalla de confirmación 5 Pulse para seleccionar Si Pulse para seleccionar No Pulse para ejecutar PROGRAMAAUTO Pulse el botón MENU para visualizar la pantalla MENU y seleccione Configu Los canales avanzarán automáticamente hasta que todos hayan sido explo...

Page 45: ...do o borrando canales Pulse para salir de la pantalla MENU Esto hace que el aparato vuelva a la condición de visión normal Sintonización de canales Programación manual de canales Utilice este ajuste cuando cambie ajustes de los canales de recepción o cuando cambie la visualización de los canales Encienda el televisor y seleccione el canal de emisión Siga los pasos de la página anterior para visual...

Page 46: ...es neon motors magnetized steel frame or iron rain shutters etc Turn off the power supply and try changing the equipment setup location If that has no effect separate magnet proofing will be required Is the antenna direction shifted Are reflected electromagnetic waves being received from mountains or buildings Is the equipment being affected by another TV electromagnetic interference Changing the ...

Page 47: ...559 mm 22 inch 16 9 aspect ratio LCD panel 487 7 mm 19 20 W 274 3 mm 10 80 559 5 mm 22 03 DIAGONAL VHF 12 UHF 56 Cable 125 3W 3W 5W 10 THD 4 cm 2 pcs 5 cm 2 pcs M3 3 5 mm Jack 1 CLOSED CAPTION V Chip Temperature 41 F 95 F 5 C 35 C Humidity 5 90 RH non condensing VIDEO RCA PIN Type 1 2 1 0 Vp p 75 Ω S VIDEO MINI DIN 4pin 1 2 Y 1 Vp p 75 Ω C 0 286 Vp p 75 Ω AUDIO L R RCA PIN Type 2 2 0 5 Vrms Y 2 1 ...

Page 48: ...85 Printed in Japan MBS0703S0 Panasonic Canada Inc 5770 Ambler Drive Mississauga Ontario L4W 2T3 Customer Record The model number and serial number of this product can be found on its rear panel You should note this serial number in the space provided below and retain this book plus your purchase receipt as a permanent record of your purchase to aid in identification in the event of theft or loss ...

Reviews: