background image

22

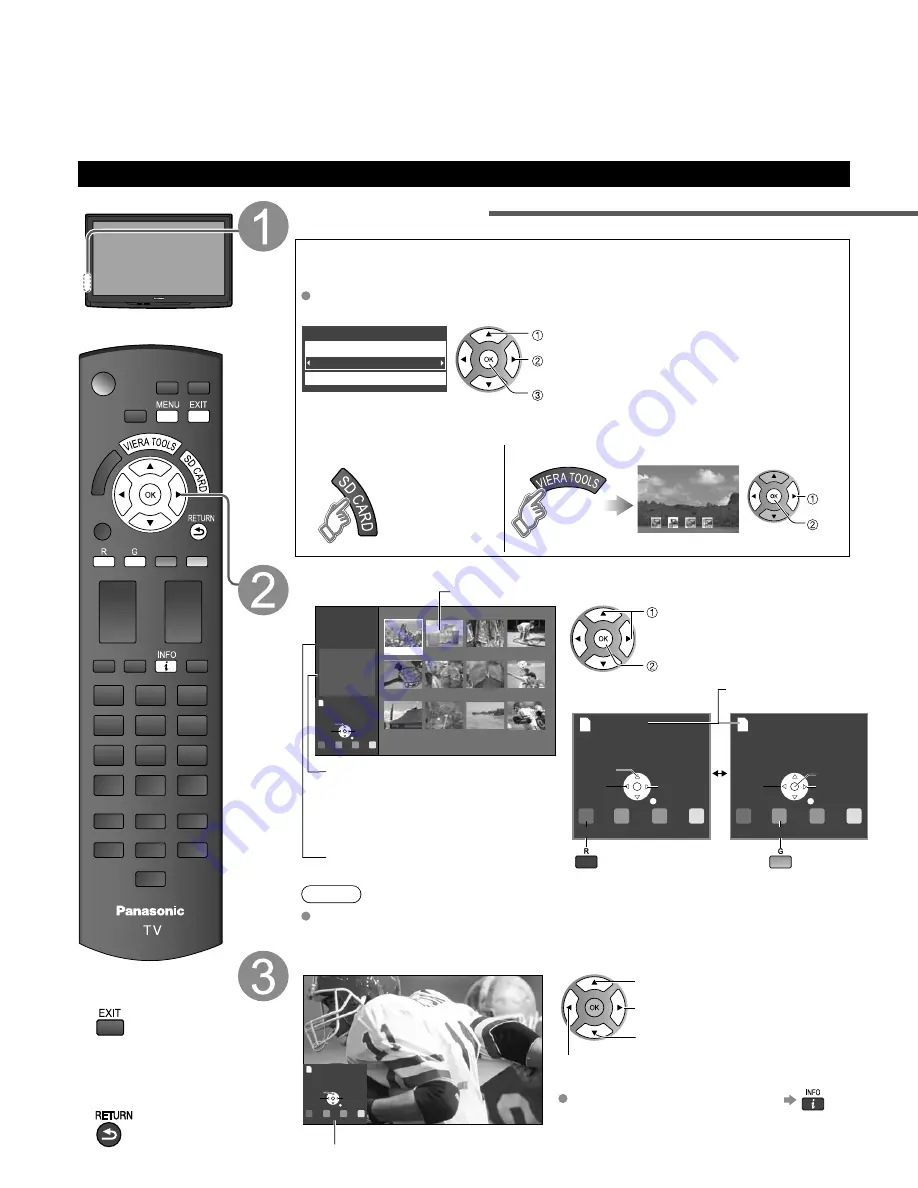
Viewing from an SD Card

You can view photos taken with a digital camera or digital video camera and saved on an SD card.
(Media other than SD Cards may not be reproduced properly.)


Press to exit from 
a menu screen


Press to return 
to the previous 
screen

Insert the SD card

 * This setting will be skipped next time unless you select “Set later”.

Set “SD card setting” and select “Play SD card now”

 “SD card setting” will be displayed automatically each time an SD card is 

inserted for the first time.

Set later

SD card setting

Play SD card automatically

Play SD card now

 select

 change

 set

Slideshow:

   A Slideshow will start 

automatically next time.

Thumbnail:

  The Photo viewer menu will be 

displayed automatically next time.

Set later:

   “SD card setting” menu will be 

displayed repeatedly.

Off:


 The data can be played manually.


Manual operation 

(“Play SD card automatically” is “Off”)


Display “Photo viewer” Start Slideshow


 select

 next

Slideshow

Select the data to be viewed

Accessing

Slideshow

R

Y

G

B

Next

Prev.

Rotate

RETURN

Name

Pana0001

Date

 03/04/2009

Size

1600×1200

Photo viewer

Total

50

Pana0001

Pana0002

Pana0003

Pana0004

Pana0005

Pana0006

Pana0007

Pana0008

Pana0009

Pana0010

Pana0011

Pana0012

Accessing

Slideshow

R

Y

G

B

Next

Prev.

Rotate

RETURN

Accessing

R

Y

G

B

Pause

Next

Prev.

RETURN

Single

 select

 view

Thumbnail view

Selected picture information is displayed.

Name

:  

Image number or file name is 

displayed.

Date

Date of recording is displayed.

Size

Display resolution is displayed.

Total number of images

Navigation area

To Slideshow

Present status

(While reading the data)

To Single 

photo play

Note

 Depending on the JPEG format, “Information” contents may not be displayed 

correctly. Refer to p. 46 (Data format for SD card browsing) for details.

View

Next

Rotate

Prev.

RETURN

Slideshow

R

Y

G

B

Displays one at a time

Navigation area

Rotate 90 degrees (counter-clockwise)

To next photo

Rotate 90 degrees (clockwise)

To previous photo

 To display/hide Navigation area   


Photo viewer

Summary of Contents for TC-P42U1 - 42" Plasma TV

Page 1: ...ERA 958 4372 or visit us at www panasonic com contactinfo For assistance Canada please call 1 866 330 0014 or visit us at www vieraconcierge ca Para solicitar ayuda EE UU Puerto Rico llame al 1 877 95 VIERA 958 4372 ó visítenos en www panasonic com contactinfo TQB2AA0810 English Español Lea estas instrucciones antes de utilizar su televisor y guárdelas para consultarlas en el futuro Las imágenes m...

Page 2: ...broadcasting in the United States as required by law on February 17 2009 Some older television receivers if they rely on a TV antenna will need a TV Converter to receive over the air digital programming but should continue to work as before for other purposes e g for watching low power TV stations still broadcasting in analog watching pre recorded movies or playing video games When a Converter is ...

Page 3: ...Setting Channels 38 Closed Caption 40 Input Labels 41 Using Timer 42 Recommended AV Connections 43 Ratings List for Lock 44 Technical Information 45 Care and Cleaning 49 FAQ 50 Specifications 52 Limited Warranty for U S A and Puerto Rico only 53 Customer Services Directory for U S A and Puerto Rico 54 Limited Warranty for Canada 55 Enjoy your TV Basic Features Advanced Features FAQs etc Safety Pre...

Page 4: ...T This equipment has been tested and found to comply with the limits for an Other Class B digital device pursuant to Part 15 of the FCC Rules These limits are designed to provide reasonable protection against harmful interference in a residential installation This equipment generates uses and can radiate radio frequency energy and if not installed and used in accordance with the instructions may c...

Page 5: ...nything that might damage the power supply cord When disconnecting the power supply cord hold the plug not the cord Do not use the power supply cord if the plug or cord is damaged Replace the cord or contact your Authorized Service Center Handling the power supply cord Insert the power plug fully into the socket outlet If the power plug is loose it could generate heat and cause fire Ensure that th...

Page 6: ...y the display manufacturer and or listed by an independent laboratory such as UL CSA ETL Follow all instructions supplied by the display and wall mount manufacturers If you have any doubts about your ability to safely install your flat panel display contact your retailer about professional installation Make sure the wall where you are mounting the display is appropriate Some wall mounts are not de...

Page 7: ... saver is automatically activated after a few minutes if no signals are sent or no operations are performed p 51 Typical still images Channel number and other logos Image displayed in 4 3 mode SD Card photo Video game Computer image Set up Do not place the unit where it s exposed to sunlight or other bright light including reflections Use of some types of fluorescent lighting may reduce the remote...

Page 8: ...emote control Do not mix old and new batteries Do not mix different battery types such as alkaline and manganese batteries Do not use rechargeable Ni Cd batteries Do not burn or break batteries Optional Accessory Note In order to maintain the TV s performance and safety be absolutely sure to ask your dealer or a licensed contractor to secure the wall hanging brackets Carefully read the instruction...

Page 9: ...om view Warning Do not disassemble or modify the pedestal Otherwise the TV may fall over and become damaged and personal injury may result Caution Do not use any other TV and displays Otherwise the TV may fall over and become damaged and personal injury may result Do not use the pedestal if it becomes warped or physically damaged If you use the pedestal when it is physically damaged personal injur...

Page 10: ...n terminals HDMI terminal green blue red green Firmly tighten by hand Match colors of plugs and terminals Insert firmly Insert firmly Reference of connection To attach To remove Insert it firmly until the tabs on both sides click into place Keep pushing both side snaps and pull down ...

Page 11: ...al Television System Committee Conventional broadcasting ATSC Advanced Television Systems Committee Digital TV Standards include digital high definition television HDTV standard definition television SDTV data broadcasting multi channel surround sound audio and interactive television If no Cable Box AC Cord Connect after all the other connections have been made Back of the TV Cable TV AC 120 V 60 ...

Page 12: ...der If the source has a higher resolution signal 480p 720p 1080i 1080p connection can be made with the use of a Component Video or HDMI cable p 14 VCR Connection can be made with the use of an RF cable and Composite Video S Video cable p 14 VHF UHF Antenna TV AV Equipment e g DVD Recorder or VCR Back of the TV AC Cord AC 120 V 60 Hz VHF UHF Antenna AV Equipment e g DVD Recorder or VCR with TV tune...

Page 13: ...er VCR and satellite receiver DVD Recorder or VCR Satellite Receiver TV VHF UHF Antenna You can enjoy high definition programming by subscribing to high definition satellite service Connection can be done with the use of HDMI or Component Video cable p 14 Note For details of external equipment connections please refer to the operating manuals for the equipment Satellite Receiver DVD Recorder or VC...

Page 14: ...ons please refer to p 31 B To use COMPONENT terminals COMPONENT IN 1 2 VIDEO AUDIO R PR PB Y L P P VIDEO AUDIO P P L R Y PB PR AUDIO OUT COMPONENT VIDEO OUT white red green blue red white red green blue red white red green blue red e g Blu ray Disc player AV Equipment Recorders may also be connected to COMPOSITE or S VIDEO terminals see below C To use S VIDEO terminals ENT VIDEO IN 1 S VIDEO R PR ...

Page 15: ...removes the channel banner p 20 Operates the Favorite channel list function p 20 Numeric keypad to select any channel p 19 or press to enter alphanumeric input in menus p 18 24 34 36 38 41 42 Use for digital channels p 19 Identifying Controls Note The TV consumes a limited amount of power as long as the power cord is inserted into the wall outlet Do not place any objects between the TV remote cont...

Page 16: ...nglish Français Español select ok Be sure to select Home Please select your viewing environment Home Store select ok Please confirm your selection Home before pressing OK button If you select Store by mistake in confirmation screen will be displayed You are selecting the mode for store demonstration Yes No select ok Select No and return to previous screen If you select Yes Screen enters store demo...

Page 17: ... Select the day Hour Adjust the hour Minute Adjust the minute Auto channel setup Select ANT Cable setup First time setup Language Clock ANT Cable setup Input labels next select Select ANT in Cable ANT Cable setup ANT in Auto program set select ANT in Cable Cable TV Antenna Antenna Not used Skip TV tuning go to Select Not used when no wire is connected to the Antenna Cable terminal Typical when Cab...

Page 18: ...nnels only Confirm registered channels program Cancel Apply Caption Favorite Add Yes Yes Yes l select Apply ok If OK is not pressed after selecting Apply the channels will not be saved The channel will be saved when no operation is performed for 60 seconds and the Manual program menu will also exit automatically If you perform scanning more than twice previously saved channels are erased Set the I...

Page 19: ... the signal reception between cable TV and antenna p 17 39 The channel number and volume level remain the same even after the TV is turned off Listen with SAP Secondary Audio Program Select Audio Mode for watching TV Digital mode Press SAP to select the next audio track if available when receiving a digital channel Audio track 1 of 2 English Analog mode Press SAP to select the desired audio mode E...

Page 20: ... desired broadcast station with the cursor or use number buttons see below Set Favorite Feature 1 Display the SUB MENU SUB MENU 2 Select Set favorite All Setup SUB MENU Edit CH caption Signal meter Set favorite Channel surf mode select ok 3 Set the displayed channel Set favorite 1 3 26 1 1 2 3 4 5 select the list number save the displayed channel select the list number to save the channel without ...

Page 21: ...tcut icons on the TV screen Unlike a conventional menu you can enjoy using playing or setting a function quickly Press to exit from a menu screen Press to return to the previous screen Display VIERA TOOLS Select the item Lock select next Displayed VIERA Link menu p 34 35 Start Slideshow p 22 23 Set Sleep Off timer p 42 Displayed Lock menu p 36 ...

Page 22: ...iewer Start Slideshow select next Slideshow Select the data to be viewed Accessing Slideshow R Y G B Next Prev Rotate RETURN Name Pana0001 Date 03 04 2009 Size 1600 1200 Photo viewer Total 50 Pana0001 Pana0002 Pana0003 Pana0004 Pana0005 Pana0006 Pana0007 Pana0008 Pana0009 Pana0010 Pana0011 Pana0012 Accessing Slideshow R Y G B Next Prev Rotate RETURN Accessing R Y G B Pause Next Prev RETURN Single ...

Page 23: ... 2 Brightness Color Tint Sharpness Picture mode Contrast Reset to defaults Select Adjust Select the item Photo settings Picture Slideshow settings Select Set set Set up Slideshow Fast On Slideshow settings Speed Repeat Select Adjust Speed You can set how many seconds each image is displayed in Slideshow mode Very fast Fast Medium Slow Very slow Repeat Turn the slideshow Repeat function On or Off N...

Page 24: ...trol to select the input of your choice Select the input of your choice then press OK During the selection if no action is taken for several seconds the Input select menu disappears HDMI 1 GAME Terminal example Label The terminal and label of the connected equipment are displayed To label each of the inputs please refer to p 41 Note The input label will be displayed on Input select screen if Input...

Page 25: ...osed Caption Setup select next Select VIERA Link settings Setup 2 2 Advanced setup About VIERA Link settings ECO power saving select next Select VIERA Link On Yes Yes TV No No VIERA Link settings VIERA Link Power on link Power off link Default speakers Stand by power save Auto power stand by select Select On default is On change Now you can set each VIERA Link function according to your preference...

Page 26: ...t Various menus allow you to make settings for the picture sound and other functions so that you can enjoy watching TV best suited for you Press to exit from a menu screen Press to return to the previous screen Display menu Displays the functions that can be set varies depending on the input signal Select the menu Menu VIERA Link Picture Audio Timer Lock SD card Closed Caption Setup select next Se...

Page 27: ...lable Color matrix SD Reduces noise of specific digital signals of DVD STB etc On Off MPEG NR Off Selects Dark or Light Valid only for external input signals Dark Light Black level Light Selects between 95 Size 1 or 100 Size 2 for the scanning area with High definition signal Size 1 Size 2 Select Size 1 if noise is generated on the edges of the screen Size 1 Selected item for HD size Scanning 95 S...

Page 28: ...aults How to Use Menu Functions Menu list Sub menu list Various menus allow you to make settings for the picture sound and other functions so that you can enjoy watching TV best suited for you Press to exit from a menu screen Press to return to the previous screen Display menu Displays the functions that can be set varies depending on the input signal Select Setup Menu VIERA Link Picture Audio Tim...

Page 29: ...2 No Yes Stand by power save No Set Auto power stand by of HDMI connection equipment p 32 No Yes with reminder Yes no reminder Auto power stand by No Selects the default speakers p 32 TV Theater Default speakers TV To conserve energy the TV automatically turns off when NO SIGNAL and NO OPERATION is performed for more than 10 minutes Enable Disable Note Not in use when setting Auto power on On Off ...

Page 30: ...ion that we have developed and added As such its operation with other manufacturers equipment that supports HDMI CEC cannot be guaranteed Please refer to the individual manuals for other manufacturers equipment supporting the VIERA Link function Version Operations HDAVI Control or later Automatic Input Switching p 33 Power on link p 33 Power off link p 33 Default speakers p 33 One touch theater pl...

Page 31: ...nd audio cables If audio cable is not connected you cannot listen to the TV program through the theater system Connecting this unit to a DVD recorder DIGA and AV amp When using a VIERA Link audio video amplifier and a compatible DVD recorder DIGA use a daisy chain connection as shown below One AV amp and one DVD recorder DIGA can be operated with this unit Be sure to connect the AV amp between thi...

Page 32: ... Link Picture Lock SD card Closed Caption Setup select next Select VIERA Link settings Setup 2 2 Advanced setup About VIERA Link settings ECO power saving select next Select VIERA Link On Yes Yes TV No No VIERA Link settings VIERA Link Power on link Power off link Default speakers Stand by power save Auto power stand by select Select On default is On change Select settings On Yes Yes TV No No VIER...

Page 33: ...t in use TV is the default setting To set the Home Theater system as default speakers change the default speakers setting from TV to Theater Sound will be output from the Home Theater whenever the TV is powered on If the ONE TOUCH PLAY key is pressed on the remote control for Panasonic Home Theater system the following sequence of operations is performed automatically Home Theater power switches O...

Page 34: ...on refer to p 30 Press to exit from a menu screen Press to return to the previous screen Display VIERA Link menu select next VIERA Link or Select the item Recorder TV VIERA Link control Speaker output select Select Home theater TV VIERA Link control Speaker output change Set Speaker control VIERA Link control only with the TV s remote control for HDAVI Control 2 or later ...

Page 35: ...u want to access Recorder Home theater Player Camcorder LUMIX If there is more than one equipment item a number after the name indicates the number of items e g Recorder 1 Recorder 2 Recorder 3 The number of equipment items that can be connected is three for recorders and a total of three for Home theater Player Camcorder LUMIX Note There is a limit to the number of HDMI connectors Recorder TV VIE...

Page 36: ...time you display the Lock menu Input your 4 digit password A 4 digit code must be entered to view a blocked program or change rating settings RETURN Password Enter password If it is your first time entering the password enter the password twice in order to register it Select the Lock mode Off Off Off Off Lock Mode Channel Game Change password Program set select Off Unlocks all the lock settings of...

Page 37: ...gram lock Mode MPAA U S TV C E L R C F L R next select MPAA U S movie ratings U S TV U S TV program ratings C E L R Canadian English ratings C F L R Canadian French ratings Select the rating to be locked select Example of MPAA U S movie ratings Change password To change the password In select Change password and press OK Input the new 4 digit password twice Off Off Off Off Lock Mode Channel Game C...

Page 38: ...k ANT Cable setup Connected devices Anti image retention Reset to defaults Language All Channel surf mode next select Select the function Cable ANT Cable setup ANT in Auto program Manual program Signal meter next select Set Auto program Set automatically Manual program Set manually Signal meter Check signal strength To reset the settings of setup menu Select Reset to defaults in Setup menu and pre...

Page 39: ...2 Yes 3 Yes Channel select Press OK to tune to the channel Select Apply program Cancel Apply Caption Favorite Add Yes el select Apply ok Select Edit Manual program Edit Cancel Apply Caption Favorite Add 2 Yes 3 Yes 4 Yes 5 Yes Channel select next Select the item to be edited R G B Y Select RETURN OK Manual program Edit Cancel Apply Caption Favorite Add 2 Yes 3 Yes 4 Yes 5 Yes 6 Yes 7 Yes 8 Yes 9 Y...

Page 40: ...ct the setting Primary Second Service 3 Service 4 Service 5 Service 6 The settings in Analog or Digital depend on the broadcaster To make more in depth display settings in digital programs Select Digital setting and press OK Select the item and set Automatic Automatic Automatic Automatic Automatic Automatic Automatic Automatic Digital setting Size Foreground Font Style Fore opacity Background Back...

Page 41: ...meric select set Video 1 VCR Label Terminal example Terminals Component 1 2 HDMI 1 3 Video 1 2 Label BLANK SKIP VCR DVD CABLE SATELLITE DVR GAME AUX RECEIVER COMPUTER Blu ray CAMERA DVD REC HOME THTR MONITOR MEDIA CTR MEDIA EXT OTHER If SKIP is selected the INPUT button press will skip its input Each selected label will be displayed on Input select screen p 24 Press to exit from a menu screen Disp...

Page 42: ...et Timer Sleep Timer 1 Timer 2 Timer 3 Timer 4 Timer 5 select next Turns Off automatically Sleep Turns On Off automatically 5 timers can be set Timer 1 Timer 5 Set the timer To set Sleep Off Timer Set to shut the unit off after a pre selected amount of time 60 Sleep Sleep minutes set 0 30 60 90 minutes To set Timer 1 5 On Off Timer Select the item and set On TV 10 3 7 6 FRI 1 15 AM 12 45 AM Timer ...

Page 43: ...f the TV Cable Box Cable TV or To watch DVDs Optical digital audio cable DVD Recorder VCR To listen to the TV through speakers or To watch camcorder images Camcorder VCR DVD Player For HDMI connection HDMI compatible equipment only For connection using HDMI DVI Conversion cable see HDMI 1 or HDMI 2 connection on this page or To watch digital video image DVD Player Set Top Box DVD Player or Set Top...

Page 44: ... ENGLISH RATINGS C E L R E Exempt Exempt programming includes news sports documentaries and other information programming talk shows music videos and variety programming C Programming intended for children under age 8 No offensive language nudity or sexual content C8 Programming generally considered acceptable for children 8 years and over No profanity nudity or sexual content G General programmin...

Page 45: ...e aspect modes This lets you choose the aspect depending on the format of the received signal and your preference p 20 e g in case of 4 3 image FULL JUST FULL JUST Enlarges the 4 3 image horizontally to the screen s side edges Recommended for anamorphic picture Stretches to justify the 4 3 image to the four corners of the screen Recommended for normal TV broadcast H FILL 4 3 H FILL Side bar Enlarg...

Page 46: ...2 JPG P1000003 JPG P1000004 JPG 100_PANA Created automatically 3 digit folder number 5 digit arbitrary characters 4 digit arbitrary characters 4 digit file number Usable characters 1 byte a to z A to Z 0 to 9 and _ The folder and file names may be different depending on the digital camera used For the suitable SD Memory Cards please confirm the latest information on the following website http pana...

Page 47: ...I adapter cable 2 When the DVI to HDMI adapter cable is used connect the audio cable to the audio input terminal Audio settings can be made on the HDMI 1 in HDMI 2 in or HDMI 3 in menu screen p 26 Applicable audio signal sampling frequencies L PCM 48 kHz 44 1 kHz 32 kHz 1 The HDMI logo is displayed on an HDMI compliant device 2 Enquire at your local digital equipment retailer shop Caution Use with...

Page 48: ...rn to the previous screen if no key operation has been performed for 15 minutes See pages 28 29 for more information Scrolling bar Input signals that can be displayed Mark Applicable input signal for Component Y PB PR and HDMI horizontal frequency kHz vertical frequency Hz COMPONENT HDMI 525 480 60i 15 73 59 94 525 480 60p 31 47 59 94 750 720 60p 45 00 59 94 1 125 1 080 60i 33 75 59 94 1 125 1 080...

Page 49: ...oap and then wring the cloth dry Use this cloth to wipe the cabinet and then wipe it dry with a dry cloth Do not allow any mild liquid dish soap to come into direct contact with the surface of the Plasma TV If water droplets get inside the unit operating problems may result Avoid contact with volatile substances such as insect sprays solvents and thinner otherwise the quality of the cabinet surfac...

Page 50: ...ital channels Check Signal meter p 39 If the signal is weak check the antenna and consult your local dealer The remote control does not work Are the batteries installed correctly p 8 Are the batteries new Pictures from external equipment are distorted when the unit is connected via HDMI Is the HDMI cable connected properly p 31 43 Turn Off the TV unit and equipment then turn them On again Check an...

Page 51: ...mes a few pixels may be bright or dark These pixels do not indicate a defective panel and will have no impact on the performance of the TV Check nearby electrical products car or motorcycle ignition systems fluorescent lamp etc Check Picture menu p 26 Check the cable connections p 11 14 Check that the correct input has been selected p 24 Check the channel settings p 38 Check the antenna cables Is ...

Page 52: ... COMPONENT IN 1 2 Y 1 0 V p p including synchronization PB PR 0 35 V p p AUDIO L R RCA PIN Type 2 0 5 V rms HDMI 1 3 TYPE A Connector 3 This TV supports HDAVI Control 4 function Card slot SD CARD slot 1 DIGITAL AUDIO OUT PCM Dolby Digital Fiber Optic FEATURES 3D Y C FILTER CLOSED CAPTION V Chip Photo Viewer HDAVI Control 4 Dimensions W H D Including pedestal 40 6 28 0 12 9 1 029 mm 709 mm 327 mm 4...

Page 53: ...s on wide screen TV s or onscreen data in a stationary and fixed location The Limited Warranty ALSO DOES NOT COVER damages which occurred in shipment or failures which are caused by products not supplied by the warrantor or failures which result from accidents misuse abuse neglect bug infestation mishandling misapplication alteration faulty installation set up adjustments misadjustment of consumer...

Page 54: ...iday 9 am 9 pm Saturday Sunday 10 am 7 pm EST For hearing or speech impaired TTY users TTY 1 877 833 8855 Accessory Purchases United States and Puerto Rico Purchase Parts Accessories and Instruction Books on line for all Panasonic Products by visiting our Web Site at http www pstc panasonic com or send your request by E mail to npcparts us panasonic com You may also contact us directly at 1 800 33...

Page 55: ... EXPRESS OR IMPLIED INCLUDING ANY IMPLIED WARRANTIES OF MERCHANTABILITY AND FITNESS FOR A PARTICULAR PURPOSE IN NO EVENT WILL PANASONIC CANADA INC BE LIABLE FOR ANY SPECIAL INDIRECT OR CONSEQUENTIAL DAMAGES In certain instances some jurisdictions do not allow the exclusion or limitation of incidental or consequential damages or the exclusion of implied warranties so the above limitations and exclu...

Page 56: ...Note ...

Page 57: ...Note ...

Page 58: ... el espacio provisto a continuación y guardar este manual más el recibo de su compra como prueba permanente de su adquisición para que le sirva de ayuda al identificarlo en el caso de que le sea sustraído o lo pierda y también para disponer de los servicios que le ofrece la garantía Modelo Número de serie Panasonic Consumer Electronics Company Division of Panasonic Corporation of North America One...

Reviews: