background image

26

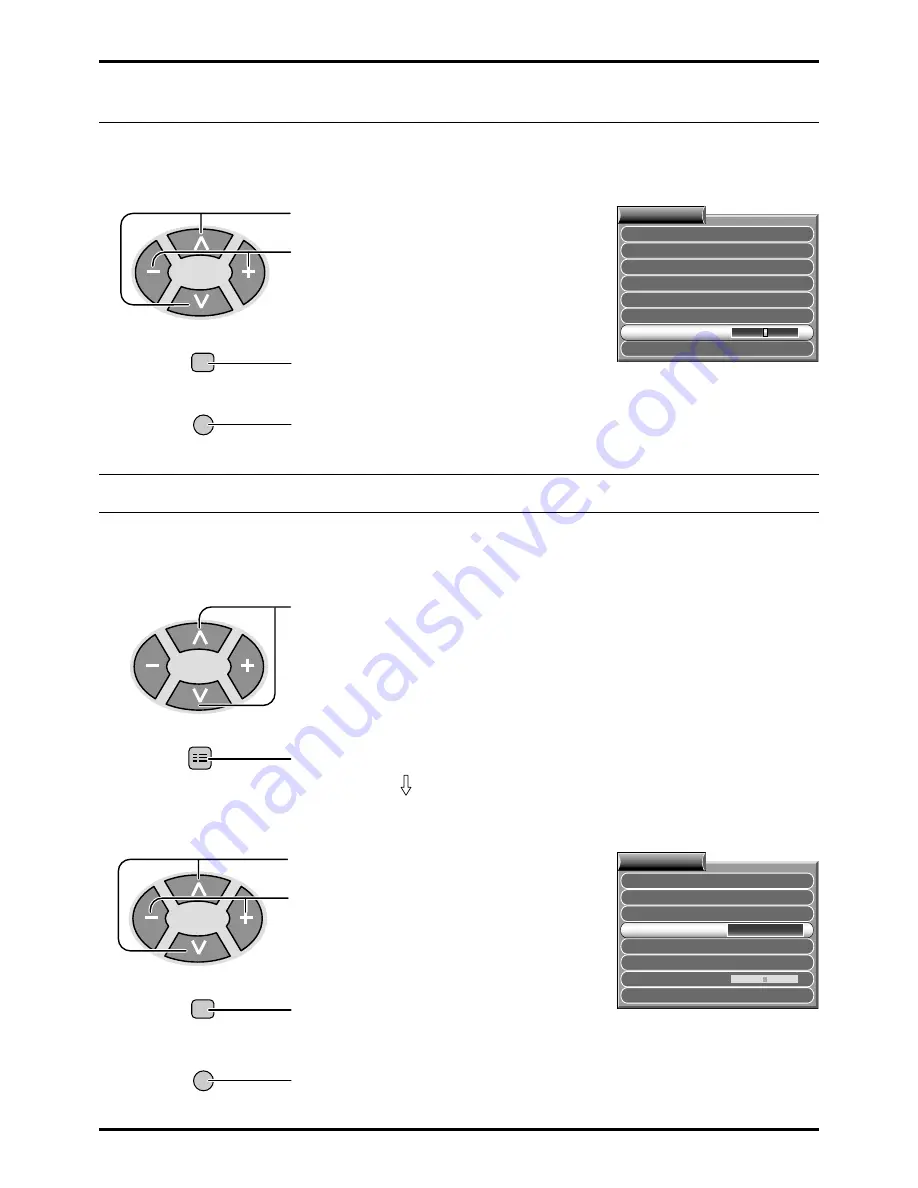
Fine Tuning

Under normal reception conditions this function is not required or necessary.
However, in areas of poor reception or constant interference, a slight adjustment of the tuning may improve the
picture and sound quality.

1

SYS SELECT

CH  SELECT

AUTO  TUNE
MANUAL  TUNE

FINE  TUNE

SKIP

SOUND  SYS
COLOUR  SYS

AUTO

OFF

POSITION

TUNING  MENU

5. 5 MHz

ASIA / M.EAST

Press to select the FINE TUNE.

Press until the clear picture is received.

3

Press to exit from the FINE TUNE.

TV/AV

2

STR

Press to store the FINE TUNE.

This stores the FINE TUNE to the selected Programme Number.

This returns the set to the normal viewing condition.

How to Cancel the Fine Tuning

Cancelling previously adjusted (manually) fine tuning, means re-activating the AFT (Automatic Fine Tuning). Re-
activating the Automatic Fine Tuning means allowing the set to automatically tune to the optimum tuning position, for
that programme Number.

Press briefly to tune the best position.

Press to access to MANUAL TUNE.

3

Press to select the MANUAL TUNE.

SYS SELECT

CH  SELECT

AUTO  TUNE

MANUAL  TUNE

FINE  TUNE
SKIP

SOUND  SYS
COLOUR  SYS

AUTO

OFF

ACCESS

POSITION

TUNING  MENU

5. 5 MHz

ASIA / M.EAST

5

Press to exit from the MANUAL TUNE.

TV/AV

4

STR

Press to store the AFT.

This stores the re-activated AFT.

This returns the set to the normal viewing condition.

1

Select the Programme Number which you would like to return to Automatic Fine Tuning
(cancel the manual fine tuning).

Tuning Channels

Press to display the SETUP MENU.

SET UP

2

Proceed to the TUNING MENU (refer to page 21).

Summary of Contents for TC-43P400H

Page 1: ...nual for all the above series of models Please read these instructions before operating your set and retain them for future reference Projection Television Operating Instructions TC 43P400H TX 43P400H TX 43P400X TC 51P400H TX 51P400H TX 51P400X Model No ...

Page 2: ...formation 1 The long time max 2 hours use of a TV game on this set is not recommended since the signal from the TV game may cause damage to the picture projection tubes of the set 2 Do not allow a still picture to be displayed for an extended period as this can cause a permanent after image to remain on the Projection TV screen Examples of still pictures include logos video games computer images a...

Page 3: ...nvergence Adjustment mode 18 Convergence1 Adjustment for RED BLUE and GREEN 19 Convergence2 Adjustment for RED and BLUE 20 Tuning Channels 21 Channel Selection 22 Channel Allocation 23 Automatic Tune 24 Manual Tune 25 Fine Tuning 26 How to Cancel the Fine Tuning 26 Programme Number Skip 27 How to Cancel the Skip Function 27 Sound System Selection Different region use differing systems 28 Colour Sy...

Page 4: ...e objects DO NOT use at a voltage other than indicated TAKE CARE NOT to damage the power cord DO NOT remove the rear cover as live parts and High Voltage components are accessible when the rear cover is removed DO NOT touch the aerial cable and this unit when there is lightning DO NOT touch the power plug if your hands are wet Cautions Do not allow a still picture to be displayed for an extended p...

Page 5: ...not mix new and old b a t t e r i e s U s e o n l y t h e specified batteries Failure to follow this precaution may result in leakage of battery fluid Fire injury or damage to surrounding components may also result Adequate ventilation is essential to prevent failure of electrical components we recommend that a gap of at least 10 cm is left all around this unit even when it is placed inside a cabi...

Page 6: ... 43P400H X TX 51P400H X TC 43P400H TC 51P400H Note Mainly the remote control for TX 43P400H X and TX 51P400H X is used as an example in the Operating Instructions TEXT Favourite Page Selection TV TEXT Selection TEXT Index Channel Search TEXT hold Still Picture AI Picture Noise Reduction Channel Search Still 1 2 3 4 5 6 7 8 9 0 INDEX HOLD STILL CH SEARCH TV AV PICTURE SOUND SET UP 100Hz PROGRE SURR...

Page 7: ...t your TV is equipped with before you begin using these Operating Instructions Instructions are given for all functions please disregard these which do not apply to your TV T C 5 1 P 4 0 0 H T X 5 1 P 4 0 0 H T X 5 1 P 4 0 0 X T C 4 3 P 4 0 0 H T X 4 3 P 4 0 0 H T X 4 3 P 4 0 0 X Securing the casters To prevent the set from tipping forward turn the two casters on the front of the TV so they face f...

Page 8: ...n the wall Aerial socket and your set Your local Television Service Centre or Dealer may be able to assist you in obtaining the correct Aerial system for your particular area and accessories required Any matters regarding Aerial installation upgrading of existing systems or accessories required and the costs incurred are the responsibility of you the Customer Please take safety precautions to prev...

Page 9: ...dition Refer to page 15 it is also possible to turn the TV set on by pressing any of the Direct Programme Number Selection buttons 0 9 or Programme Number Up or Down buttons on the TV set or on the Remote Control If the Wall Outlet is switched OFF or the Main Plug is unplugged when the TV set is again turned ON by either connecting the Main Plug to the Wall Outlet or switching the Wall Outlet ON i...

Page 10: ...ls and Terminals on the TV Item No Function Refer to Page Item No Function Refer to Page Main Headphones Jack 13 Sub Headphones Jack 13 AV3 Input Terminals 11 STR 14 Function 14 Volume Down 14 Volume Up 14 TV AV Selection 14 Aerial Terminal RF In Terminal 8 Monitor Output Terminals 12 AV1 Input Terminals 11 AV2 Input Terminals 11 AV4 Input Terminals 11 DVD Y PB PR Input 12 Programme Number Down Pr...

Page 11: ...witched off and the signal from the S Video input will be used When a Monaural VCR is used connect the Monaural Audio cable to the Audio L Left terminal Select the desired AV input position by pressing the TV AV button Refer to page 15 Input 3 is located on the front of the unit The AV2 and AV4 audio input terminals serve as the audio input terminal for both the Video input and the DVD input Super...

Page 12: ...ts the main picture normal video and audio signals Teletext display on screen will not be output at the MONITOR OUT terminals Even if the television is in picture in picture condition MONITOR OUT terminals output the same signals as main picture on the screen and sound from speakers Sub picture including strobe still channel search etc will not be output at the MONITOR OUT terminals The DVD signal...

Page 13: ...Main Headphones will function Use Volume Up or Down button to control volume level Sub Headphones plug For the sub Headphones volume control refer to page 32 3 5mm Plug Optional not supplied S VIDEO Sub Main VIDEO L MONO AUDIO R AV3 IN Screen condition Single picture Teletext Picture in Picture Picture and Picture B A B A A Speaker Sound A Stereo A Stereo A Stereo A Stereo A Stereo A Stereo B Mono...

Page 14: ...e number Channel number Stereo mode Picture menu Sound menu Scan mode Sound system and colour system Store see page 26 27 37 Stores some settings in TUNING menus and TELE TEXT Function selection Displays the on screen display functions use repeatedly to select from the available functions The following adjustments can be accessed directly Notes NTSC TINT Displayed when receiving NTSC signals TUNIN...

Page 15: ...TV set OFF to Standby mode Sound Mute Press to mute the sound completely the Mute symbol will appear Press again to restore the previous sound level and cancel the mute Programme Number Selection Press to select the next higher or lower Programme number Press to increase or decrease the sound volume level VOLUME 18 Press to select TV AV1 AV2 AV3 and AV4 input signal modes sequentially AV1 AV2 AV3 ...

Page 16: ...AN MODE AUTO ON PICTURE P NR AUTO MENU VOLUME BASS TREBLE BALANCE SURROUND SUB HEADPHONE HEADPHONE VOL OFF DYNAMIC SOUND To PICTURE adjust menu see page 30 To HELP MENU EXT CONNECTION MENU DEMO ACCESS HELP MENU HOW TO USE THE MENUS MOVE BETWEEN MENU OPTIONS OPEN OR CLOSE THE MENUS GO BACK TO WATCHING ADJUST OR ACCESS CHOSEN OPTION MENU To SOUND adjust menu see page 32 The HELP button runs a demons...

Page 17: ...ICKER REDUC STROBE CH COLOUR SET TEXT SELECT ENGLISH VCR GAME OFF OFF DYNAMIC FASTEXT SETUP MENU TUNING MENU PICTURE SHIFT CHILD LOCK CONVERGENCE LANGUAGE OFF OFF ACCESS SETUP MENU ENGLISH Press to access to CONVERGENCE CONVERGENCE 2 CONVERGENCE 1 ACCESS SELECT ACCESS RETURN TV AV EXIT CONVERGENCE 2 CONVERGENCE 1 ACCESS SELECT ACCESS RETURN TV AV EXIT To CONVERGENCE see page 18 SYS SELECT CH SELEC...

Page 18: ...AL signal and again with the NTSC signal Convergence Adjustment Vertical centre marker Horizontal centre marker 1 Press to display the Setup Menu 2 Press to select the CONVERGENCE Press to access to the CONVERGENCE menu SET UP TUNING MENU PICTURE SHIFT CHILD LOCK CONVERGENCE LANGUAGE OFF OFF ACCESS SETUP MENU ENGLISH 3 Press to select the CONVERGENCE1 or the CONVERGENCE2 Press to access to the fun...

Page 19: ...ine Press N button to adjust the blue mode Stores RED RED Press to align the horizontal blue line with the horizontal yellow line Becomes a white line Press to align the vertical blue line with the vertical yellow line Becomes a white line BLUE Press N button to adjust the green mode Stores BLUE Press to align the horizontal green line with the vertical centre maker Press to align the vertical gre...

Page 20: ...Position 1 is selectd 1 2 3 4 5 6 7 8 9 0 F P INDEX HOLD STILL CH SEARCH TV TEXT 100Hz PROGRE SURROUND MULTI PIP Press to align the horizontal red line with the horizontal blue line Becomes a white line Press to align the vertical red line with the vertical blue line Becomes a white line Press N button to adjust the blue mode Stores RED RED Press to align the horizontal blue line with the horizont...

Page 21: ... mode as detailed below Press to select the SYS SELECT Press to select the appropriate system SYS SELECT CH SELECT AUTO TUNE MANUAL TUNE FINE TUNE SKIP SOUND SYS 5 5 MHz COLOUR SYS AUTO OFF POSITION ASIA M EAST TUNING MENU The system select indicator will change as follows 2 Regional System Selection 2 SYSTEM SELECT Region CHINA HK UK ASIA M EAST NZ INDONES AUSTRALIA E EUROPE SPECL VER AMERICA CAT...

Page 22: ...s the channels tuned in order from programme No 1 Press the button 1 to view channel 2 Press the button 2 to view channel 4 Press the button 3 to view channel 6 During position mode various reception channels can be viewed DIRECT SELECT When the Channel Selection is on DIRECT and Auto Tune is performed the unit memories the programme number which is the same as the channel tuned This method allows...

Page 23: ... 11 12 13 2 13 14 1 2 1 2 12 13 57 21 62 63 69 21 62 63 69 21 62 63 69 21 62 63 69 21 62 63 69 62 63 69 62 63 62 C13 S 1 S 2 S 3 S 1 S 2 S 3 S 1 S 2 S 3 S 1 S 1 S 2 S 3 21 22 23 24 28 57 58 59 62 63 69 90 91 92 93 94 95 96 97 98 99 70 73 74 75 76 77 78 79 80 81 89 100 117 118 120 125 100 125 Z10 Z11 Z12 Z13 Z14 Z15 Z16 Z17 Z18 Z19 S11 S12 S13 S14 S15 S16 S17 S18 S19 S20 S11 S12 S13 S14 S15 S16 S17...

Page 24: ...SELECT CH SELECT AUTO TUNE MANUAL TUNE FINE TUNE SKIP SOUND SYS COLOUR SYS AUTO OFF POSITION TUNING MENU 5 5 MHz ASIA M EAST Note When the sound volume is too small to confirm turn it up by using the sound volume button on the remote control 2 Press to improve the Sound quality if the Sound is not clear or no sound is produced on a programme Number Position Press to exit from the Tuning Menu This ...

Page 25: ...tore The tuning position is memorised STR SET UP Adjust the Sound System refer to page 24 step 2 to 3 3 Helpful Hint 1 If a clear picture with correct colours cannot be obtained when a Broadcast or AV signal is received refer to the Colour System Selection operation on page 28 2 3 When using a VCR without video and audio input output terminals it is convenient to connect the aerial cable as indica...

Page 26: ...elling previously adjusted manually fine tuning means re activating the AFT Automatic Fine Tuning Re activating the Automatic Fine Tuning means allowing the set to automatically tune to the optimum tuning position for that programme Number Press briefly to tune the best position Press to access to MANUAL TUNE 3 Press to select the MANUAL TUNE SYS SELECT CH SELECT AUTO TUNE MANUAL TUNE FINE TUNE SK...

Page 27: ... to select the Programme Number you d like to skip Press to change the mode to ON 3 Press to select the SKIP Press to display the SETUP MENU SET UP 2 Proceed to the TUNING MENU refer to page 21 5 Press to exit from the SKIP TV AV 4 STR Press to store the Skip function This returns the set to the normal viewing condition Repeat Step1 to 4 for each Programme Number for which the Skip function is des...

Page 28: ...iffering systems If a clear picture with correct colours cannot be obtained when a Broadcast or AV signal is received this function is used Colour System Condition Note PAL SECAM and NTSC 3 58 are different colour signal broadcast transmission systems applicable to differing countries NTSC 4 43 is a trick playback mode used in special VCR to playback NTSC recorded video tapes through PAL televisio...

Page 29: ...witches the TV off within a preset time which you can choose from between 0 to 90 minutes in 15 minutes intervals OFF 60 75 90 30 15 45 DYNAMIC NORMAL OFF OFF TIMER FLICKER REDUCTION Lets you control any picture movement Set to Dynamic to activate motion compensation to smooth the image and get rid of picture movement Set to Normal to correct minor picture movement or if slight ghosting of figures...

Page 30: ...D SOFT For viewing in brighter environments This menu selects a higher than normal levels of Brightness and Contrast For viewing in normal evening lighting environments This menu selects the normal levels of Brightness and Contrast For viewing in a dark room This menu selects reduced levels of Brightness and Contrast MENU MENU CONTRAST BRIGHTNESS COLOUR SHARPNESS C TEMP STANDARD STANDARD PICTURE N...

Page 31: ...ress to switch between modes PROGRESSIVE 100 Hz MODE AUTO AI SCAN MODE AUTO ON PICTURE P NR AUTO MODE Function AUTO 100 Hz MODE PROGRESSIVE The TV software will select the best mode for the signal being viewed 100Hz will give a steady picture for most signal transmission Recommended when receiving NTSC signals Note We recommend that you set Scan mode to Progressive when viewing a PAL 60 or NTSC tr...

Page 32: ...Adjust Headphone volume Adjust Sub Headphone volume Adjusts output volume Left SP Right SP MENU VOLUME BASS TREBLE BALANCE SURROUND SUB HEADPHONE HEADPHONE VOL OFF DYNAMIC SOUND MENU DYNAMIC MENU STANDARD MENU SOFT Notes When set to Multi PIP mode the main and sub sound are both adjusted simultaneously When using one of the double window features note that the headphones will relay the soundtrack ...

Page 33: ...s not displayed when the N Button is pressed The Normal mode is the factory preset condition Returning to this original condition is called Normalization Helpful Hint N Normalization SURROUND Press to switch between ON and OFF SURROUND ON SURROUND OFF OR The benefits of surround sound are enormous You can be completely enveloped in sound just as if you were at a concert hall or cinema The surround...

Page 34: ...ar Picture in Pcture PIP Press the Red button Each time the location of the sub picture is changed Press the Yellow button Each time the main picture and the sub picture are swapped Press the Blue button to exit from the PIP mode Picture and Picture MULTI PIP Press twice to view two pictures picture and picture at the same time Press the Yellow button Each time the picture in the left and the pict...

Page 35: ...d in the centre of the screen still playing Press to pause the search Press to exit from the feature Press to select each channel s freeze frame in turn Press to watch the selected channel exiting the feature INDEX CH SEARCH Red Green Yellow Blue CH SEARCH INDEX CH SEARCH CH SEARCH 1 2 3 4 4 5 6 SELECT OK EXIT Channel Search Press again to cancel the pause Re starts the search Access Strobe via th...

Page 36: ...ill be illegible unless you select the Text Language which matches the text being received Select the correct LANGUAGE Refer to page 29 LIST mode FASTEXT mode Red Green Yellow Blue SOUND Press to display the volume function with a green bar CONTRAST VOLUME Press to select the desired function Four differently coloured page numbers are situated at the bottom of the screen Each of these numbers can ...

Page 37: ... 25 only Press one of the four coloured buttons and enter the new page number List Store STR Press to reveal hidden words e g quiz page answers Press again to hide Reveal Press and hold the page numbers will change to white indication and the page is stored Press to hold the Teletext page when viewing multi page information is displayed on the top left of the screen Press again to return to automa...

Page 38: ...age number before the T disappears To select page 6 enter 0 0 0 and 6 T T0006 Viewing a normal TV programme Viewing the Teletext page Select a new page number TELE TEXT Teletext page News Flash Update Index Press to display special functions to view the TV picture whilst searching for a Teletext page Press to view the TV picture When a news flash page has been selected Press to see the update of i...

Page 39: ... occurs it is recommended you switch from STEREO to MONO Even when the contents of the receiving signal undergo changes selection mode is kept intact When the receiving conditions deteriorate listening will be easier if the mode is set to the MONO position using the stereo bilingual sound selection button DUAL also known as DUAL MONO or as BILINGUAL is not currently transmitted in some countries V...

Page 40: ...f the manufacturers listed above may not be possible 3 In some cases new products may not be operative 4 It will not operate with other than the above manufactures Helpful Hint Manufacturer Code Manufacturer Code Panasonic National AIWA FUJITSU HITACHI JVC MITSUBISHI NEC ORION PHILIPS SANYO SHARP SONY TOSHIBA 10 11 12 13 15 16 20 25 26 27 30 31 32 35 36 40 41 42 43 45 46 50 55 56 57 58 60 61 65 66...

Page 41: ...e Power Switch or Stand by Button on the Remote Control Colour Control Refer to page 30 31 Colour System Refer to page 28 Retune Channels Refer to page 21 Magnetic interference from unshielded equipment TV set moved while ON Turn the TV set off for 30 minutes using the Power Switch on the TV set Sound System Refer to page 28 Colour System Refer to page 28 Do not allow a still picture to be display...

Page 42: ...iods with rubber or vinyl products Remove dirt and soiling by wiping with a light cloth Even if the unit is heavily soiled do not apply cleaner directly to the unit Soak a cloth in a solution of neutral cleanser thinned with water Then wring out the cloth wipe the unit clean and finish by wiping with a dry cloth Do not use any type of cleansers on the picture screen Dust will accumulate on the pic...

Page 43: ...ear S Video Video Audio L R terminals AV2 IN Rear Video or Y PB PR Audio L R terminals AV3 IN Front S Video Video Audio L R terminals AV4 IN Rear Video or Y PB PR Audio L R terminals Remote control Transmitter EUR511250 TX 43P400H X TX 51P400H X EUR511251 TC 43P400H TC 51P400H R6 AA Battery 2 Dimensions W H D Mass Weight 932 mm 1260 mm 520 mm 1095 mm 1385 mm 520 mm 54 kg Net 60 kg Net Woofer 13 cm...

Page 44: ... number and serial number of this product can be found on its cabinet You should note this serial number in the space provided below and retain this book plus your purchase receipt as a permanent record of your purchase to aid in identification in the event of theft or loss and for Warranty Service purposes Model Number Serial Number ...

Reviews: