background image

14

RQT8299

If the temperature of the 
rechargeable battery is high or 
low, charging may take longer 
than usual and you may not be 
able to charge. (P28)

The AC adaptor is for use with 
this unit only. Do not use it for 
other equipment. Also, do not 
use an AC adaptor for other 
equipment with this unit.

When not using the unit for a 
long time, remove the 
rechargeable battery.

When the settings of the unit 
have been changed, do not 
remove the rechargeable battery 
until the unit is turned off. (If you 
remove the battery while the unit 
is turned on, the changed 
settings cannot be saved.)

While the stereo earphones are 
inserted in this unit, you cannot 
insert/remove the rechargeable 
battery because the battery lid 
cannot be opened fully. Remove 
the stereo earphones when 
inserting/removing the 
rechargeable battery.

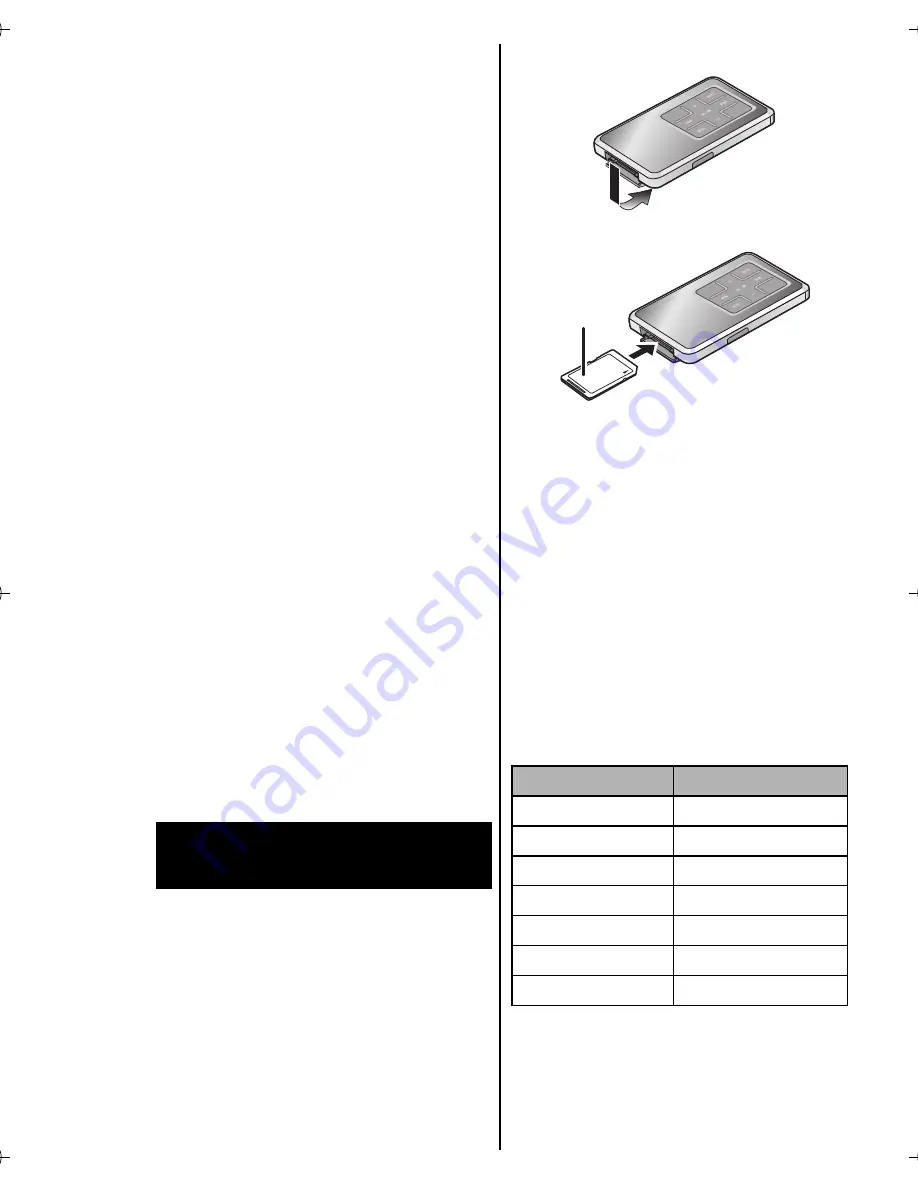
Insert and remove the SD 
Memory card when the unit 
is turned off. 

While “ACCESSING CARD” 
appears, the card is being read 
from or written to. Do not turn off 
the unit or remove the card. Such 
action may result in malfunction 
or loss of the card’s contents.

1. Open the card lid.

2. Insert the SD Memory card.

Face the label 

A

 upward and 

insert the card straight as far 
as it goes.

To remove the SD Memory card

1

Open the card lid.

2

Press the card until it 
clicks.

3

Pull it straight out.

Standard recording times 
for Voice recording and 
FM recording


The times listed in the above 
tables are approximate.

Up to 24 hours can be recorded 
continuously on a file.

Inserting and removing 
SD Memory card

Card memory

Recording time

32 MB

2 hours

64 MB

4 hours

128 MB

8 hours 30 minutes

256 MB

16 hours

512 MB

33 hours

1 GB

66 hours

2 GB

132 hours

A

SV-SD750V.book  14 ページ  2005年11月24日 木曜日 午後1時8分

Summary of Contents for SV-SD750V

Page 1: ...Operating Instructions SD Audio Player Model No SV SD750V Before use please read these instructions completely GC SG GK GN GH RQT8299 B ...

Page 2: ...the fuse differ according to the type of AC mains plug figures A and B Confirm the AC mains plug fitted and follow the instructions below Illustrations may differ from actual AC mains plug 1 Open the fuse cover with a screwdriver 2 Replace the fuse and close or attach the fuse cover Dear Customer Thank you for purchasing this product Before connecting operating or adjusting this product please rea...

Page 3: ...ated on bottom of the unit This product may receive radio interference caused by mobile telephones during use If such interference is apparent please increase separation between the product and the mobile telephone To reduce risk of radio interference caused by headphones or earphones only use adequate accessories with cable length less than 3 m Insertion of connector Even when the connector is pe...

Page 4: ...in music recognition technology and related content delivery For more information visit www gracenote com CD and music related data from Gracenote Inc copyright C 2000 2003 Gracenote Gracenote CDDB Client Software copyright 2000 2003 Gracenote This product and service may practice one or more of the following U S Patents 5 987 523 6 061 680 6 154 773 6 161 132 6 230 192 6 230 207 6 240 459 6 330 5...

Page 5: ...niSD card requires miniSD card adaptor formatted in a FAT12 file system or a FAT16 file system based on SD Memory card specifications You can use SD Memory cards with the following capacities from 8 MB to 2 GB in this unit Panasonic cards are recommended Usable memory is slightly less than the card capacity Please confirm the latest information on the following website http panasonic co jp pavc gl...

Page 6: ...ems in menus or tracklists more quickly The function is off when this product is purchased Refer to P19 for how to set the function on When using the Touch Slide function To select one by one Slide your finger while pressing A lightly To select items quickly by scrolling the tracklist Slide your finger to j or i and hold If you keep holding j or i scrolling will stop at the last first item If you ...

Page 7: ... ROM package is necessary Please keep the CD ROM package in a safe place SD Jukebox incorporates copyright protection technology with encryption to support musicians and the music industry and protect the rights of lawful owners Thus the following restrictions apply when using SD Jukebox Recording and operating problems may occur on some PC systems Please note that Panasonic and Panasonic dealers ...

Page 8: ...f you click Yes on the next screen displayed the SD Jukebox icon appears on the desktop after restarting the PC 10 Click Finish Choose Yes I want to restart my computer now The PC automatically restarts The installation is now finished When installing SD Jukebox the USB driver is installed simultaneously If the installer program does not start automatically 1 From the Windows start menu select Run...

Page 9: ...he checkbox next to the tracks to be imported 4 Click 3 For details on how to use SD Jukebox refer to the PDF operating instructions for SD Jukebox About the PDF operating instructions for SD Jukebox The operating instructions for SD Jukebox are installed along with the application as a PDF file You will need Adobe Acrobat Reader to read the file containing the operating instructions PDF file Read...

Page 10: ...ot be used on Macintosh Even if the system requirements mentioned in these operating instructions are fulfilled some personal computers can not be used Operation is not guaranteed when used on Windows OSs except those above Operation on an upgraded OS is not guaranteed Operation on an OS other than the one pre installed is not guaranteed Multi boot environment is not supported Only available when ...

Page 11: ...mory card creating playlists and editing P9 Data saving function This unit functions as a USB reader writer and is recognised by the PC as an external device This enables data other than music data to be saved from the PC to an SD Memory card by drag and drop Operation is not guaranteed when using the USB cable only Insert the rechargeable battery Do not disconnect the USB cable while ACCESSING is...

Page 12: ...ttery charges until full while the unit is connected to a computer with the USB cable Turning on off the unit Charging the battery The battery is not charged at the time of purchase Charge before initial use 1 Insert the rechargeable battery Turn the unit over and insert the rechargeable battery aligning the 3 mark on the battery with the 3 mark on the unit 1 Slide the battery lid in the direction...

Page 13: ... connected during FM reception the sound will stop being output for a while Battery indicator The battery indicator appears on the display panel After the battery indicator has blinked for a while the unit will be turned off soon When the battery indicator is blinking The following operations are not possible Mark register remove FM recording Voice recording File lock File erase Operation buttons ...

Page 14: ...ened fully Remove the stereo earphones when inserting removing the rechargeable battery Insert and remove the SD Memory card when the unit is turned off While ACCESSING CARD appears the card is being read from or written to Do not turn off the unit or remove the card Such action may result in malfunction or loss of the card s contents 1 Open the card lid 2 Insert the SD Memory card Face the label ...

Page 15: ...on this unit In these cases format the card with SD Jukebox Refer to the PDF operating instructions for SD Jukebox P9 Folder structure of an SD Memory card used for this unit Do not move or erase folders or files with Explorer etc Formatting on this unit 1 Select VOICE REC mode P23 2 Press MODE twice 3 Press r or s to select CARD FORMAT and then press 1 4 Press r or s to select YES and then press ...

Page 16: ...list is shown Select a track and then press 1 to start play Adjust the volume 0 25 Increase Press i Decrease Press j Tracks recorded on an SD Memory card cannot be erased selectively Use SD Jukebox or an SD Stereo System to erase them HOLD function If the HOLD switch is moved in the direction of is displayed and the unit stops responding when a button is pressed This prevents operations such a pla...

Page 17: ...ARTIST is displayed Press i or j to select a playlist and then press 1 to start play from the first track on the selected playlist NO LIST is displayed when the playlist has not been found Playlists can be displayed by pressing and holding the MODE approximately 2 seconds or more For details on how to create a playlist refer to the PDF operating instructions for SD Jukebox P9 BEST TRACKS Play trac...

Page 18: ...etween two points AB in the same track RANDOM Random repeats all tracks in a selected playlist INTRO PLAY When stopped only Plays the first 10 seconds of each track in a selected playlist in order During INTRO PLAY press 1 to start play and press MARK to register as a marked track P19 To set the section to repeat in A B REPEAT 1 Select A B REPEAT during play 2 Press 1 at the start point A and once...

Page 19: ...y pressing 9 i direction and j direction Up to 5 steps and then press 1 to set TOUCH SLIDER ON Using touch slide function OFF Not using touch slide function default setting LANGUAGE Japanese ENGLISH English Simplified Chinese Traditional Chinese INITIALIZE Select YES to return settings to the default settings MODE select AUDIO Volume 12 CONTRAST 0 EQ NORMAL EFFECT OFF PLAY MODE NORMAL DISPLAY ITEM...

Page 20: ...SET MARK menu P19 If a mark is registered or removed during play the information is written onto the SD Memory card after play stops Do not remove the SD Memory card or the rechargeable battery until writing is finished The information will not change Marks cannot be registered during A B REPEAT Marks cannot be removed during A B REPEAT and INTRO PLAY As the cord of the stereo earphones acts the F...

Page 21: ...tion if reception is weak or there is excessive noise If an unwanted frequency or noise is occupying a channel delete the channel with ERASE PRESET CH P23 and manually preset stations again When finished the first station memorized is displayed TUNING MODE is set to PRESET There may be an increase in noise when using this unit near a PC or other digital equipment If the AC adaptor is connected dur...

Page 22: ...es are saved with the file name Fxxxx The xxxx in a Fxxxx file name is the recording counter It increases by 1 each time a recording is made irrespective of the mode selected It returns to 0001 if RESET NUMBER P24 or INITIALIZE P19 is carried out Noise may be recorded if you adjust the volume while recording During recording each time you press MODE the display changes recording time remaining tim...

Page 23: ...ES and then press 1 to erase Displayed when TUNING MODE is set to PRESET only TUNING MODE MANUAL You can select the stations frequencies manually P21 PRESET You can select the preset stations STEREO MONO STEREO To receive as stereo MONO To receive as monaural is displayed MONO is selected to reduce noise when reception is weak SETUP Refer to SETUP in the AUDIO mode menu P19 Insert an SD Memory car...

Page 24: ...rded continuously for up to approximately 24 hours If the AC adaptor is connected during recording the recording will stop VOICE REC mode menu 1 Press MODE twice 2 Press r or s to select an item and then press 1 Repeat this step to select other items RESET NUMBER The file name of the next file recorded returns to 0001 Press i or j to select YES and then press 1 ALL FILES ERASE Erasing all the file...

Page 25: ...e list is shown Select a file and then press 1 to start play VOICE PLAY mode menu 1 Press MODE twice 2 Press r or s to select an item and then press 1 Repeat this step to select other items If displayed during play PLAY MODE NORMAL Plays in order from the selected file 1 REPEAT Repeats 1 file ALL REPEAT Repeats all files A B REPEAT Repeats between two points AB in the same file SETUP Refer to SETU...

Page 26: ... you use SD Jukebox to save voice recording file and other important files on a PC Locking and erasing files may take time if there is a large number of files Use the rechargeable battery and AC adaptor together or use the fully charged rechargeable battery 1 Mode AUDIO mode FM TUNER mode VOICE PLAY mode VOICE REC mode 2 During play 3 Remaining battery power 4 Registering marks Presetting stations...

Page 27: ...prevent them from being swallowed Do not let reflected light hit people Lights reflects from this unit s display like a mirror It can thus get into the eyes of people who are operating a vehicle etc If it is used under direct sunlight or strong light and cause an accident Be careful about how you hold the unit TR PL VO PL PL S XBS1 S XBS2 TRAIN S XBS ACCESSING CARD Do not remove the SD Memory card...

Page 28: ...aptor detach the label on the card or attach other labels or stickers Blinking of the status indicator Intervals of about 3 seconds During audio play voice play and FM tuner reception Intervals of about 1 second on for about 0 5 seconds and off for about 0 5 seconds While writing to the SD Memory card formatting FM tuner recording voice recording etc Intervals of about 2 seconds on for about 1 sec...

Page 29: ...battery run down P13 If the battery has not run down try removing and re inserting it Are the connections for the rechargeable battery dirty Play time is short after recharging This may occur the first time you recharge the battery or if you have not used it for a long time Play time should be restored after a few recharges If play is extremely short even after fully recharging the battery the bat...

Page 30: ...nction Cannot use the SD Memory card Is the card s write protect switch moved to the LOCK position Has the card been formatted on a PC in a FAT32 file system or NTFS file system Format the card on this unit or SD Jukebox ACCESSING can not be disappeared while connecting to PC If a NTFS format SD Memory card is inserted into the unit log on to the PC again as Administrator User or a user with the s...

Page 31: ...mensions 86 0 mm W k46 0 mm H k9 9 mm D excluding the projecting parts Maximum dimensions 87 3 mm W k46 7 mm H k11 0 mm D JEITA Mass Approx 53 0 g with rechargeable battery Approx 40 0 g without rechargeable battery Recording Media SD Memory card card capacities between 8 MB and 2 GB Specifications are subject to change without notice The battery duration shown depends on operating conditions Usab...

Page 32: ...RQT8299 B F1105Re0 1000 A Matsushita Electric Industrial Co Ltd Web site http www panasonic co jp global C En ...

Reviews: