background image

13

14

MANUAL

PRESET

or

or

MODE

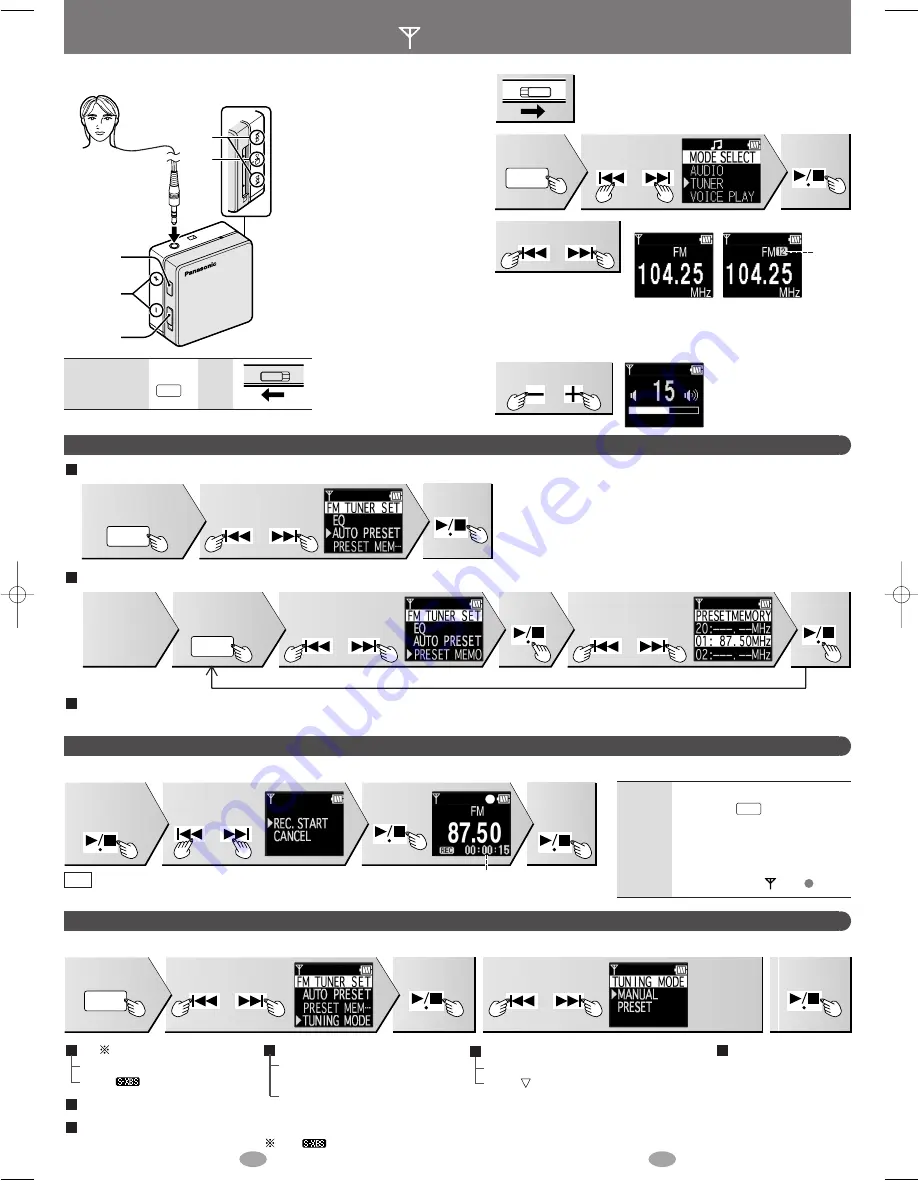
Using the FM radio (TUNER mode)

As the cord of the earphones
acts the FM antenna, extend it
as far as possible rather than
leaving it coiled.

Presetting FM stations

AUTO PRESET 

(20 stations can be stored.)

PRESET MEMORY (MANUAL) 

(20 stations can be stored.)

To listen to preset channels

Select the preset channel in step 3 above.

3

Select the station.

• Press and hold for more

than 2 seconds for
automatic tuning. When 

the button is released the frequency starts scrolling
and stops when a station is found.

• You can preset stations to make tuning simpler. 

Select “PRESET” for “TUNING MODE” before step 3
(

below: TUNER mode settings)

2

Select “TUNER”.

or

MODE

Press

Select “AUTO PRESET”

Select the
frequency and
press twice

Select
“MANUAL”
for “TUNING
MODE”
(

below )

Press

Press twice during

FM reception

Press

Select 
“PRESET MEMORY”

Press

Select the channel

Press

Repeat as many times as is required.

• The tuner automatically presets the stations it can receive into the

channels in order.

• Auto Preset may not function if reception is weak or there is

excessive noise. If an unwanted frequency or noise is occupying a
channel, use PRESET MEMORY (MANUAL).

• When finished, the first station memorized is displayed. “TUNING

MODE” is set to “PRESET”.

Playback in VOICE PLAY mode: monaural 

page 15

or

Recording the radio

Note

Off

OPR

OFF

ON

or

Press

Select “REC. START”

Press

Press again

to stop

recording.

While listening

to the station,

press

Press

Preset
numbers

4

Adjust the volume. (0-25)

• Noise may be heard

when adjusting the
volume.

or

Press

MODE

or

Press

Press

Press

L

R

Stereo earphones
(Use only the
included headphones)
Insert firmly. (The
longer cord is R)

1

Turn the unit on.

OPR

OFF

ON

TUNER mode settings

MODE

or

or

2. Set.

3. Confirm.

1. Select the desired item.

Press twice

Press

Press

Press

Press

EQ

NORMAL

:

Normal

S-XBS

: Add powerful bass

AUTO PRESET (Above)

PRESET MEMORY (Above)

TUNING MODE

MANUAL

: You can select the stations

(frequencies) manually.

PRESET

: You can select the

preset stations.

BAND STEP
(The tuning band

step)

200 kHz / 100 kHz / 50 kHz

• Converting the steps

erases all preset stations.

STEREO/MONO

STEREO

: To receive as stereo

MONO

: To receive as monaural

(MONO is selected to reduce noise
when reception is weak.)

Example:
TUNING
MODE

Setting mode

Other modes

Press

MODE

1

2

4

2

2,3

Press

• Recorded files are saved with the file name “Fxxxx”.
• Noise may be recorded if you adjust the volume while recording.

• No sound is output when switching between functions in TUNER mode.

The 

icon is displayed if S-XBS is selected.

Changing

the

display

• During recording, each time you

press the 

: Recording time

→ 

Remaining time

→ 

file name.

• When remaining time becomes

less than 10 minutes, the
remaining time is displayed. The
remaining 

time, and flash.

MODE

Recording time

SV̲SD100V̲En0221    05.2.22  10:03  AM    ページ 7

Summary of Contents for SV-SD100V

Page 1: ...puter automatically restarts The installation is now finished If the installer program does not start automatically on your computer follow these steps 1 From the Windows start menu choose Run 2 Type autorun exe and click on OK Follow the on screen instructions The ID of the CD ROM drive that you inserted the CD ROM into You can use upper or lower case letters in this step Installing SD Jukebox Th...

Page 2: ...er RAM 256 MB or more Free hard disk space 100 MB or more Depending on the version of Windows or audio data additional free hard disk space is required Display High Color 16 bit or more Desktop resolution of 800 600 pixels or more 1 024 768 pixels or more recommended Sound Windows compatible sound device CD ROM drive required for installation and for CD recording A CD ROM drive capable of digital ...

Page 3: ... of your body Listening caution Do not play your headphones or earphones at a high volume Hearing experts advise against continuous extended play If you experience a ringing in your ears reduce volume or discontinue use Do not use while operating a motorized vehicle It may create a traffic hazard and is illegal in many areas You should use extreme caution or temporarily discontinue use in potentia...

Page 4: ...ntial damages or limitations on how long an implied warranty lasts so the exclusions may not apply to you This warranty gives you specific legal rights and you may also have other rights which vary from state to state If a problem with this product develops during or after the warranty period you may contact your dealer or Servicenter If the problem is not handled to your satisfaction then write t...

Page 5: ... when it comes out of this mode Disconnect the unit and reconnect it or restart the computer if this happens To disconnect the USB cable double click the icon which is in the task tray of the computer and follow the onscreen instructions The rechargeable battery is charging while the unit is connected to your computer by USB cable However it cannot charge fully Note 5 1 2 OPR OFF ON 4 3 Record tra...

Page 6: ... This is cancelled with the skip and stop functions RANDOM All tracks random repeat in a playlist INTRO PLAY To play the first 10 seconds of each track in order You can select this while play is stopped EQ 2 3 NORMAL Normal S XBS1 Add powerful bass S XBS2 Enhanced S XBS1 effect TRAIN Reduces sound leaks and listening fatigue INT AB All 1 EQ PLAY MODE EFFECT MOOD icon Play indicator Track informati...

Page 7: ...onaural page 15 or Recording the radio Note Off OPR OFF ON or Press Select REC START Press Press again to stop recording While listening to the station press Press Preset numbers 4 Adjust the volume 0 25 Noise may be heard when adjusting the volume or Press MODE or Press Press Press L R Stereo earphones Use only the included headphones Insert firmly The longer cord is R 1 Turn the unit on OPR OFF ...

Page 8: ...s than 10 minutes the remaining time is displayed The remaining time and flash MODE VOICE PLAY mode settings MODE or or 2 Set 3 Confirm 1 Select the desired item Press Press Press Press PLAY MODE Same as AUDIO mode page11 RANDOM and INTRO PLAY cannot be selected 1 FILE LOCK LOCK Locking a selected file A lock icon appears for the locked file UNLOCK Cancelling a 1 FILE LOCK ALL LOCK LOCK Locking al...

Reviews: