background image

 V

iewing 3D images

32

  Registration

 First registration

 Perform the first registration when the 3D Eyewear is used for the first time.

 1

  Turn on the TV

 2

  Slide the power switch from “OFF” to “ON”

 The 3D Eyewear will power on and start registration.
 Place the 3D Eyewear within 50 cm from the TV while registration in progress.

 3

  The green LED lights on the 3D Eyewear for 3 seconds when the registration is successfully completed

 After first registration, the 3D Eyewear will reconnect with TV automatically when 3D Eyewear is powered on near the 
TV in 3D mode.

 Registration again

 When connection with registered TV fails, or when using with another TV, re-register the 3D Eyewear.

 1

  Turn on the TV

 2

  Within 50 cm from the TV, hold the power switch on the “MODE” position for more than 2 seconds

 The registration will start.

 3

  The green LED lights for 3 seconds when the pairing is successfully completed

 Note


 If the registration failed, the 3D Eyewear will power off. In this case, power off the TV and perform from step 1.


 Release the power switch when Registration again starts.

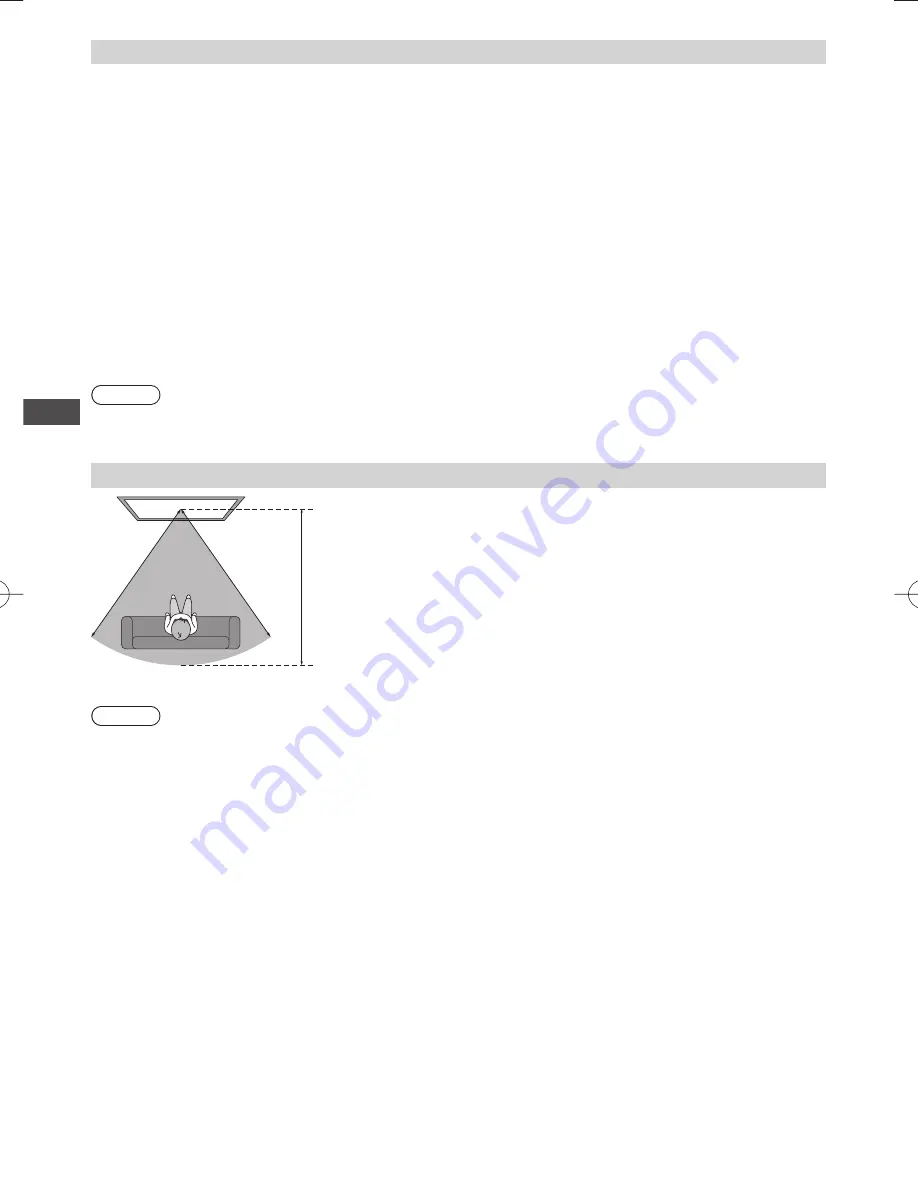
  Viewing range for the 3D Eyewear


 Approx. 
3.2 m

 Note


 You cannot view the 3D images with the 3D Eyewear too far from the TV, because of the difficulty of receiving radio 
waves from the TV.


 The range may be shortened depending on the obstacles between the TV and the 3D Eyewear, or the surrounding 
environment.


 There are differences in the viewing range of the 3D Eyewear among individuals.


 The 3D Eyewear may not operate correctly at the outside of the viewing range.

Summary of Contents for ST50T

Page 1: ...r Serial Number Information on Disposal in other Countries outside the European Union This symbol is only valid in the European Union If you wish to discard this product please contact your local authorities or dealer and ask for the correct method of disposal India Only For the purpose of recycling to facilitate effective utilization of resources please return this product to a nearby authorized ...

Page 2: ...nasonic product Please read these instructions carefully before operating this product and retain them for future reference The images shown in this manual are for illustrative purposes only English TQB4TC0290 ST50D series ST50K series ST50M series ST50P series ST50T series ...

Page 3: ...er are registered trademarks DTS 2 0 Digital Out is a trademark of DTS Inc Product includes software DTS Inc All Rights Reserved DivX DivX Certified DivX Plus HD and associated logos are trademarks of Rovi Corporation or its subsidiaries and are used under license RealD 3D is a trademark of RealD The Bluetooth word mark and logos are registered trademarks owned by the Bluetooth SIG Inc and any use...

Page 4: ...he personal and non commercial use of a consumer to i encode video in compliance with the AVC Standard AVC Video and or ii decode AVC Video that was encoded by a consumer engaged in a personal and non commercial activity and or was obtained from a video provider licensed to provide AVC Video No license is granted or shall be implied for any other use Additional information may be obtained from MPE...

Page 5: ...o not remove the rear cover as live parts are accessible when it is removed There are no user serviceable parts inside High voltage components may cause serious electrical shock Have the TV checked adjusted or repaired at your local Panasonic dealer Do not expose to direct sunlight and other sources of heat Avoid exposing the TV to direct sunlight and other sources of heat To prevent the spread of...

Page 6: ...e internal circuitry Allow sufficient space around the TV for radiated heat Minimum distance When using the pedestal keep the space between the bottom of the TV and the surface where the TV is set In case of using Wall hanging bracket follow the manual of it 10 10 10 7 cm Do not block the rear air vents Blocked ventilation by newspapers table cloths curtains etc may cause overheating fire or elect...

Page 7: ...ay be regarded as illegal access SSID is a name for identifying a particular wireless network for transmission Do not subject the built in wireless LAN to high temperatures direct sunlight or moisture Data transmitted and received over radio waves may be intercepted and monitored The built in wireless LAN uses 2 4 GHz and 5 GHz frequency bands To avoid malfunctions or slow response caused by radio...

Page 8: ...lastic bags that can be breathed in or swallowed by young children accidentally Keep these parts out of reach of young children Optional accessories Please contact your local Panasonic dealer to purchase the recommended optional accessories For additional details please read the manual of the optional accessories 3D Eyewear set Rechargeable type TY ER3D4MW TY ER3D4SW If you need 3D Eyewears additi...

Page 9: ...staller will void your warranty Carefully read the instructions accompanying optional accessories and be absolutely sure to take steps to prevent the TV from falling off Handle the TV carefully during installation since subjecting it to impact or other forces may cause product damage Take care when fixing wall brackets to the wall Always ensure that there are no electrical cables or pipes in the w...

Page 10: ...t might fall over and become damaged and personal injury may result Ensure that the TV does not fall over If the TV is knocked or children climb onto the pedestal with the TV installed the TV may fall over and personal injury may result Two or more people are required to install and remove the TV If two or more people are not present the TV may be dropped and personal injury may result When removi...

Page 11: ... class 4 65 class F D Tabs bottom 3 Attach the bracket to the tabs of the neck and fix with assembly screws 4 Attach the cover and fix securely with assembly screw B C D Tabs top E A Securing the TV Use the assembly screws 42 50 class or 65 class to fasten securely Tighten the four assembly screws loosely at first then tighten them firmly to fix securely Carry out the work on a horizontal and leve...

Page 12: ...m the bracket 6 Remove the assembly screws from the Back of stand and pull out the neck Adjusting the panel to your desired angle Do not place any objects within the full rotation range View from the top 42 class 15 50 class 10 Preventing the TV from falling over 42 50 class Using the fall prevent screw hole and a screw commercially available securely fix the body of the pedestal to the installati...

Page 13: ...functions 10 Sound Mute Switches sound mute on or off 11 Teletext p 25 Switches to teletext mode 12 Volume Up Down 13 Numeric buttons Changes channel and teletext pages Sets characters When in Standby mode switches TV on 14 Aspect p 23 Changes aspect ratio 15 Light Lights the buttons for about 5 seconds except the buttons 25 16 Input mode selection TV switches TV mode p 21 AV switches to AV input ...

Page 14: ...in the following conditions No signal is received and no operation is performed for 30 minutes in TV mode Off Timer is active in the Timer Menu p 22 No operation is performed for the period selected in Auto Standby p 43 1 Function select Volume Contrast Brightness Colour Sharpness Tint NTSC signal Bass Treble Balance Auto Tuning Music or Speech mode in the Sound Menu 2 Channel Up Down Value change...

Page 15: ...rminals 6 7 8 9 10 5 3 2 4 1 1 SD Card slot p 52 2 Headphone jack p 80 3 USB 1 2 p 52 80 4 HDMI1 3 p 15 79 5 ETHERNET p 16 63 6 Antenna terminal see below 7 DIGITAL AUDIO OUT p 79 8 PC p 80 9 AV1 IN AUDIO OUT p 79 10 AV2 IN p 79 80 Connections Mains lead and aerial TV AC 220 240 V 50 60 Hz ST50P series AC 110 240 V 50 60 Hz Mains lead Aerial RF cable Mains lead Make sure that the mains lead is sec...

Page 16: ... required Any matters regarding aerial installation upgrading of existing systems or accessories required and the costs incurred are the responsibility of you the Customer AV devices Player 3D compatible player TV Player 3D compatible player HDMI cable DVD Recorder VCR TV DVD Recorder VCR RF cable Aerial RF cable Set top box TV Set top box HDMI cable Satellite dish Note Check the type of terminals...

Page 17: ...ired connection TV Internet environment LAN cable Shielded Use the Shielded Twist Pair STP LAN cable Wireless connection Internet environment Access point Built in wireless LAN Using clamper Clamper Standard accessory Attach the clamper Bundle the cables hole Insert the clamper in a hole hooks Set the tip in the hooks To remove from the TV To loosen Keep pushing both side snaps snaps knob Keep pus...

Page 18: ...esia China CIS E Europe CATV Other Hong Kong select access When selecting CATV Other press the OK button and then select the Channel Plan from Indian CATV South Africa American System American CATV or Japan CATV Auto Tuning starts Auto Tuning will start to search for TV channels and store them The stored channels and sorted channel order vary depending on the area broadcasting system and condition...

Page 19: ... Access the encryption key input mode Encryption Key Setting Security type WPA PSK Encryption type TKIP Please input the encryption key Encryption key Connection will be made with the following settings Network Name SSID Access Point A If the selected access point is not encrypted the confirmation screen will be displayed It is recommended to select the encrypted access point 3 Enter the encryptio...

Page 20: ...ons And then select Retry 4 Go to the next step Press twice 6 Select Home Select Home viewing environment to use in your home environment Please select your viewing environment Home Shop select set Shop viewing environment for shop display only Shop viewing environment is the demonstration mode to explain main features of this TV Select Home viewing environment to use in your home environment You ...

Page 21: ...ages might be displayed before VIERA Connect home screen Please read these instructions carefully and follow the on screen instructions Example VIERA Connect home screen MORE BACK To go to the next level select MORE To back to the previous level select BACK To return to VIERA Connect home screen To exit from VIERA Connect To set the VIERA Connect introduction banner display off VIERA Connect Banne...

Page 22: ...A Connect To set this banner display off VIERA Connect Banner p 43 The banner is subject to change 2 Select TV mode 3 Select a channel up down or To select the two digit channel position number e g 39 Other useful functions Display Information banner Display Information banner Also appears when changing a channel To hide II Audio mode p 83 Sound mute On 1 90 Off Timer remaining time For settings p...

Page 23: ...f individual channel or input mode Off Timer Turn the TV to Standby mode automatically after a fixed period 1Display the menu 2Select Timer Timer select access 3Select Off Timer and set the time in 15 minute increments 15 30 45 60 75 90 Off minutes Off Timer Auto Standby minutes minutes minutes minutes minutes select Off Timer access select the time store To cancel set to Off or turn the TV off To...

Page 24: ...mage at the standard 14 9 without distortion Displays a 16 9 letterbox or 4 3 image without distortion Just Zoom2 Displays a 4 3 image full screen Stretching is only noticeable at the left and right edges Displays a 16 9 letterbox anamorphic image full screen without distortion 4 3 Zoom3 Displays the image at the standard 4 3 without distortion Displays a 2 35 1 letterbox anamorphic image full scr...

Page 25: ...e Watching less than 10 seconds is not regarded as the previously viewed channel or input mode Change OSD language You can change language for on screen displays 1Display the menu 2Select Setup Setup select access 3Select OSD Language OSD Language Access select access 4Select the language and set OSD Language English select set ...

Page 26: ... bottom of the screen Each of these numbers can be altered and stored in the TV s memory Store frequently viewed pages p 26 To change mode Teletext p 43 1 Switch to Teletext Displays the index page content varies depending on the broadcasters 01 02 03 04 05 06 07 TELETEXT INFORMATION 17 51 28 Feb Time date Sub page number Colour bar Current page number 2 Select the page or up down or Coloured butt...

Page 27: ...d Coloured button you want to change View sub page View sub page Only when Teletext is more than one page Appears at top of the screen The number of sub pages varies depending on the broadcasters It may take some time for searching during which time you can watch TV To view specific sub page Enter the 4 digit number Example P6 Watch TV while waiting for update View the TV picture while searching f...

Page 28: ...I3 HDMI2 HDMI1 select watch You can also select the input using the AV button on the remote control or the TV except SD Card USB Press the button repeatedly until the desired input is selected To switch between COMPONENT and VIDEO in AV2 move the indicator by pressing left and right cursor button SD Card USB Switches to Media Player Using Media Player p 52 You can label or skip each input mode exc...

Page 29: ...nt Skip to the next track title or chapter Pause Pause Resume Record Start recording How to change the code Each type of the Panasonic equipment has its own remote control code Change the code according to the equipment you want to operate Press and hold during the following operations Enter the appropriate code see table below Press Type of the equipment features Code DVD Recorder DVD Player Blu ...

Page 30: ...se stop using the 3D Eyewear immediately if you feel tired are not feeling well or experience any other uncomfortable sensation When you set the effect by using 3D Adjustment take into account that the vision of 3D images varies among different individuals Take an appropriate break after viewing a 3D movie Take a break of between 30 60 minutes after viewing 3D content on interactive devices such a...

Page 31: ...around the nose or temples In rare cases the materials used in the 3D Eyewear may cause an allergic reaction Lithium Battery Danger of explosion if battery is incorrectly replaced Replace only with the same or equivalent type 3D Eyewear 3D Eyewear 3D Eyewear can be worn over vision correction glasses Use the Panasonic 3D Eyewear that has this logo and supports Bluetooth wireless technology Full HD...

Page 32: ...tery Replacing the battery p 33 Insulating sheet Pull Indicator lamp status Indicator lamp Status Lights red for 2 seconds when turned on Sufficient battery level Flashes 5 times when turned on Low battery level Flashes red and green alternately Under pairing Flashes green once every 2 seconds Under reconnecting to the TV Lights green for 3 seconds Pairing or reconnecting is successfully completed...

Page 33: ...D Eyewear 1Turn on the TV 2Within 50 cm from the TV hold the power switch on the MODE position for more than 2 seconds The registration will start 3The green LED lights for 3 seconds when the pairing is successfully completed Note If the registration failed the 3D Eyewear will power off In this case power off the TV and perform from step 1 Release the power switch when Registration again starts Vi...

Page 34: ...in line with the waste disposal regulations in your local area 1Loosen the screw and remove the cover using with a precision Phillips No 0 plus screwdriver The screw is not removed from the cover 2Replace the battery If difficulty remove it with the tip of the driver Use the specified type of battery coin shaped lithium battery CR2025 Note the correct polarity or 3Replace and fasten the cover Push...

Page 35: ...tch is next turned on Select No if you do not want to display this message again Turn off the 3D Eyewear after using it Note The 3D image or 3D effect may not be available in the following conditions VIERA Connect home screen p 20 is displayed If light appears to flicker under fluorescents or dimmers when using the 3D Eyewear change the setting of 3D Refresh Rate p 40 3D content will not be correc...

Page 36: ...D Please note the 3D images appear slightly different from the originals Using this function for profit making purposes or publically showing images converted from 2D to 3D in places such as shops or hotels etc may infringe on the rights of the copyright holder protected under copyright law Table of images that can be seen for each 3D Mode Selection Manual and the source image format If the pictur...

Page 37: ...press the RETURN button to go to Effect setting Effect Adjusts the 3D depth according to the contents or to your preference Picture Sequence Select Reverse if you feel that the sense of depth is unusual except in 2D 3D mode Normal Reverse Edge Smoother Set to On if you feel the contoured parts of an image are not smooth enough except in 2D 3D mode Off On 3D Detection Automatically detects the 3D f...

Page 38: ...ions of each feature VIERA Link p 75 78 Photo p 54 Video p 58 Music p 61 VIERA Connect p 20 71 Media Server p 68 When two or more available devices are connected a selection screen will be displayed Please select the correct description and access Note If the selected feature is not available the demonstration to explain how to use it can be displayed Press the OK button to view the demonstration ...

Page 39: ...lect store Adjust using the slide bar 50 Sharpness Moved change store Go to the next screen Child Lock Access Displays the next screen access To return to TV at any time To return to the previous screen To change menu pages up down Enter characters by free input menu You can enter names or numbers freely for some items English only A B C D E F G H I J K L M N O P Q R S T U V W X Y Z 0 1 2 3 4 5 6 ...

Page 40: ...r each Contrast Brightness Colour Sharpness Adjusts the levels of these options according to your personal preference Tint Adjusts the picture hue to suit your taste For NTSC signal Component and HDMI input Colour Balance Sets the overall colour tone of the picture Cool Normal Warm Not valid when Viewing Mode is set to True Cinema Channel Colour Set Adjusts the suitable colour density from 3 level...

Page 41: ...function is available for the interlaced signal except in the mode of PC VIERA Connect or when Viewing Mode is set to Game 3D Refresh Rate Reduces juddering and flicker noises of the 3D images when using the 3D Eyewear Auto 100Hz 120Hz 100Hz If light appears to flicker under fluorescents or dimmers of 50 Hz 120Hz If light appears to flicker under fluorescents or dimmers of 60 Hz Side Panel Adjusts...

Page 42: ...s Sound Mode Selects your favourite sound mode for each input Music Speech User Music Improves sound quality for watching music videos etc Speech Improves sound quality for watching news drama etc In Music and Speech modes you can adjust Bass and Treble settings and those settings will be stored for each mode User Adjusts the sounds manually by using the equaliser to suit your favourite sound qual...

Page 43: ...e to the distance between the speakers and the wall Over 30cm Up to 30cm If the back space between the TV and wall is over 30 cm Over 30cm is recommended If the back space between the TV and wall is within 30 cm Up to 30cm is recommended MPX Selects multiplex sound mode if available p 83 Stereo Use this normally Mono When stereo signal cannot be received M1 M2 Available while mono signal is transm...

Page 44: ...kips the unwanted channels or edits channels p 46 Auto Tuning Automatically searches for the receivable channels p 46 Manual Tuning Searches for the channels manually p 47 OSD Language Changes language for on screen displays Display Settings Teletext Teletext display mode FASTEXT List p 25 Teletext Character Set Selects teletext language font English CIS E Europe Persian Input Labels Accesses the ...

Page 45: ...ode to reduce the power consumption Off On With reminder On No reminder p 75 This function is available when VIERA Link is set to On DivX VOD Displays DivX VOD registration code p 86 Advance Enables the advanced picture settings Off On Set to On to display the advanced items in the Picture Menu p 51 System Menu Shipping Condition Resets all settings to the original condition p 49 Software Licence ...

Page 46: ...anted channels etc 1 Select TV mode p 21 2 Display the menu and select Setup Setup select access 3 Select Tuning Menu Tuning Menu Access select access The displayed item depends on the selected mode 4 Select one of the following functions Auto Tuning Manual Tuning Tuning Menu Access Access Channel List Edit Access select access ...

Page 47: ...uning p 47 To rename the channel name Set characters maximum 5 characters Store Edit channel name Name select set To use numeric buttons English only p 89 Note If a VCR is connected only with the RF cable edit VCR Set all channels automatically Auto Tuning Automatically retune all channels received in the area 1 Start Auto Tuning 2 Settings are made automatically Auto Tuning All tuning data will b...

Page 48: ...stem to Auto If a VCR is connected only with the RF cable select channel position 0 5 5MHz CH57 0 1 120 Manual Tuning Fine Tuning Manual Tuning Sound System Colour System Store Auto 1Select the channel position 2Select the channel 3Search 4Select Store select store Auto Tuning using the buttons on the TV For Auto Tuning using the buttons on the TV p 13 1Press the F button repeatedly until Auto Tun...

Page 49: ...te of the PIN number in case you forget it 2Select Child Lock List Change PIN Child Lock List Child Lock Access select access 3Select the channel input to be locked 2 3 Child Lock List TV and AV Name Input External External Type Lock TV TV TV TV AV AV AV1 AV2 Appears when the channel input is locked External External External AV AV AV PC HDMI1 HDMI2 select lock To cancel Select the locked channel ...

Page 50: ...select access 2 Select System Menu System Menu Access select access 3 Select Shipping Condition System Menu Shipping Condition Access select access Restore Settings Shipping Condition 1Check the message and initialise 2Follow the on screen instructions Shipping Condition All tuning data will be erased Are you sure Are you sure 1 Confirm 2 Confirm 3 Start Shipping Condition Reset to Factory Shippin...

Page 51: ... wide view VGA 640 480 pixels WVGA 852 480 pixels XGA 1 024 768 pixels WXGA 1 280 768 pixels 1 366 768 pixels Options change depending on signals Clock Set to the minimum level if noise occurs H pos Adjusts horizontal position V pos Adjusts vertical position Clock Phase Eliminates flicker and distortion Adjust after Clock adjustment Set to the minimum level if noise occurs Sync Chooses another syn...

Page 52: ...n the Picture Menu is set to True Cinema Menu Item Adjustments Configurations alternatives Picture Advanced Settings White Balance R Gain G Gain B Gain Adjusts the white balance of bright red green blue area R Cutoff G Cutoff B Cutoff Adjusts the white balance of dark red green blue area Reset to Defaults Press the OK button to reset to the default White Balance Colour Management R Hue G Hue B Hue...

Page 53: ...ecording was made by the recording equipment The file without record of the date is shown The picture may not appear correctly on this TV depending on the recording equipment used Display may take some time when there are many files and folders Partly degraded files might be displayed at a reduced resolution Picture setting may not work depending on the conditions The folder and file names may be ...

Page 54: ... All photos EXIT Select RETURN Slideshow View Select Drive Select Contents Select Info View Option Menu SD Card Media Player Photo All photos Selected device name To display the information of the highlighted content 1 48 p1010001 JPG 2011 10 23 1600X1200 File name Date Pixel File number Total file number Note You can also access each mode directly by using VIERA TOOLS p 37 Select the appropriate ...

Page 55: ...elect Info View Option Menu SD Card Media Player Photo All photos To change the size of photos on a thumbnail screen select Change Size change Error display Single view Photos are displayed one at a time Select the file from the thumbnail of photos to be viewed select access Example Single view Single view Stop EXIT Select RETURN Rotate Operation guide To display hide the operation guide To return...

Page 56: ...is recommended to take a photo for L and then move your camera to the right about 5 cm and take another photo for R To view the created 3D photo with 3D effect you need the 3D Eyewear Standard accessories p 7 1Display the option menu in the thumbnail view 2Select Multi Shot 3D Slideshow Settings Multi Shot 3D Change Size Option Menu select access 3Select two photos for L left and R right EXIT Sele...

Page 57: ...played at a random position and random scale Drift calendar Drift Photos are displayed like flow images You can select to display the calendar or not The month of calendar is turned by pressing the left or right cursor button Gallery calendar Gallery The various sizes of photos in the frame are displayed You can select to display the calendar or not The month of calendar is turned by pressing the ...

Page 58: ...t to Motion Repeat Slideshow repeat Off On Back Ground Music Selects the back ground music during Photo mode Off Type1 Type2 Type3 Type4 Type5 User Auto Type1 5 are the fixed music each installed in this TV User Music data in the device registered by yourself will be played back To register the music 1 Select the music file Depending on the condition of the device select folders until you reach th...

Page 59: ...tically starts from where you watched last time when you turn the TV on after the TV is turned off or in Standby mode due to electric outage etc To turn off the auto resume Auto Resume Setup p 59 61 Playback from the selected scene in the title SD Video or AVCHD Playback of the selected scene will start to the end of the title 1Select the title 2Select the scene 3Start playback select access Note ...

Page 60: ...the sound Only available during playback Subtitle Subtitles On Off if available Only available during playback Subtitle Text Selects the font type to display subtitles correctly if available Only available during playback Aspect Change Aspect1 Displays the content enlarged without distortion Aspect2 Displays the content full screen Original Displays the content original size You can also change th...

Page 61: ...nd SPDIF Selection Auto select access store select access Menu Item Adjustments Configurations alternatives Sound SPDIF Selection SPDIF A standard audio transfer file format Selects the initial setting for digital audio output signal from DIGITAL AUDIO OUT and HDMI2 ARC function terminals Auto PCM Auto Dolby Digital Plus Dolby Digital and HE AAC multi channel are output as Dolby Digital Bitstream ...

Page 62: ...operation guide To operate the playback Rewind Pause Playback Stop Fast forward To the previous track To the next track To return to thumbnail Music Setup Auto Resume Setup Setup the setting for Music mode only available in the thumbnail view 1Display the option menu 2Select Music Setup or Auto Resume Setup 3Set Music Setup Auto Resume Setup Option Menu select access store select access Menu Item ...

Page 63: ... setup for homegroup settings of Windows 7 is required For details refer to the help functions of Windows 7 TwonkyMedia server TwonkyMedia server is the product of PacketVideo Corporation To obtain the Installation Guides for installing and setting TwonkyMedia server visit the website of TwonkyMedia Additional fees may be charged to obtain server software Note For more information about the server...

Page 64: ... cable for this connection If your modem has no broadband router functions use a broadband router If your modem has broadband router functions but there are no vacant ports use a hub Ensure that the broadband routers and hubs are compatible with 10BASE T 100BASE TX If you use the equipment compatible only with 100BASE TX category 5 LAN cables are required Example 2 For DLNA You can connect the TV ...

Page 65: ...ote Volume Network Link Settings Network Remote Control On On On select access select access store Menu Item Adjustments Configurations alternatives Network Link Settings VIERA Name Sets your favourite name for this TV This name will be used as the name of this TV on the screen of the other network equipment DLNA Remote Control Enables to control the TV using Windows 7 via the network Off On DLNA ...

Page 66: ...xy Settings IP DNS Settings Auto The available settings are displayed automatically Manual settings IP Address Subnet Mask Default Gateway DNS Address select access store 3Select Proxy Settings and set the items It is not required for normal household use Acquire IP Address IP Address Subnet Mask Default Gateway Acquire DNS Address DNS Address Proxy Settings IP DNS Settings Auto Auto Access select...

Page 67: ...ftware Message Wireless Access Network Status On select access When the access point is already set Current Settings screen will be displayed To change the settings select No on this screen and go to the next step 3Select your desired access point 1 2 3 Access Point A Access Point B Access Point C 11n 2 4GHz 11n 5GHz 11n 5GHz Available Wireless Networks No Network Name SSID Status Wireless type se...

Page 68: ... after entering and saving the settings on the wireless access point WPS PIN Connect Manual You can setup SSID security type encryption type and encryption key manually Follow the on screen instructions and set manually When you use 11n 5 GHz for the wireless system between the built in wireless LAN and access point select AES for the encryption type Please input the network name SSID Network Name...

Page 69: ...2012 01 28 14 48 2012 02 09 19 58 P000135 P000180 P000214 P000251 P000276 P000293 V100025 V100042 M10054 M10078 3648x2736 JPEG Info Select Pixel Media Server Format EXIT RETURN View Slideshow Option Menu select access Depending on the condition of media server you may need to select the folder before selecting the file To display the information of the highlighted file Note Non playable files are ...

Page 70: ...Playback 2011 02 19 11 21 00 15 39 00 02 05 MEDIASERVER Operation guide Information banner EXIT RETURN Manual skip To display hide the operation guide and information banner To the previous content To the next content To change aspect To operate the playback Rewind Pause displays the time seek bar Playback Stop Fast forward Manual skip Press to skip forward about 30 seconds To return to list For m...

Page 71: ...Slideshow repeat Off On Back Ground Music Selects the back ground music during Photo mode Off Type1 Type2 Type3 Type4 Type5 Video Setup Video Preview Sets to start the preview of the title or scene in the thumbnail screen Off On Image may not be displayed for an instant in the thumbnail screen Set the preview Off to resolve this Multi Audio Dual Audio Dual Mono Audio Selects between selectable sou...

Page 72: ...IERA Connect home screen My Account Confirms or removes the account information of the TV you entered on VIERA Connect Lock Sets to restrict access to some services Beep Sets beep sound On or Off when operating VIERA Connect Notices Displays the information of VIERA Connect Note Be sure to update the software when a software update notice is displayed on the TV screen If the software is not update...

Page 73: ...es VIERA Link HDMI connection Connected equipment Features DIGA Recorder DVD Player Blu ray Disc Player HD Video Camera LUMIX Camera Channel download 2 Easy playback Power on link Power off link Reduce unnecessary power consumption in Standby 3 3 Auto standby for unnecessary equipment 3 3 Pause Live TV programme 2 4 Direct TV Recording 2 Control the menu of the connected equipment by VIERA remote ...

Page 74: ...or audio output from the TV 1 Available with the equipment which has HDAVI Control 2 or later function 2 Available with the equipment which has HDAVI Control 3 or later function 3 Available with the equipment which has HDAVI Control 4 or later function 4 Available with a DIGA Recorder which has HDD 5 While playing a disc 6 Except for watching a disc 7 If the connected equipment has HDAVI Control 5...

Page 75: ... m Set up the connected equipment Read the manual of the equipment For optimal recording the settings of the recorder may need to be changed For details read the manual of the recorder Set VIERA Link to On in the Setup Menu VIERA Link p 44 Set up the TV After connection turn the equipment on and then switch the TV on Select the input mode from HDMI1 HDMI2 or HDMI3 p 27 and make sure that an image ...

Page 76: ... into Standby mode automatically to reduce the power consumption For example when the input mode is switched from HDMI or when Speaker Selection is changed to TV except for watching a disc If you select On With reminder the on screen message will be displayed before the connected equipment turns to standby This function may not work properly depending on the connected equipment If required set to ...

Page 77: ...d on HDD from where it was paused If the paused TV picture disappears after a few minutes press OPTION button to restore the pause picture Follow the operation guide to operate Pause Live TV function To operate Pause Live TV Search backward Playback Stop If you stop playback the recorded programme will be deleted from HDD Search forward Pause Operations may vary depending on the recorder In this c...

Page 78: ... If other manufacturers equipment is accessed Setup Contents Selection menu may be displayed Available VIERA remote control buttons depend on the connected equipment Note Some operations may not be available depending on the equipment In this case use its own remote control to operate the equipment If multiple recorders or players are connected VIERA Link Menu Pause Live TV Direct TV Rec VIERA Lin...

Page 79: ...ute When the equipment is turned off TV speakers will be active TV TV speakers are active Multi channel sound If you want to enjoy the multi channel sound e g Dolby Digital 5 1ch via an Amplifier connect it with HDMI cable and Optical digital audio cable p 73 and then select Home Cinema If your Amplifier has HDAVI Control 5 function you only need to connect it with HDMI cable to the TV s HDMI2 ter...

Page 80: ...DEO adaptor supplied AV1 IN AUDIO OUT adaptor supplied AV2 IN COMPONENT VIDEO adaptor supplied HDMI equipment Fully wired HDMI compliant cable Recorder Player Camcorder HDMI connection p 88 To watch DVDs DVD Player Listening Viewing Camcorder Game equipment Viewing Listening Camcorder Game equipment To listen with speakers RCA cable Amplifier with speaker system Optical digital audio cable or To e...

Page 81: ...0 Rear of the TV AV2 IN COMPONENT VIDEO adaptor supplied Headphones M3 stereo mini plug To adjust volume Headphone Volume p 41 USB devices Communication Camera PC Listening Viewing Computer Conversion adaptor if necessary ...

Page 82: ...ch videocassettes DVDs VCR DVD player To watch camcorder images Video camera To play games Game equipment To use amplifier with speaker system 2 To use network services 3 VIERA Link Recommended Connection 1 To connect the equipment the terminal adaptor supplied is necessary 2 Use HDMI2 for connecting an amplifier This connection is applicable when using an amplifier that has ARC Audio Return Chann...

Page 83: ...5 96 97 98 99 100 107 117 118 120 125 2 11 12 1 2 11 21 62 63 69 S 1 S 2 S 3 S 1 S 2 S 3 99 C49 100 125 S 1 S 2 S 3 S 1 S 2 S 3 32 41 S1 S2 S10 S11 S12 S13 S14 S15 S16 S17 S18 S19 S20 S21 S41 1 2 11 12 21 62 63 69 21 62 63 69 21 62 63 69 21 62 63 69 62 63 69 62 63 62 C13 S 1 S1 S2 S10 S1 S2 S10 S1 S2 S10 42 51 52 61 62 69 70 S11 S12 S13 S14 S15 S16 S17 S18 S19 S20 S11 S12 S13 S14 S15 S16 S17 S18 S...

Page 84: ...man Used in Australia Malaysia etc Type of broadcast Regular broadcast Standard Audio BILINGUAL or DUAL MONO MAIN I SUB II STEREO Mode Indicator No Indicator If the stereo signal is poor or the receiving conditions are not optimum or if STEREO MONO automatic switching occurs it is recommended you switch from STEREO to MONO Even when the contents of the receiving signal undergo changes selection mo...

Page 85: ...DivX4 DivX5 DivX6 H 264 BP MP HP Motion JPEG MPEG1 MPEG2 MPEG4 SP ASP AAC Dolby Digital Dolby Digital Plus DTS core HE AAC LPCM MPEG Audio MP3 This TV supports Motion JPEG recorded by Panasonic LUMIX Camera 1 This TV is not available for playing back Motion JPEG with the media server 1 Some products of before the year 2004 may not be available The compatibility with future products is not guarante...

Page 86: ...g2 H 264 MPEG4 SP ASP AAC HE AAC PS mpg mpeg vob vro H 264 2 MPEG1 MPEG2 VC 1 2 AAC 2 Dolby Digital Dolby Digital Plus 2 HE AAC 2 LPCM MPEG Audio MP3 2 2 This codec can be played back only in Media Player TS m2ts tp trp ts H 264 MPEG1 MPEG2 VC 1 3 AAC Dolby Digital Dolby Digital Plus DTS core 3 HE AAC MPEG Audio MP3 3 3 This codec can be played back only in Media Player Music Codec File extension ...

Page 87: ...be displayed or playable ABOUT DIVX VIDEO ON DEMAND This DivX Certified device must be registered in order to play purchased DivX Video on Demand VOD movies To obtain your registration code locate the DivX VOD section in the Setup Menu Go to vod divx com for more information on how to complete your registration To show DivX VOD registration code DivX VOD p 44 If you want to generate the new regist...

Page 88: ...panasonic jp support global cs tv USB Flash Memory USB Flash Memory format FAT16 FAT32 or exFAT Note Data modified with a PC may not be displayed Do not remove the device while the TV is accessing data Otherwise this can damage device or TV Do not touch the pins on the device Do not subject the device to a high pressure or impact Insert the device in the correct direction Otherwise this can damage...

Page 89: ...ENT VIDEO adaptor Note Audio settings can be made on HDMI1 2 3 Input in the Sound Menu p 42 If the connected equipment has an aspect adjustment function set the aspect ratio to 16 9 These HDMI connectors are type A These HDMI connectors are compatible with HDCP High Bandwidth Digital Content Protection copyright protection Equipment having no digital output terminal may be connected to the input t...

Page 90: ...ad Check the gamepads that have been tested for the performance with this TV at the following website English only http panasonic jp support global cs tv Some of the keys of gamepads correspond to the operation of the remote control Select Start 10 11 1 7 6 9 8 2 3 4 5 Example Remote Control Remote Control 1 Volume Up Down 7 VIERA TOOLS 2 Channel Up Down 8 EXIT 3 9 INPUT AV 4 OK 5 RETURN 10 MENU 6...

Page 91: ...024 60 Hz 63 98 60 02 1 280 768 60 Hz 47 70 60 00 1 366 768 60 Hz 48 39 60 04 Applicable input signal for PC is basically compatible to VESA standard timing PC from HDMI terminal Signal name Horizontal frequency kHz Vertical frequency Hz 640 480 60 Hz 31 47 60 00 1 280 720 60 Hz 45 00 60 00 1 920 1 080 60 Hz 67 50 60 00 Applicable input signal for PC is basically compatible to HDMI standard timing...

Page 92: ... p 72 73 Turn the connected equipment on and then switch the TV on p 74 The screen becomes dim This occurs when the contrast is lowered automatically to avoid image retention in the following conditions without any user operation for a few minutes No signal in AV mode Selected locked channel Selected invalid channel Displayed menu Thumbnail or still picture Problem Causes Actions Screen Chaotic im...

Page 93: ... and the 3D Eyewear There is something wrong with the 3D images Check the setting of Picture Sequence or Edge Smoother p 36 The indicator lamp does not light when pressing the power button on the 3D Eyewear The battery may be running low or flat Replace it HDMI Sound is unusual Set the sound setting of the connected equipment to 2ch L PCM Check the HDMI1 2 3 Input setting in the Sound Menu p 42 If...

Page 94: ...reign objects are not inside the USB port An error message appears Follow the message s instructions If the problem persists contact your local Panasonic dealer or the authorised service centre Maintenance First remove the mains plug from the socket outlet Display panel Cabinet Pedestal Regular care Gently wipe the surface of the display panel cabinet or pedestal by using a soft cloth to clean the...

Page 95: ... Special Disc Players and Special VCR s or DVD 16 PAL 60 Hz 6 0 MHz 17 PAL 60 Hz 6 5 MHz Receiving Channels VHF BAND 2 12 PAL SECAM B K1 0 12 PAL B AUST 1 9 PAL B N Z 1 12 PAL SECAM D 1 12 NTSC M Japan 2 13 NTSC M USA UHF BAND 21 69 PAL G H I SECAM G K K1 28 69 PAL B AUST 13 57 PAL D K 13 62 NTSC M Japan 14 69 NTSC M USA CATV S1 S20 OSCAR 1 125 USA CATV C13 C49 JAPAN S21 S41 HYPER Z1 Z37 CHINA 5A ...

Page 96: ...IGITAL AUDIO OUT PCM Dolby Digital DTS Fibre optic Built in wireless LAN Standard compliance and Frequency range 1 IEEE802 11a n 5 15 GHz 5 35 GHz 5 47 GHz 5 85 GHz IEEE802 11b g n 2 40 GHz 2 4835 GHz Security WPA2 PSK TKIP AES WPA PSK TKIP AES WEP 64 bit 128 bit Bluetooth wireless technology 2 Standard Compliance Bluetooth 3 0 Frequency Range 2 402 GHz 2 480 GHz 1 The frequency and channel differ...

Page 97: ...09 mm 50 mm TV only Mass 20 5 Net With Pedestal 17 5 Net TV only 27 0 Net With Pedestal 23 0 Net TV only Sound Speaker Front speaker 8 train speakers 2 Woofer Φ 80 mm 1 Audio output 18 W 4 W 4 W 10 W Headphones M3 3 5 mm stereo mini Jack 1 TV continue 65 class Model No TH P65ST50D TH P65ST50K TH P65ST50M TH P65ST50T TH P65ST50P Power Source AC 220 240 V 50 60 Hz AC 110 240 V 50 60 Hz Power Consump...

Page 98: ...y Panasonic Viewing range Within 3 2 m from front surface of the TV Materials Main body Resin Lens section Liquid crystal glass Communication system 2 4 GHz band FH SS Frequency Hopping Spread Spectrum There are differences in the viewing range of the 3D Eyewear among individuals The 3D Eyewear may not operate correctly at the outside of the viewing range Note Design and Specifications are subject...

Page 99: ...ontact us at the contact information provided below for a charge no more than our cost of physically performing source code distribution a complete machine readable copy of the corresponding source code covered under LGPL Contact Information cdrequest am linux jp Source code covered under LGPL is also freely available to you and any other member of the public via our website below http www am linu...

Page 100: ...99 MEMO ...

Reviews: