background image

RQ

TX

00

44

6

Si

mp

le

 S

etu

p

Turn off all equipment before connection and read the appropriate operating instructions.

Do not connect the AC power supply cord until all other connections are complete.

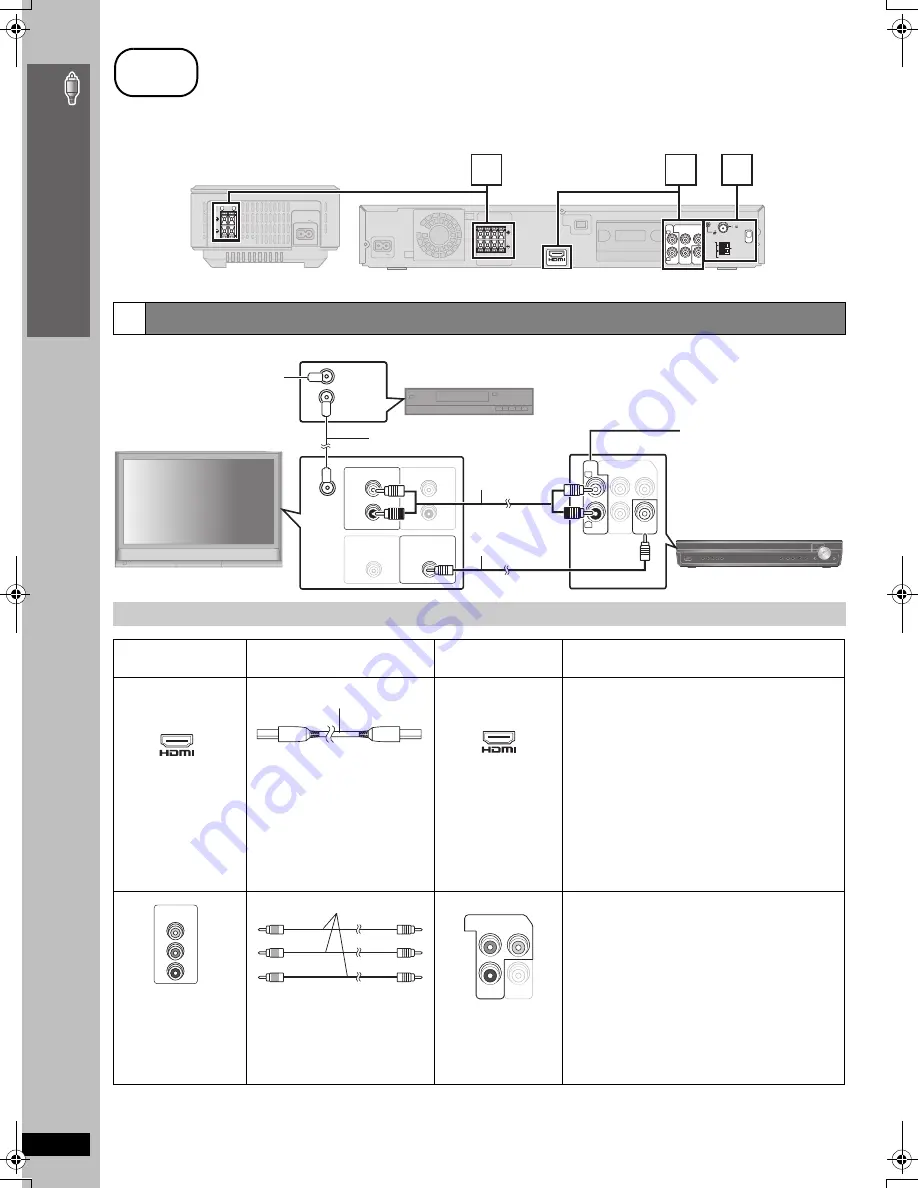
Basic setup example

[Note]

Do not make the video connections through the video cassette recorder.

Due to copy guard protection, the picture may not be displayed properly.

Only one video connection is required.

1

Audio and video connections

Other video connections for improved picture quality

Television terminals

Cables required

(not included)

Main unit terminals

Features

[Note]

Non-HDMI-compliant cables 
cannot be utilized.

It is recommended that you use 
Panasonic’s HDMI cable. 
Recommended part number: 
RP-CDHG15 (1.5 m/4.9 ft), 
RP-CDHG30 (3.0 m/9.8 ft), 
RP-CDHG50 (5.0 m/16.4 ft), etc.

[\\\\\\\\\\\HDMI\\\\\\\\\\\]

This connection provides the best picture quality.

Set “Video Mode” to “On” (

page 24, “HDMI” menu).

Set “Video Output Mode” (

page 21, Picture Menu).

EZ Sync “HDAVI Control”

If your Panasonic television is an HDMI control 
compatible television, you can operate your television 
synchronizing with home-theater operations or vice 
versa (

page 26, Using the EZ Sync

TM 

“HDAVI 

Control

TM

”).

Make the audio connection (

above) when you use 

EZ Sync “HDAVI Control” function.

All Panasonic televisions 
that have 480p input 
connectors are 
compatible. Consult the 
manufacturer if you have 
another brand of 
television.

[COMPONENT\VIDEO]

Connect to terminals 
of the same color.

This connection provides a much purer picture than the 
VIDEO OUT terminal.

After making this connection, select “Darker” from the 
“Black Level Control” in the “Video” menu 
(

page 24).

To enjoy progressive video

Connect to a progressive output compatible 
television.

1

Set “Video Mode” to “Off” (

page 24, “HDMI” 

menu).

2

Set “Video Output Mode” to “480p”, and then follow 
the instructions on the menu screen (

page 21, 

Picture Menu).

step

2

Cable connections

AC  I

N

TRA

N

SMITTER

DIGITAL

COMPO

N

E

N

V

IDEO OUT

V

IDEO

OUT

P

B

Y

R

P

FM A

N

T

75

AM

A

N

T

LOOP

EXT

XM

LOOP

A

N

T G

N

D

R

L

AUX

A

V

 OUT

AC IN

I/D SET

L

R

OPTIO

N


V

 .1

3

2

1

Main unit

Wireless system

R

L

AUX

COMPO

N

E

N

V

IDEO OUT

V

IDEO

OUT

P

B

Y

R

P

AUDIO OUT

L

R

AUDIO I

N

L

R

RF I

N

V

IDEO I

N

V

IDEO OUT

RF OUT

RF I

N

Cable TV box or video cassette recorder

(not included)

Main unit

Audio cable

(not included)

You can enjoy audio from your 
television, video cassette 
recorder or cable TV programs 
through this home theater 
system by connecting to the 
AUX terminals. Select “AUX” 
as the source (

page 31).

Television 

(not included)

To your cable TV 
service or television 
antenna

RF cable

 (not included)

Video cable

(included)

A

V

 I

N

HDMI cable

A

V

 OUT

COMPO

N

E

N

T

V

IDEO I

N

P

R

P

B

Y

Video cables

COMPO

N

E

N

V

IDEO OUT

V

IDEO

OUT

P

B

Y

R

P

Ca

b

le connec

tions

0044En_p03-13.fm  Page 6  Thursday, January 4, 2007  10:08 AM

Summary of Contents for SCPT750 - DVD HOME THEATER SOUND SYSTEM

Page 1: ...usting this product please read the instructions completely Please keep this manual for future reference If you have any questions contact In the U S A 1 800 211 PANA 7262 In Canada 1 800 561 5505 1 ALL 2 4 1 As an ENERGY STAR Partner Panasonic has determined that this product meets the ENERGY STAR guidelines for energy efficiency U S A and Canada Wireless surround speakers 4 High quality picture ...

Page 2: ... NOT EXPOSE THIS APPARATUS TO RAIN MOISTURE DRIPPING OR SPLASHING AND THAT NO OBJECTS FILLED WITH LIQUIDS SUCH AS VASES SHALL BE PLACED ON THE APPARATUS USE ONLY THE RECOMMENDED ACCESSORIES DO NOT REMOVE THE COVER OR BACK THERE ARE NO USER SERVICEABLE PARTS INSIDE REFER SERVICING TO QUALIFIED SERVICE PERSONNEL The lightning flash with arrowhead symbol within an equilateral triangle is intended to ...

Page 3: ...23 Changing the delay time of the speakers 25 Using the EZ SyncTM HDAVI ControlTM 26 One touch play 26 Auto input switching 26 Speaker control 26 Power off link 26 EZ Sync Control only with TV s remote control for HDAVI Control 2 26 Using the FM AM radio 27 Presetting stations automatically 27 Selecting the preset channels 27 Manual tuning 27 Using the XM Satellite Radio 28 Selecting XM channels b...

Page 4: ...evision Left and right speakers are interchangeable Place to the right or left of the television on the floor or a sturdy shelf so that it will not cause vibration Leave about 30 cm 1113 16q from the television Place the wireless system within approximately 10 m 33 ft from the main unit Do not use the wireless system or the digital transmitter in a metal cabinet or bookshelf Center speaker Main un...

Page 5: ...le of supporting 10 kg 22 lbs per screw Consult a qualified building contractor when attaching the speakers to a wall Improper attachment may result in damage to the wall and speakers 1 Drive a screw not included into the wall 2 Fit the speaker securely onto the screw s with the hole s Fitting speaker stands not included except subwoofer Ensure the stands meet these conditions before purchasing th...

Page 6: ...onic televisions that have 480p input connectors are compatible Consult the manufacturer if you have another brand of television COMPONENT VIDEO Connect to terminals of the same color This connection provides a much purer picture than the VIDEO OUT terminal After making this connection select Darker from the Black Level Control in the Video menu page 24 To enjoy progressive video Connect to a prog...

Page 7: ...M antenna not included Use an XM Connect Play antenna or XM Passport Mini Tuner and Home Dock Subscription is required to receive XM Satellite Radio Refer to page 28 for details Click AM ANT LOOP EXT LOOP ANT GND FM ANT 75 Leave the AM loop antenna connected AM outdoor antenna Using a vinyl wire not included Run a piece of vinyl wire horizontally across a window or other convenient location 5 to 1...

Page 8: ...gital transmitter Insert fully until you hear a click Main unit step 4 iPod connection OPTIONV 1 11 9 10 Dock adapter for iPod 5th generation video 30GB Dock adapter for iPod nano 2nd generation aluminum 2GB 4GB 8GB Universal Dock for iPod Connect the dock to the back of the main unit When removing use your fingernail or a flat object to lift upwards The mark 11 10 or 9 is shown on the back of eac...

Page 9: ...rn on your television and change its video input mode e g VIDEO 1 AV 1 etc To change your television s video input mode refer to its operating instructions This remote control can perform some basic television operations page 10 To change these settings later Select QUICK SETUP in the Others menu page 25 step 6 Preparing the remote control R6 LR6 AA Insert so the poles i and j match those in the r...

Page 10: ...us screen 15 Select the disc or show disc information 16 Display current playback condition 16 Select a group of contents to play 15 Turn the unit off automatically Sleep timer The maximum setting is 120 min in 30 min steps Press the button again to confirm the remaining time on the unit s display To cancel select OFF in the main unit s display Start up and play a disc automatically 15 26 Select p...

Page 11: ...dphone plug type 3 5 mm 1 8z stereo mini plug Reduce the volume before connecting Audio is automatically switched to 2 channel stereo To prevent hearing damage avoid listening for prolonged periods of time Headphones not included Remote control signal sensor Adjust the volume of the main unit EST 1924 Selecting fine audio equipment such as the unit you ve just purchased is only the start of your m...

Page 12: ...D DVD RAM that cannot be removed from their cartridge 2 6 GB and 5 2 GB DVD RAM and Chaoji VCD available on the market including CVD DVCD and SVCD that do not conform to IEC62107 Disc handling precautions Do not attach labels or stickers to discs This may cause disc warping rendering it unusable Do not write on the label side with a ball point pen or other writing instrument Do not use record clea...

Page 13: ... malfunction Cleaning of the lens is generally not necessary although this depends on the operating environment Format Disc Extension Reference WMA CD R RW WMA wma Compatible compression rate between 48 kbps and 320 kbps You cannot play WMA files that are copy protected This unit does not support Multiple Bit Rate MBR an encoding process for audio content that produces an audio file encoded at sev...

Page 14: ...e you want to play is facing up To load discs on the other trays press DISC SKIP on the main unit Play will start from the disc in the front left position of the tray For DVD RAM remove the disc from its cartridge before use Do not load more than one disc per tray touch the drawer or the carousel while they are in motion rotate the carousel by hand close the drawer by hand Stop Press to select a d...

Page 15: ...P VOLUME Numbered buttons ONE TOUCH PLAY STOP PAUSE SKIP SLOW SEARCH On screen item select Enter number DVD VR DVD V VCD CD e g To select 12 S10 1 2 VCD with playback control Press STOP to cancel the PBC function and then press the numbered buttons WMA MP3 JPEG e g To select 123 1 2 3 ENTER Press CANCEL to cancel the number s DVD V Shows a disc top menu DVD VR Press the button to show the programs...

Page 16: ...AY to skip back a few seconds This may not work depending on the disc s recording This does not work with R RW Checking and selecting the disc 1 Press DISC to show the Disc information screen To exit the screen press DISC 2 Press the numbered buttons 1 5 to select the disc Displaying current playback condition ENTER CANCEL DISC PLAY MODE CD MODE QUICK REPLAY REPEAT QUICK OSD 1 5 PLAY STOP Numbered...

Page 17: ...s 3 4 to select the program number 2 Press the numbered buttons to change each item WMA MP3 Press ENTER to register the selection To clear the selected program 1 Press 3 4 to select the program number 2 Press CANCEL or press 3 4 2 1 to select Clear and press ENTER To clear the whole program Select Clear all with 3 4 2 1 and press ENTER The whole program is also cleared when the disc is moved out o...

Page 18: ...TER Playing from the selected item Navigation Menu 1 Press MENU To exit the screen press MENU 2 Press 2 followed by 3 4 to select the group and press ENTER 3 To play content in the group in order Press ENTER To start play from the selected content Press 3 4 to select and ENTER ENTER TOP MENU DIRECT NAVIGATOR MENU PLAY LIST FUNCTIONS STOP SLOW SEARCH Numbered buttons MENU T O P M E N U Playback Men...

Page 19: ...exit Content title No 1 Few times in summer Less and less And when I was born Quatre gymnopedies You ve made me sad I can t quit him Evening glory Wheeling spin Velvet Cuppermine Ziggy starfish 2 3 4 5 6 7 8 9 10 Playlist Krissa e g Playing RAM and DVD R RW DVD VR discs DVD VR Playing the programs 1 Press DIRECT NAVIGATOR To exit the screen press DIRECT NAVIGATOR 2 Press 3 4 to select the program ...

Page 20: ... VR VCD To select L R or LR DVD V Karaoke disc To select On or Off for vocals Read the disc s instructions for details Signal type data LPCM PPCM ÎDigital DTS MP3 MPEG Signal type kHz Sampling frequency bit ch Number of channels e g 3 2 1ch 1 Low frequency effect 1 not displayed if there is no signal 0 No surround 1 Mono surround 2 Stereo surround left right 1 Center 2 Front leftiFront right 3 Fro...

Page 21: ...t Contrast Increases the contrast between light and dark parts of the picture Brightness Brightens the picture Sharpness Adjusts the sharpness of the edges of horizontal lines Color Adjusts the shade of the picture s color Gamma Adjusts the brightness of dark parts Depth Enhancer Reduces the rough noise in the background to give a greater feeling of depth Video Output Mode To select suitable pictu...

Page 22: ...ion Normal Laterally stretches images Auto Expands 4 3 letterbox images to fill more of the screen Other images appear in full in the center of the screen Shrink Images appear in the center of the screen Zoom Expands to 4 3 aspect ratio If your television has a similar feature use it instead for a better effect Just Fit Zoom To select the appropriate screen size to fit your television screen DVD V...

Page 23: ...it HDMI Menu Item Setting Select Go right Select Register Select Register SETUP QUICK SETUP enables successive settings of the items in the shaded area Audio Choose the audio language English French Spanish Original 1 Other 2 Subtitle Choose the subtitle language Automatic 3 English French Spanish Other 2 Menus Choose the language for disc menus Changing the menu language in QUICK SETUP also chang...

Page 24: ...nected to the HDMI AV OUT terminal Select Bitstream when the equipment can decode the bitstream digital form of 5 1 channel data Otherwise select PCM audio output is 2 channel If the bitstream is output to the equipment without a decoder high levels of noise can be output and may damage your speakers and hearing DTS Digital Surround 5 Bitstream PCM Dynamic Range Compression Off On Adjusts for clar...

Page 25: ...nce Actual speaker position Ideal speaker position Primary listening distance Dolby Digital Dolby Pro Logic II Music Movie 0 ms 0 ms 10 ms 5 ms 5 ms 15 ms 10 ms 10 ms 20 ms 15 ms 15 ms 25 ms ms ms L Exit LS R SW C RS 0 0 0 0 Center delay time Exit Surround delay time Language code list Abkhazian 6566 Afar 6565 Afrikaans 6570 Albanian 8381 Ameharic 6577 Arabic 6582 Armenian 7289 Assamese 6583 Aymar...

Page 26: ...the television menu will automatically turn the home theater system on and select AUX as the source The television speakers are automatically muted You can control the volume setting using the volume or mute button on the TV s remote control The volume level is displayed on the main unit s FL display To cancel muting you can also use the home theater remote control page 10 If you turn off the home...

Page 27: ...at steps 1 and 2 Note After changing the setting previously preset frequencies will be cleared Preset them again Presetting stations automatically 1 Press TUNER BAND 1 to select FM or AM 2 Press and hold ENTER 3 Release the button when FM AUTO or AM AUTO is displayed The tuner tunes to the lowest frequency and starts to preset all the stations it can receive into the channels in ascending order SE...

Page 28: ...hat allows you to optimize the XM signal reception Tips for optimizing reception To prevent interference with wireless equipment place the antenna away from this unit Panasonic wireless sound system SH FX80 SH FX85 Panasonic wireless system SH FX50 SH FX60 SH FX65 and other equipment that emits radio waves such as radio equipment and microwave ovens Place the antenna near a south facing window wit...

Page 29: ...UAL PRESET 3 Press the numbered buttons to select the XM channel To select a 2 digit or 3 digit number e g 12 S10 1 2 125 S10 S10 1 2 5 Alternatively press 6 5 2 to select the desired XM channel Press and hold 6 5 2 to scan through quickly Selecting XM channels by category 1 Press TUNER BAND 1 to select XM 2 Press 3 4 2 1 to enter category tune mode The category of the current XM channel flashes o...

Page 30: ...n specifically Dolby Surround encoded When another source is selected Super Surround is available This does not work when audio is output from HDMI AV OUT terminal Dolby Pro Logic II Super Surround cannot be used together with Surround Music You can adjust the volume of the surround speakers to get the best surround effect below Adjusting the volume of each speaker Speaker level adjustments This i...

Page 31: ...ing the Music Port 1 Connect the external device not included Plug type 3 5 mm 1 8z stereo mini plug 2 Press N O SELECT repeatedly to select MUSIC P Adjust the volume on the external device to a normal listening level and then adjust the volume of the main unit You can enjoy sound from all speakers when you press SRD MUSIC to turn on Surround Music page 30 SELECT SRD MUSIC PL S SRD STOP PAUSE PLAY...

Page 32: ... Video CD has playback control you can select scenes and information with menus Progressive Interlaced NTSC the video signal standard has 480 interlaced i scan lines whereas progressive scanning uses twice the number of scan lines This is called 480p Using progressive output you can enjoy the high resolution video recorded on media such as DVD Video Your television must be compatible to enjoy prog...

Page 33: ...oo long The HDMI cable is damaged XM RADIO It takes a short time for the XM radio to power up after turning on the main unit during which time XM RADIO is displayed only when the selected source is XM Wait a few seconds for this process to complete XM ERROR There may be an error in the XM radio module Turn the main unit off and then back on The XM antenna may be defective Consult the dealer of the...

Page 34: ...I menu is set to On 24 Picture The picture on the television is not displayed correctly or disappears Ensure that the unit is connected directly to the television and is not connected through a video cassette recorder Mobile telephone chargers can cause some disturbance If you are using an indoor television antenna change to an outdoor antenna The television antenna wire is too close to the unit M...

Page 35: ...scs that include or have the same region number as the one on the rear panel of this unit can be played Cover page No on screen display Select On in On Screen Messages in the Display menu 24 Main unit s screen saver remains When using the HDMI connection audio video information is continually transferred between the main unit and the television regardless of which source has been selected on the m...

Page 36: ...e Bit Rate MBR 4 Exif Ver 2 1 JPEG Baseline files Picture resolution between 160k120 and 6144k4096 pixels Sub sampling is 4 0 0 4 2 0 4 2 2 or 4 4 4 Extremely long and narrow pictures may not be displayed 5 The total combined maximum number of recognizable audio and picture contents and groups 4000 audio and picture contents and 400 groups Pick up Wavelength DVD CD 662 785 nm Laser power DVD CD U ...

Page 37: ...demarks of DTS Inc Apparatus Claims of U S Patent Nos 4 631 603 4 577 216 and 4 819 098 licensed for limited viewing uses only This product incorporates copyright protection technology that is protected by method claims of certain U S patents and other intellectual property rights owned by Macrovision Corporation and other rights owners Use of this copyright protection technology must be authorize...

Page 38: ...OR INCIDENTAL OR CONSEQUENTIAL DAMAGES RESULTING FROM THE USE OF THIS PRODUCT OR ARISING OUT OF ANY BREACH OF THIS WARRANTY As examples this excludes damages for lost time travel to and from the servicer loss of media or images data or other memory content The items listed are not exclusive but are for illustration only ALL EXPRESS AND IMPLIED WARRANTIES INCLUDING THE WARRANTY OF MERCHANTABILITY A...

Page 39: ... cover any product which is used commercially Dry cell batteries are also excluded from coverage under this warranty This warranty is extended to the original end user purchaser only A purchase receipt or other proof of date of original purchase is required before warranty service is performed THIS EXPRESS LIMITED WARRANTY IS IN LIEU OF ALL OTHER WARRANTIES EXPRESS OR IMPLIED INCLUDING ANY IMPLIED...

Page 40: ...SURROUND SURROUND FRONT SUB WOOFER FRONT FRONT CENTER CAUTION DO NOT INSTALL OR PLACE THIS UNIT IN A BOOKCASE BUILT IN CABINET OR IN ANOTHER CONFINED SPACE ENSURE THE UNIT IS WELL VENTILATED TO PREVENT RISK OF ELECTRIC SHOCK OR FIRE HAZARD DUE TO OVERHEATING ENSURE THAT CURTAINS AND ANY OTHER MATERIALS DO NOT OBSTRUCT THE VENTILATION VENTS DO NOT OBSTRUCT THE UNIT S VENTILATION OPENINGS WITH NEWSP...

Reviews: