background image

Listening operations

11

RQT7364

CDs

This unit can play CD-DA (digital audio) format audio CD-R
and CD-RW that have been finalized (a process performed after
recording that enables this unit to play audio CD-R and CD-
RW).
It may not be able to play some CD-R or CD-RW due to the
condition of the recording.
The unit contains five CD trays.
You can simply listen to the CD on a single tray, or you can
select and listen to the CD in a particular tray. See the section
on All-Disc play (

\

 page 13) for information on how to listen to

all the CDs one after another.

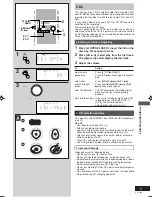
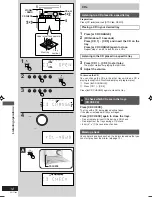
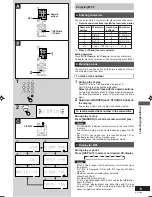
Listening to CD on a single tray

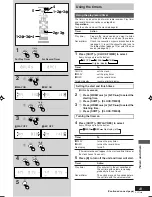
1

Press [

0

 OPEN/CLOSE] to insert the CD on the

disc tray. Press again to close.

2

Press [CD 

3

/

8

] to start play from the first track.

The player stops after playing the last track.

3

Adjust the volume.

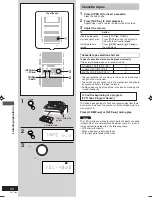
A CD selection and care

Only play CDs with COMPACT disc DIGITAL AUDIO trademark.
(see 

a

)

Do not;

• Use irregularly shaped CDs. (

b

)

• Attach extra labels and stickers.
• Use discs with labels and stickers that are coming off or with

adhesive exuding from under labels and stickers. (

c

)

• Attach scratch-proof covers or any other kind of accessory.
• Write anything on the CD.
• Clean CDs with liquids. (Wipe with a soft, dry cloth.)
• Use CDs printed with label printer available on the market.

To prevent damage

Always observe the following points.
• Set the system on a flat, level surface.

Do not set it on top of magazines, inclined surfaces, etc.

• Do not move the system while tray is opening/closing, or when

loaded. Always unload all CDs before moving the system.

• Do not put anything except a CD in the tray.
• Do not use cleaning CDs or CDs which are badly warped or

cracked.

• Do not disconnect the AC power cord from the household

AC outlet during CD changing operation.

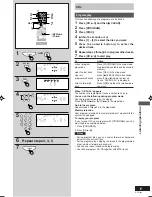
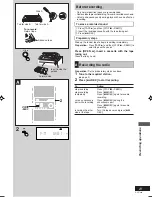
To

stop the disc

pause play

skip tracks

search through
tracks

view CD indicator

start one touch play

Action

Press [STOP 

7

 ,–DEMO].

Press [CD 

3

/

8

]. Press again to resume

play.

Press [

4

4

4

4

4

/REW/

4

] or [

3

3

3

3

3

/FF/

¢

].

Press and hold [

4

4

4

4

4

/REW/

4

] or [

3

3

3

3

3

/FF/

¢

] during play or pause.

The CD indicator on the display lights
whenever the tray is in the playing
position.

If the unit is in standby mode and a CD
is loaded, press [CD 

3

/

8

] or [CD 1] ~

[CD 5]. The unit will come on
automatically and play will start.

2

1

3

(CD 1) ~
(CD 5)

DEMO

STOP

,

4

/REW/

4

,

3

/FF/

¢

1

0

OPEN/

CLOSE

2

CD 

6

3

DOWN

VOLUME

UP

A

a

b

c

RQT7364-P_09-15_EN

30/12/03, 10:34 am

11

Summary of Contents for SCPM19 - MINI HES W/CD PLAYER

Page 1: ...21 Recording the radio 21 Recording CDs 22 Auto off function 22 Timers and others Using the timers 23 Using the sound quality settings 25 Enhancing the sound quality 25 Using an external unit 25 Reference Troubleshooting guide 26 Warranty ONLY FOR U S A 27 Customer Services Directory ONLY FOR U S A 27 Specifications Back cover Maintenance Back cover When moving the unit Back cover For U S A As an ...

Page 2: ...tructions in the literature accompanying the appliance CAUTION This equipment has been tested and found to comply with the limits for a Class B digital device pursuant to Part 15 of the FCC Rules These limits are designed to provide reasonable protection against harmful interference in a residential installation This equipment generates uses and can radiate radio frequency energy and if not instal...

Page 3: ...RE DO NOT OPEN COVERS AND DO NOT REPAIR YOURSELF REFER SERVICING TO QUALIFIED PERSONNEL CAUTION DO NOT INSTALL OR PLACE THIS UNIT IN A BOOKCASE BUILT IN CABINET OR IN ANOTHER CONFINED SPACE ENSURE THE UNIT IS WELL VENTILATED TO PREVENT RISK OF ELECTRIC SHOCK OR FIRE HAZARD DUE TO OVERHEATING ENSURE THAT CURTAINS AND ANY OTHER MATERIALS DO NOT OBSTRUCT THE VENTILATION VENTS Supplied accessories AC ...

Page 4: ...rer 12 Use only with the cart stand tripod bracket or table specified by the manufacturer or sold with the apparatus When a cart is used use caution when moving the cart apparatus combination to avoid injury from tip over 13 Unplug this apparatus during lightning storms or when unused for long periods of time 14 Refer all servicing to qualified service personnel Servicing is required when the appa...

Page 5: ... Speakers are designed identically so that no left or right channel orientation is necessary Notes Keep your speakers at least 10 mm 13 32 away from the system for proper ventilation These speakers do not have magnetic shielding Do not place them near televisions personal computers or other devices easily influenced by magnetism To avoid damage to the speakers do not touch the speaker cones if you...

Page 6: ... building etc A FM outdoor antenna Disconnect the FM indoor antenna if an FM outdoor antenna is installed Note An outdoor antenna should be installed by a qualified technician only B AM outdoor antenna Connect the outdoor antenna without removing the AM loop antenna Run 5 to 12 m of vinyl covered wire horizontally along a window or other convenient location Note When the unit is not in use disconn...

Page 7: ...ons such as 3function in exactly same way as the buttons on the main unit ç Auto off Sleep timer button AUTO OFF SLEEP 22 24 é Disc button DISC 13 è CD Program tuner preset button PROGRAM 10 15 ê Play mode select button PLAY MODE 9 13 Use this for selecting CD play mode tune mode and FM mode ë Repeat button REPEAT 14 í Delete button DEL 18 ì Album selection button ALBUM 16 î Intro button INTRO 17 ...

Page 8: ...Original display REC 3 Within 5 seconds Press and hold 4 4 4 4 4 REW 4 or 3 3 3 3 3 FF to set the time 4 Press SHIFT CLOCK TIMER Displaying the clock Press SHIFT CLOCK TIMER The clock is shown for about 5 seconds Note The clock may lose or gain some time over a period Readjust if necessary C Convenient functions To dim the display panel Press DIMMER The display brightness will be reduced except fo...

Page 9: ... sound quality Press and hold PLAY MODE to display MONO To cancel press and hold PLAY MODE again MONO is also cancelled if the frequency is changed For normal listening turn off MONO B FM allocation setting By main unit only This system allows you to receive FM broadcasts allocated in 0 1 MHz steps To change the step to 0 1 MHz 1 Press and hold TUNER BAND After a while the display flashes with the...

Page 10: ...zed is tuned in B Manual presetting Preset the stations one at a time 1 Press 4 4 4 4 4 REW 4 or 3 3 3 3 3 FF to tune to the required station 2 Press PROGRAM 3 Press numeric buttons to select a channel The station occupying a channel is erased if another station is preset in that channel C Selecting channels 1 Press numeric buttons to select the channel For channels 10 to 15 press h10 then the two...

Page 11: ...rs c Attach scratch proof covers or any other kind of accessory Write anything on the CD Clean CDs with liquids Wipe with a soft dry cloth Use CDs printed with label printer available on the market To prevent damage Always observe the following points Set the system on a flat level surface Do not set it on top of magazines inclined surfaces etc Do not move the system while tray is opening closing ...

Page 12: ...ying except in All Disc Random play or program play 1 Press 0 CD CHANGE 2 Press CD 1 CD 5 Press 0 CD CHANGE again to close the tray Press CD CHECK The tray with a CD being played will not open If the player is stopped all trays will open Press CD CHECK again to close the trays Do not remove or insert CDs during a CD check Do not pull out the trays during a CD check 8 cm 33 20 CDs cannot be checked...

Page 13: ...start play To select track 10 or over press h10 then the two digits When 1 RANDOM or A RANDOM is selected in step 2 Press CD 3 8 to play CD When playback ends The current play mode will be retained Final disc For example if play starts from disc 4 disc 3 will be the final disc Order of progression Disc 4 5 1 2 3 Notes You can use the CD Play Mode function together with repeat play During 1 RANDOM ...

Page 14: ...repeat your favorite tracks 1 Program the tracks you want perform steps 1 6 on page 15 2 Press REPEAT and make sure REPEAT ON and are displayed 3 Press CD 3 8 Playback will start To use repeat play with CD Play Mode function Set the desired mode press REPEAT before or during playback and make sure REPEAT ON and are displayed C CD display This function allows you to display the remaining play time ...

Page 15: ...in the stop mode Add to the program Repeat steps 3 through 5 in the stop mode Memory retention Your program is retained in memory for about 1 week while the system is unplugged To replay your program If you turned OFF your program with PROGRAM you can play it again as explained below 1 Press PROGRAM 2 Press CD 3 8 Notes During program play you can search forward or backward only within the current...

Page 16: ... necessarily be played in the order you recorded them Display when in the stop mode MP3 Indicates the disc contains MP3 files A Album skip play During play or stop Press ALBUM or to select the desired album You can also press the center button of ALBUM TRACK followed by 4 or on the main unit to select an album When selecting in the stop mode Press CD 3 8 to start play B Track skip play During play...

Page 17: ...start the disc 3 When you have selected 1 ALBUM in step 1 Press ALBUM or to select and start the album When you have selected 1 TRACK in step 1 press the numeric buttons to select and play will start For two digit numbers press h10 once then the two digits For three digit numbers press h10 twice then the three digits When playback ends The current play mode will be retained When NOT MP3 ERROR1 app...

Page 18: ... repeat mode page 14 with program play You cannot program more than one CD for MP3 You cannot program CD DA together with MP3 tracks The program memory is cleared when you change a disc or open the CD tray B Album Track title search Preparation Press CD 3 8 and then 7 CLEAR 1 For album title search press TITLE SEARCH once For track title search press TITLE SEARCH twice 2 Enter the album track titl...

Page 19: ... recall a marker and start play Notes NO MARKER indicates that the marker in the current disc is empty The marker memory will be cleared when you open the CD tray For CD DA you cannot use this function during 1 Disc Random play and All Disc Random play You cannot use this function during program mode C Display for MP3 During play or pause Press DISPLAY to select your desired CD display a b c d e f...

Page 20: ...ectly To find the beginning of a program TPS Tape Program Sensor TPS finds the beginning of a track and resumes play from there Each press increases the number of tracks skipped up to a maximum of 9 Press 4 4 4 4 4 REW 4 or 3 3 3 3 3 FF during play Note The TPS function searches for silent parts of about 4 seconds in length which are normally found between tunes As a result it may not function pro...

Page 21: ... the source Press OPEN 0 insert a cassette with the tape facing out Close the lid by hand A Recording the radio Preparation Do the preparatory steps as above 1 Tune to the required station page 9 2 Press 8 REC to start recording Side A Tab for side B Tab for side A To re record Adhesive tape Normal tape OPEN 0 B Insert inside the guides Forward side B A 2 DEMO STOP 2 8 REC To stop recording stop r...

Page 22: ...own on the display To cancel Press SHIFT AUTO OFF again to clear AUTO OFF from the display For your reference The setting is maintained even if the unit is turned off When the unit is turned on again AUTO OFF is displayed and the unit functions as described above AUTO OFF disappears from the display if either tuner or AUX is selected as the source but continues to function normally To stop recordi...

Page 23: ...or 3 3 3 3 3 FF to select the finishing time 2 Press SHIFT CLOCK TIMER Turning the timer on 4 Press SHIFT PLAY REC to select Every time you press the button PLAY REC No display off The indicator doesn t appear if the start and finish times or the clock haven t been set 5 Press y y y y y to turn off the unit and timer will start 4 1 2 3 5 2 2 2 3 1 1 1 2 3 4 2 2 1 SHIFT CLOCK TIMER For Play Timer F...

Page 24: ...s do not get stored in the timer memory 1 After step 4 on the previous page start playing the desired source 2 Reset the CD numbers if you have changed any of them confirm that a CD or cassette is inserted then press y to put the unit on standby Notes If you turn the unit off and on again while a timer is functioning the finish time setting will not be activated If the unit is on the timer will no...

Page 25: ... Sound EQ Changes to sound quality do not affect recordings B Enhancing the sound quality Press S SOUND EQ The button light is on Press the button again to cancel The button light goes out Using the live effect SURROUND Press SHIFT SURROUND to add natural width and depth to the stereo sound indicator will appear To cancel Press SHIFT SURROUND toclearthe indicator When listening through headphones ...

Page 26: ...adio The picture on the TV disappears or stripes appear on the screen The location and orientation of the antenna are incorrect If you are using an indoor antenna change to an outdoor antenna 6 The TV antenna wire is too close to the unit Separate the antenna wire of the TV set from the unit When there is a television set nearby If the erasure prevention tabs have been removed cover the holes with...

Page 27: ...CT OR ARISING OUT OF ANY BREACH OF THIS WARRANTY As examples this excludes damages for lost time travel to and from the servicer loss of media or images data or other memory content The items listed are not exclusive but are for illustration only ALL EXPRESS AND IMPLIED WARRAN TIES INCLUDING THE WARRANTY OF MERCHANTABILITY ARE LIMITED TO THE PERIOD OF THE LIMITED WARRANTY Some states do not allow ...

Page 28: ...s D A converter MASH 1 bit DAC MP3 Bit rate 32kbps 320kbps Sampling frequency 32kHz 44 1kHz 48kHz SPEAKER SECTION Type 2 way 2 speaker system Speaker s Full Range 10cm 4 cone type Tweeter 6cm 23 8 cone type Impedance 6Ω Input power HIGH 70W Max LOW 70W Max Output sound pressure level 80dB W 1 0 m Frequency range 55Hz 22kHz 16dB 70Hz 20kHz 10dB Dimensions WxHxD 128 mm x 250 mm x 222mm 51 32 x 927 3...

Reviews: