background image

11

Simple setup

RQT7700

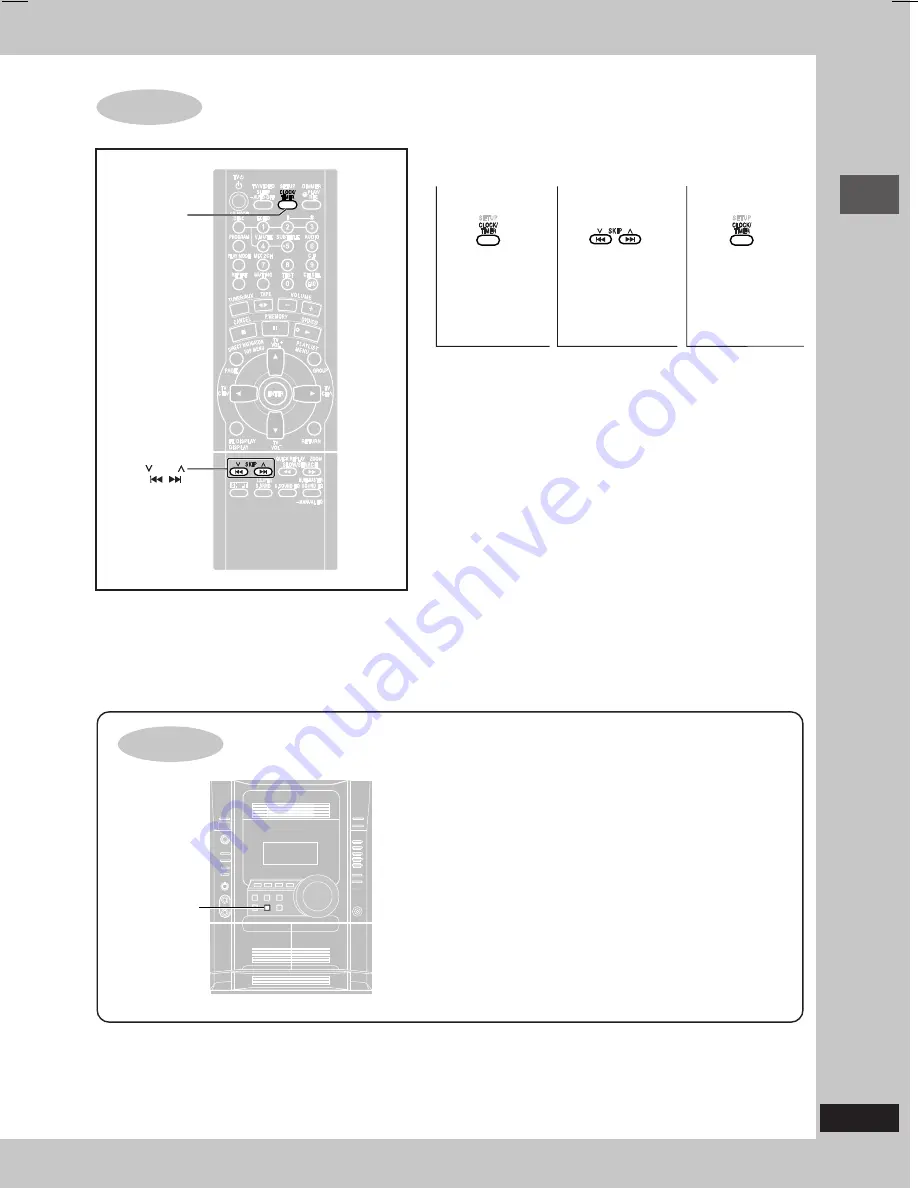
Setting the time

When the unit is first plugged in, a demonstration of its functions
may be shown on the display.
If the demo setting is off, you can show a demonstration by turning
on the demo.

Press and hold [–DEMO].

The display changes each time the button is held down.

NO DEMO

 (off)

DEMO ON

 (on)

You can reduce the power consumed in standby mode by
turning the demonstration off.

STEP

7

This is a 24-hour clock.

 The time is shown for about 5 seconds when you select “CLOCK” again.

 Reset the clock regularly to maintain accuracy.

DEMO function

SKIP

CLOCK/TIMER

– DEMO

1

2

3

Select
“CLOCK”.

Set the time
(press within 7
seconds or so).

Press to finish
setting the time.

RQT7700(06-11)2

5/14/04, 8:50 AM

11

Summary of Contents for SC-VK71D

Page 1: ...rted by this player Region numbers are allocated to DVD players and software according to where they are sold For Saudi Arabia Kuwait the Middle East and South Africa The region number of this player is 2 The player will play DVD Video marked with labels containing 2 or ALL Example For Southeast Asia The region number of this player is 3 The player will play DVD Video marked with labels containing...

Page 2: ...SC VK81D and SC VK71D for a variety regions Unless otherwise indicated illustrations in these operating instructions are of SC VK71D for Southeast Asia Operations in these instructions are described mainly with the remote control but you can do the operations on the main unit if the controls are the same System SC VK91D SC VK81D SC VK71D Main unit SA VK91D 1 unit SA VK81D 1 unit SA VK71D 1 unit Fr...

Page 3: ...us 20 Main Menu Other Settings 20 Discs Changing the player s setting 22 Changing the delay time Speaker Setting 23 Radio operations The radio 24 Manual tuning Preset tuning 24 Selecting channels 24 Tape operations Cassette tapes 25 Sound field and sound quality operations Sound field and sound quality 26 Dolby Digital and DTS Dolby Pro Logic II 26 Super Surround Center Focus 26 Speaker level adju...

Page 4: ...oured markings identifying the terminals in your plug proceed as follows The wire which is coloured Blue must be connected to the terminal which is marked with the letter N or coloured Black or Blue The wire which is coloured Brown must be connected to the terminal which is marked with the letter L or coloured Brown or Red WARNING DO NOT CONNECT EITHER WIRE TO THE EARTH TERMINAL WHICH IS MARKED WI...

Page 5: ... CD G DVD R RW DVD RW SACD Divx Video Discs and Photo CD DVD RAM that cannot be removed from their cartridge 2 6 GB and 5 2 GB DVD RAM and Chaoji VCD available on the market including CVD DVCD and SVCD that do not conform to IEC62107 Playing DVDs and Video CDs The producer of these discs can control how they are played so you may not always be able to control play as described in these operating i...

Page 6: ...w Caution Use the speakers only with the recommended system Failure to do so may lead to damage to the amplifier and or the speakers and may result in the risk of fire Consult a qualified service person if damage has occurred or if you experience a sudden change in performance Do not attempt to attach these speakers to walls using methods other than those described in this manual Notes on speaker ...

Page 7: ...ER OUT SVIDEO OUT VK71D L R L R SURROUND 6 CENTER 6 MAIN 6 TO SB PS81B TO SB PC81B TO SB VK61 Surround speaker right Center speaker Front speaker right VK81D L R L R SURROUND 6 CENTER 6 MAIN 6 SUB WOOFER 6 TO SB PS81 TO SB PC81 TO SB VK81 TO SB WVK81 Surround speaker right Center speaker Front speaker right Subwoofer VK91D L R L R L R L R SURROUND 6 CENTER 6 HIGH 6 LOW 12 SUB WOOFER 6 MAIN TO SB P...

Page 8: ...or To enjoy progressive video 1 Connect to the component video input terminals on a 480P compatible television Video will not be displayed correctly if connected to an incompatible television 2 In QUICK SETUP set Progressive Out to Enable 3 Change Progressive to 480P A page 21 Picture Menu Video Output Mode All televisions manufactured by Panasonic that have 480P input connectors are compatible Co...

Page 9: ...ts base Keep loose antenna cord away from other wires and cords FM indoor antenna Fix the other end of the antenna where reception is best Conserving power The unit consumes power approx 1 W even when it is turned off with f main unit f I To save power when the unit is not to be used for a long time unplug it from the household AC power socket You will need to reset some memory items after pluggin...

Page 10: ... for a long period of time Store in a cool dark place 7 7 7 7 7 Use Point at the sensor avoiding obstacles at a maximum range of 7m directly in front of the unit Insert so the poles and match those in the remote control Do not use rechargeable type batteries QUICK SETUP To change these settings later Select QUICK SETUP in Others tab A page 23 STEP6 RETURN SETUP SHIFT ENTER DVD CD The QUICK SETUP s...

Page 11: ...O The display changes each time the button is held down NO DEMO off DEMO ON on You can reduce the power consumed in standby mode by turning the demonstration off STEP7 This is a 24 hour clock The time is shown for about 5 seconds when you select CLOCK again Reset the clock regularly to maintain accuracy DEMO function SKIP CLOCK TIMER DEMO 1 2 3 Select CLOCK Set the time press within 7 seconds or s...

Page 12: ...AX 30 Microphone jacks MIC 1 2 30 Deck 1 cassette holder 25 Å Disc tray open close button OPEN CLOSE c 14 Disc change button DISC CHANGE c 15 Display DVD CD direct play buttons 1 5 15 Super sound EQ button SUPER SOUND EQ 27 Sound EQ button SOUND EQ 27 VK91D VK81D Subwoofer button SUBWOOFER 27 Headphones jack PHONES 32 Deck 2 cassette holder 25 Main unit Center console DVD CD play button DVD CD 10 ...

Page 13: ...ton CLOCK TIMER SETUP 10 11 22 29 5 Play timer record timer Dimmer button rPLAY REC DIMMER 29 32 6 Disc select CD mode button DISC CD MODE Disc button 1 5 15 16 7 Numbered buttons 0 9 X X X X X10 15 8 Menu Playlist Group button MENU PLAYLIST GROUP 15 18 19 9 Cursor buttons 8 9 Enter button ENTER 10 14 15 27 These buttons have the following functions 8 9 TV volume buttons TV VOL TV VOL 32 TV channe...

Page 14: ...uring play Content skip during play Up to 5 steps Press DVD CD to start play DVD A Motion picture parts only VCD Slow motion forward direction only 1 2 3 4 Place a disc in the disc tray Load double sided discs so the label for the side you want to play is facing up A page 35 Tray disc handling procedure Remove TYPE 2 and 4 discs from their cartridges before use Read the instructions for the disc c...

Page 15: ...screen DVD A Motion picture parts only VCD forward direction only Pressing J also activates forward direction RAM DVD A DVD V VCD CD Example To select 12 X10 A 1 A 2 VCD with playback control While stopped press the numbered buttons WMA MP3 JPEG Example To select 123 1 A 2 A 3 A ENTER Press SHIFT CANCEL to cancel the number s DVD A DVD V Shows a disc top menu DVD V Shows a disc menu VCD Shows a di...

Page 16: ...h multiple soundtracks VCD SVCD only Press SHIFT SUBTITLE several times to select the subtitle language To clear or display the subtitles Press to select On or Off Quick replay Only when the elapsed play time can be displayed Press SHIFT QUICK REPLAY to skip back a few seconds Note This feature may not work while playing some parts of a disc or at all with some discs Position Memory Only when the ...

Page 17: ...NTER and 8 8 8 8 8 9 9 9 9 9 to select an item then press ENTER again to confirm the number All the items on the disc title or group are selected when you select ALL 4 Press DVD CD to play To change or clear the program DVD A DVD V WMA MP3 JPEG Press 8 9 to select an item To change an item repeat step 3 To clear an item press SHIFT CANCEL or select Clear and press ENTER Press SHIFT PAGE to skip a ...

Page 18: ...ght Album Version Track Artist 1 I Drove All Night Album Version 2 Love Is All We Need Album Version 3 FAITH Album Version 4 In His Touch Album Version 5 One Heart Album Version 6 Stand By Your side Album Version 7 NAKED Album Version 8 Sorry For Love Album Version 9 Have You Ever Been In Love Album Version 10 Reveal Album Version T T RETURN to exit to select and press ENTER 2 Press 8 9 to move th...

Page 19: ...ing folders and files At the time of recording prefix folder and file names with 3 digit numbers in the order you want to play them this may not work at times Files must have the extension WMA or wma MP3 or mp3 JPG jpg JPEG or jpeg WMA You cannot play WMA files that are copy protected MP3 This unit is not compatible with ID3 tags Compatible sampling rate 8 11 02 12 16 22 05 24 32 44 1 and 48 kHz 0...

Page 20: ...in stereo Sampling frequency of 96 kHz is converted to 48 kHz Except RAM To mark up to 5 positions to play again ENTER The unit is now ready to accept markers To mark a position ENTER at the desired Marker point To mark another position A ENTER To recall a marker A ENTER To erase a marker A SHIFT CANCEL This feature does not work during program and random play Repeat RAM Motion picture parts only ...

Page 21: ...ground to give a greater feeling of depth Video Output When playing NTSC discs Mode 480I Interlace 480P Progressive If you have chosen 480P A see above select the method of conversion for progressive output to suit the type of material Transfer Mode Auto1 normal For viewing film material Auto2 For viewing film material the same as Auto1 but able to convert 30 frame per second progressive video Vid...

Page 22: ...reset The QUICK SETUP enables successive settings of the items in the shaded area Video Audio Display Others Disc Setup Audio English Menus English Subtitle Automatic Ratings Level 8 Item Tab Setting ENTER RETURN to select and press to exit Setup menu Shows Setup menu Select the tab Select the item Make the settings Press to exit 1 2 3 4 5 TV Aspect 4 3 Pan Scan Regular aspect television 4 3 Choos...

Page 23: ...n again to the default settings No L L L L L Others tab Changing the delay time Speaker Setting Effective when playing multi channel audio Center and surround speakers only For optimum listening with 5 1 channel sound all the speakers except for the subwoofer should be the same distance from the seating position If you have to place the center or surround speakers closer to the seating position ad...

Page 24: ...llocation setting the frequencies you previously preset in the memory will be cleared Preset them again Preset tuning There are two methods of pre setting stations Automatic presetting All the stations the tuner can receive are preset Manual presetting You can select the stations to preset and the order they are preset in Up to 15 stations each can be set in the FM and AM bands Preparation Press T...

Page 25: ...pe playback Press L main unit L STOP To select the reverse mode While TAPE is selected as the source Press and hold PLAY MODE Every time you press and hold the button One side is played Both sides are played forward reverse Play stops at the end of the reverse side Both sides are played repeatedly until L main unit L STOP is pressed To listen to 2 tapes consecutively load a tape into each deck and...

Page 26: ...m material whether or not it has been specifically Dolby Surround encoded Press SHIFT pPLII Every time you press the button MOVIE Movie software recorded in Dolby Surround MUSIC Stereo sources OFF Cancel This works only in DVD CD mode pPLII lights when there is effect Super Surround Press S SRND main unit SUPER SURROUND Every time you press the button MUSIC Adds surround effects to stereo sources ...

Page 27: ...age 35 Sampling frequency During multi channel output of these discs this feature reproduces the frequencies lost during recording to give you a sound closer to the original WMA MP3 Disc recording is other than 8 kHz 16 kHz 32 kHz This feature reproduces the higher frequencies lost during recording to give you a sound closer to the original Setting DVD A DVD V CD LPCM PPCM RAM WMA MP3 Type of musi...

Page 28: ...2Prepare the desired disc recording mode To record programmed tracks A do steps 1 3 on page 17 Ensure disc is stopped Tape to tape recording 1Press TAPE and then L main unit L STOP 2Press c DECK1 on the main unit and insert the cassette you want to record 4 Press REC on the main unit to start recording To stop recording Press L main unit L STOP If the tape finishes before the disc The disc continu...

Page 29: ...me is shown for about 5 seconds To change the setting Press SLEEP to select the new setting You can use the sleep timer in combination with the play record timer Make sure the unit is off before the play record timer s start time Note The sleep timer will be turned off when you start recording The play record timer You can set the timer to come on at a certain time to wake you up play timer or to ...

Page 30: ...DIO Every time you press the button RAM VCD CD WMA MP3 TUNER CASSETTE AUX AUDIO L R AUDIO L AUDIO R Display on the main unit RAM VCD LR L R On screen display on the television AUDIO L R LR Left channel sound is heard from the left speaker and right channel sound is heard from the right speaker Vocal and accompaniment AUDIO L L Only left channel sound No vocal AUDIO R R Only right channel sound Voc...

Page 31: ...HO 3 ECHO 4 ECHO OFF off The effect increases with the level To record your karaoke performance Preparation Do the preparatory steps 1 2 on page 28 When singing along with discs Insert the disc s you want A page 14 Press DVD CD When singing along with tape Press c DECK 1 on the main unit and insert the tape you want When singing along with radio Select your desired station A page 24 When singing a...

Page 32: ...2 channel Note Avoid listening for prolonged periods of time to prevent hearing damage Operating a television Point the remote control at the television for the following operations Turning the television on off Press SHIFT TVf f f f f Switching the television s video input mode Press SHIFT TV VIDEO Changing channels Press SHIFT TV CH4 4 4 4 4 or SHIFT TV CH3 3 3 3 3 Adjusting the volume Press SHI...

Page 33: ... High Definition Compatible Digital and Pacific MicrosonicsTM are either registered trademarks or trademarks of Pacific Microsonics Inc in the United States and or other countries HDCD system manufactured under license from Pacific Microsonics Inc This product is covered by one or more of the following In the USA 5 479 168 5 638 074 5 640 161 5 808 574 5 838 274 5 854 600 5 864 311 5 872 531 and i...

Page 34: ...perating instructions The equipment connections described are examples Peripheral equipment and optional cables are sold separately unless otherwise indicated Using other equipment Using a subwoofer VK71D Connect an active subwoofer not included See below for connection AM ANT FM ANT VOLT ADJ EXT LOOP 75Ω To the subwoofer s input terminal Audio cable not included AC IN COMPONENT VIDEOOUT VIDEO OUT...

Page 35: ...y higher quality pictures than if the signals were output from the VIDEO OUT terminal or S VIDEO OUT terminal I P B MPEG 2 the video compression standard adapted for use with DVD Video codes frames using these 3 picture types I Intra coded picture This picture has the best quality and is the best to use when adjusting the picture P Predictive coded picture This picture is calculated based on past ...

Page 36: ... to 2 hours for it to evaporate This unit cannot play discs other than the ones listed in these operating instructions 5 19 You can only play DVD Video if their region number is the same or includes the same region Cover number as the unit or if DVD Video is marked ALL Confirm the region number for the unit on the rear panel The disc may be dirty and may require cleaning 5 Ensure that the disc is ...

Page 37: ...rd ST flickers or doesn t light Sound is distorted A beat sound is heard A low hum is heard during AM broadcasts Adjust the position of the FM or AM antenna Use an outdoor antenna 34 Turn the television off or separate it from the unit Separate the antenna from other cables and cords Sound No sound Distorted sound Effects do not work Humming heard during play Check the connections 7 Turn the volum...

Page 38: ...n the unit Voltage Do not use high voltage power sources This can overload the unit and cause a fire Do not use a DC power source Check the source carefully when setting the unit up on a ship or other place where DC is used Power cord protection Ensure the AC power cord is connected correctly and not damaged Poor connection and lead damage can cause fire or electric shock Do not pull bend or place...

Page 39: ...frica and Southeast Asia Mic jack Sensitivity 0 7 mV 600 Ω Terminal Mono 6 3 mm jack 2 system CASSETTE DECK SECTION Type Auto Reverse Track system 4 Track 2 Channel Head Record Playback Solid Permalloy Head Erasure Double Gap Ferrite Head Motor DC Servo Motor Recording System AC Bias 100 kHz Erase System AC Erase 100 kHz Tape Speed 4 8 cm s Overall Frequency Response 3 6 dB at DECK OUT Normal TYPE...

Page 40: ...er speaker SB PC81 Type 2 way 3 speaker system Bass reflex Speaker unit s Impedance 6 Ω Woofer 8 cm Cone type Woofer 8 cm Cone type Tweeter 6 cm Cone type Input power IEC 120 W Max Output sound pressure 83 5 dB W 1 0 m Cross over frequency 5 5 kHz Frequency range 75 Hz 22 kHz 16 dB 85 Hz 20 kHz 10 dB Dimensions WxHxD 395 x 105 x 124 mm Mass 1 7 kg VK81D Subwoofer SB WVK81 Type 1 way 2 speaker syst...

Reviews: