

Standby/on switch [
^
], [
8
] (4, 6)
Press to switch the unit from on to standby
mode or vice versa. In standby mode, the
unit is still consuming a small amount of
power.
[DIMMER]
Dims the display panel. Press again to
cancel.
Numeric buttons
[1-9, 0,
≧
10] (4, 5, 8, 9)
To select a 2-digit number
e.g. 16: [
≧
10]
[1]
[6]
To select a 3-digit number
e.g. 226: [
≧
10]
[
≧
10]
[2]
[2]
[6]
[DEL] (4)
[PROGRAM] (4, 5)
[REPEAT] (4)
[PLAY MODE] (4, 5)
[USB
q
/
h
]
(8)
[CD
q
/
h
] (4)
[
u
/
t
], [
y
/
i
] (4, 5, 8)
[RE-MASTER] (7)
[BASS] (7)
[
e
,
r
], [
w
,
q
] (4, 6, 7, 8)
[OK] (4, 6, 9)
[DISPLAY] (4, 5)
[AUTO PRESET] (5)
[TUNE MODE] (5)
[
z
, PLAY] (6)
[CLOCK/TIMER] (6)
[AUTO OFF]
This function allows you to turn the unit off
(except in radio mode) after the unit is left
unused for about 30 minutes. Press twice
to turn it on.
[SLEEP] (6)
[+, VOL
, –], [– ]
[MUTE]
Mutes the sound. Press again to cancel.
“MUTE” is also cancelled when the volume
is adjusted or the unit is turned off.
[AUX] (1)
[RADIO] (5)
[
g
] (4, 8)
[D.BASS] (7)
[PRESET EQ] (7)
[TREBLE] (7)
[SURROUND] (7)
[INPUT LEVEL] (1)
[FM MODE] (5)
[FM/AM/AUX] (5, 9)
[CD
;
, OPEN/CLOSE] (4)
USB port (8)
Remote control signal sensor
Aim the remote control at the sensor,
avoiding obstacles, at a maximum range of
7 m directly in front of the unit.
Preset EQ
Press
[PRESET EQ]
repeatedly to select “HEAVY”, “SOFT”, “CLEAR”,
“VOCAL” or “FLAT”.
Bass or Treble
Press
[BASS]
or
[TREBLE]
to select “BASS” or “TREBLE”.
Press [
e
,
r
] to adjust the level (-4 to +4).
Surround Sound
Press
[SURROUND]
repeatedly during play to select “ON SURROUND”
or “OFF SURROUND”. If interference in FM stereo reception increases,
cancel the surround sound effect.
D.Bass
Press
[D.BASS]
repeatedly during play to select “ON D.BASS” or
“OFF D.BASS”.
Re-master
(MP3)
Press
[RE-MASTER]
repeatedly during play to select “ON RE-MASTER” or
“OFF RE-MASTER”.
7
Sound adjustment
5
Radio operations
The USB connectivity enables you to connect and
play MP3 tracks from USB mass storage class.
Preparation:
Before connecting any USB mass storage
device to the unit, ensure that the data stored
therein has been backed up.
It is not recommended to use a USB extension
cable. The device connected via the cable will
not be recognised by this unit.
Reduce the volume and connect the USB
mass storage device.
Press [USB
q
/
h
] to start play.
•
•
USB mass storage device (not included)
Stop
Press
[
g
]
. “RESUME” is
displayed. The position is
memorised.
Press
[USB
q
/
h
]
to resume
play.
Press
[
g
]
again to clear the
position.
To remove the USB mass storage device,
select a source other than “USB”.
Removing the USB mass storage device with
it selected as a source can damage the data
stored in the device.
•
For other operating functions, they are similar
as those described in “Disc operations”
(
➡
Section 4).
USB operations
External unit
8
Devices which are defined as USB mass
storage class:
USB devices that support bulk only transfer
USB devices that support USB 2.0 full speed
•
•
Compatible devices
Stop
Press
[
g
]
.
Pause
Press
[CD
q
/
h
]
. Press
again to resume play.
Skip track
Press
[
u
/
t
]
or
[
y
/
i
]
.
Search the
current track
(CD)
Press and hold
[
u
/
t
]
or
[
y
/
i
]
.
Skip album
(MP3)
Press
[
e
,
r
]
.
Direct access
play
(Play starts with
the track you
select.)
CD:
Press the numeric
buttons to select the
track.
MP3:
Press
[
e
,
r
]
to
select the album.
Press
[
y
/
i
]
once and then the
numeric buttons to
select the track.
Basic play
Press [DISPLAY] repeatedly during play or
pause to view the current track’s information.
Maximum number of displayable characters:
approximately 30
This unit supports ver. 1.0 and 1.1 ID3 tags.
Text data that is not supported will not be
displayed.
•
•
Press [CD
q
/
h
].
Press [PLAY MODE] repeatedly to select
the following modes.
Mode
To play
1TR
1-TRACK
one selected track on the
disc.
Press the numeric buttons
to select the track.
1ALBUM
1-ALBUM
(MP3)
one selected album on the
disc.
Press
[
e
,
r
]
to select the
album.
RND
RANDOM
a disc randomly.
1ALBUM RND
1-ALBUM
RANDOM
(MP3)
all tracks in one selected
album randomly.
Press
[
e
,
r
]
to select the
album.
During random play, you cannot skip to the
previous track.
The current play mode is cleared when you
open the sliding door.
To repeat program play or selected play mode,
press
[REPEAT]
. Press again to cancel.
•
•
•
Play Mode function
Cancel program
mode
Press
[PROGRAM]
in the
stop mode to clear “PGM”
indicator from the display.
Replay the
program
Press
[PROGRAM]
in the
stop mode and
then
[CD
q
/
h
]
.
Check program
contents
Press
[
u
/
t
]
or
[
y
/
i
]
when “PGM” is displayed in
the stop mode. To check while
programming, press
[PROGRAM]
twice after
“PGM” appears and then
press
[
u
/
t
]
or
[
y
/
i
]
.
Delete last
programmed
track
Press
[DEL]
in the stop mode.
Clear all
programmed
tracks
Press
[
g
]
in the stop mode.
“CLR ALL” is displayed. Within
5 seconds, press the button
again to clear all tracks.
The program memory is cleared when you open
the sliding door.
•
Display function
Disc operations
4
Press [
^
] to turn the unit on.
Press [CD
;
, OPEN/CLOSE] on the main
unit to open the sliding door.
Tilt the disc into the disc tray under the
sliding door and then set the CD in place.
Press [CD
;
, OPEN/CLOSE] to close the
sliding door.
Keep fingers away from the sliding door when
it is closing to avoid possible minor injuries.
Press [CD
q
/
h
] to start play.
Damage may occur if the sliding door is forced
closed.
Be careful of CD hitting the sliding door while
being removed.
•
•
Program play
Enables you to program up to 24 tracks.
Press [CD
q
/
h
] and then [
g
].
Press [PROGRAM].
CD:
Press the numeric buttons to
select the track.
To program more tracks, continue by
pressing the numeric buttons.
Press [OK] or [CD
q
/
h
] to start play.
■
Batteries
(not included)
Use a manganese dry battery or an alkaline dry battery.
Insert so the poles (+ and –) match those in the remote control.
Remove if the remote control is not going to be used for a long period of time.
Store in a cool and dark place.
Do not heat or expose to flame.
Do not leave the batteries in an automobile exposed to direct sunlight for a long period of time with
doors and windows closed.
Mishandling of batteries in the remote control can cause electrolyte leakage, which may cause a fire.
•
•
•
•
•
•
•
■
Do not:
mix old and new batteries.
use different types of batteries at the same time.
take apart or short-circuit the batteries.
attempt to recharge alkaline or manganese batteries.
use the batteries if the coverings have been peeled off.
•
•
•
•
•
R6/LR6, AA
Place this side in before the other side.
Preparing the remote control
2
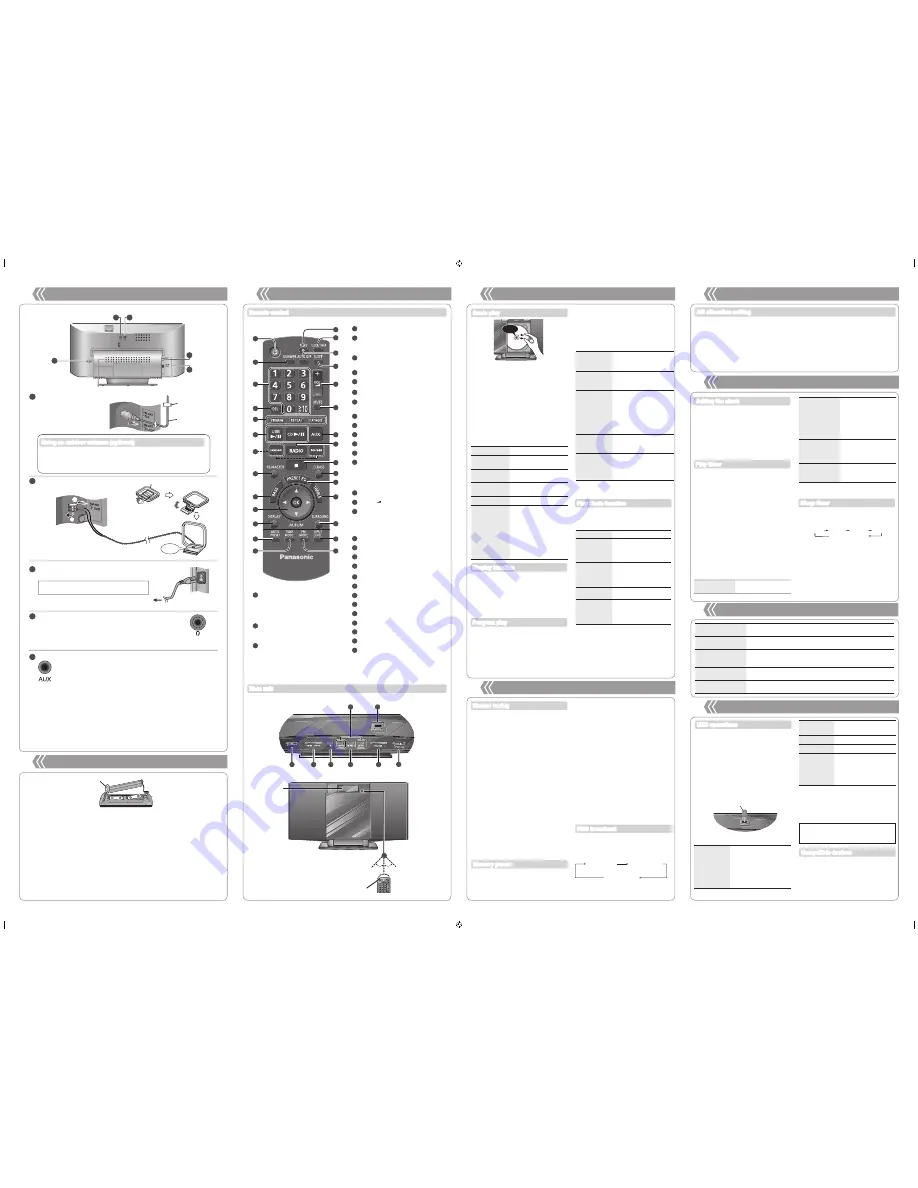
Control guide
3
Press [RADIO] to select “FM” or “AM”.
Press [TUNE MODE] to select “MANUAL”.
Press [
u
/
t
] or [
y
/
i
] to select the
frequency of the required station.
To tune automatically
Repeat step
and
(
➡
above)
.
Press and hold [
u
/
t
] or [
y
/
i
] until
the frequency starts changing rapidly.
To cancel auto tuning, press
[
u
/
t
]
or
[
y
/
i
]
once again.
Auto tuning may not function when there is
excessive interference.
To improve FM sound quality
Press [FM MODE] to display “MONO”
indicator. Press again to cancel.
“MONO” is also cancelled if the frequency is
changed.
Turn “MONO” off for normal listening.
To improve AM sound quality
Press [RADIO] to select “AM”.
Press and hold [TUNE MODE] repeatedly
to change the beat proof setting (“BP 1” or
“BP 2”).
•
•
•
•
You can preset up to 30 FM channels and 15 AM
channels.
Preparation:
Press
[RADIO]
to select “FM” or “AM”.
Manual tuning
Memory preset
RDS display may not be available if the
reception is poor.
•
Station
Name (PS)
Program
Type (PTY)
Frequency
display (FREQ)
Press [DISPLAY] to display.
Manual presetting
Press [TUNE MODE] to select “MANUAL”.
Press [
u
/
t
] or [
y
/
i
] to tune to the
required station.
Press [PROGRAM].
Press the numeric buttons to select a
channel.
The station occupying a channel is erased if
another station is preset in that channel.
To preset more stations, repeat step
to
.
Selecting a preset station
Press [TUNE MODE] to select “PRESET”.
Press [
u
/
t
] or [
y
/
i
] to select the
channel.
Alternatively, press the numeric buttons to
select the channel.
•
RDS broadcast
Enables you to display the name of a broadcasting
station or a program type. “RDS” lights when RDS
signal is received.
Automatic presetting
Press [PLAY MODE] to switch between
“LOWEST” and “CURRENT” frequency.
Press [AUTO PRESET] to start presetting.
Top View
6
31
1
7
22
29
18
30
Refer to the numbers in parentheses for section reference.
•
AUD
I
O SYSTEM
28
27
26
25
24
23
22
21
20
2
18
17
16
15
14
3
1
4
5
6
7
8
9
10
11
12
13
19
Front View
Display
Transmission window
Approx. 30°
Approx. 30°
32
1
2
3
4
5
6
7
8
9
10
11
12
13
14
15
16
17
18
19
20
21
22
23
24
25
26
27
28
29
30
31
32
Remote control
Main unit
MP3:
Press [
e
,
r
] to select the album.
Press [
y
/
i
] once and then the
numeric buttons to select the track.
Press [OK].
To program more tracks, repeat step
to
.
Press [CD
q
/
h
] to start play.
Click!
Pause
Press
[USB
q
/
h
]
. Press
again to resume play.
Skip track
Press
[
u
/
t
]
or
[
y
/
i
]
.
Skip album
Press
[
e
,
r
]
.
Direct access
play (Play starts
with the track
you select.)
Press
[
e
,
r
]
to select the
album.
Press
[
y
/
i
]
once and
then the numeric buttons
to select the track.
6
Timer
Change the source
or volume
Press
[
z
,
PLAY]
twice
to clear
z
PLAY indicator
from the display.
Make changes to the
source or volume.
Perform step
and
(
➡
left).
Check the settings
(When the unit is
on or in standby
mode)
Press
[CLOCK/TIMER]
repeatedly to select
“
z
PLAY 1”, “
z
PLAY 2” or
“
z
PLAY 3”.
Cancel
Press
[
z
, PLAY]
twice
to clear the timer indicator
from the display.
The timer will start at the preset time, with the
volume increasing gradually to the preset level.
•
You can set the timer to come on at a certain time to
wake you up.
This unit offers 3 optional play timers.
Preparation:
Turn the unit on and set the clock (
➡
above).
Prepare the music source (disc, radio, USB or
AUX) and set the volume.
•
•
Play timer
The sleep timer can turn the unit off after a set time.
Press [SLEEP] to turn the sleep function on or
off.
Press [SLEEP] once to check the remaining
time.
The play timer and sleep timer can be used
together. The sleep timer always has the priority.
Be sure not to overlap the timer settings.
When AUTO OFF is ON and the unit is left
unused for about 30 minutes, the unit will shut
down even if the play time or sleep time has not
expired.
•
•
Sleep timer
30MIN 60MIN 90MIN 120MIN
OFF (Cancelled)
This is a 24-hour clock.
Press [CLOCK/TIMER] to select “CLOCK”.
Within 5 seconds, press [
e
,
r
] to set the
time.
(Press and hold to change the time
faster.)
Press [OK].
To display the clock, press
[CLOCK/TIMER]
.
Reset the clock regularly to maintain accuracy.
•
•
Setting the clock
Press [CLOCK/TIMER] repeatedly to select
play timer.
Within 5 seconds, press [
e
,
r
] to set the
starting time.
Press [OK].
To set the finishing time, repeat step
and
.
To activate the timer
Press [
z
, PLAY] repeatedly to turn the
selected play timer on.
Press [
^
] to turn the unit off.
Change the
settings
Repeat step
to
(
➡
above).
5
Radio operations
(continued)
AM allocation setting
The unit may also receive AM broadcast allocated
in 10 kHz step.
To change the step to 10 kHz (by main unit
only)
Press [FM/AM/AUX] to select “AM”.
Press and hold [FM/AM/AUX].
After a few seconds the display changes to
display current minimum frequency.
Continue to hold down [FM/AM/AUX].
When the minimum frequency changes, release
the button.
To return to the original step, repeat step
to
(
➡
left).
After the setting is changed, any previously
preset frequency will be cleared.
•
•
g
Notes on speakers
These speakers do not have magnetic shielding. Do not place them near televisions,
personal computers or other devices easily influenced by magnetism.
The speaker nets cannot be removed.
•
•
Connections
1
Tape the antenna to a wall or
column, in a position with the
least amount of interference.
•
FM indoor antenna
Connect the FM indoor antenna.
Adhesive tape
1
1
2
Connect the AM loop antenna.
Stand the antenna up on
its base.
AM loop antenna
2
Click!
Keep the loose antenna cord away from other wires and cords.
•
Connect the AC mains lead after all other connections are complete.
Connect the AC mains lead.
3
READ THE CAUTION FOR THE AC MAINS
LEAD ON SECTION 10 BEFORE CONNECTION.
To household mains socket
Ventilation holes
1
2
3
4
5
Use FM outdoor antenna only if the radio reception is poor.
Use the included antenna plug adapter to connect the FM outdoor antenna.
The antenna should only be installed by a competent technician.
Never use an outdoor antenna during lightning storm.
•
•
•
•
Using an outdoor antenna (optional)
Switch the equalizer off or turn the volume of the portable equipment down to reduce
the input signal. High level of input signal will distort the sound.
For details, refer to the instruction manual of the other equipment.
Cords and equipment are not included.
•
•
•
You can select the sound input level of the portable audio equipment.
Press [INPUT LEVEL] repeatedly to select “HIGH” or “NORMAL”.
Avoid listening for prolonged periods of time to prevent hearing damage.
Excessive sound pressure from earphones and headphones can cause hearing loss.
•
•
Reduce the volume level and connect the headphones.
Plug type: 3.5 mm stereo
Headphones
(not included)
4
Plug the audio cord into the AUX jack.
Plug type: 3.5 mm stereo
Press [AUX] and start playback from the portable audio source.
5
Portable audio equipment (during AUX mode)
Back View
SC-HC10_EN (EB) 12.01.10.indd 2
12/01/2010 11:35:34