background image

8

VQT2Q52

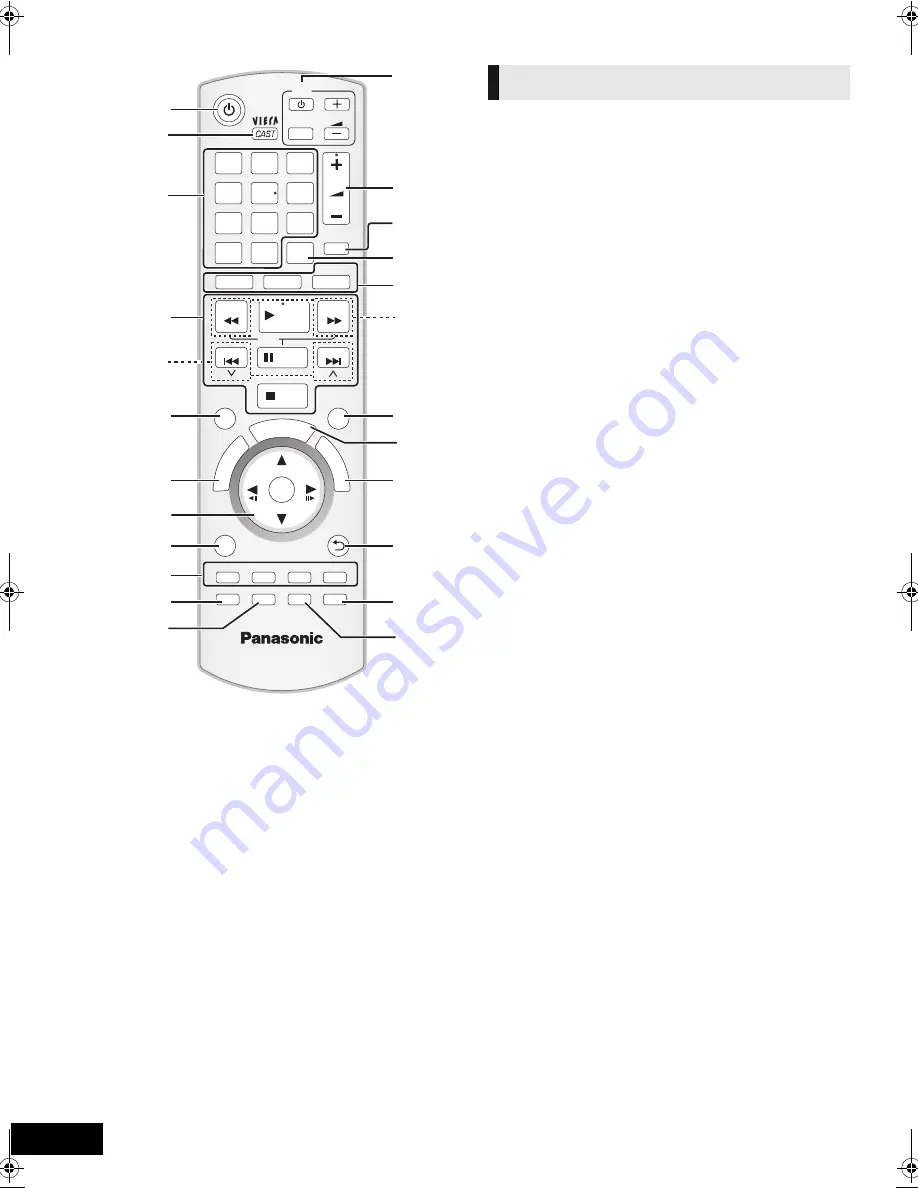
Control reference guide

1

Turn the unit on and off (

>

19)

2

Display the Home screen of VIERA CAST (

>

34)

3

Select title numbers, etc./Enter numbers or characters 
(

>

34)

[CANCEL] : Cancel

4

Basic playback control buttons (

>

25)

5

Select preset radio stations (

>

29)

6

Show status messages (

>

25)

7

Show Top Menu/DIRECT NAVIGATOR (

>

25)

8

[

3

,

4

,

2

,

1

]: Menu selection

[OK]: Selection
[

2

,

1

]: Select preset radio station (

>

29)

[

2

] (

2;

), [

1

] (

;1

): Frame-by-frame (

>

25)

9

Show OPTION menu (

>

26)

10 Coloured buttons (red, green yellow, blue)

These buttons are used when;

Operating a BD-Video disc that includes Java

TM


applications (BD-J).

Displaying “Title View” and “Album View” screens. 
(

>

28)

Operating contents of VIERA CAST (

>

34)

11 Set the sound mode (

>

24)/Select speaker channel 

(

>

24)

12 Select surround sound effects (

>

24)

13

TV


operation


buttons

You can operate the TV through the unit’s remote control.
[

Í

]: Turn the television on and off

[AV]: Switch the input select
[

i j

VOL] : Adjust the volume

14 Adjust the volume of the main unit
15 Mute the sound

“MUTE” flashes on the unit’s display, while the function is 
on.

To cancel, press the button again or adjust the volume.

Muting is cancelled if the unit is turned off.

16 Switch on/off Secondary Video (Picture-in-picture) (

>

26)

17 Select the source

[BD/SD]: Select disc drive or SD card drive (

>

23)

[iPod]: Select iPod/iPhone as the source (

>

23, 33)

[RADIO/EXT-IN]: Select FM tuner, USB or external audio 
as the source (

>

23, 29, 30)

18 Select radio stations manually (

>

29)

19 Exit the menu screen
20 Show START menu (

>

23)

21 Show Pop-up menu (

>

25)

22 Return to previous screen
23 Select audio (

>

25)

24 Show Playback menu (

>

34)/Set the sleep timer

CANCEL

PIP

RETURN

VOL

STOP

1

2

3

4

5

6

7

8
0

9

VOL

TV

AV

SEARCH

SKIP

SLOW

SKIP

PLAY

PAUSE

SEARCH

OK

BD/SD

iPod

EXT-IN

MUTE

RADIO

PO

P-U

P M

EN

U

 T

O

M

EN

U

EXIT

STATUS

OPTION

-SLEEP

-CH SELECT

SOUND SURROUND DISPLAY AUDIO

abc

def

jkl

mno

tuv

ghi

qrs

p

xyz

w

D

IR

EC

N

AV

IG

AT

OR

19

8

21

22

24

13

15

20

1

4

18

2

23

14

16

17

3

5

6

7

9

10

11

12

START

Remote control

1

Press and hold [

j

SLEEP].

2

While “SLEEP 

££

” is displayed, press [

j

SLEEP] 

several times to select the time (in minutes).

Timer selection is up to 120 minutes.

Select “OFF” when cancelling the setting.

To confirm the remaining time
Press and hold the button again.

SCBT735_330_230EBEPEG_VQT2Q52-B.book  8 ページ  2010年2月9日 火曜日 午前10時51分

Summary of Contents for SC-BT735

Page 1: ...g this product For optimum performance and safety please read these instructions carefully Before connecting operating or adjusting this product please read the instructions completely Please keep this manual for future reference The illustration shows the image of the unit SC BT735 EB EP VQT2Q52 Model number suffix EB denotes UK model ...

Page 2: ... UNIT DISPOSE OF BATTERIES IN AN ENVIRONMENTALLY FRIENDLY MANNER WARNING TO REDUCE THE RISK OF FIRE ELECTRIC SHOCK OR PRODUCT DAMAGE DO NOT EXPOSE THIS APPARATUS TO RAIN MOISTURE DRIPPING OR SPLASHING AND THAT NO OBJECTS FILLED WITH LIQUIDS SUCH AS VASES SHALL BE PLACED ON THE APPARATUS USE ONLY THE RECOMMENDED ACCESSORIES DO NOT REMOVE THE COVER OR BACK THERE ARE NO USER SERVICEABLE PARTS INSIDE ...

Page 3: ...rrespond with the coloured markings identifying the terminals in your plug proceed as follows The wire which is coloured Blue must be connected to the terminal which is marked with the letter N or coloured Black or Blue The wire which is coloured Brown must be connected to the terminal which is marked with the letter L or coloured Brown or Red WARNING DO NOT CONNECT EITHER WIRE TO THE EARTH TERMIN...

Page 4: ...perating life by disconnecting the unit from the power source if it is not to be used for a long time Placement Voltage AC mains lead protection Foreign matter Service Information for Users on Collection and Disposal of Old Equipment and used Batteries These symbols on the products packaging and or accompanying documents mean that used electrical and electronic products and batteries should not be...

Page 5: ... TV Enjoying TV with unit s speakers 30 Surround sound effects 30 Sound modes 30 Making settings for digital audio input 30 Linked operations with the TV VIERA Link HDAVI ControlTM 31 Setting the audio link 31 Easy control only with VIERA remote control 32 Other devices Using the iPod iPhone 32 iPod iPhone Connection 32 iPod iPhone Playback 33 Advanced operations Enjoying VIERA CAST 34 Playback me...

Page 6: ...HC730 SB HC230 SB HC230 Surround speakers SB HS735 SB HS230 SB HS230 Subwoofer SB HW330 SB HW330 SB HW480 BT735 BT330 BT230 1 Remote control N2QAKB000090 2 Batteries for remote control 1 Sheet of speaker cable stickers 1 Video cable K2KA2BA00001 1 FM indoor antenna RSAX0002 1 Antenna plug adaptor K1YZ02000013 For the United Kingdom and Republic of Ireland Speaker cable centre REEX1154 with green c...

Page 7: ... not use the following discs jDiscs with exposed adhesive from removed stickers or labels rented discs etc jDiscs that are badly warped or cracked jIrregularly shaped discs such as heart shapes To dispose or transfer this unit The unit may keep the user settings information in the unit If you discard this unit either by disposal or transfer then follow the procedure to return all the settings to t...

Page 8: ...display while the function is on To cancel press the button again or adjust the volume Muting is cancelled if the unit is turned off 16 Switch on off Secondary Video Picture in picture 26 17 Select the source BD SD Select disc drive or SD card drive 23 iPod Select iPod iPhone as the source 23 33 RADIO EXT IN Select FM tuner USB or external audio as the source 23 29 30 18 Select radio stations manu...

Page 9: ...ook firmly towards the unit until it clicks into place Then push the succeeding hooks one by one until all have clicked into place 3 Check that the cover now moves correctly If it does not remove it and repeat the above procedure 1 AC IN terminal 18 2 Speaker terminals 15 3 Cooling fan 4 USB port for optional wireless adaptor 18 5 HDMI AV OUT terminal 17 6 FM radio antenna terminal 15 7 DIGITAL AU...

Page 10: ...D DVD Video Video DVD RAM Video AVCHD JPEG DVD R Video AVCHD DivX MP3 JPEG DVD R DL DVD RW Video AVCHD R RW R DL CD Music CD Music CD DA CD R CD RW DivX Music CD DA MP3 JPEG SD SD Memory Card 8 MB to 2 GB Includes miniSD Card and microSD Card SDHC Memory Card 4 GB to 32 GB Includes microSDHC Card SDXC Memory Card 48 GB 64 GB Includes microSDXC Card as of December 2009 MPEG2 AVCHD JPEG USB USB devi...

Page 11: ...with an adaptor card These are usually supplied with such cards or otherwise customer provided Keep the Memory Card out of reach of children to prevent swallowing To protect the card s contents move the record prevention tab on the SD card to LOCK This unit is compatible with SD Memory Cards that meet SD Card Specifications FAT12 and FAT16 formats as well as SDHC Memory Cards in FAT32 format Does ...

Page 12: ...speakers BT735 2 Front speakers 2 Surround speakers 4 Stands with cables 4 Bases 8 Screws A 4 Screws B BT330 2 Front speakers 2 Stands with cables 2 Bases 8 Screws A B 1 2 2 1 Back of the base Tighten securely Insert the wire fully r White s Blue line Push Leave about 80 mm Tighten securely Screw A Screw B Press into the groove Pull the cable straight along the line and slide into the groove 1 2 2...

Page 13: ...ot have strong enough support Improper attachment may result in damage to the wall or speakers Use a string of less than 2 0 mm which is capable of supporting over 10 kg e g BT735 A String not included Thread from the wall to the speaker and tie tightly B Rear of the speaker C Screw eye not included D Wall E Approx 150 mm Speaker cable sticker Colour 1 FRONT L WHITE 2 FRONT R RED 3 SURROUND L BLUE...

Page 14: ...power 100 W Min For more details refer to the operating instructions for the optional wireless system Caution The main unit and supplied speakers are to be used only as indicated in this setup Failure to do so may lead to damage to the amplifier and or the speakers and may result in the risk of fire Consult a qualified service person if damage has occurred or if you experience a sudden change in p...

Page 15: ...PLE Subwoofer 5 GREEN Centre speaker 2 RED Front speaker Rch 1 WHITE Front speaker Lch 4 GREY Surround speaker Rch 3 BLUE Surround speaker Lch When using the optional wireless system do not attempt to connect any extra surround or surround back speakers to the main unit FM ANT 75 Main unit A FM indoor antenna included B Adhesive tape Affix this end of the antenna where reception is best FM ANT Ω 7...

Page 16: ...tting 1080p signal please use HDMI cables 5 0 meters or less Recommended part number RP CDHS15 1 5 m RP CDHS30 3 0 m RP CDHS50 5 0 m etc To enjoy TV audio from this home theatre system s speakers select AUX TV as a source 23 To enjoy TV audio from this home theatre system s speakers select DIGITAL IN 1 TV or D IN 1 as a source Connection to a TV Basic connection AV OUT VIDEO OUT AUX L R VIDEO OUT ...

Page 17: ...INGS HDMI Audio Output Off 39 Connection for the best picture and audio VIDEO OUT AUX OPTICAL 2 1 DIGITAL AUDIO IN L R OPTICAL 2 1 DIGITAL AUDIO IN L R 2 OPTICAL 1 DIGITAL AUDIO IN AV OUT AV OUT ARC OPTICAL OUT AV IN OPTICAL 1 HDMI AV OUT ARC TV A HDMI cable not included B Optical digital audio cable not included For the TV audio an audio cable not included can be also used by connecting the AUX t...

Page 18: ...n the LAN terminal can damage the unit Read the operating instructions for the Wireless LAN Adaptor DY WL10 optional thoroughly when using it For up to date compatibility information on your Wireless router Access Point refer to http panasonic jp support global cs VIDEO OUT LAN 10BASE T 100BASE TX LAN WIRELESS Only the Wireless LAN Adaptor DY WL10 optional can be used AC IN Main unit A AC mains le...

Page 19: ...m If a digital transmitter is inserted it is required to specify the current settings Speakers position Specify the positioning of the surround speakers BT230 Speaker check Check if the connection to each speaker is valid BT735 BT330 Auto Speaker Setup Adjust the speaker output level automatically Speaker Output Make surround sound setting for speaker output Cinema Surround The function creates th...

Page 20: ...Key supplied with your Wireless router Access point Access Point Connection Setting Network Easy Setting OK RETURN Network Easy Setting Connection Test Wired Wireless Select a connection mode Current setting Wired LAN cable connection Connect a LAN cable to the unit and select Wired Wireless LAN connection Connect the Wireless LAN Adaptor DY WL10 to the USB port and select Wireless Access Point Co...

Page 21: ...ollowing screen will be displayed You can perform update anytime by selecting Firmware Update in the Setup menu 40 Downloading will require several minutes It may take longer or may not work properly depending on the connection environment If you do not want to check for the latest firmware version set Automatic Update Check to Off 40 Display Check the following 1 LAN cable connection or Connectio...

Page 22: ...ing OK Press and hold the numbered button 1 or 2 which has the same number you selected in the step 6 for more than 5 seconds 2 Press OK Inserting or removing a media When inserting a media ensure that it is facing the right way up While the reading indicator is displayed do not turn off the unit or remove the media Such action may result in loss of the media s contents When removing the SD card p...

Page 23: ...is unit s speakers 30 1 TV is displayed next to items set for TV AUDIO input DIGITAL IN 2 2 To enjoy audio from other devices with this unit s speakers 30 2 CABLE SAT is displayed next to DIGITAL IN when set for CABLE SAT AUDIO input To enjoy sound from the TV Select one source from either AUX TV ARC TV or DIGITAL IN 1 TV Sound Equalizer 24 OK RETURN Home Cinema START BD Video To Others Playback T...

Page 24: ... II MUSIC Dolby Pro Logic II Music Adds 5 1 channel effects to stereo sources except DivX 7 1CH VS 7 1CH Virtual Surround You can enjoy 6 1 7 1 channel surround like effect using 5 1 channel speakers S SURROUND Super Surround You can enjoy sound from all speakers with stereo sources 2CH STEREO You can play any source in stereo Sound will be output to the front speakers and the subwoofer only L R F...

Page 25: ...media These functions may not work depending on the media and contents Press STOP The stopped position is memorised Resume play function Press 1 PLAY to restart from this position The position is cleared if the tray is opened or you press STOP several times to display STOP on unit s display On BD Video discs including BD J 49 the resume play function does not work Press PAUSE Press PAUSE again or ...

Page 26: ...er to access the BD Live content Follow the screen display or instruction manual of the disc for information on acquiring an account 1 Connect to the network 18 2 Insert an SD card with 1 GB or more free space SD card is used as the local storage 49 3 Insert the disc Deleting data Formatting SD cards 1 Insert an SD card 2 Press START 3 Press 3 4 to select To Others and press OK 4 Press 3 4 to sele...

Page 27: ...ired is displayed The remaining number of plays decreases each time a program is played However when playing from the point where play was previously stopped the remaining number of plays does not decrease due to the resume play function Displaying subtitles text You can display subtitles text on the DivX video disc on this unit This function has no relation to the subtitles specified in DivX stan...

Page 28: ...Picture Page 02 02 DIRECT NAVIGATOR Album View DVD RAM VR OPTION OK RETURN OPTION DIRECT NAVIGATOR Picture View DVD RAM VR Video Picture Play RETURN 2006 9 12 Page 001 001 0001 0005 0009 0006 0007 0008 0002 0003 0004 Date 11 12 2009 Total 3 9 e g JPEG on DVD RAM Shooting date Useful functions While Album View or Picture View screen is displayed Start Slideshow You can display still pictures one by...

Page 29: ...rwritten when another station is stored in the same channel preset 1 Press RADIO to select FM 2 Press the numbered buttons to select the channel To select a 1 digit number e g 1 1 B OK To select a 2 digit number e g 12 1 B 2 Alternatively press W X or 2 1 If the station you are listening to is transmitting RDS signals RDS will light up on the display While listening to the radio broadcast Press DI...

Page 30: ...ailed information on this operation please refer to the Changing the sound modes section on page 24 Select to suit the type of audio from the DIGITAL AUDIO IN terminals on the main unit Press EXT IN several times to select D IN 1 DIGITAL IN 1 or D IN 2 DIGITAL IN 2 DIGITAL IN 1 DIGITAL IN 2 Press AUDIO M1 M2 M1rM2 stereo audio Only works with Dolby Dual Mono M1 or M2 is not available if On is sele...

Page 31: ...dividual manuals for other manufacturers equipment supporting VIERA Link function You can turn on this unit and the TV and start play with a single press of a button While the unit and the TV are in standby mode Press 1 PLAY You can select whether audio is output from the unit s speakers or the TV speakers by using the TV menu settings Home Cinema This unit s speakers are active When this unit is ...

Page 32: ... or reduce the volume of the main unit to its minimum Make sure that the video cable connection is made to view photos videos from the iPod iPhone 1 Push to open the iPod iPhone lid 2 Connect the iPod iPhone not included firmly About recharging the battery iPod iPhone will start recharging regardless of whether this unit is on or off IPOD will be shown on the main unit s display during iPod iPhone...

Page 33: ...on your TV You can use the remote control to operate the iPod iPhone menu The operation may vary among iPod iPhone models 3 4 To navigate menu items OK To go to the next menu RETURN To return to the previous menu 1 Press START 2 Press 3 4 to select Menu and then press OK 3 Press 3 4 to select Play Mode and then press OK 4 Press 3 4 to select an item and press OK 5 Press 3 4 to select the setting a...

Page 34: ... continuity of the services All features of websites or content of the service may not be available Some content may be inappropriate for some viewers Some content may only be available for specific countries and may be presented in specific languages Playback menu 1 Press BD SD to select BD DVD 2 Press DISPLAY e g BD Video 3 Press 3 4 to select the menu and press 1 4 Press 3 4 2 1 to select the i...

Page 35: ...tput at 24p Only when you have selected On in 24p Output 39 and play discs recorded at a rate of 60 fields per second Sound Effects 1 2 Discs recorded at 48 kHz or less This feature gives you brighter sound by increasing the high frequency portion of the audio Dialog Enhancer 1 The volume of the centre channel is raised to make dialog easier to hear High Clarity Sound When connected to TV via HDMI...

Page 36: ...different depending on the equipment connected to this unit Select the contents by repeating the operation Control Panel is displayed once the playback starts Operation can be performed with 3 4 2 1 OK RETURN and EXIT Press OK if the Control Panel is not displayed Discs cannot be played back Also depending on the equipment playback of pictures may not be possible Items displayed in grey on the dis...

Page 37: ...w the on screen instructions Enter a 4 digit password with the numbered buttons when the password screen is shown BD Video Ratings Set an age limit of BD Video play Follow the on screen instructions Enter a 4 digit password with the numbered buttons when the password screen is shown Soundtrack Preference Choose the language for audio If Original is selected the original language of each disc will ...

Page 38: ... including the button click sound 7 1ch Audio Reformatting Surround sound with 6 1ch or less is automatically expanded and played back at 7 1ch If Off is selected sound is played over the original number of channels Note that in the case of 6 1ch audio playback will be at 5 1ch Audio reformatting is enabled in the following cases When you have selected PCM in Digital Audio Output When the audio is...

Page 39: ...nnected to an HDTV through other equipment it must also be 1080p compatible 24p Output When this unit is connected to a TV supporting 1080 24p output using an HDMI cable movies and other material recorded at 24p are output at 24p When playing DVD Video set to On and then set 24p in Picture 35 to On When BD Video images other than 24p are played images are output at 60p HDMI Colour Mode This settin...

Page 40: ...s router Access point and connection settings to be set and the current connection settings and connection state to be checked when a wireless connection is used Connection Setting The Wireless router Access point connection wizard will be displayed IP Address DNS Settings This is for checking the state of the network connection and setting the IP address and DNS related Press OK to show the respe...

Page 41: ...e of the Front L and Front R speaker volume respectively No signal is output for the subwoofer To adjust its volume see page 24 Adjusting speaker level during play 3 Press OK The test signal stops To finish the speaker setting Press 3 4 2 1 to select Complete and press OK Speaker settings A B C Primary listening distance A Approximate room dimensions B Actual speaker position C Ideal speaker posit...

Page 42: ...er F 97 mm G 210 mm to 212 mm H 72 mm I 349 mm to 351 mm J 26 mm BT735 Centre speaker BT330 BT230 Centre speaker K 117 mm L 209 mm to 211 mm M 97 mm N 18 8 mm O 17 mm P 99 mm to 101 mm To avoid speaker dropping BT735 Front speaker Centre speaker Surround speaker BT330 Front speaker e g BT735 Front speaker Consult a qualified building contractor to avoid damage to the wall or speakers Use a string ...

Page 43: ...sehold mains socket 18 The unit switches to standby mode When the time set for the sleep timer has passed the power will be turned off 8 One of the unit s safety devices is activated Press Í I on the main unit to turn the unit on The main unit is turned off when the input for the TV is changed This is a normal phenomenon when using VIERA Link HDAVI Control 4 or later For details please read the op...

Page 44: ...TART is pressed jRe select the TV s VIDEO IN input channel Distorted sound or noise is heard Adjust the position of the antenna Use an outdoor antenna 15 A beat sound is heard Try to keep a certain amount of distance between the antenna and the TV I can t connect to the network Confirm the network connection and settings 18 40 Check the operating instructions for each device and connect accordingl...

Page 45: ...message disappears Select a position with good ventilation when installing the unit Do not block the ventilation hole on the rear and side of the unit U72 U73 The HDMI connection acts unusually Turn the unit and TV off Disconnect the HDMI cable between the player and the TV HDMI ONLY Some BD Video discs can only be output with HDMI NET Displays while VIERA CAST is starting up No PLAY There is a vi...

Page 46: ...4 and 8192k8192 pixels sub sampling is 4 2 2 or 4 2 0 Reference JPEG conforming DCF is supported MOTION JPEG and Progressive JPEG is not supported DivX File format DivX Extension Files must have the extension DIVX divx AVI or avi Picture resolution Up to 1920k1080 pixels Reference DivX certified to play DivX video up to HD 1080p including premium content Video jNumber of stream Up to 1 Codec DIV3 ...

Page 47: ...YCbCr4 4 4 RGB Colour Space bps bit per second Transfer rate of bit Display Meaning LPCM Digital Digital TrueHD DTS DTS 96 DTS HD HI RES DTS HD MSTR MPEG Signal type ch channel Number of channels k kHz Sampling frequency b bit Number of bits bps bit per second Transfer rate of bit Language Code Language Code Language Code ENG FRA DEU ITA ESP NLD SVE NOR DAN POR RUS English French German Italian Sp...

Page 48: ...ouTube and Picasa are trademarks of Google Inc Made for iPod means that an electronic accessory has been designed to connect specifically to iPod and has been certified by the developer to meet Apple performance standards Works with iPhone means that an electronic accessory has been designed to connect specifically to iPhone and has been certified by the developer to meet Apple performance standar...

Page 49: ...a signal format achieved by improving the previous DTS DTS ES and DTS 96 24 formats It is compatible with sampling frequency 96 kHz 48 kHz BD Video supports up to 7 1 channel output DTS HD Master Audio Essential This is a lossless audio format and compatible with 96 kHz 7 1 ch and 192 kHz 2 ch or less In addition faithful reproduction of the master audio is enabled using lossless audio encoding te...

Page 50: ...OOFER 115 W per ch 6 FM TUNER SECTION Preset memory 30 stations Frequency range 87 50 MHz to 108 00 MHz 50 kHz step Antenna terminals 75 unbalanced SPEAKER SECTION FRONT SPEAKERS BT735 SB HF730 Type 2 WAY 3 SPEAKER Bass ref Woofer 3 5 cm k 10 cm CONE TYPEk 2 Tweeter 2 5 cm SEMI DOME TYPE Impedance 3 Output sound pressure 78 dB W 1 m Frequency range 100 Hz to 30 kHz j16 dB 130 Hz to 25 kHz j10 dB D...

Page 51: ...BT330 SB HW330 Type 1 WAY 1 SPEAKER Kelton type Woofer 16 cm CONE TYPE Passive radiator 25 cm Impedance 6 Output sound pressure 78 dB W 1 m Frequency range 35 Hz to 180 Hz j16 dB 40 Hz to 160 Hz j10 dB Dimensions WkHkD 180 5 mmk322 mmk351 mm Mass Approx 4 6 kg BT230 SB HW480 Type 1 WAY 1 SPEAKER Bass ref Woofer 16 cm CONE TYPE Impedance 6 Output sound pressure 78 dB W 1 m Frequency range 40 Hz to ...

Page 52: ...HD 38 49 F Finalize 11 Firmware update 21 Formatting SD cards 26 Frame by frame 25 H HDMI 16 49 High Clarity Sound 35 38 I iPod iPhone 32 IP address 40 J JPEG 46 L LAN 18 Language Audio 37 Code list 47 Menu 38 On Screen 38 Soundtrack 34 Subtitle 34 38 Local storage 49 LPCM 49 M Menu Playback 34 Pop up 25 Setup 37 MPEG2 46 MP3 46 Mute the sound 8 O On Screen Language 38 Status Message 25 P Picture ...

Reviews: