Panasonic SAXR58 - DIGITAL A/V RECEIVER Operating Instructions Manual Download Page 35

ENGLISH

RQTV0156

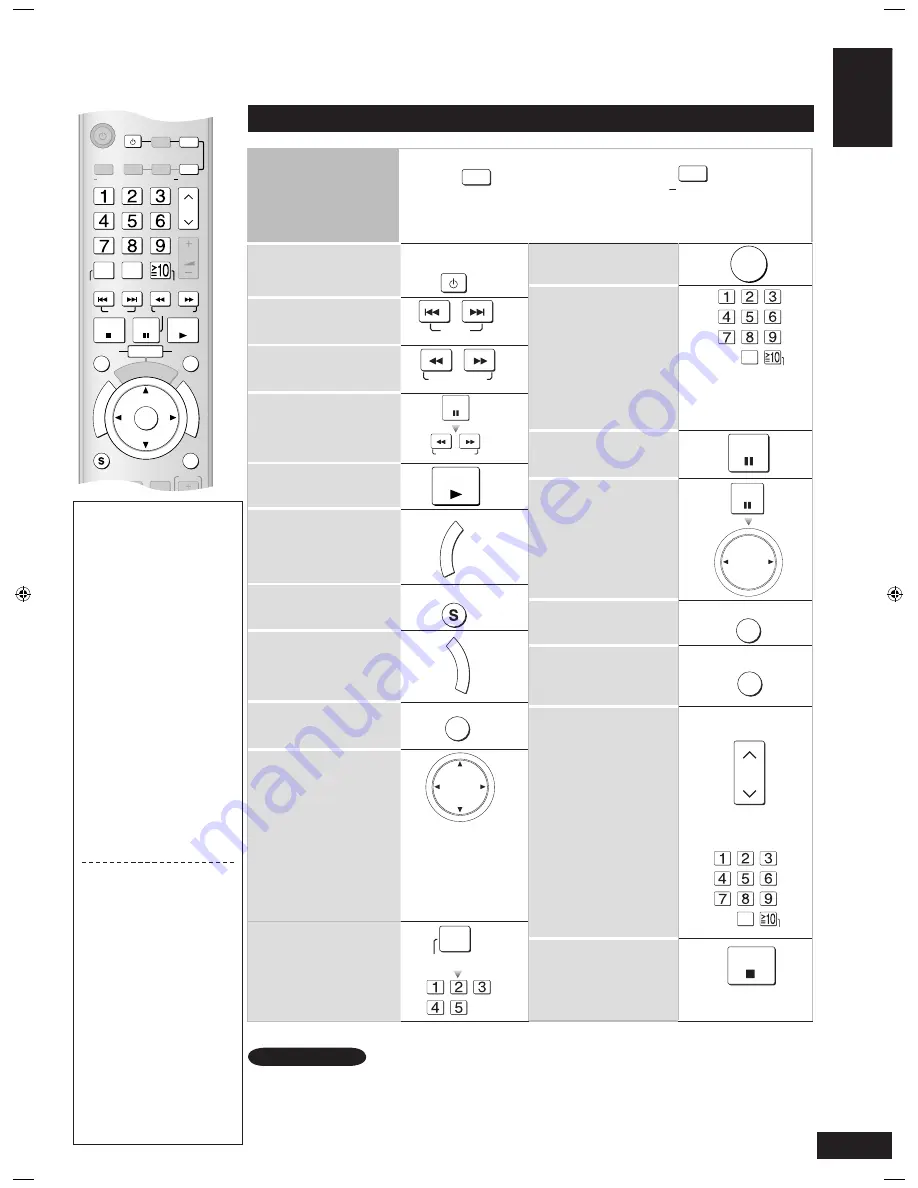
To switch the unit’s input 
to 

“DVR”

 or 

“DVD”

/To 

switch the remote control 
to the DVD recorder or 
DVD player operation 
mode


Do this before trying to operate the  
DVD recorder.

To confirm selection of 
an item

For selecting tracks and 
chapters directly


You may have to then 
press [ENTER] on some 
models.

To pause

Frame-by-frame

To skip ahead 30 seconds 
(For DVD recorder only)

To switch the DVD 
recorder’s drive (HDD, 
disc, and SD) (For DVD 
recorder only)
Select the channel (For 
DVD recorder only)

To change channels 
sequentially


To select a channel 
directly

To stop play

DVD recorder/DVD player

To switch the DVD 
recorder/DVD player on 
or off

To skip a track or chapter 

To search through the 
disc 

Slow-motion

To start play

To show the direct 
navigator or top menu

To show sub menus

To show the FUNCTIONS 
window (while stopped)

To return to the previous 
screen

To navigate through 
menus


Use these buttons 
to select items after 
pressing [DIRECT 
NAVIGATOR, 
TOP MENU], [S, 
SUB MENU], or 
[FUNCTIONS].

To specify a disc (5-disc 
changer only) (For DVD 
player only)

AV

SYSTEM

SKIP

SLOW/SEARCH

PAUSE

SLOW/SEARCH

PLAY

D

IR

EC

T

N

AV

IG

AT

O

R

T

O

P

M

E

N

U

SUB MENU

FU

N

C

T

IO

N

S

RETURN

DVD

PLAYER

ANALOG 6CH

ENTER

0

-/--

PAUSE

PAUSE

MANUAL SKIP

DRIVE SELECT

CH

0

-/--

STOP

Do this before trying to operate the 
DVD player.

DIRECT TUNING

DISC

Using the remote control with other equipment

ONE T

OUCH PLAY

DIR

EC

TN

AV

IGA

TO

R

TO

P

M

EN

U

FU

NC

TIO

NS

0

RECEIVER

AV

SYSTEM

TV

RECORDER

DVD

DVD

PLAYER

ANALOG 6CH

VCR

CD

TUNER

BAND

CH

VOLUME

DIRECT TUNING

SKIP

SLOW/SEARCH

STOP

PAUSE

PLAY

DRIVE SELECT

DVD RECORDER

MANUAL SKIP

ENTER

SUB MENU

RETURN

OFF

SUBWOOFER

TEST

TV

LEVEL

EFFECT VOL

NEO : 6

SFC

MUSIC

MOVIE

DIMMER

MUTING

TV/AV

DISC

-/--

AUTO

RECORDER

DVD

Before using this remote 
control with a Panasonic DVD 
recorder

You may need to change the 

code

 in the remote control to 

match the remote control 

mode


of the DVD recorder.

Preparation

: Check the remote 

control mode of your DVD 
recorder. Read its operating 
instructions for details.

Press [DVD 

RECORDER].

While pressing [ENTER], 

press and hold [1], 

[2], or [3] for about 2 

seconds.

The remote control code 

switches to 1, 2, or 3, 

depending on which 

numbered button you 

pressed.

The factory setting is 

“1”

.

If you are unable to switch the 
drives on the DVD recorder

The DVD recorder is not 
responding to the signal from 
the remote control.
Do the following to change the 
signal, then try switching drives 
again.

Press [DVD 

RECORDER].

While pressing [ENTER], 

press and hold [8] for 

about 2 seconds.

To restore the original 

signal:

In step 2, while pressing 

[ENTER], press and hold [9] 

for about 2 seconds.

1.

2.

1.

2.

[FUNCTIONS] activates display functions on some of the Panasonic DVD players.

35

Point the remote control at the equipment you want to operate.

Note

Using the remote control with other equipment

SA-XR58.indb   35

6/27/2006   6:55:42 PM

Summary of Contents for SAXR58 - DIGITAL A/V RECEIVER

Page 1: ...tions AV Control Receiver Model No SA XR58 Dear customer Thank you for purchasing this product Before connecting operating or adjusting this product please read the instructions completely Please keep this manual for future reference ...

Page 2: ...g life by disconnecting the unit from the power source if it is not to be used for a long time CAUTION Do not place anything on top of this unit or block the heat radiation vents in any way In particular do not place DVD recorder or CD DVD players on this unit as heat radiated from it can damage your software Manufactured under license from Dolby Laboratories Dolby Pro Logic and the double D symbo...

Page 3: ...ns 30 Sound effects Adjusting the bass Adjusting the treble Adjusting front speaker balance Adjusting the subwoofer level 31 Other functions Selecting audio channels Adjusting the dimness of the display Sleep timer Muting 31 The radio 32 Manual tuning 32 Preset tuning 33 Presetting stations Selecting channels 33 RDS broadcasts 34 Changing the display 34 Using the remote control with other equipmen...

Page 4: ... PCM cm DTS96 24DTS ES DIGITAL EX EX RDS M DIGITAL INPUT kHz MHz AUTO SPEAKER SETUP ADVANCED DUAL AMP BI AMP SPEAKERS A B AUTO DETECTOR SURROUND AUX SETUP MIC MENU SETUP RETURN INPUT SELECTOR ENTER VOLUME HDMI TUNE SVIDEO IN VIDEO IN L AUDIO IN R 1 2 3 4 5 6 7 8 9 10 11 12 13 15 16 17 18 19 20 21 22 23 Standby on switch 8 Press to switch the unit from on to standby mode or vice versa In standby mo...

Page 5: ...gital signal Some DVD equipment e g with HDMI Ver 1 0 cannot output multi channel audio as a digital signal Use the 6 channel discrete connection pages 8 and 20 if this is the case The HDMI indicator lights when you are using this connection To play audio from the television through speakers connected to this unit page 9 Rear panel DVD equipment TV HDMI DVD HDMI If you decide to connect a DVD play...

Page 6: ...video components without an HDMI Connection cable Check the connections on your equipment and prepare the necessary cables Your equipment will have more than one way of connecting video so decide which best suits your needs To play audio from the television through speakers connected to this unit page 9 Digital input settings You can change the input settings for the digital terminals if necessary...

Page 7: ... TV STB OUT SUBWOOFER L R FRONT A FRONT B L R CENTER SURROUND L R SURROUND BACK L R TV MONITOR OUT DVD RECORDER IN COMPONENT VIDEO TV STB IN LOOP EXT LOOP EXT LOOP EXT AM ANT FM ANT LOOP ANT GND SPEAKERS 7 Turn off all components before making any connections Peripheral equipment and cables sold separately unless otherwise indicated To connect equipment refer to the appropriate operating instructi...

Page 8: ...IN DVD PLAYER IN DVDRECORDER IN TV STB OUT VIDEO TV MONITOR DVD PLAYER IN IN DVDRECORDER IN VCR IN TV STB L R IN CD CENTER SUBWOOFER SURROUND FRONT DVD DVD 6CH IN AUDIO IN DVDRECORDER IN VCR IN TV STB OUT SUBWOOFER L R FRONT A FRONT B L R CENTER SURROUND L R SURROUND BACK L R TV MONITOR OUT DVD RECORDER IN COMPONENT VIDEO TV STB IN SPEAKERS LOOP EXT LOOP EXT LOOP EXT AM ANT FM ANT LOOP ANT GND 8 H...

Page 9: ... SURROUND BACK L R TV MONITOR OUT DVD RECORDER IN COMPONENT VIDEO TV STB IN SPEAKERS LOOP EXT LOOP EXT LOOP EXT AM ANT FM ANT LOOP ANT GND 9 Playing audio from your television through speakers connected to this unit Turn off all components before making any connections Peripheral equipment and cables sold separately unless otherwise indicated To connect equipment refer to the appropriate operating...

Page 10: ...OR DVD PLAYER IN IN DVDRECORDER IN VCR IN TV STB L R IN CD CENTER SUBWOOFER SURROUND FRONT DVD DVD 6CH IN AUDIO IN DVDRECORDER IN VCR IN TV STB OUT SUBWOOFER L R FRONT A FRONT B L R CENTER SURROUND L R SURROUND BACK L R TV MONITOR OUT DVD RECORDER IN COMPONENT VIDEO TV STB IN LOOP EXT LOOP EXT LOOP EXT AM ANT FM ANT LOOP ANT GND SPEAKERS Y PB PR Connecting other equipment Connecting a set top box ...

Page 11: ...the speakers Reduce the volume and connect the headphones Plug type 6 3 mm stereo in diameter Adjust the volume 1 2 3 Avoid listening for prolonged periods of time to prevent hearing damage Turning the speakers off automatically engages stereo play and when you play multi channel sources they are down mixed 2CH MIX Some DVD Audio prohibit down mixing Note that if you are using DVD 6CH input page 2...

Page 12: ... Surround EX Use Dolby Pro LogicΙΙx DTS NEO 6 or SFC to enhance 2 channel or 5 1 channel sources 6 This is the best setup for playing 6 1 channel sources DTS ES and Dolby Digital Surround EX Use Dolby Pro LogicΙΙx DTS NEO 6 or SFC to enhance 2 channel or 5 1 channel sources Use this setup when you do not have a center speaker The center channel is split between the front speakers 5 This is the bes...

Page 13: ...eaker impedance Front A 6 to 16 Ω Center 6 to 16 Ω Surround 6 to 16 Ω Surround back 6 to 16 Ω Rear panel After changing your speaker set up Perform auto speaker setup pages 14 to 16 or automatic speaker detection page 17 or for manual settings page 27 Note Connecting biwireable speakers Biwireable speakers have separate terminals for the high frequency and low frequency signals Use this connection...

Page 14: ...ge 17 However for a more optimized listening environment carry out the setup here Checks which speakers you have connected The factory setting is 7 speakers and a subwoofer Some types of speakers and cables may cause disruptions to the setup In this case conduct manual setting Speaker and size settings page 27 DISTANCE Checks the distance of each speaker from the listening position and adjusts the...

Page 15: ... A V I G A T O R T O P M E N U F U N C T I O N S 0 DVD PLAYER ANALOG6CH VCR CD TUNER BAND CH VOLUME DIRECTTUNING SKIP SLOW SEARCH STOP PAUSE PLAY DRIVE SELECT DVDRECORDER MANUAL SKIP ENTER SUB MENU RETURN OFF SUBWOOFER TEST TV LEVEL EFFECT VOL NEO 6 SFC MUSIC MOVIE DIMMER MUTING TV AV DISC AUTO AUTO SPEAKER SETUP ADVANCED DUAL AMP BI AMP SPEAKERS A B AUTO DETECTOR SURROUND AUX SETUP MIC TUNE SVIDE...

Page 16: ...ECT LS RS SPEAKERS Surround speakers not detected You must have surround speakers connected before you can connect and use surround back speakers effectively 13 CHECK CONNECTIONS TO LS RS SPEAKERS One or both surround speakers not detected Check the connections 13 CHECK CONNECTIONS TO L R SPEAKERS Check the front L and R connections 13 LOW SIGNAL Change the position height and direction of the mic...

Page 17: ... speaker you are adjusting in steps 4 and 5 Test signal for connected speakers resumes after 2 seconds 4 5 Press to stop the test signal 6 Speaker abbreviations L Front left C Center R Front right RS Surround right LS Surround left SBR Surround back right SBL Surround back left SB Surround back If you connect one surround back speaker SUBW Subwoofer SPEAKERS A are on SPEAKERS A and B are on SPEAKE...

Page 18: ...uttons on the remote control pages 34 to 36 If you have a combination DVD recorder VCR page 9 Select DVR to watch DVDs Select VCR to watch video tapes Start playing the source If you would prefer to listen in stereo press SURROUND to turn the indicator off To return to surround sound press SURROUND to turn the indicator on Adjust the volume Volume range dB minimum 79 dB to 0 dB maximum The unit st...

Page 19: ...umber of channels recorded in the original source For example if it is a 5 1 channel source there will be no output from the surround back speakers The SURROUND mode turns off when input is 192 kHz PCM Whenever you switch to a different source the following display appears to show you the number of channels It may not appear with some sources Subwoofer Surround and surround back channels Front and...

Page 20: ...can turn this function off page 29 BI AMP The bi amp activates if you have bi wired your front speakers and play analogue or stereo PCM sources The amplifiers for the front and surround speakers separately run the low frequency and high frequency You can use this feature in combination with the Advanced Dual Amp above for an even clearer and purer stereo sound Preparation Bi wire your front speake...

Page 21: ...h your television off then on again and check that images from DIGA appear correctly Do this whenever you change connections or settings TV VIERA Preparation Rear panel DVD recorder DIGA TV HDMI AV IN DIGITAL AUDIO OUT OPTICAL DVD HDMI AV OUT One touch Home Theater Point the remote control at your DIGA DVD recorder and press ONE TOUCH PLAY If you switch your VIERA off this unit also switches off u...

Page 22: ...ss you have connected both surround speakers and surround back speakers pages 13 and 14 to 17 Make sure you have also set these speakers as present in Speaker and size settings page 27 To cancel press OFF Adjusting the Dolby Pro LogicΙΙx MUSIC mode You can make the following adjustments in stereo sources Dimension Control You can make up for differences in the output level of the front and surroun...

Page 23: ...H VOLUME DIRECTTUNING SKIP SLOW SEARCH STOP PAUSE PLAY DRIVE SELECT DVDRECORDER MANUAL SKIP ENTER SUB MENU RETURN OFF SUBWOOFER TV LEVEL EFFECT VOL NEO 6 SFC MUSIC MOVIE MUTING TV AV DISC TEST DIMMER AUTO NEO 6 OFF Adjusting the NEO 6 MUSIC mode Center Image Control This is an overall adjustment for the front and center speakers to achieve a more natural sound Press to select C IMAGE then press to...

Page 24: ...Adds reverberation and depth that makes you feel like you were in a concert hall Pop rock Suitable for pop and rock Vocal For adding gloss to vocals Jazz Adds the reverberations you would experience in an intimate jazz club Dance Adds the echoes and feeling of space you would experience in a dance hall Party This mode uses all available speakers so that sound is in stereo regardless of the directi...

Page 25: ... speaker unless you have also connected a surround back speaker the left surround back speaker There may be some distortion with some input sources and modes Reduce the effect level above or choose another mode Note Adjusting SFC Sound Field Control Adjusting the output level Press to select the speaker you want to adjust then press to adjust the level C center RS surround right SBR surround back ...

Page 26: ...to select EXIT To return to the previous display To cancel Press to confirm Turn to select a sub item Press to confirm Press MENU SETUP RETURN INPUT SELECTOR ENTER 2a INPUT SELECTOR INPUT SELECTOR ENTER MENU SETUP RETURN ENTER ENTER MENU SETUP RETURN AUTO SPEAKER SETUP ADVANCED DUAL AMP BI AMP SPEAKERS A B AUTO DETECTOR SURROUND AUX SETUP MIC MENU SETUP RETURN INPUT SELECTOR ENTER VOLUME HDMI TUNE...

Page 27: ...layed through the subwoofer SUBW Subwoofer LR Front speakers C Center speaker S Surround speakers SB Surround back speakers SUBW Subwoofer NO Unconnected YES Connected factory setting LR Front C Center S Surround NONE Speakers not connected center or surround SMALL Speakers that cannot adequately reproduce the bass range sufficient for most speakers when using a subwoofer factory setting LARGE Spe...

Page 28: ...not process other signals Choose another mode if PCM FIX causes noise TV Television DVR DVD recorder DVD DVD player CD CD player AUTO The unit automatically detects whether input is digital or analogue HDMI takes priority when input is digital ANALOG Analogue input fixed DIG Digital input fixed PCMFIX PCM from CDs digital input fixed Factory setting TV DVR DVD CD AUTO DIGITAL INPUT lights after fi...

Page 29: ... channels remain intact YES Reset all settings to those made in the factory NO Cancel Specify the DVD equipment you have connected to the HDMI terminal To reduce standby power consumption Choice for turning off the HDAVI Control page 21 Select and confirm Select and confirm Select the equipment and confirm DVR You have connected a DVD recorder factory setting DVD You have connected a DVD player St...

Page 30: ...the setting Press to confirm Exit the menu Press repeatedly until EXIT appears Press to confirm The previous display reappears You can also turn INPUT SELECTOR to select EXIT To return to the previous display To cancel Press to confirm Press MENU SETUP RETURN INPUT SELECTOR ENTER INPUT SELECTOR ENTER MENU SETUP RETURN ENTER MENU SETUP RETURN ONE TOUCH PLAY D I R E C T N A V I G A T O R T O P M E N...

Page 31: ...play when the unit is receiving a signal with dual audio channels 2 3 Select and confirm Adjust and confirm Use the bar as a guide L Front left R Front right You cannot adjust the balance when the PARTY SFC mode is on page 24 Adjusting front speaker balance 2 3 Adjust the subwoofer level while listening to a source for a more or lesser bass Press to select a level Factory setting SUBW 20 There is ...

Page 32: ... not press a button while the cursor is flashing the display returns to the frequency being received If the frequency has not been input correctly ERROR will be displayed On the main unit Select TUNER FM or TUNER AM Turn Tune to the station Press Automatic tuning Press and hold TUNE 2 or 1 until the frequency starts scrolling to start automatic tuning Tuning stops when a station is found or when t...

Page 33: ...o the station page 32 2 Enter the menu Press 3 Select TUNER and confirm 4 Select MEMORY and confirm 5 Select a channel number and press ENTER STORED is displayed 6 Press MENU SETUP RETURN twice to select EXIT and press ENTER To preset other channels repeat from step 1 Even if the AC mains lead is disconnected from the household mains socket the stations remain in the memory for approximately two w...

Page 34: ...umentary TEST Test broadcast ALARM Emergency announcement Changing the display This unit can display the text data transmitted by the radio data system RDS available in some areas lights while RDS signals are being received RDS displays may not be available if reception is poor 1 Press MENU SETUP RETURN to enter the menu 2 Select TUNER and confirm 3 Select RDS DISP and confirm 4 Select the display...

Page 35: ... DIRECTTUNING DISC Using the remote control with other equipment ONE TOUCH PLAY D I R E C T N A V I G A T O R T O P M E N U F U N C T I O N S 0 RECEIVER AV SYSTEM TV RECORDER DVD DVD PLAYER ANALOG6CH VCR CD TUNER BAND CH VOLUME DIRECTTUNING SKIP SLOW SEARCH STOP PAUSE PLAY DRIVE SELECT DVDRECORDER MANUAL SKIP ENTER SUB MENU RETURN OFF SUBWOOFER TEST TV LEVEL EFFECT VOL NEO 6 SFC MUSIC MOVIE DIMMER...

Page 36: ... or off To start play Fast forward rewind To pause Select the channel To change channels sequentially To select a channel directly To stop play VCR AV SYSTEM PLAY SLOW SEARCH PAUSE CH 0 STOP To switch the unit s input to CD To switch the remote control to the CD player operation mode Do this before trying to operate the CD player To switch the CD player on or off To start play To skip a track To s...

Page 37: ...R ANALOG6CH Press and hold the button corresponding to the equipment 0 0 Enter the first digit Enter the second digit The remote control outputs the on off signal If the code is correct the equipment turns on or off If it doesn t try entering another code INNO HIT 34 ITT 08 10 11 37 ITT NOKIA 05 07 37 18 27 37 JVC 18 20 21 09 KENDO 40 08 09 37 KENWOOD 15 LOEWE 14 33 03 32 LOEWE OPTA 32 LUXOR 37 08...

Page 38: ...ced AM TUNER SECTION Frequency range 522 kHz to 1611 kHz 9 kHz steps 530 kHz to 1620 kHz 10 kHz steps Sensitivity 20 µV 330 µV m Selectivity at 999 kHz 55 dB IF rejection at 999 kHz 50 dB VIDEO SECTION Output voltage at 1 V input unbalanced 1 0 1 Vp p Maximum input voltage 1 5 Vp p Input output impedance 75 Ω unbalanced S Video Input DVD DVD Recorder TV STB Output TV MONITOR Component Video Input ...

Page 39: ... You cannot use the SURROUND effect when the input source contains PCM signals with sampling frequencies of 192 kHz Cancel DVD analogue 6 channel playback You cannot use the effect when the input source contains dual audio signals in Dolby Digital or DTS formats 13 18 20 There is no DTS audio output There is audio output but the DTS decoder indicator is not lit Set the DTS Digital Audio Output set...

Page 40: ...OSSA ILMASTOSSA Laite tulee asettaa lähelle verkkopistorasiaa ja pistokkeen täytyy olla sellaisessa asennossa että siihen on helppo tarttua ongelman sattuessa Information on Disposal for Users of Waste Electrical Electronic Equipment private households This symbol on the products and or accompanying documents means that used electrical and electronic products should not be mixed with general house...

Reviews: