background image

41

RQT8655

Using other useful functions

Preparation

Press [THEATER] to switch the remote control to operate this unit.

Audio output from this unit becomes 2-channel only. Multi-channel 
audio is down-mixed (

page 49).

w

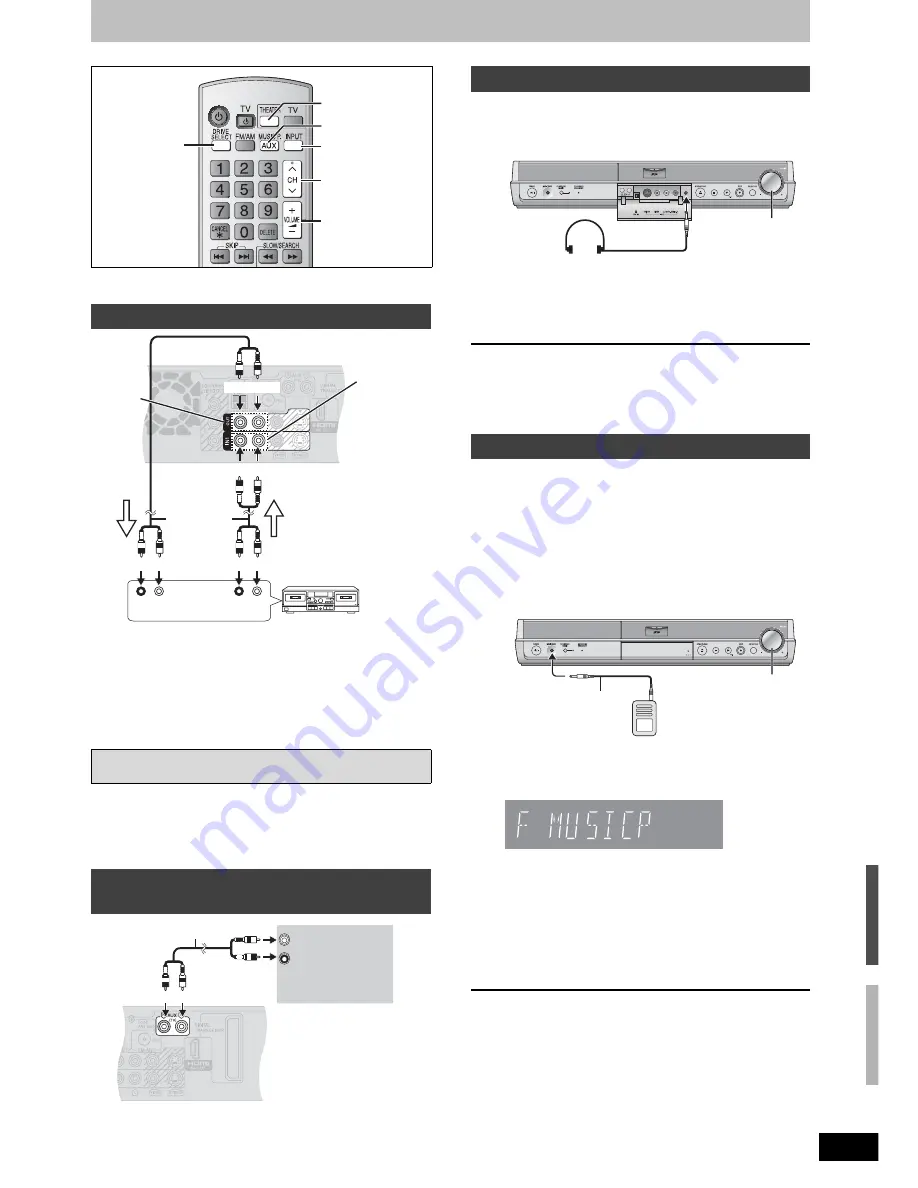
Recording audio from discs or television 
broadcasts to a tape deck

1 Discs: Press [DRIVE SELECT] to select the DVD drive as the source.

Television broadcasts: Press [

9 :

 CH] to select the channel.

2 Start recording and play.

Refer to the manual of the other unit for details.

w

To playback audio from a tape deck, etc., 
through this unit’s speakers

1 Press [DRIVE SELECT] to select the DVD drive as the source.
2 Press [INPUT] to select “IN1” or “IN2”.
3 Start play.

1 Press [AUX] to select “AUX” as the source.
2 Turn on the television and select the channel.
3 Adjust the volume on this unit.

p

Set TV volume minimum.

1

Reduce the volume and connect the 
headphones (not included).

Headphone plug type: 

3.5 mm (1/8

) stereo mini plug

2

Adjust headphone volume with 
[

A B

VOLUME].

Audio output becomes 2-channel only. Multi-channel audio is 
down-mixed (

page 49).

]Note]

p

When headphones are connected, “Equalizer (EQ)” and “Surround 

Music” can be used to change the sound quality (

 page 35). 

p

Avoid listening for prolonged periods of time to prevent hearing 

damage.

The Music Port allows you to connect and enjoy music from an 
external device (e.g. MP3 player) through your home theater system.

Preparation

To avoid distorted sound, make sure that any equalizer function of 
your external device is turned off.

1

Reduce the volume and connect the 
external device (not included).

Plug type: 

3.5 mm (1/8

) stereo mini plug

2

Press [MUSIC P.] to select “F MUSICP”.

F MUSICP

R MUSICP*

AUX

$

* Select “R MUSICP” if the optional Panasonic wireless 

accessory (e.g. SH-FX60) is set up with your home theater 
system. For details, please refer to its operating instructions.

3

Adjust the external device volume to a 
normal listening level, and then adjust 
the volume of the main unit with 
[

A B

VOLUME].

]Note]

p

When “R MUSICP” is selected, “Equalizer (EQ)” and “H. Bass” can 

be set to change the sound quality. (

 page 35)

p

If the audio is distorted, turn the volume down on the connected 

external device. 

Connecting other audio equipment

FM/AM broadcasts and audio from the AUX terminals, “F MUSICP” 
or “R MUSICP” are not output through the AUDIO OUT terminals.

Enjoying TV broadcast with this unit’s 
speakers

INPUT

9:

CH

MUSIC P., AUX

DRIVE SELECT

A B

VOLUME

THEATER

R       L

PLAY OUT

R       L

REC IN

Red White

Red White

Red White

Red White

Tape deck

Audio cable

(not included)

For play

For
recording

OUT

IN1

You can also 
connect to the 
IN2 input 
terminals on 
the front.

Back of the main unit

AUDIO OUT
L

R

Television

Audio cable 

(not included)

Red White

Red

White

Back of the main unit

Using headphones

Using the Music Port

A B

VOLUME

A B

VOLUME

External device

Reduce the volume before 
connecting.

Audio cable

(not included)

C

han

gi

ng 

the u

n

it

’s se

tt

in

gs /

 Usi

n

g

 ot

h

e

r u

sef

ul

 f

u

nct

ions

Summary of Contents for SART50 - HOME THEATER

Page 1: ...oduct please read the instructions completely Please keep this manual for future reference Region number supported by this unit Region numbers are allocated to DVD players and software according to where they are sold pThe region number of this unit is 1 pThe unit will play DVDs marked with labels containing 1 or ALL Example 1 ALL 2 4 1 If you have any questions contact 1 800 211 PANA 7262 The war...

Page 2: ... of the building as close to the point of cable entry as practical The lightning flash with arrowhead symbol within an equilateral triangle is intended to alert the user to the presence of uninsulated dangerous voltage within the product s enclosure that may be of suffi cient magnitude to constitute a risk of electric shock to persons CAUTION CAUTION TO REDUCE THE RISK OF ELECTRIC SHOCK DO NOT REM...

Page 3: ...abling discs to be played on other equipment Finalize 33 Creating Top Menu Create DVD Top Menu 33 Enabling the second layer on DL dual or double layer on single side discs to be recordable Close First Layer 33 The radio 34 Manual tuning 34 Preset tuning 34 Sound effect 35 Changing the sound quality 35 Dolby Digital and DTS 36 Muting the sound 36 Adjusting the subwoofer level 36 Speaker level adjus...

Page 4: ...C940 Surround speakers SB FS941 Subwoofer SB W940 The remote control information w Batteries pInsert so the poles and match those in the remote control pDo not use rechargeable type batteries pDo not mix old and new batteries pDo not use different types at the same time pDo not heat or expose to flame pDo not take apart or short circuit pDo not attempt to recharge alkaline or manganese batteries p...

Page 5: ...ignals to 2 channels page 36 Channel select page 12 Main unit Disc tray page 12 Channel select page 12 SD card slot page 8 Connector for headphones page 41 Turn up down the volume Connector for an external device page 41 Equalizing the sound page 35 Connector for external equipment page 30 Stop page 12 17 Open close disc tray page 12 Start play page 16 Start recording page 12 Specify the time to s...

Page 6: ...f dual or double layer discs after closing the first layer page 33 You will no longer be able to record to the first layer after you do this page 10 When playing a title recorded on both layers video and audio may momentarily cut out when the unit is switching layers 2 You may not be able to use R recorded on this unit in another Panasonic DVD recorder and vice versa Once the disc is finalized how...

Page 7: ...folder name or file name has been input using other equipment the name may not be displayed properly or you may not be able to play or edit the data Play only discs Disc type DVD Video DVD Audio DVD RW VR format CD Video CD Indication in these instructions DVD V DVD A RW VR CD VCD Logo Instructions High quality movie and music discs High fidelity music discs DVD RW recorded on another DVD Recorder...

Page 8: ...nlight In very dusty or humid areas Near a heater Locations susceptible to significant differences in temperature condensation can occur Where static electricity or electromagnetic waves occur pTo protect discs from scratches and dirt return them to their cases or cartridges when you are not using them The precision parts in this unit are readily affected by the environment especially temperature ...

Page 9: ...ion speakers pThe sound of this unit becomes 0 pAudio output becomes 2 channel only Multi channel audio is down mixed page 49 Note pThe display may be blank for several seconds if you switch the speakers while viewing pIf you switch to this unit s speakers while the unit is currently off the power to this unit will automatically turn on See Power on link below pIf the unit is turned off speakers a...

Page 10: ...cessary to finalize DVD R etc on this unit after recording or copying titles to them You can then play them as a commercially sold DVD Video However the discs become play only and you can no longer record or copy You can record and copy again if you format DVD RW RW To enable play on other DVD equipment please use Create DVD Top Menu in DVD Management menu page 33 Recording to a DVD R DL and R DL ...

Page 11: ...sing FR mode is convenient in these kinds of situations pWhen the amount of free space on the disc makes selecting an appropriate recording mode difficult pWhen you want to record a long program with the best picture quality possible e g Recording a 90 minutes program to disc If you select XP mode The program will not fit one disc If you select SP mode The program will fit one disc If you select F...

Page 12: ...isplay Recording will take place on free space on disc Data will not be overwritten pYou can adjust the volume using A B VOLUME Adjusting the volume will not affect the recorded audio pYou cannot change the channel or recording mode during recording You can change the channel or recording mode while paused however the recording will then be as a separate title pYou can record while the unit is in ...

Page 13: ...o stop play Press w To stop recording 2 seconds after play stops Press w To stop scheduled recording Press w to stop playing After 2 seconds press w Press to select Stop recording and press ENTER 1 Press DIRECT NAVIGATOR during recording 2 Press to select a title and press ENTER To stop play Press w To exit Direct Navigator screen Press DIRECT NAVIGATOR To stop recording Press w to stop playing Pr...

Page 14: ...ndby has been activated pRepeat steps 2 4 to schedule other recordings Note When the disc is removed scheduled recording standby is cancelled the indicator goes out You can put the unit back on standby by inserting a recordable disc the lights on again w To return to the previous screen Press RETURN w To exit the screen Press SCHEDULE w When recording the channel not set on this unit from cable bo...

Page 15: ...d recording you can change the end time as long as the recording mode is not FR w To delete a program Press to select the program and press CANCEL _ or ADD DLT w To cancel recording that has already begun Press to select program and press SUB MENU then press ENTER w To exit the schedule list Press SCHEDULE pPrograms that failed to record are displayed gray and cannot be changed They are automatica...

Page 16: ...ew screen 5 Press to select the title and press ENTER You can also select titles with the numbered buttons e g 5 0 5 15 1 5 To show other pages Press to select Previous or Next and press ENTER pYou can also press to show other pages 6 Adjust the volume with A B VOLUME To exit the screen Press DIRECT NAVIGATOR To change the sound quality page 35 Direct Navigator screen icons Title protected Title t...

Page 17: ...rn to normal speed Slow motion RAM R R DL RW V R R DL RW DVD V DVD A Motion picture parts only RW VR VCD While paused press or pThe speed increases up to 5 steps pPress PLAY to restart play p VCD Forward direction only pThe unit will pause if slow motion play is continued for approximately 5 minutes excluding DVD V DVD A VCD Frame by frame RAM R R DL RW V R R DL RW DVD V DVD A Motion picture parts...

Page 18: ...displayed when you insert a disc containing MP3 files and still pictures JPEG TIFF w To select Pictures Menu 1 Press RETURN 2 Press FUNCTIONS 3 Press to select Menu and press ENTER 4 Press to select Pictures and press ENTER You can proceed to step 3 right If you switch to MP3 menu again Select MP3 Music in step 4 SD While stopped and SD card has been inserted SD Card Operations screen right is aut...

Page 19: ...rmat JPEG TIFF non compressed RGB chunky format Files must have the extension jpg JPG tif and TIF pNumber of pixels between 34 x 34 and 6144 x 4096 pixels Sub sampling is 4 2 2 or 4 2 0 pThis unit can handle a maximum of 3000 files and 300 folders including higher folders pOperation may take time to complete when playing TIFF format still pictures or when there are many files and or folders some f...

Page 20: ... be displayed correctly pThe display order on this unit may differ from how the order is displayed on a computer pDepending on how you create the disc writing software files tracks and folders groups may not play in the order you numbered them pThis unit is not compatible with packet writing format pDepending on the recording some items may not be playable pThis unit is not compatible with ID3 tag...

Page 21: ... video artifacts pFine Details are sharper pCinema Mellows movies enhances detail in dark scenes DNR RAM R R DL RW V R R DL RW DVD V DVD A RW VR VCD Reduces mosaic like distortion and picture degradation On Off Progressive Only when you have selected 480p in TV Type Setup Guide page 14 Select On to enable progressive output pSelect Off if the picture is stretched horizontally pWhen progressive out...

Page 22: ...e editing above 5 Press SUB MENU then press to select the operation and press ENTER pYou can go back to Title View To return to the previous screen Press RETURN To exit the screen Press DIRECT NAVIGATOR Title Chapter Programs are recorded as a single title consisting of one chapter RAM You can divide a title into multiple chapters Each section between the division points becomes a chapter page 17 ...

Page 23: ...m the division point Press to select Preview and press ENTER The unit plays 10 seconds before and after the division point To change the division point Restart play and press to select Divide then press ENTER at the point you want to divide Note pThe divided titles retain the name and CPRM property page 49 of the original title pVideo and audio just before and after the dividing point may momentar...

Page 24: ...dd other chapters 8 Press RETURN All the selected scenes become the playlist To return to the previous screen Press RETURN To exit the screen Press RETURN several times You can arrange the chapters page 22 to create a playlist pEditing playlists doesn t modify the recorded data Playlists are not recorded separately so this doesn t use much capacity pYou cannot create or edit a playlist while recor...

Page 25: ... Playlist Refer to Playlist operations right No 0 9 08 10 30 Mon 0 30 Page 01 01 Previous Next ENTER 001 002 S SUB MENU Select PLAYLISTS DVD RAM Chapter View 0 00 15 0 00 24 Move Chapter Create Chapter Combine Chapters Delete Chapter View Playlists Add Chapter Refer to Chapter operations right Playlist operations Delete Playlist RAM Press to select Delete and press ENTER Once deleted the playlists...

Page 26: ...IGATOR To return to the previous screen Press RETURN w To select the higher folder While the Album View screen is displayed Only if there is a multiple number of higher folders recognizable Press SUB MENU Press to select Select Root folder and press ENTER Press to select the higher folder and press ENTER SRD MUSIC ENTER SUB MENU RETURN DIRECT NAVIGATOR B DRIVE SELECT THEATER To show other pages Pr...

Page 27: ... units will be released pSettings cannot be made for files not in accordance with DCF standards or if there is no remaining space on the card Add Picture Create Album RAM SD Press to select Start or Yes and press ENTER Press to select the album which contains the still picture you want to add and press ENTER Press to select the item and press ENTER wIf Select pictures to copy is selected Press to ...

Page 28: ...ing and press ENTER pFor individual still pictures only When specifying another folder as the copying destination select Folder 5 Press to select Yes and press ENTER to start copying w To cancel all settings 1 Press to select Cancel All and press ENTER 2 Press to select Yes and press ENTER The settings and lists may be cancelled in the following situations When a title or still picture has been re...

Page 29: ...ture and press ENTER To select another folder below Press to confirm Press to select Picture Folder and press ENTER Press to select Folder and press ENTER Press to select New Entry and press ENTER Press to select the folder and press ENTER To switch to the higher folder below Press to confirm Source DVD Destination SD card DVD SD card Copy Cancel All Destination Capacity 3757MB Mode Picture High S...

Page 30: ... DV IN terminal on this unit is for use with DV equipment only It cannot be connected to a computer etc pThe DV equipment name may not be shown correctly pDepending on the DV equipment the images or audio may not be input properly pThe date and time information on the tape in the DV equipment will not be recorded pYou cannot record and play simultaneously RAM R R DL RW V R R DL RW Note When record...

Page 31: ...er finalization page 33 When entering a title name the name that will appear in the Top Menu can be previewed in Top Menu Preview Finalized Disc window Delete Navigator Refer to the control reference on page 30 RAM R R DL RW V R R DL RW SD You cannot delete items on finalized discs pA title or a still picture cannot be restored once it is deleted Make certain before proceeding pYou cannot delete w...

Page 32: ...so being deleted pStill picture data JPEG TIFF or computer data cannot be deleted pDelete does not work if one or more titles are protected RAM RW V RW RW VR SD R R DL New disc only After performing steps 1 3 left 4 Press to select Format Disc DVD or Format memory card and press ENTER 5 Press to select Yes and press ENTER 6 Press to select Start and press ENTER A message appears when formatting is...

Page 33: ... can take a few minutes 7 Press ENTER pRecording or editing on the disc may delete the menu In that case create the menu again R DL R DL DVD R DL and R DL discs have two layers of recording surface on one side This unit does not offer seamless recording on two layers Recording stops when space on the first layer becomes full You must close the first layer to start recording on the second layer Clo...

Page 34: ...equency FM 87 9 MHz or 87 5 MHz AM 520 kHz 3 Press and hold ENTER Release the button when AUTO FM or AUTO AM is lit on the display The tuner presets all the stations it can receive into the channels in ascending order p SET OK is displayed when the stations are set The last station to be set is then played pThe unit of display is MHz for FM radio and kHz for AM radio when the selector is in FM AM ...

Page 35: ...ess L6 to K6 in 2 units pTo check the current setting press SFC EQ pThe set level for BASS and TREBLE remains intact Even after the unit is turned off Center Focus Available with pMulti channel sound Discs where the dialogue is recorded in the center channel You can make the sound of the center speaker seem like it is coming from within the television Press C FOCUS Each time you press the button C...

Page 36: ... the speakers so they are the same apparent level as the front speakers where you would normally be sitting and listening Preparation pPress DRIVE SELECT to select the DVD drive pTurn off the other sound effects pThis cannot be set while Surround Music page 35 is set to ON ERROR is displayed in the display window Please set this once Surround Music is set to OFF You can adjust the balance of the f...

Page 37: ...ons Underlined items are the factory presets Channel Signal Source RF IN Setup Guide page 13 pAntenna pCableTV Set Channels Automatically Setup Guide page 13 L Preset Channel Captions 1 Setup Guide page 14 L Manual Channel Captions 1 Setup Guide page 14 L Setup Off Timer Select how long the unit remains on when it is not being used pThis has no effect when FM AM AUX F MUSICP or R MUSICP is selecte...

Page 38: ...utomatic is selected The picture is coarser pFrame Select if small text or fine patterns cannot be seen clearly when Automatic is selected The picture is clearer and finer Black Level Control Select for adjusting the black level control to the desired setting for picture enhancement pPress ENTER to show the following settings Input Level Adjusts the black level of the input signal pLighter pDarker...

Page 39: ...ff When video is output from COMPONENT VIDEO OUT terminal HDMI Resolution You can only select items compatible with the connected equipment This setting normally does not need to be changed However if you are concerned about output picture quality it may be improved by changing the setting Still pictures play at a resolution equivalent to 480p regardless of the settings pAuto Automatically selects...

Page 40: ...nected 1 Press to select Test and press ENTER A Test signal is output from each speaker in a clockwise motion Signals are also output from the front speakers but they cannot be adjusted Use this when adjusting other speakers for comparison When the test signal is being output press to lengthen the time of the test signal 2 Press to select the desired level for each speaker while test signal is bei...

Page 41: ...ome theater system Preparation To avoid distorted sound make sure that any equalizer function of your external device is turned off 1 Reduce the volume and connect the external device not included Plug type 3 5 mm 1 8 stereo mini plug 2 Press MUSIC P to select F MUSICP F MUSICP R MUSICP AUX Select R MUSICP if the optional Panasonic wireless accessory e g SH FX60 is set up with your home theater sy...

Page 42: ...L or RW Format the disc with this unit 6 32 This disc is not formatted properly pThe operation is prohibited by the unit or disc SET t stands for a number pThe remote control and main unit are using different codes Change the code on the remote control Press and hold ENTER and the indicated number button at the same time for more than 2 seconds 15 Setup Guide HARD ERR HARD and ERR are alternately ...

Page 43: ...of the DVD player play may not be possible To enable play on other DVD players please use Create DVD Top Menu in the DVD Management menu 33 Can I play DVD Video DVD Audio and Video CDs bought in another country pYou can play them if the video standard is NTSC pHowever you cannot play DVD Video if their region number does not include 1 or ALL Cover Can a DVD Video that does not have a region number...

Page 44: ... HDMI Output Display Aspect in the Setup menu to Normal pCheck the settings for TV Type 4 3 TV Settings for DVD Video or 4 3 TV Settings for DVD RAM in the Setup menu 21 39 39 There is a lot of after image when playing video pSet DNR in the Video menu to Off 21 When playing DVD Video using progressive output one part of the picture momentarily appears to be doubled up pSet Progressive in the Video...

Page 45: ...selected you cannot set anything other than Equalizer EQ or H Bass to change the sound quality Also when using headphones you cannot set anything other than Equalizer EQ or Surround Music pIf the audio is distorted when F MUSICP or R MUSICP is selected turn the volume down on the connected external device pWhen audio playback is output through multi channel Sound Field Control SFC cannot be set pT...

Page 46: ...PRM pThe disc is full or nearly full Erase unneeded titles or use another disc pYou cannot record on finalized DVD R DVD R DL DVD RW DVD Video format R R DL or DVD RW VR format discs pDue to peculiarities of DVD R DVD R DL DVD RW DVD Video format R R DL or RW you may be unable to record onto them if you either insert and remove the disc or switch the unit on and off while a disc is loaded a total ...

Page 47: ... is dirty Wipe with a damp cloth and then wipe dry pYou tried formatting a disc that is not compatible with this unit 8 6 7 Cannot create chapters Cannot mark the start point or the end point during Shorten Title operation pThe unit writes the chapter division information to the disc when you turn it off or remove the disc The information is not written if there is an interruption to the power bef...

Page 48: ...stitutes may result in fire electric shock or other hazards 4 Safety check After repairs or service ask the servicer to perform safety checks to confirm that the unit is in proper working condition The servicer will require all components to service your system Therefore should service ever be necessary be sure to bring the entire system For product information or assistance with product operation...

Page 49: ...on your television Each frame consists of two fields pA frame still shows two fields so there may be some blurring but picture quality is generally better pA field still shows less picture information so it may be rougher but there is no blurring HDMI High Definition Multimedia Interface HDMI is a next generation digital interface for consumer electronic products Unlike conventional connections it...

Page 50: ...rence input 309 mVrms FS 2 Vrms 1 kHz 0 dB Input impedance 47 kj Analog Output LINE pin jack C1 Reference output 309 mVrms FS 2 Vrms 1 kHz 0 dB Output impedance 1 kj Load impedance 10 kj Number of channels Recording 2 channels Playback 2 channels HDMI Output 19 pin type A C1 HDMI Ver 1 2a EDID Ver 1 3 SD Card Slot Still Picture JPEG TIFF SD Memory Card Slot 1 pc Compatible media SD Memory Carda1 M...

Page 51: ...MAGES RESULTING FROM THE USE OF THIS PRODUCT OR ARISING OUT OF ANY BREACH OF THIS WARRANTY As examples this excludes damages for lost time travel to and from the servicer loss of media or images data or other memory content The items listed are not exclusive but are for illustration only ALL EXPRESS AND IMPLIED WARRANTIES INCLUDING THE WARRANTY OF MERCHANTABILITY ARE LIMITED TO THE PERIOD OF THE L...

Page 52: ...cture 27 title 23 Quick Start 37 Quick View 17 Radio connection 11 FM frequency step 34 Optional FM antenna connection 34 Ratings 38 Recording DV camcorder recording 30 Flexible Recording 13 from a video cassette recorder 30 mode 11 scheduled 14 Remote control code 15 Repeat play 21 Restore Default Settings 37 Resume play function 17 Scheduled recording 14 SD card 7 8 Setup menu 37 Sound Field Con...

Reviews: