background image

29

R

Q

T

X

0221

G

e

tt

ing S

ta

rte

d

P

lay

in

g

 D

isc

s

Othe

r Op

e

ra

tions

Refer

ence

Select to suit the type of equipment you connected to the HDMI AV OUT 
terminal.
Select “BITSTREAM” when the equipment can decode the bitstream 
(digital form of 5.1-channel data). Otherwise, select “PCM”.
(If the bitstream is output to the equipment without a decoder, high levels 
of noise can be output and may damage your speakers and hearing.)

DOLBY DIGITAL

§

BITSTREAM

PCM

DTS

§

BITSTREAM

PCM

§


When audio is output from HDMI AV OUT terminal, and the connected 
equipment does not support the item selected, the actual output will 
depend on the performance of this connected equipment.

JPEG TIME

Set the speed of the slideshow.
Factory preset: 3 SEC

1 SEC to 15 SEC (in 1-unit steps)

15 SEC to 60 SEC (in 5-unit steps)

60 SEC to 180 SEC (in 30-unit steps)

DEFAULTS

This returns all values in the MAIN menu to the default settings.

RESET
The password screen is shown if “RATINGS” (

B

28) is set. Please enter 

the same password, then turn the unit off and on again.

AUDIO menu

DYNAMIC RANGE

ON:

Adjusts for clarity even when the volume is low. Convenient for 
late night viewing. (Only works with Dolby Digital)

OFF

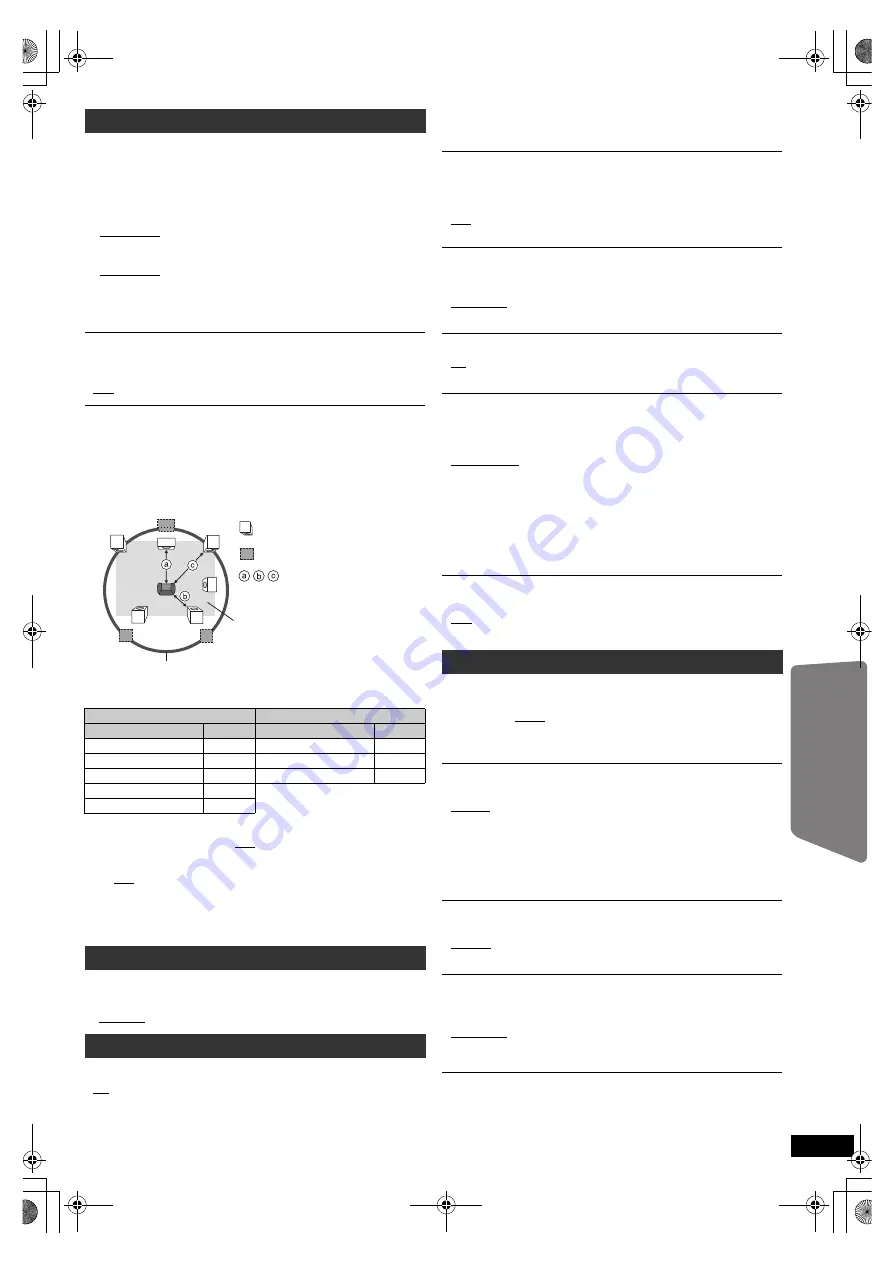
SPEAKER SETTINGS

Select the delay time of the speakers.

(Effective when playing 5.1-channel sound)

(Center and surround speakers only)
For optimum listening with 5.1-channel sound, all the speakers, except for 
the subwoofer, should be the same distance from the seating position.
If you have to place the center or surround speakers closer to the seating 
position, adjust the delay time to make up for the difference.

If either distance 

a

 or 

b

 is less than 

c

, find the difference in the table 

and change to the recommended setting.

a

 Center speaker

b

 Surround speaker

Difference (Approx.)

Setting

Difference (Approx.)

Setting

30 cm (1 foot)

1ms

150 cm (5 feet)

5ms

60 cm (2 feet)

2ms

300 cm (10 feet)

10ms

90 cm (3 feet)

3ms

450 cm (15 feet)

15ms

120 cm (4 feet)

4ms

150 cm (5 feet)

5ms

SETTINGS:

C DELAY (Center Delay): 0ms, 1ms, 2ms, 3ms, 4ms, 5ms
Select the delay time for your center speaker.

LS/RS DELAY (Left Surround/Right Surround Delay): 
0ms, 5ms, 10ms, 15ms
Select the delay time for your surround speakers.

TEST TONE: SETTING
Use the test tone for speaker level adjustments (

B

17, Adjusting 

the speaker output level manually).

DISPLAY menu

LANGUAGE

Choose the language for the on-screen messages.

ENGLISH

FRANÇAIS

ESPAÑOL

HDMI menu

VIDEO PRIORITY

ON:

When using the HDMI AV OUT terminal for video output. The 
resolution of the video output from the HDMI AV OUT terminal is 
optimized according to the capability of the connected 
equipment (e.g. TV).

L

LS

R

SW

C

RS

C

RS

LS

: Actual speaker position

: Ideal speaker position

: Primary listening 
  distance

Approximate room dimensions

Circle of constant primary listening distance

OFF: When not using the HDMI AV OUT terminal for video output. 

Video output will not depend on the connected equipment, but 
on this unit.

AUDIO OUT

ON:

When audio output is from the HDMI AV OUT terminal. 
(Depending on the capabilities of the connected equipment, 
audio output may differ from the audio settings of the main unit.)

OFF: When audio output is not from the HDMI AV OUT terminal. (The 

audio is output using the settings of the main unit.)

RGB RANGE

This works only when “COLOR SPACE” in Menu 4 (HDMI) is set to RGB 
(

B

23).

STANDARD

ENHANCED:

When the black and white images are not distinct.

VIERA Link

ON:

The VIERA Link “HDAVI Control” function is available (

B

24).

OFF

POWER OFF LINK

Select the desired power off link setting of this unit for VIERA Link operation 
(

B

24). (This works depending on the settings of the connected VIERA Link 

“HDAVI Control” compatible equipment.)

VIDEO/AUDIO: When the TV is turned off, this unit will turn off 

automatically.

VIDEO: When the TV is turned off, this unit will turn off except during the 

following conditions:

– audio playback (

[CD]


[MP3]


[WMA]

)

– iPod  mode
– radio mode
– “AUX” or “D-IN” mode (non-selected TV audio setting for 

VIERA Link)

TV AUDIO

Select the TV audio input to work with the VIERA Link operations (

B

24).

AUX

DIGITAL IN

OTHERS menu

FL DIMMER

Change the brightness of the unit’s display and indicator.

BRIGHT

DIM:

The display is dimmed. 
(SURROUND OUTPUT indicator will turn off even if it is 
activated.)

AUTO:

The display is dimmed, but brightens when you perform some 
operations. (The SURROUND OUTPUT indicator will turn on 
if it is activated, when you perform some operations.)

DVD-VR/DATA

Select to play only DVD-VR or DATA format.

DVD-VR: To play the video programs on DVD-RAM or DVD-R/-RW.

DATA:

To play the data files on DVD-RAM or DVD-R/-RW.

SCREEN DIMMER

This is to prevent burn marks on the TV screen.

OFF

WAIT 5 MIN: If there is no operation for 5 minutes, the picture turns 

gray. The TV screen will resume when you perform some 
operations. (This does not work during video playback.)

RQTX0221-P_770_en.book  Page 29  Monday, January 12, 2009  5:56 PM

Summary of Contents for SAPT770 - DVD THEATER RECEIVER

Page 1: ... the instructions completely Please keep this manual for future reference If you have any questions contact In the U S A and Puerto Rico 1 800 211 PANA 7262 In Canada 1 800 561 5505 Region number The player plays DVD Video marked with labels containing the region number 1 or ALL Example 1 ALL 2 4 1 As an ENERGY STAR Partner Panasonic has determined that this product meets the ENERGY STAR guideline...

Page 2: ...UNIT DISPOSE OF BATTERIES IN AN ENVIRONMENTALLY FRIENDLY MANNER The lightning flash with arrowhead symbol within an equilateral triangle is intended to alert the user to the presence of uninsulated dangerous voltage within the product s enclosure that may be of sufficient magnitude to constitute a risk of electric shock to persons CAUTION CAUTION TO REDUCE THE RISK OF ELECTRIC SHOCK DO NOT REMOVE ...

Page 3: ... 15 of the FCC Rules These limits are designed to provide reasonable protection against harmful interference in a residential installation This equipment generates uses and can radiate radio frequency energy and if not installed and used in accordance with the instructions may cause harmful interference to radio communications However there is no guarantee that interference will not occur in a par...

Page 4: ...egree of compression Linear PCM pulse code modulation These are uncompressed digital signals similar to those found on CDs MP3 MPEG Audio Layer 3 An audio compression method that compresses audio to approximately one tenth of its size without any considerable loss of audio quality Playback control PBC If a Video CD has playback control you can select scenes and information with menus Progressive I...

Page 5: ...remote control 19 Other modes of play 20 Playing CDs sequentially CD Mode 20 Repeat play 20 Program and Random play 20 Using navigation menus 21 Playing data discs 21 Playing RAM and DVD R RW DVD VR discs 21 Using on screen menus 22 Other Operations Using the VIERA LinkTM HDAVI ControlTM 24 One touch play 24 Auto input switching 24 Power off link 24 Speaker control 25 VIERA Link Control only with ...

Page 6: ...ore starting assembly setup and connection Keep the screws out of reach of children to prevent swallowing For optional wall mount refer to page 27 2 Bases 8 Screws 2 Front speakers 2 Stands with cable 1 2 2 1 Tighten securely Slide into the groove Position the cable between the ridges Tighten securely Press into the groove Insert the wire fully i White j Blue Push Leave about 120 mm 423 32z Leave ...

Page 7: ...s Main unit Digital transmitter Wireless system Place the wireless system within approximately 15 m 47 ft from the main unit and in a horizontal position with the top panel faced upward To allow for proper ventilation and to maintain good airflow around the wireless system position it with at least 5 cm 2q of space on all sides To avoid interference maintain the following distances between the wir...

Page 8: ...ICAL IN AUX 3 1 TRANSMITTER DIGITAL Do not insert or remove the digital transmitter while the main unit is on Digital transmitter Insert fully until you hear a click Main unit CENTER SUBWOOFER FRONT 6 5 2 1 L R WHITE FRONT L GRAY SURROUND R BLUE SURROUND L RED FRONT R GREEN CENTER PURPLE SUBWOOFER DO NOT Lch SURROUND 3 Push SPEAKERS ENCEINTES LS RB LB RS SURROUND AMBIOPHONIQUES SURR L SIDE R SIDE ...

Page 9: ...nal After making this connection select DARKER from the BLACK LEVEL in the VIDEO menu B 28 To enjoy progressive video Connect to a progressive output compatible TV Set VIDEO OUT I P in VIDEO menu to PROGRESSIVE and then follow the instructions on the menu screen B 28 Other audio connection TV or external equipment terminal Cable required not included Main unit terminal Features Do not bend sharply...

Page 10: ...f vinyl wire horizontally across a window or other convenient location 5 0 m to 12 m 16 ft to 39 ft FM outdoor antenna Using a TV antenna not included The antenna should be installed by a competent technician 75 coaxial cable not included U S A and Canada Antenna plug not included Use outdoor antenna if FM AM radio reception is poor Disconnect the antenna when the unit is not in use Do not use the...

Page 11: ...sor B 39 avoiding obstacles at a maximum range of 7 m 23 ft directly in front of the unit step 4 AC power supply cord connections AC IN AC IN 110 127V 220 240V VOLT ADJ To household AC outlet Main unit Wireless system AC power supply cord included Before connecting the AC power supply cord Set the voltage Use a flat head screwdriver to move the voltage selector to the appropriate position for the ...

Page 12: ...aker setup The speaker level settings can be optimized to accommodate your room s listening conditions so that you can enjoy the ideal surround sound experience Place the Auto speaker setup microphone at actual seating position At ear level when seated The test signal is output from each speaker Note Auto speaker setup can be activated through Smart setup only step 7 SMART SETUP Preparation Turn o...

Page 13: ...old MEMORY The tuner starts to preset all the stations it can receive into the channels in ascending order PLAY MODE 1 2 3 4 5 6 7 8 0 9 10 SEARCH SEARCH EXT IN RADIO F U N C T I O N S MENU OK SKIP SKIP SEARCH Numbered buttons FUNCTIONS RADIO OK PLAY MODE MENU VOLUME SELECTOR TUNE MEMORY TUNE MODE FM MODE EXT IN RADIO MENU PLAY LIST OK Confirming the preset channels 1 Select FM or AM Main unit Pre...

Page 14: ...uency Continue to hold the button down The minimum frequency changes and the step is changed e g 87 9 Factory preset 87 5 To return to the original step repeat steps 1 and 2 Note After changing the setting previously preset frequencies will be cleared Preset them again 1 2 3 4 5 6 7 8 0 9 10 OK SKIP SKIP Numbered buttons OK VOLUME SELECTOR TUNE MEMORY Presetting stations manually 1 While listening...

Page 15: ...m the START menu 1 Show the START menu This unit automatically turns on The TV also turns on when using VIERA Link HDAVI Control This works only when in DVD CD or IPOD mode without any disc device being loaded connected e g 2 Select an item To exit press START 3 Make the setting DVD iPod START SETUP EXT IN RADIO OK RADIO EXT IN DVD iPod SETUP START OK START DVD CD Home theater OK RETURN Input sele...

Page 16: ...urround output will be in mono STEREO Sound will only be output to the front speakers and the subwoofer from any source VOL SOUND SURROUND CHSELECT SETUP W SRD OK OK VOL SETUP CH SELECT SURROUND SOUND W SRD SURROUND Recommended modes to enjoy TV audio or stereo sources from all speakers PLII MOVIE PLII MUSIC S SRND Selecting sound mode 1 Select a sound mode Each time you press the button EQ Equali...

Page 17: ...djust speaker level during play 1 Press and hold CH SELECT to select the speaker While the speaker channel is displayed press CH SELECT L C R RS LS SW You can adjust SW Subwoofer only if the disc includes a subwoofer channel and ÎPLII is not lit S appears on the main unit s display when you have selected S SRND B 16 Enjoying surround sound effects In this case you can adjust both surround speaker ...

Page 18: ...scs one by one For DVD RAM remove the disc from its cartridge before use Do not Load more than one disc per tray Push or pull out the tray by hand Label facing up Start play Turn i VOLUME to adjust the volume Select DVD CD Turn on the unit Press to skip Press and hold to search during play start slow motion play during pause Press 1 Play to start normal play Open all the disc trays To select a des...

Page 19: ... PLAY LIST FL DISPLAY TOP MENU DIRECT NAVIGATOR Numbered buttons VOL PLAY STOP PAUSE SKIP SKIP SEARCH SLOW SEARCH OK OK Select Confirm Selecting a disc Disc information screen is displayed To exit the screen press DISC e g DVD V Enter number DVD VR DVD V VCD CD e g To select 12 S10 B 1 B 2 VCD with playback control Press STOP to cancel the PBC function and then press the numbered buttons Disc menu...

Page 20: ...andom VCD CD You can playback all the items on a disc in the selected tray in random order DVD V WMA MP3 JPEG You can playback selected item s on a disc in the selected tray in random order All Disc random when CD Mode is on VCD CD You can playback all the items on all the discs in random order Playing CDs sequentially CD Mode VCD CD WMA MP3 While stopped press and hold Repeat play 1 During play p...

Page 21: ...KIP SKIP OK RETURN MENU PLAY LIST TOP MENU DIRECT NAVIGATOR DATA DISC ROOT OK Perfume My favorite1 My favorite2 My favorite3 Underwater Fantasy planet Starpersons1 Starpersons2 Group Folder Content File WMA MP3 JPEG OK 1 While picture is displayed e g 2 Select a picture Press 9 SKIP to skip page by page Playing RAM and DVD R RW DVD VR discs DVD VR Playing the programs 1 While stopped e g To exit t...

Page 22: ...ns depend on the disc Read the disc s instructions for details Signal type data LPCM PPCM ÎD DTS MP3 MPEG Signal type kHz Sampling frequency bit ch Number of channels PLAY SPEED DVD VR DVD V To change play speed from k0 6 to k1 4 in 0 1 unit steps Press 1 PLAY to return to normal play After you change the speed Dolby Pro Logic II has no effect Audio output switches to 2 channel stereo Sampling fre...

Page 23: ...ed in the center channel OFF ON Menu 4 HDMI HDMI STATUS To show HDMI information B below Confirming HDMI information HD ENHANCER This works when the HDMI connection is being used with VIDEO PRIORITY B 29 HDMI menu set to ON To sharpen the 720p 1080i and 1080p picture quality OFF 1 weakest to 3 strongest VIDEO FORMAT This works when the HDMI connection is being used with VIDEO PRIORITY B 29 HDMI me...

Page 24: ...ource is DVD CD AUX or D IN When using DVD CD as the source set TIME DELAY in VIDEO menu to 0 ms AUTO B 28 You can turn on this unit and the TV and start playing the disc with a single press of a button Note Playback may not be immediately displayed on the TV If you miss the beginning portion of playback press or 6 to go back to where playback started When you switch the TV input to TV tuner mode ...

Page 25: ...ting the TV s remote control refer to the below illustration for operation buttons You can operate the playback with the indicated controls The on screen control panel can also be shown by using a button on the TV s remote control e g SUB MENU This works only during DVD CD playback and resume modes or while the iPod music playback screen is displayed on the TV Note Depending on the menu some butto...

Page 26: ...ack only Press PLAY MODE several times SONGS ALBUMS OFF Repeat mode Press and hold REPEAT and then press the button several times within a few seconds During the music video playback ONE ALL OFF PLAY PAUSE iPod PLAY MODE REPEAT F U N C T I O N S STOP OK RETURN SKIP SKIP OK RETURN iPod STOP PLAY SKIP PAUSE PLAY MODE REPEAT FUNCTIONS iPod Dock for iPod Main unit e g Pull out Dock adapter not include...

Page 27: ... 4GB 6GB Compatibility depends on the software version of your iPod Speaker installation options You can attach all of the speakers except subwoofer to a wall The wall or pillar on which the speakers are to be attached should be capable of supporting 10 kg 22 Ibs per screw Consult a qualified building contractor when attaching the speakers to a wall Improper attachment may result in damage to the ...

Page 28: ...le language AUTO 3 ENGLISH FRENCH SPANISH OTHER 2 MENUS Choose the language for disc menus ENGLISH FRENCH SPANISH OTHER 2 SETUP OK RETURN OK RETURN SETUP CHSELECT SETUP SET MAIN DISC VIDEO AUDIO DISPLAY HDMI OTHERS EXIT SETUP RETURN Menu OK SET RETURN DISC EXIT SETUP SETTING STATE AUDIO SUBTITLE MENUS RATINGS PASSWORD ENGLISH AUTO ENGLISH 8 NO LIMIT Item Setting Display the current setting of the ...

Page 29: ... on screen messages ENGLISH FRANÇAIS ESPAÑOL HDMI menu VIDEO PRIORITY ON When using the HDMI AV OUT terminal for video output The resolution of the video output from the HDMI AV OUT terminal is optimized according to the capability of the connected equipment e g TV L LS R SW C RS C RS LS Actual speaker position Ideal speaker position Primary listening distance Approximate room dimensions Circle of...

Page 30: ...be removed from their cartridge 2 6 GB and 5 2 GB DVD RAM and Chaoji VCD available on the market including CVD DVCD and SVCD that do not conform to IEC62107 Do not attach labels or stickers to discs This may cause disc warping rendering it unusable Do not write on the label side with a ball point pen or other writing instrument Do not use record cleaning sprays benzine thinner liquids which preven...

Page 31: ...c shock or other hazards 4 Safety check After repairs or service ask the servicer to perform safety checks to confirm that the unit is in proper working condition The servicer will require all components to service your system Therefore should service ever be necessary be sure to bring the entire system For product information or assistance with product operation In the U S A and Puerto Rico refer...

Page 32: ...IC The Auto speaker setup microphone is not inserted Check whether the Auto speaker setup microphone is plugged in properly into the SETUP MIC jack NOISY Excessive ambient noise in the room Perform the setup again and keep quiet during the Auto speaker setup No response when any buttons are pressed This unit cannot play discs other than the ones listed in these operating instructions B 30 The unit...

Page 33: ...ed when the connected TV is not progressive compatible Press and hold CANCEL until PRG disappears from the main unit display and the picture is displayed correctly When using the HDMI AV OUT terminal ensure that an incompatible video output with the connected TV is not selected Press and hold CANCEL until the picture is displayed correctly The output will return to 480p B 23 Video images converted...

Page 34: ...Laser power DVD CD U S A Others CLASS II CLASS I CLASS 1 CLASS 1M Audio output Disc Number of channels 5 1 ch FL FR C SL SR SW VIDEO SECTION Video system NTSC Composite video output Output level Terminal 1 Vp p 75 Pin jack 1 system Component video output Y output level PB output level PR output level Terminal 1 Vp p 75 0 7 Vp p 75 0 7 Vp p 75 Pin jack Y green PB blue PR red 1 system HDMI AV output...

Page 35: ...W approx 0 3 W Manufactured under license from Dolby Laboratories Dolby Pro Logic and the double D symbol are trademarks of Dolby Laboratories Manufactured under license under U S Patent s 5 451 942 5 956 674 5 974 380 5 978 762 6 487 535 other U S and worldwide patents issued pending DTS and DTS Digital Surround are registered trademarks and the DTS logos and Symbol are trademarks of DTS Inc c 19...

Page 36: ... THIS PRODUCT OR ARISING OUT OF ANY BREACH OF THIS WARRANTY As examples this excludes damages for lost time travel to and from the servicer loss of media or images data or other memory content The items listed are not exclusive but are for illustration only ALL EXPRESS AND IMPLIED WARRANTIES INCLUDING THE WARRANTY OF MERCHANTABILITY ARE LIMITED TO THE PERIOD OF THE LIMITED WARRANTY Some states do ...

Page 37: ...RTICULAR PURPOSE IN NO EVENT WILL PANASONIC CANADA INC BE LIABLE FOR ANY SPECIAL INDIRECT OR CONSEQUENTIAL DAMAGES In certain instances some jurisdictions do not allow the exclusion or limitation of incidental or consequential damages or the exclusion of implied warranties so the above limitations and exclusions may not be applicable WARRANTY SERVICE IF YOU SHIP THE PRODUCT TO A SERVICENTRE Carefu...

Page 38: ...reset radio stations B 13 7 Select surround sound effects B 16 8 Show a disc top menu or program list B 19 21 9 Select or confirm menu items Frame by frame B 19 Show a disc menu or play list B 19 21 Show setup menu or select speaker channel B 17 28 Turn Whisper mode Surround on off B 16 TV operations Aim the remote control at the Panasonic TV and press the button Í Turn the TV on off INPUT Change ...

Page 39: ...ikaans 6570 Albanian 8381 Ameharic 6577 Arabic 6582 Armenian 7289 Assamese 6583 Aymara 6589 Azerbaijani 6590 Bashkir 6665 Basque 6985 Bengali Bangla 6678 Bhutani 6890 Bihari 6672 Breton 6682 Bulgarian 6671 Burmese 7789 Byelorussian 6669 Cambodian 7577 Catalan 6765 Chinese 9072 Corsican 6779 Croatian 7282 Czech 6783 Danish 6865 Dutch 7876 English 6978 Esperanto 6979 Estonian 6984 Faroese 7079 Fiji ...

Page 40: ...partment 6200 Wiesbaden Biebrich Hagenauerstr 43 Germany p C Panasonic Corporation 2008 RQTX0221 1P Printed in Singapore F1208AD1019 User memo DATE OF PURCHASE ___________________________________________ DEALER NAME _________________________________________________ DEALER ADDRESS _____________________________________________ _____________________________________________________ TELEPHONE NUMBER __...

Reviews: