background image

Before use

RQT5717

8

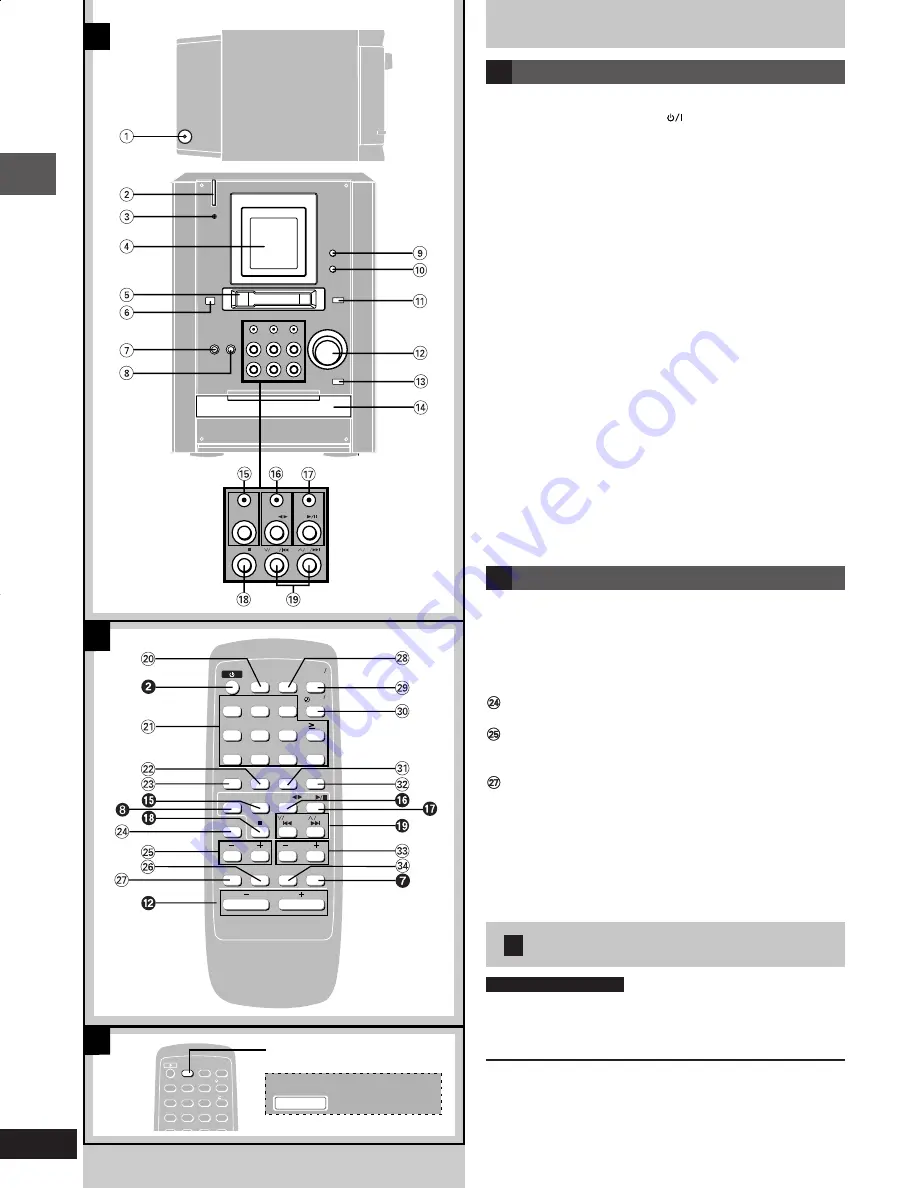
Front panel controls

A

Main unit

1

1

1

1

1

Headphone jack (PHONES) ................................................... 20

2

2

2

2

2

 Standby/on switch (POWER 

)

Press to switch the unit from on to standby mode or vice versa.  In
standby mode, the unit is still consuming a small amount of
power.

3

3

3

3

3

AC supply indicator (AC IN)

This indicator lights when the unit is connected to the AC power
supply.

4

4

4

4

4

Display

5

5

5

5

5

Cassette slot

6

6

6

6

6

Remote control signal sensor

7

7

7

7

7

Display select/demonstration button ..................................... 9
(DISPLAY, –DEMO)

8

8

8

8

8

CD, Tape, Tuner, Aux select button
(SELECTOR) ............................................................... 13, 18, 20

9

9

9

9

9

CD edit button (CD EDIT) ...................................................... 19

0

0

0

0

0

Recording start/pause button (

[

REC/

 J

) ....................... 17, 18

!

!

!

!

!

Cassette eject button (EJECT 

c

) ......................................... 15

@

@

@

@

@

Volume control (VOLUME DOWN, UP) ..................... 10, 12, 15

#

#

#

#

#

CD tray open/close button (OPEN/CLOSE 

c

) ..................... 12

$

$

$

$

$

CD Tray

%

%

%

%

%

Tuner/band select button and indicator
(TUNER/BAND) ....................................................................... 10

^

^

^

^

^

Cassette play/direction button and indicator
(TAPE 

1 2

.............................................................................. 15

&

&

&

&

&

CD play/pause button and indicator (CD 

-

/

 J

) ................... 12

*

*

*

*

*

CD, Tape stop button (STOP 

L

) ...................................... 12, 15

(

(

(

(

(

Skip/search/preset channel button
(

4

4

4

4

4

/REW/


g

 , 

3

3

3

3

3     

/FF/


f

 ) ........................................ 10, 12, 16

B

Remote Control

Buttons such as 

2

 function in exactly same way as the buttons on

the main unit.

)

)

)

)

)

Auto power off button (AUTO OFF) ........................................ 8

¡

¡

¡

¡

¡

Numeric buttons .............................................................. 11, 12

Program button (PROGRAM) ................................................ 14

£

£

£

£

£

Tuning mode select button (TUNE MODE) .................... 10, 17
Reverse mode select button
(REV MODE) ..................................................................... 17, 18
Bass buttons (–BASS+) ......................................................... 20

§

§

§

§

§

Sound virtualizer button
(SOUND VIRTUALIZER) ......................................................... 20
Muting button (MUTING) ........................................................  9

Sleep timer button (SLEEP) .................................................. 22

ª

ª

ª

ª

ª

Clock/timer button (CLOCK/TIMER) ........................... 9, 21, 22

º

º

º

º

º

Play timer/recording timer button (

˚

˚

˚

˚

˚

PLAY/REC) .......... 21, 22

Cancel button (CANCEL) ....................................................... 14

¤

¤

¤

¤

¤

Play mode select button (PLAY MODE) ............................... 13

Treble buttons (–) .................................................. 20

Dimmer button (DIMMER) ....................................................... 9

C

1

2

3

4

5

6

7

9

0

10

CANCEL

AUTO OFF SLEEP

8

PROGRAM

TUNE MODE

PLAY MODE

VOLUME

DISPLAY

DIMMER

MUTING

SOUND

VIRTUALIZER

REV MODE

SELECT

SELECTOR

OR

TAPE

APE

TUNER

TUNER

CD

CD

CLOCK

 TIMER

PLAY

REC

REW

CLEAR

FF

BASS

TREBLE

A

B

CD

TUNER/BAND

TAPE

STOP

FF

REW

1

2

3

4

5

6

7

9

0

10

CANCEL

AUTO OFF

SLEEP

8

PROGRAM

TUNE MODE

PLAY MODE

CLOCK

 TIMER

PLAY

REC

AUTO OFF

Top of the
unit

RDS

PS

S

O O

PTY

FADER

C

AUTO OFF

 C

Auto power-off

by remote control only

When “CD” or “TAPE” is selected as the source
To save power, the unit turns off if it is left unused for 10 minutes.

Press [AUTO OFF].
“AUTO OFF” is displayed.

To cancel
Press [AUTO OFF] again.

For your reference
• The setting is maintained even if the unit is turned off.  When the

unit is turned on again, the unit functions as described above.

• If you select any source other than “CD” or “TAPE”, “AUTO OFF”

goes out.  It comes on again when you select “CD” or “TAPE”.

e4-9

1/17/01, 6:22 PM

8

Summary of Contents for SAPM25 - MINI HES W/CD PLAYER

Page 1: ...17 2Y Before connecting operating or adjusting this product please read these instructions completely Please keep this manual for future reference PP CD Stereo System Operating Instructions Model No SC PM25 ...

Page 2: ...number and serial number of this product can be found on either the back or the bottom of the unit Please note them in the space provided below and keep for future reference MODEL NUMBER SERIAL NUMBER User memo DATE OF PURCHASE DEALER NAME DEALER ADDRESS TELEPHONE NUMBER CAUTION THIS PRODUCT UTILIZES A LASER USE OF CONTROLS OR ADJUSTMENTS OR PERFORMANCE OF PROCEDURES OTHER THAN THOSE SPECIFIED HER...

Page 3: ...nterference by one or more of the following measures Reorient or relocate the receiving antenna Increase the separation between the equipment and receiver Connect the equipment into an outlet on a circuit different from that to which the receiver is connected Consult the dealer or an experienced radio TV technician for help Any unauthorized changes or modifications to this equipment would void the...

Page 4: ...d AC outlet only one way If the plug doesn t fit one way try reversing it If the plug still doesn t fit contact an electrician to replace the obsolete outlet Do not attempt to defeat the safety purpose of the plug 3 Power cord protection Route the AC power supply cord so that it will not be walked on or pinched by items placed on or against it Never take hold of the plug or cord with wet hands Alw...

Page 5: ...ically so that no left or right channel orientation is necessary Notes Keep your speakers at least 10 mm 13 32 away from the system for proper ventilation These speakers do not have magnetic shielding Do not place them near televisions personal computers or other devices easily influenced by magnetism To avoid damage to the speakers do not touch the speakers cones if you have taken the nets off Li...

Page 6: ...he antenna where the reception is best and interference is minimal 3 Connect the speaker cables Connect each end of the speaker cables to the terminal lever of the same color so and are correct Never allow the exposed wires to contact each other when connected Incorrect connection can damage the unit Caution Use only the supplied speakers The combination of the main unit and speakers provide the b...

Page 7: ...Note When the unit is not in use disconnect the outdoor antenna to prevent possible damage that may be caused by lighting Never use an outdoor antenna during an electrical storm External unit connections Make sure that the power supply for all components has been turned off before making any connections For details refer to the operating instructions of the unit which are to be connected All perip...

Page 8: ...8 Numeric buttons 11 12 Program button PROGRAM 14 Tuning mode select button TUNE MODE 10 17 Reverse mode select button REV MODE 17 18 Bass buttons BASS 20 Sound virtualizer button SOUND VIRTUALIZER 20 Muting button MUTING 9 Sleep timer button SLEEP 22 ª ª ª ª ªClock timer button CLOCK TIMER 9 21 22 º º º º ºPlay timer recording timer button PLAY REC 21 22 Cancel button CANCEL 14 Play mode select b...

Page 9: ...ock When the unit is ON Press DISPLAY DEMO To cancel Press DISPLAY DEMO again Note The clock may lose or gain some time over a period Readjust if necessary Convenient Functions B To dim the display panel by remote control only Use this when you are going to sleep or any other time you would prefer the panel to be dimmer Press DIMMER The display panel dims and side panel indicators except for the A...

Page 10: ... there is excessive interference To cancel auto tuning press 4 4 4 4 4 REW g or 3 3 3 3 3 FF f once again If noise is excessive in FM by remote control only Press and hold TUNE MODE to display MONO This mode improves sound quality if reception is weak but broadcasts will be heard in monaural Press and hold TUNE MODE again to cancel the mode MONO goes out MONO is also canceled if the frequency is c...

Page 11: ...ration Press TUNER to select FM or AM A Automatic presetting Do the following once each for FM and AM Preparation Tune to the frequency where presetting is to begin page 10 Press and hold PROGRAM The tuner presets all the stations it can receive into the channels in ascending order When finished the last station memorized is tuned in Manual presetting Preset the stations one at a time 1 1 1 1 1 Pr...

Page 12: ... digit track Press 10 and then the two numbers you want For example Track no 20 10 2 0 Track no 35 10 3 5 One touch play When a CD is loaded and the unit is off press CD J The unit comes on and starts play To remove a CD Press OPEN CLOSE c Note During random play page 13 you cannot skip to tracks which have already been played During program play page 14 or random play you cannot search forward or...

Page 13: ... to select the desired track number Play will start with the track you select To select a two digit track Press 10 and then the two numbers you want For example Track no 20 10 2 0 Track no 35 10 3 5 B Repeat play and random play by remote control only Press PLAY MODE before or during play to select the desired play mode Every time you press the button Previous display 1 RANDOM To repeat just one t...

Page 14: ...PROGRAM instead of following steps 2 to 3 1 1 1 1 1 Select desired tracks using the g or f 2 2 2 2 2 Press PROGRAM To cancel program play mode Press PROGRAM in the stop mode Programmed contents will be saved in memory Press L CLEAR in the stop mode This will also erase the entire program To select a two digit track Press 10 and then the two numbers you want A When is displayed Total play time of t...

Page 15: ...ect tape Press STOP L then press EJECT c One touch play When the system is OFF and cassette is inserted play starts automatically when you press TAPE 2 3 To select the reverse mode by remote control only Press REV MODE to select the reverse mode Every time you press the button One side is played Both sides are played repeatedly until CLEAR is pressed Both sides are played Cassette tape selection a...

Page 16: ...th silent parts found within tunes Before recording Types of tapes which can be recorded correctly The system automatically identifies the type of tape NORMAL POSITION TYPE I HIGH POSITION TYPE II METAL POSITION TYPE IV This system cannot correctly record or erase metal position tapes Erasure prevention The illustration shows how to remove the tabs to prevent recording To record on the tape again ...

Page 17: ...e exposed tape facing left 2 Press REV MODE on the remote control to select the reverse mode Every time you press the button One side only records and Both sides record forward reverse automatically changes to when REC J is pressed 3 unneccessary with auto editing recording Page 19 Set the tape direction FWD To record on the forward side REV To record on the reverse side To change the direction Pr...

Page 18: ...the reverse mode Every time you press the button One side is recorded 3 Press SELECTOR to select the CD mode 4 Press OPEN CLOSE c to open the CD tray Insert the CD with label facing upward Press OPEN CLOSE c c c c c to close the CD tray 5 Press REC J to start recording If you selected in step 2 the direction will automatically change to when recording starts The recording will start from the first...

Page 19: ...cords 10 seconds of silence and then starts recording To stop recording Press STOP L The CD also stops To record selected tracks 1 1 1 1 1 Program tracks steps 1 to 3 on page 14 2 2 2 2 2 Do steps 2 to 4 above Note Auto edit recording cannot be used with random and repeat play page 13 B One track edit recording 1 REC Preparation Insert a CD page 12 and a cassette Wind the tape to where you want to...

Page 20: ... Using an external unit Listening to an external source See page 7 for external unit connection 1 1 1 1 1 Press POWER to turn on the unit 2 2 2 2 2 Press SELECTOR to select AUX Every time you press the button CD AUX TAPE TUNER 3 3 3 3 3 Start playback from the external source Refer to your equipment s operating instructions Recording from an external source 1 1 1 1 1 Follow steps 1 2 on page 17 2 ...

Page 21: ... 2 2 Press CLOCK TIMER The start and finish times are now set Turning the timer on 4 Press PLAY REC Every time you press the button PLAY REC OFF PLAY to turn the play timer on REC to turn the record timer on 5 Press to turn the unit off The unit must be off for the timers to operate For play timer The timer play will start at the preset time and volume level you preset For record timer About 30 se...

Page 22: ... selected Note If you turn the unit off and on again while a timer is functioning the finish time setting will not be activated If the unit is on the timer will not function The unit must be in the standby mode If AUX is selected as the source when the timer comes on the system turns on and engages AUX as the source If you want to playback or record from a connected unit set the other unit s timer...

Page 23: ...display is wrong or play won t start TAKE OUT DISC appears on the display Only one track from the CD is recorded The disc may be upside down Ç Wipe the disc Replace the disc if it is scratched warped or nonstandard Condensation may have formed inside the unit due to a sudden change in temperature Wait about an hour for it to clear and try again There is a problem with the disc mechanism A power fa...

Page 24: ...RQT5717 24 Reference Servicenter List U S A ...

Page 25: ...briel Industrial Park Carolina Puerto Rico 00985 Panasonic Consumer Electronics Company or Panasonic Sales Compa ny collectively referred to as the warrantor will repair this product with new or refurbished parts in the event of a defect in materials or workman ship free of charge in the U S A or Puerto Rico as follows all time periods start from the date of original purchase COMPACT DISC PLAYERS ...

Page 26: ...16 32Ω FM TUNER SECTION Frequency range 87 9 107 9 MHz 200 kHz steps 87 5 108 0 MHz 100 kHz steps Sensitivity 1 8 µV IHF S N 26 dB 1 5 µV Antenna terminal s 75Ω unbalanced AM TUNER SECTION Frequency range AM 520 1710 kHz 10 kHz steps Sensitivity AM S N 20 dB at 999 kHz 500 µV m CASSETTE DECK SECTION Track system 4 track 2 channel Heads Record playback Solid permalloy head Erasure Double gap ferrit...

Page 27: ...27 RQT5717 Reference Memo ...

Page 28: ...y Secaucus New Jersey 07094 http www panasonic com Panasonic Sales Company Division of Matsushita Electric of Puerto Rico Inc PSC Ave 65 de Infantería Km 9 5 San Gabriel Industrial Park Carolina Puerto Rico 00985 Panasonic Canada Inc 5770 Ambler Drive Mississauga Ontario L4W 2T3 www panasonic ca 2001 Matsushita Electric Industrial Co Ltd Printed in Malaysia ...

Reviews: