7
RQTV0288
Remote control
Main unit
To pause track
To skip a track
(During play/pause)
To search the current
track
(During play/pause)
press and hold
press and hold
When you select another source or turn the main unit off, the iPod turns off.
iPod will start recharging regardless of whether this unit is in On or
Standby condition.
“IPOD
” will be shown on the main unit’s display during iPod charging
in main unit standby mode.
Check iPod to see if the battery is fully recharged.
If you are not using iPod for an extended period of time after recharging
has completed, disconnect it from main unit, as the battery will be
depleted naturally. (Once fully recharged, additional recharging will not
occur.)
•
•
•
•
External unit
Note
iPod is a trademark of Apple Inc., registered in the U.S. and other
countries.
Preparation:
Reduce the volume of the main unit.
Confirm the iPod connection. (
➡
above)
Confirm the USB cable is removed. (
➡
PC Sync, right)
Press [iPod
q
/
h
] to play the iPod.
Adjust the volume of the main unit.
•
•
•
g
Charging the iPod
g
Playing the iPod
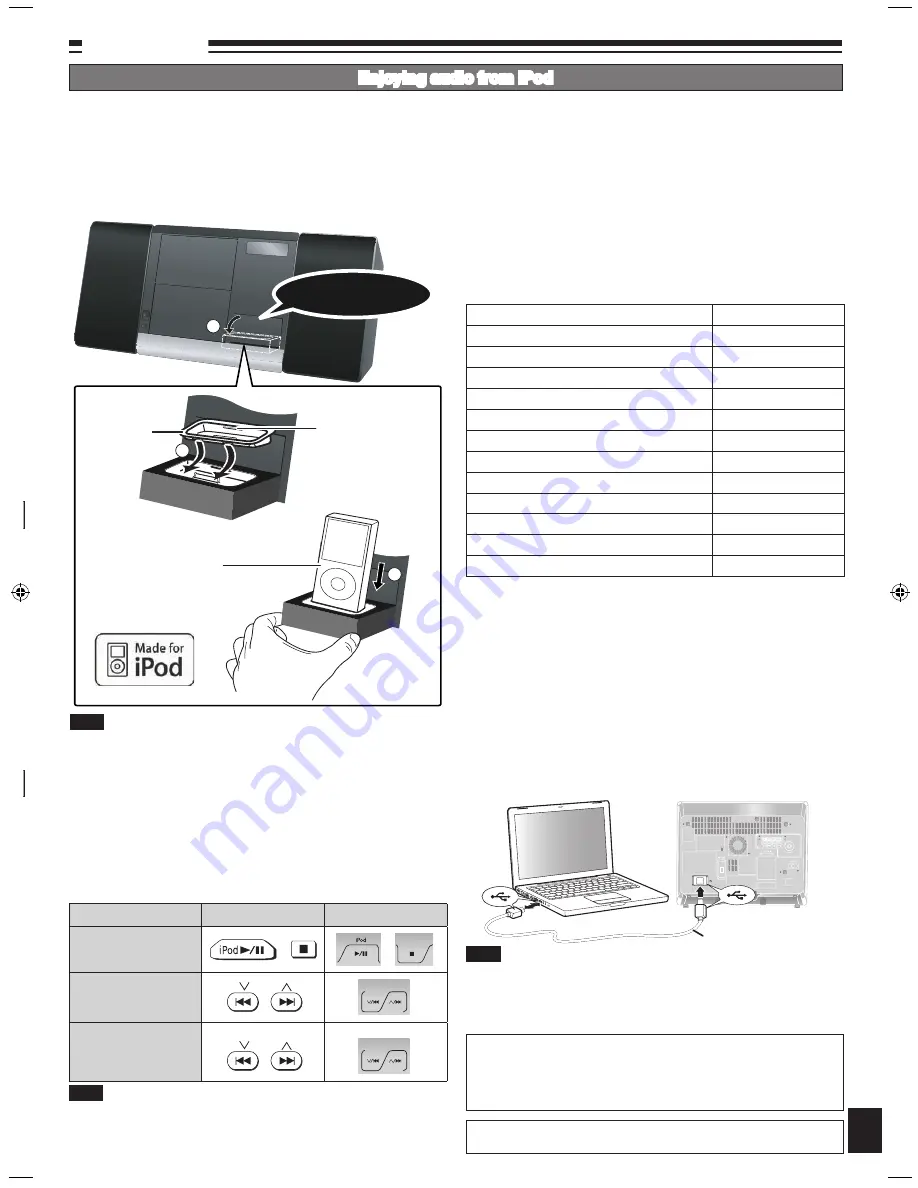
3
2
1
g
Inserting the iPod
Push to open the Built-in iPod Dock and then press down until a
click sound is heard.
Insert the suitable dock adapter for your iPod.
Insert your iPod into the dock.
Hold the dock when connecting/disconnecting the iPod.
Recharging starts when the iPod is inserted.
•
•
iPod
(not included)
Note
When removing,
insert your fingernail
or a flat object and lift
upwards.
Push and then
press down.
➡
Page 3 for the buttons position of remote control and main unit.
You can preset up to 30 FM channels and up to 15 AM channels.
Preparation:
Press [FM/AM] to select “FM” or “AM”.
Automatic presetting
Press and hold [PGM, -AUTO PRESET] to start presetting.
Manual presetting
Press [PLAY MODE] to select “MANUAL”.
Press [
u
,
2
] or [
i
,
1
] to tune to the required station.
Press [PGM, -AUTO PRESET].
Press the numbered buttons to select a channel.
The station occupying a channel is erased if another station is preset in
that channel.
Repeat steps 2 to 4 to preset more stations.
Selecting a preset station
Press the numbered buttons to select the channel.
For channels 10 to 30 press [
≧
10], then the two digits.
OR
Press [PLAY MODE] to select “PRESET”.
Press [
u
,
2
] or [
i
,
1
] to select the channel.
Press [FM/AM] to select “FM” or “AM”.
Press [PLAY MODE] to select “MANUAL”.
Press [
u
,
2
] or [
i
,
1
] to select the frequency of the required
station.
To tune automatically
Press [FM/AM] to select “FM” or “AM”.
Press [PLAY MODE] to select “MANUAL”.
Press and hold [
u
,
2
] or [
i
,
1
] until the frequency starts
changing rapidly.
Auto tuning stops when it finds a station.
To cancel auto tuning, press
[
u
,
2
]
or
[
i
,
1
]
once again.
Auto tuning may not function when there is excessive interference.
•
•
Manual tuning
Memory preset
The unit can play MP3, a method of compressing audio without overly
hurting audio quality.
When creating MP3 files to play on this unit
Maximum number of tracks and albums: 999 tracks and 256 albums.
Compatible compression rate: Between 64 kbps and 320 kbps (stereo).
128 kbps (stereo) is recommended.
Disc formats: ISO9660 level 1 and level 2 (except for extended formats).
The time for reading TOC depends on the number of the tracks, the
folders or folder structures.
Limitations on MP3
This unit is compatible with multi-session but if there are a lot of sessions
it takes more time for play to start. Keep the number of sessions to a
minimum to avoid this.
This unit cannot play files recorded using packet write.
If the disc includes both MP3 and normal audio data (CD-DA), the unit
plays the type recorded in the inner part of the disc.
If the disc includes both MP3 and other types of audio data (e.g. WMA or
WAV), the unit plays only the MP3.
Depending on how you create MP3 files, they may not play in the order
you numbered them or may not play at all.
•
•
•
•
•
•
•
•
g
Compatible iPod
Name
Memory size
iPod touch
8GB, 16GB
iPod nano 3rd generation (video)
4GB, 8GB
iPod classic
80GB, 160GB
iPod nano 2nd generation (aluminum)
2GB, 4GB, 8GB
iPod 5th generation (video)
60GB, 80GB
iPod 5th generation (video)
30GB
iPod nano 1st generation
1GB, 2GB, 4GB
iPod 4th generation (color display)
40GB, 60GB
iPod 4th generation (color display)
20GB, 30GB
iPod 4th generation
40GB
iPod 4th generation
20GB
iPod mini
4GB, 6GB
Compatibility depends on the software version of your iPod.
•
g
PC Sync
Enables data synchronization between PC and iPod without unplugging
iPod from the set.
Preparation:
Confirm the iPod is well inserted into the dock. (
➡
left)
Connect your PC to the main unit through USB cable.
(PC will
automatically detect iPod.)
To transfer songs to iPod, refer to iPod instruction manual.
Before disconnecting the USB cable, make sure the procedure of
safe eject of hardware from PC is done.
PC Sync will function only when the main unit is in Standby or On condition.
Note
Recording and operating problems may occur on some computer
systems.
Please note that Panasonic and Panasonic dealers cannot be held liable
for any lost audio data or other direct or indirect damage except in cases
of intentional or gross negligence.
Dock adapter
(not included)
USB cable
(not included)
It is recommended to use the dock adapter from Apple.
Enjoying audio from iPod
SC-EN38_P,PC (RQTV0288)_running change1.indd 7
2/20/2008 9:55:05 AM


