38
9.6.
Firmware Version-Up Information
9.6.1.
Process Flow (1/2)
Collect ROM
Files
(Copy files into
CD-R/RW)
Load disc into
unit
(To update rate)
Step 1
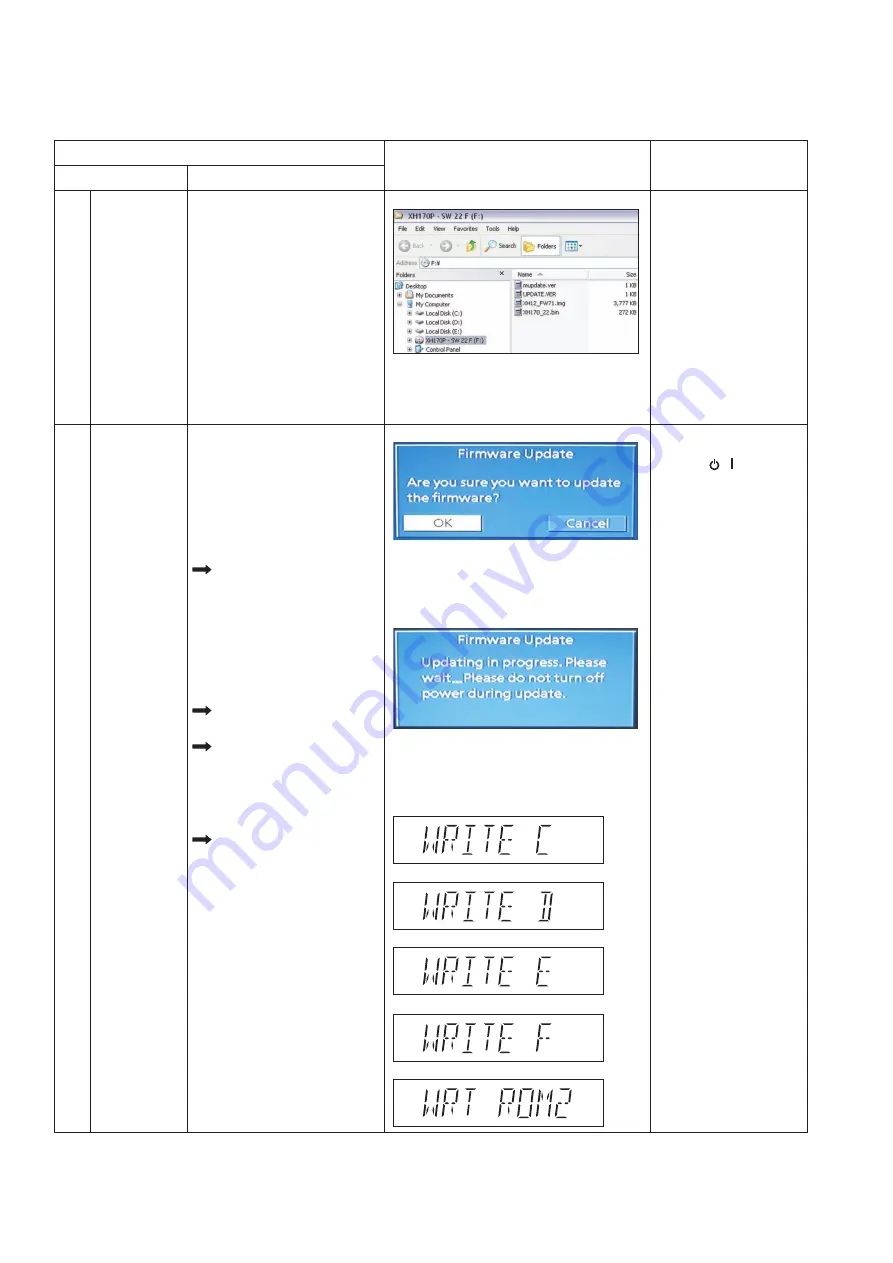
Unzip the firmware update file.
Step 2
Burn below files into root folder of
the CD disc.
Step 3
1. UPDATE.ver
2. XH12_FW71.img
3. mupdate.ver
4. XH170_22.bin
Notes:
1. Software update files =
"mupdate.ver" & "XH170_22.bin"
2. Firmware update files =
"UPDATE.ver" & "XH12_FW71.img"
All panel keys and
remote controller keys,
including [ / ] key,
are invalid during CD
Update.
Caution:
Make sure the
power supply during CD
update. If the power supply
cable is unplugged during
update stage, CD update
will fail. The DVD model
can't work, and can't be
recovered by CD update
again.
User can put both files
into the same root
directory. DVD MODEL
will choose the right
ROM files to update
its firmware.
FL/ GUI Display
Remarks
Item
Description
Process
1
2
GUI Display 1.1:
Step 1
Power on main unit.
Step 2
Change selector to DVD/CD mode
(default is CD/DVD mode)
Step 3
Load in the disc with software/
firmware update data.
After disc reading, GUI will
display as:
"GUI Display 1.1:
Are you sure you want to
update the firmware?"
Wait about 15~20 min to finish
update process.
After disc reading, GUI will
display as:
"GUI Display 1.2:
Updating in progress. Please
wait...Please do not turn off
power during update."
FL will display in the sequence
of " WRITE C", "WRITE D",
" WRITE E", "WRITE F" and
"WRT ROM2" as FL display
1.1~1.5 shown.
Step 4
Use remote control to select "OK"
button and press remote control
[OK] key.
GUI Display 1.2:
FL Display 1.1:
FL Display 1.2:
FL Display 1.3:
FL Display 1.4:
FL Display 1.5:
Display 1:
Summary of Contents for SA-XH170EB
Page 5: ...5 1 4 Caution For AC Cord For EB only ...
Page 6: ...6 1 5 Caution For Fuse Replacement ...
Page 15: ...15 4 1 Others Licences ...
Page 16: ...16 5 General Introduction 5 1 Power Saving Features ...
Page 17: ...17 5 2 Linked Operations with the TV VIERA Link HDAVI Control ...
Page 18: ...18 5 3 Disc Information 5 3 1 Discs that can be played ...
Page 19: ...19 5 3 2 File Extension Type Support MP3 JPEG DivX 5 4 DivX Information ...
Page 20: ...20 6 Location of Controls and Components 6 1 Remote Control Key Button Operations ...
Page 21: ...21 6 2 Main Unit Key Button Operations ...
Page 23: ...23 7 3 Connection with an ARC compatible TV ...
Page 25: ...25 3 Gently pull out the tray 4 Remove disc ...
Page 26: ...26 8 2 Playing From an USB Device ...
Page 49: ...49 12 3 Main Components and P C B Locations ...
Page 77: ...77 Step 9 Slide the tray in fully ...
Page 82: ...82 ...
Page 92: ...92 ...
Page 118: ...118 ...
Page 130: ...130 ...
Page 134: ...134 ...


