


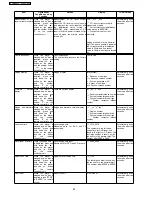


Item
Operational
Condition and Key
Function
Details
Display
TO Exit Mode
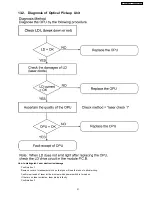
Measurement of CD
laser current electricity
While the player is
stopped and no disc is
inserted,
press
and
hold down the
button on the player
and the number button
“3”
on
the
remote
controller unit.
Measurement of CD laser current
electricity
Measures CD laser current electricity
and displays the result together with
the
initialization
value
stored
in
EEPROM. After measurement, CD
laser is lit till the power is turned off (or
goes off when the primary power is
turned off).
LDC
*1
_032
*2
_032
*3
*1
: CD laser current electricity
measurement mode
*2
: Current electricity initialization
value stored in EEPROM
*3
: Present value of current
electricity
Values are shown in the decimal
digit. The above example indicates
the current electricity initialization
value is 28mA and its present
value is 26mA when laser is turned
on.
Automatically exits
the mode after five
seconds.
User initialization
While the player is
stopped and no disc is
inserted,
press
and
hold down the
button on the player
and the number button
on the remote
controller unit.
User initialization
The user setting recovers the factory
setting.
“INITIALIZE”
-
Region display
While the player is
stopped and no disc is
inserted,
press
and
hold down the
button on the player
and
the
number
button,
“6”
on
the
remote controller unit.
Region display
[srrrxxyzzzz]
s : Panecon model type
rrr : Panecon release number
x : Syscon generation (45)
y: Syscon model type
zzz: Syscon release number
Automatically exits
the mode after five
seconds.
Firmware
version
display
While the player is
stopped and no disc is
inserted,
press
and
hold down the
button on the player
and
the
number
button,
“7”
on
the
remote controller unit.
Firmware version display
rrr
*1
_xx
*2
y
*3
zzz
*4
*1
: Panel computer release number
*2
: System computer generation
*3
: System computer model type
*4
: System computer release
number
Automatically exits
the mode after five
seconds.
Region and firmware
display
While the player is
stopped and no disc is
inserted,
press
and
hold down the
button on the player
and
the
number
button,
“8”
on
the
remote controller unit.
Region and firmware version display
_r
*1
__xx
*2
y
*3
zzz
*4
*1
: Region number
*2
: System computer generation
*3
: System computer model type
*4
: System computer release
number
Automatically exits
the mode after five
seconds.
Laser use time
While the player is
stopped and no disc is
inserted,
press
and
hold down the
button on the player
and the
button
on
the
remote
controller unit.
Laser usage time
Measures each for DVD and CD
respectively.
T1_1234_5678
The numbers in the left show
usage time for DVD laser and
those in the right for CD laser. The
four-digit number is shown by the
ten hours in the decimal digit. The
number after 0000 is 9999.
Automatically exits
the mode after five
seconds.
Reset laser use time While the usage time 1
is displayed, press and
hold down the
button on the player
and the
button
on
the
remote
controller unit.
Laser usage time reset
Resets both for DVD and CD at once.
T1_0000_0000
Automatically exits
the mode after five
seconds.
Spindle use time
While the player is
stopped and no disc is
inserted,
press
and
hold down the
button on the player
and the
button
on
the
remote
controller unit.
Spindle motor usage time
T2_1234
The four-digit number is shown by
the ten hours in the decimal digit.
The number after 00000 is 99999.
Automatically exits
the mode after five
seconds.
User reset
While the player is
stopped and no disc is
inserted, press “STOP”
& “ENTER” on remote
control.
Reset the unit.
“DVD RESET”
Automatically exits
the mode after five
seconds.
28
SA-VK91DGCS / SA-VK91DGCP
Summary of Contents for SA-VK91DGCS
Page 10: ...10 Operation Procedures 10 SA VK91DGCS SA VK91DGCP ...
Page 11: ...11 SA VK91DGCS SA VK91DGCP ...
Page 12: ...11 Disc information 12 SA VK91DGCS SA VK91DGCP ...
Page 13: ...13 SA VK91DGCS SA VK91DGCP ...
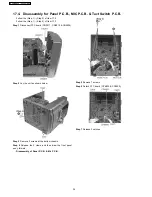
Page 17: ...13 Procedure for repairing the set 17 SA VK91DGCS SA VK91DGCP ...
Page 42: ...42 SA VK91DGCS SA VK91DGCP ...
Page 45: ...45 SA VK91DGCS SA VK91DGCP ...
Page 46: ...46 SA VK91DGCS SA VK91DGCP ...
Page 48: ...48 SA VK91DGCS SA VK91DGCP ...
Page 49: ...49 SA VK91DGCS SA VK91DGCP ...
Page 50: ...50 SA VK91DGCS SA VK91DGCP ...
Page 51: ...51 SA VK91DGCS SA VK91DGCP ...
Page 52: ...52 SA VK91DGCS SA VK91DGCP ...
Page 53: ...53 SA VK91DGCS SA VK91DGCP ...
Page 54: ...54 SA VK91DGCS SA VK91DGCP ...
Page 55: ...55 SA VK91DGCS SA VK91DGCP ...
Page 56: ...56 SA VK91DGCS SA VK91DGCP ...
Page 57: ...57 SA VK91DGCS SA VK91DGCP ...
Page 59: ...59 SA VK91DGCS SA VK91DGCP ...
Page 130: ...130 SA VK91DGCS SA VK91DGCP ...
Page 133: ...133 SA VK91DGCS SA VK91DGCP ...
Page 134: ...134 SA VK91DGCS SA VK91DGCP ...
Page 136: ...26 3 Cabinet 26 3 1 Cabinet Parts Location 136 SA VK91DGCS SA VK91DGCP ...
Page 137: ...137 SA VK91DGCS SA VK91DGCP ...
Page 138: ...138 SA VK91DGCS SA VK91DGCP ...
Page 154: ...26 6 Packaging 154 SA VK91DGCS SA VK91DGCP ...
Page 155: ...155 SA VK91DGCS SA VK91DGCP PRT0407 D K J N L ...


