background image

RQT6682

20

Listening operations

Using the timers

Using the play/record timer

by remote control only

The timer has two functions. It can be set to on at a certain
time to wake you up, or it can be set to record the radio.
The play timer cannot be used in combination with the
record timer.

Preparations

• Turn the unit on and set the clock (

\

 page 9).

For the play timer

, prepare the music source you want to

listen to; cassette, CD or radio, and set the volume.

For the record timer

, check the cassette’s erasure pre-

vention tabs (

\

 page 16: 

A

), insert the tape and tune to

the radio station (

\

 page 10).

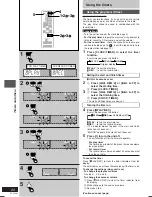
1

Press [CLOCK / TIMER] to select the timer
function.

Every time you press the button:

CLOCK

    Original display

REC

PLAY

˚

˚

˚

˚

˚

PLAY

: to set the play timer

˚

˚

˚

˚

˚

REC

: to set the record timer

Setting the start and finish times

(Within 10 seconds or so)

2

1


Press


[

g

, REW/

4

4

4

4

4

] or [

f

3

3

3

3

3

/ FF] to

select the starting time.

2

Press [CLOCK / TIMER].

3

1

Press [

g

, REW/

4

4

4

4

4

] or [

f

3

3

3

3

3

/ FF] to

select the finishing time.

2

Press [CLOCK / TIMER].

The start and finish times are now set.

Turning the timer on

4

Press [

˚

˚

˚

˚

˚

PLAY/REC].

Every time you press the button:

    PLAY

REC

no displays (off)

˚

˚

˚

˚

˚

PLAY

: to turn the play timer on

˚

˚

˚

˚

˚

REC

: to turn the record timer on

(The indicator doesn’t appear if the start and finish
times haven’t been set.)

“ERROR” appears if the clock hasn’t been set.

5

Press [ ] to turn the unit off.

The unit must be off for the timers to operate.

For play timer

The timer play will start at the preset time and volume
level you preset.

For record timer

The record timer comes on about 30 seconds earlier
than the set time.

To cancel the timer

Press [

˚

˚

˚

˚

˚

PLAY/ REC] to clear the timer indicators from the

display.
The timer comes on at the set time everyday if the timer is on.

To change the settings (when unit is on)

To change the play/record times

Do steps 1, 2, 3, and 5.

To change the source or volume

1

Press [

˚

˚

˚

˚

˚

PLAY/ REC] to clear the timer indicator from

the display.

2

Make changes to the source or volume.

3

Do steps 4 to 5.

1

2

3

4

5

TIMER

TIMER

CLOCK

REW

FF

TIMER

TIMER

CLOCK

REW

FF

TIMER

TIMER

CLOCK

PLAY

REC

REC

4

1   2       3

1

2

3

4

5

6

7

8

9

0

10

VOL

VOL

VOL

VOL

REW

FF

FM MODE

FM MODE

DIMMER

DIMMER

DISPLA

DISPLAY

MU

MUTING

ING

BASS

BASS

TREBLE

TREBLE

PLAY

SLEEP

SLEEP

TIMER

TIMER

CL

CLOCK

CK

REC

REC

EQ

EQ

VIR

VIRTUALIZER

TUALIZER

SOUND

SOUND

PRESET

PRESET

TUNE MODE

TUNE MODE

CD REC

CD REC

MODE

CD PLA

CD PLAY

MODE

PROGRAM/

PROGRAM/

 CLEAR

TAPE

APE

TUNER

TUNER

BAND

BAND

CD

CD

STOP 

STOP 

5

2

2

   2       3

1

1

Timers and others

PLAY

ON

ON

REC

PLAY

REC

OFF

OFF

PLAY

REC

OFF

OFF

PLAY

REC

(Continued on next page)

FOR RECORD TIMER

FOR PLAY TIMER

RQT6682(11-24)NEW1.P65

1/3/03, 10:58 AM

20

Summary of Contents for SA-PM10

Page 1: ...indicates the United Kingdom Before connecting operating or adjusting this product please read these instructions completely Please keep this manual for future reference E CD Stereo System Operating Instructions Model No SC PM10 EB GN GCS ...

Page 2: ...ng operations The radio manual tuning 10 The radio preset tuning 11 CDs 12 Cassette tapes 15 Recording operations Before recording 16 Recording the radio 16 Recording CDs 17 Timers and others Sound Quality 19 Using the timers 20 Reference Troubleshooting guide 22 Technical specifications 23 Maintenance 23 THIS UNIT IS INTENDED FOR USE IN MODERATE CLIMATES TÄMÄ LAITE ON TARKOITETTU KÄYTETTÄVÄKSI LE...

Page 3: ...in these instructions occurs disconnect the AC mains lead and contact your dealer or an authorized service center Electric shock or damage to the unit can occur if the unit is repaired disassembled or reconstructed by unqualified persons Extend operating life by disconnecting the unit from the power source if it is not to be used for a long time Supplied accessories Please check and identify the s...

Page 4: ...markings identifying the terminals in your plug proceed as follows The wire which is coloured Blue must be connected to the terminal which is marked with the letter N or coloured Black or Blue The wire which is coloured Brown must be connected to the terminal which is marked with the letter L or coloured Brown or Red WARNING DO NOT CONNECT EITHER WIRE TO THE EARTH TERMINAL WHICH IS MARKED WITH THE...

Page 5: ...and remote control unit Do not expose the remote control signal sensor to direct sunlight or to the bright light of a fluorescent light Take care to keep the remote control signal sensor and end of the remote control unit free from dust If this system is installed in a rack with glass doors the glass doors thickness or color might make it necessary to use the remote control unit a shorter distance...

Page 6: ...akers The combination of the main unit and speakers provide the best sound Using other speakers can damage the unit and sound quality will be negatively affected Caution Use the speakers only with the recommended system Failure to do so may lead to damage to the amplifier and or the speakers and may result in the risk of fire Consult a qualified service person if damage has occurred or if you expe...

Page 7: ...oor antenna without removing the AM loop antenna Run 5 to 12 m of vinyl covered wire horizontally along a window or other convenient location Note When the unit is not in use disconnect the outdoor antenna to prevent possible damage that may be caused by lighting Never use an outdoor antenna during a lightning storm A B A B FM outdoor antenna not included For Others For Europe AM outdoor antenna n...

Page 8: ...Cassette play button TAPE 2 15 áCD tray open close button OPEN CLOSE c 12 àCD tray B Remote Control Buttons such as 8function in exactly same way as the buttons on the main unit âSleep timer button SLEEP 21 äCD program clear tuner preset button PROGRAM CLEAR 11 14 ãCD play mode select button CD PLAY MODE 13 åCD recording mode button CD REC MODE 18 çFM mode BP button FM MODE 10 16 éTuning mode sele...

Page 9: ...ome time over a period Readjust if necessary B Convenient Functions by remote control only To dim the display panel Use this when you are going to sleep or any other time you would prefer the panel to be dimmer Press DIMMER The display panel dims except for the AC IN indicator To cancel Press DIMMER again To mute the volume This feature is convenient when you have a telephone call etc Press MUTING...

Page 10: ...f for a moment until the frequency starts changing rapidly The unit begins auto tuning stopping when it finds a station Auto tuning may not function when there is excessive interference To cancel auto tuning press g REW 4 4 4 4 4 or 3 3 3 3 3 FF f once again If noise is excessive in FM by remote control only Press FM MODE to display MONO This mode improves sound quality if reception is weak but br...

Page 11: ...e two digits OR 1 Press TUNE MODE to select PROGRAM 2 Press g REW 4 4 4 4 4 or f 3 3 3 3 3 FF to select the channel 2 Adjust the volume Allocation setting Each country allocates broadcast bands according to their particular needs This system can also receive AM broadcasts allocated in 10 kHz steps To change the step 9kHz 10kHz Preparation Press TUNER BAND to select FM 1 Press and hold TUNER BAND A...

Page 12: ...uch play When a CD is loaded and the unit is off press CD J The unit comes on and starts play To remove a CD Press OPEN CLOSE c Note During random play page 13 you cannot skip to tracks which have already been played During program play page 14 or random play you cannot search forward or backward over tracks During program play skipping is always in the programmed order whether forward or backward...

Page 13: ...es not work when PROGRAM is displayed press and hold PROGRAM CLEAR first Tracks cannot be selected with the numbered buttons You cannot skip to tracks already played Search can be done within the track in play only To cancel repeat play and random play Press CD PLAY MODE to clear 1 and RANDOM If cancelled during play play continues to the end of the disc Pressing OPEN CLOSE c also cancels repeat p...

Page 14: ...layed Total play time of the programmed tracks equals or exceeds 100 minutes Tracks can still be programmed and played B When FULL appears The number of programmed tracks is limited to 36 No further tracks can be programmed C Check program contents Check to see if P is displayed then press either g REW 4 4 4 4 4 or f 3 3 3 3 3 FF Every time you press one of the buttons the track and program number...

Page 15: ...nd metal position tapes can be played but the unit will not be able to do full justice to the characteristics of these cassettes Tapes exceeding 100 minutes are thin and can break or get caught in the mechanism Tape slack can get caught up in the mechanism and should be wound up before the tape is played Endless tapes can get caught up in the deck s moving parts if used incorrectly To find the beg...

Page 16: ...l position tapes High position and metal position tapes can be used but the unit will not be able to record or erase them correctly Erasure prevention The illustration shows how to remove the tabs to prevent recording To record on the tape again cover as shown The effect of volume and sound quality on recording These have no effect on recording They can be changed for playback To erase a recorded ...

Page 17: ...facing upward Press OPEN CLOSE c c c c c to close the CD tray 4 Press REC J to start recording The recording will start from the first track To stop recording Press STOP L The recording and the CD will stop To stop recording temporarily Press REC J To resume recording press REC J To record from a specific point on a tape Before recording advance the tape to the point from where you want to start r...

Page 18: ...cassette page 15 Wind the tape to where you want to start recording 1 Press STOP L to select the CD mode 2 Press CD REC MODE on the remote control so 1 REC is displayed 3 Press g REW 4 4 4 4 4 or 3 3 3 3 3 FF f to select the track you want to record 4 Press REC J to start recording CD plays and recording starts at the same time To stop recording Press STOP L The CD also stops To continue recording...

Page 19: ...s speakers If interference in FM stereo reception increases cancel the sound virtualizer effect C To adjust the tone quality by remote control only 1 Press BASS to select low frequency sound or TREBLE to select high frequency sound 2 Press VOL or VOL to adjust the level The tone level can be varied within a range of 5 to 5 Note Changes to tone quality do not affect recordings Listening with headph...

Page 20: ...cord timer on The indicator doesn t appear if the start and finish times haven t been set ERROR appears if the clock hasn t been set 5 Press to turn the unit off The unit must be off for the timers to operate For play timer The timer play will start at the preset time and volume level you preset For record timer The record timer comes on about 30 seconds earlier than the set time To cancel the tim...

Page 21: ...F To confirm the remaining time only while unit is ON Press SLEEP The remaining time is shown for about 3 seconds To change the time remaining during operation Press SLEEP to show the remaining time and then press SLEEP to select the desired time Note The play and sleep timer or the record and sleep timer can be used together The sleep timer always has priority Be sure not to overlap timer setting...

Page 22: ...r doesn t light Sound is distorted A beat sound is heard A low hum is heard during AM broadcast An AM broadcast station cannot be picked up clearly Use an outdoor antenna 7 Turn the TV off or separate it from the unit Separate the antenna from other cables and cords Frequency step is set to 10 kHz Change the frequency step to 9 kHz Å Listening to the radio The picture on the TV disappears or strip...

Page 23: ...otor DC servo motor Recording system AC bias 100 kHz Erasing system AC erase 100 kHz Tape speed 4 8 cm s Overall frequency response 3 6 dB at DECK OUT NORMAL TYPE I 35 Hz 14 kHz S N 50 dB A weighted Wow and flutter 0 15 WRMS Fast forward and rewind times Approx 120 seconds with C 60 cassette tape If the surfaces are dirty To clean this unit wipe with a soft dry cloth Never use alcohol paint thinne...

Page 24: ...RVICE OG REPARASJONSARBEID MÅ UTFØRES AV KVALIFISERT PERSONELL VAROITUS ÄLÄ ASENNA TAI LAITA TÄTÄ LAITETTA KABINETTITYYPPISEEN KIRJAKAAPPIIN TAI MUUHUN SULJETTUUN TILAAN JOTTA TUULETUS ONNISTUISI VARMISTA ETTÄ VERHO TAI MIKÄÄN MUU MATERIAALI EI HUONONNA TUULETUSTA JOTTA VÄLTETTÄISIIN YLIKUUME NEMISESTA JOHTUVA SÄHKÖISKU TAI TU LIPALOVAARA ÄLÄ PEITÄ LAITTEEN TUULETUSAUKKOJA SA NOMALEHDELLÄ PÖYTÄLII...

Reviews: