background image

RQT8043

RQTV0286

ES

P

A

Ñ

O

L

ES

P

A

Ñ

O

L

ES

P

A

Ñ

O

L

ES

P

A

Ñ

O

L

ES

P

A

Ñ

O

L

19

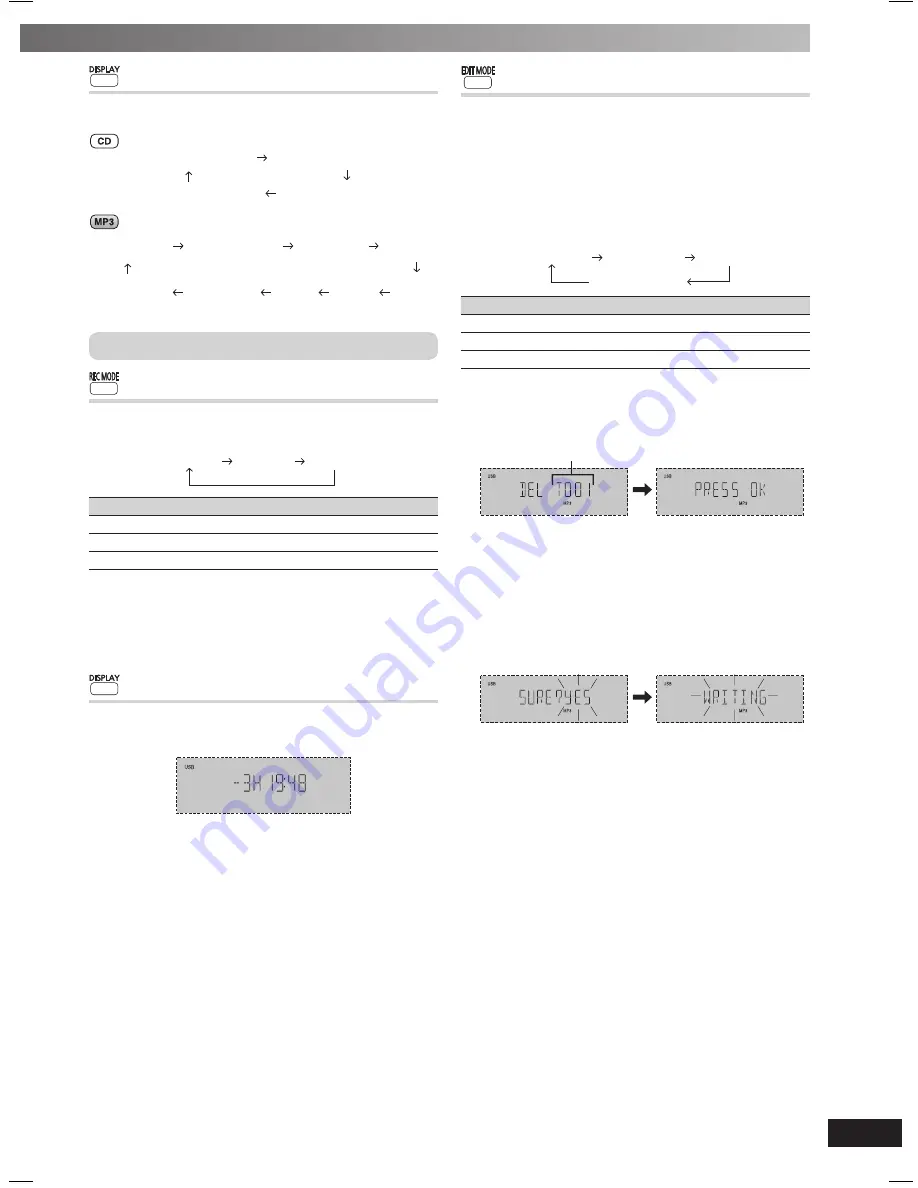
  Display function

This function allows you to display the information during recording.

 Press [DISPLAY] repeatedly during USB recording mode.

Elapsed play time

Remaining play time

USB remaining REC time

Recording REC mode

Elapsed 

play time

Remaining 

play time

Album 

Name

Tag 

(Artist)

Tag 

(Track)

Tag 

(Album)

Track 

Name

Recording 

REC mode

USB remaining 

REC time

Other recording functions

  Recording mode

You can select the desired recording mode before you start 
recording.

 Press [REC MODE] repeatedly to select your desired setting.

128 KBPS

192 KBPS

320 KBPS

Recording mode

Effect

128 KBPS

Long play mode

192 KBPS

Normal mode

320 KBPS

High quality sound mode

During recording

Press [DISPLAY] repeatedly to display the current recording 
mode.

Note:

You cannot change the recording mode during recording.

  Display function

You are able to check the USB device’s remaining recording time 
before or during recording.

Press [DISPLAY].

Note:

During recording, the remaining time displayed is an estimation of 
the current recording mode.

   Erasing the recorded tracks

This function allows you to erase unwanted tracks quickly and 
easily.

1

 Press [

6

, USB] and then [

7

, CLEAR].

2

  Press [PLAY MODE] to select ALL.


Select your desired album or tracks.

3

   Press [EDIT MODE] to select your desired erasing mode.

Each time you press the button:

TRACKDEL

Original display

ALBUMDEL

FORMAT

Edit Mode

Action

TRACKDEL

Erase single track

ALBUMDEL

Erase one album

FORMAT

Erase all albums (format USB device)

4

   Press [OK].

Within 2 seconds or so, the selected item to be erased is 
displayed followed by the “PRESS OK” display.

Example:

Track number

5

  Press [OK] again.

6

   Press [

4

4

/REW] or [

¢

3

/FF] to select “YES” then 

press [OK] to confi rm the erasure.

“WRITING” is displayed.

OR

Press [

4

4

/REW] or [

¢

3

/FF] to select “NO” then 

press [OK] to cancel the erasure.

Example:

Note:

For “ALBUM DEL”, only 999 tracks in albums which contain more 
than 1000 tracks will be erased. To erase the selected album, 
repeat steps 2 to 6.

RQTV0286-1B.indd   19

RQTV0286-1B.indd   19

5/5/08   3:54:25 PM

5/5/08   3:54:25 PM

Summary of Contents for SA-AK770

Page 1: ...SB WAK770 Unless otherwise indicated illustrations in these operating instructions are for the United Kingdom and Continental Europe Operations in these instructions are described mainly using the remote control but you can perform the operations on the main unit if the controls are the same Your unit may not look exactly the same as illustrated SUPPLIED ACCESSORIES SUPPLIED ACCESSORIES Please che...

Page 2: ...RQT8043 RQTV0286 ESPAÑOL ESPAÑOL ESPAÑOL ESPAÑOL ESPAÑOL 2 Inside of product Tuotteen sisällä Produktets innside SUOMI Back of product ...

Page 3: ...is to be fitted please observe the wiring code as stated below If in any doubt please consult a qualified electrician IMPORTANT The wires in this mains lead are coloured in accordance with the following code Blue Neutral Brown Live As these colours may not correspond with the coloured markings identifying the terminals in your plug proceed as follows The wire which is coloured Blue must be connect...

Page 4: ...ts thereby shortening the unit s service life Place it at least 15 cm away from wall surfaces to avoid distortion and unwanted acoustical effects Do not place heavy items on the unit Voltage Do not use high voltage power sources This can overload the unit and cause a fire Do not use a DC power source Check the source carefully when setting the unit up on a ship or other places where DC is used AC ...

Page 5: ... it from the household mains socket You will need to reset some memory items after plugging in the unit Note The included AC mains lead is for use with this unit only Do not use it with other equipment Do not use an AC mains lead from other equipment Simple setup Speaker connections Speaker connections FM indoor antenna Tape the antenna where reception is best Adhesive tape AM loop antenna Antenna...

Page 6: ...ntrol 2 Do not mix old and new batteries use different types of batteries at the same time take apart or short circuit the batteries attempt to recharge alkaline or manganese batteries use batteries if the covering has been peeled off Mishandling of batteries in the remote control can cause electrolyte leakage which may cause a fire Remove the batteries if the remote control is not going to be use...

Page 7: ...ve been finalised It may not be able to play some CD R RW due to the condition of the recording Do not use irregularly shaped disc Do not use disc with labels and stickers that are coming off or with adhesive exuding from under labels and stickers Do not attach extra labels or stickers on the disc Do not write anything on the disc Note about using a DualDisc The digital audio content side of a Dua...

Page 8: ...tape fast forward or rewind tape program sensor TPS tune or preset channel selection time adjustment manual EQ setting MID and TREBLE 15 Tape recording function 12 16 CD to USB high speed auto recording 18 Recording indicator 18 USB port Cassette deck open 12 Music port jack 16 Headphone jack Avoid listening for prolonged periods of time to prevent hearing damage Excessive sound pressure from earp...

Page 9: ... recording 18 This auto off function allows you to turn off the unit in disc tape or USB mode only after left unused for 10 minutes Press and hold SLEEP AUTO OFF to activate the function Press and hold SLEEP AUTO OFF again to cancel The setting is maintained even if the unit is turned off To dim the display panel Press the button to activate Press the button again to cancel To mute the sound Press...

Page 10: ...ay see right Play Mode function you can search only within the track Play Mode function You can listen to specific discs and tracks Preparation Select and play your desired disc Press 7 CLEAR Press PLAY MODE to select the desired mode Mode To play 1 DISC 1 DISC One selected disc ALL DISC ALL DISC All loaded discs in succession from the selected disc to the final disc Example 4 5 1 2 3 1 TRACK 1 TR...

Page 11: ...en 1 5 to select the disc 2 Press 7 CLEAR 3 Press PROGRAM 4 Press 5 ALBUM to select your desired album 5 Press 4 REW or FF to select the track 6 Press OK Repeat steps 4 to 6 to program other tracks 7 Press 6 CD to start play For two digit track press h10 once then the two digits For three digit track press h10 twice then the three digits To Action Cancel program mode Press PROGRAM in the stop mode...

Page 12: ... them correctly Note Changes to volume and sound quality do not affect recording This function does not work during any RANDOM mode selection Preparation Wind up the source tape so recording can begin immediately 1 Press 0 OPEN and insert the cassette to be recorded Insert with the side to be recorded facing towards you and the exposed tape facing down 2 Select the source to be recorded Radio reco...

Page 13: ... text data transmitted by the radio data system RDS available in some areas If the station you are listening to is transmitting RDS signals RDS will light up on the display Press DISPLAY to display Station name PS Program Type PTY Frequency display FREQ Program type displays NEWS AFFAIRS INFO SPORT EDUCATE DRAMA CULTURE SCIENCE VARIED POP M ROCK M M O R M LIGHT M CLASSICS OTHER M WEATHER FINANCE C...

Page 14: ...the timers to operate Other basic operations To Action Change the settings Repeat steps 1 to 4 and 6 see left and above Change the source or volume 1 Press PLAY REC to clear the timer indicator from the display 2 Make changes to the source or volume 3 Perform steps 5 to 6 see above Check the settings Press CLOCK TIMER repeatedly to select PLAY or REC Cancel Press PLAY REC to clear the timer indica...

Page 15: ...y Changing the sound quality RE MASTER RE MASTER This feature reproduces the frequencies lost during recording original soundtrack to give you a sound closer to the original Press RE MASTER repeatedly to select either ON RE MASTER or OFF RE MASTER Note During CD MP3 or USB selection the re master effect is digital As for MUSIC PORT or OPTION port selection the re master effect is analogue This fun...

Page 16: ...nterfering with other Panasonic Avoid interfering with other Panasonic equipment equipment Other Panasonic audio or video equipment may start functioning when you operate the unit using the supplied remote control You can operate this unit in another mode by setting the remote control operating mode to REMOTE 2 The main unit and remote control must be set to the same mode 1 Press MUSIC P main unit...

Page 17: ...it when you remove the memory card Failure to do so may cause malfunction to the device When you connect a compatible digital audio player to the USB port charging may be activated It will not charge when the unit is in standby mode during DEMO OFF Connecting and playing a Bluetooth device Connecting and playing a Bluetooth device For the United Kingdom and Continental Europe By connecting a Bluet...

Page 18: ...erform high speed recording Record the CD at normal speed The sound is muted during high speed recording Recording from CD using analogue format You can change your recording mode from the default digital recording to analogue recording 1 Press 6 CD and then 7 CLEAR 2 Press and hold EDIT MODE to select ANALOG REC Each time you press and hold the button ANALOG REC analogue recording DIGITAL REC dig...

Page 19: ...he USB device s remaining recording time before or during recording Press DISPLAY Note During recording the remaining time displayed is an estimation of the current recording mode Erasing the recorded tracks This function allows you to erase unwanted tracks quickly and easily 1 Press 6 USB and then 7 CLEAR 2 Press PLAY MODE to select ALL Select your desired album or tracks 3 Press EDIT MODE to sel...

Page 20: ...le radio USB and etc or press 4 4 REW or 3 FF during recording Stop the recording function 12 appears on the display during standby mode You plugged the AC mains lead in for the first time or there was a power failure recently Set the time 14 F61 is displayed Check and correct the speaker cords connection If this does not fix the problem consult the dealer 5 F76 is displayed There is a power suppl...

Page 21: ...ize or high memory USB flash drive takes longer time to read USB OVER CURRENT ERROR The USB device is drawing too much power Disconnect the USB device Turn the unit off and then back on HI SPEED CAN T REC You cannot use high speed recording while using analogue mode Change to digital mode or use normal recording PLEASE WAIT XX MIN You cannot perform a second high speed recording You have to wait u...

Page 22: ...RSK Bølgelengde 780 nm Laserstyrke Ingen farlig stråling sendes ut Audio output Disc Number of channels 2 1 FL FR SW FL Front left channel FR Front right channel SW Subwoofer channel USB SECTION USB Port USB Standard USB 2 0 full speed Media file format support MP3 mp3 USB device file system FAT 12 FAT 16 FAT 32 USB port power 500 mA Max USB Ripping recording Recording file format MP3 mp3 Bit rate...

Page 23: ... or benzine to clean this unit Before using chemically treated cloth read the instructions that came with the cloth carefully For a cleaner crisper sound cassette deck Clean the heads regularly to assure good quality playback and recording Use a cleaning tape not included When moving the unit 1 Remove all discs 2 Press y I to turn the unit off 3 Disconnect the AC mains lead ...

Page 24: ... Industrial Co Ltd Web Site http panasonic net Pursuant to at the directive 2004 108 EC article 9 2 Panasonic Testing Centre Panasonic Marketing Europe GmbH Winsbergring 15 22525 Hamburg Germany RQTV0286 2B L0408KE2058 En ...

Reviews: