background image

Preparation

10

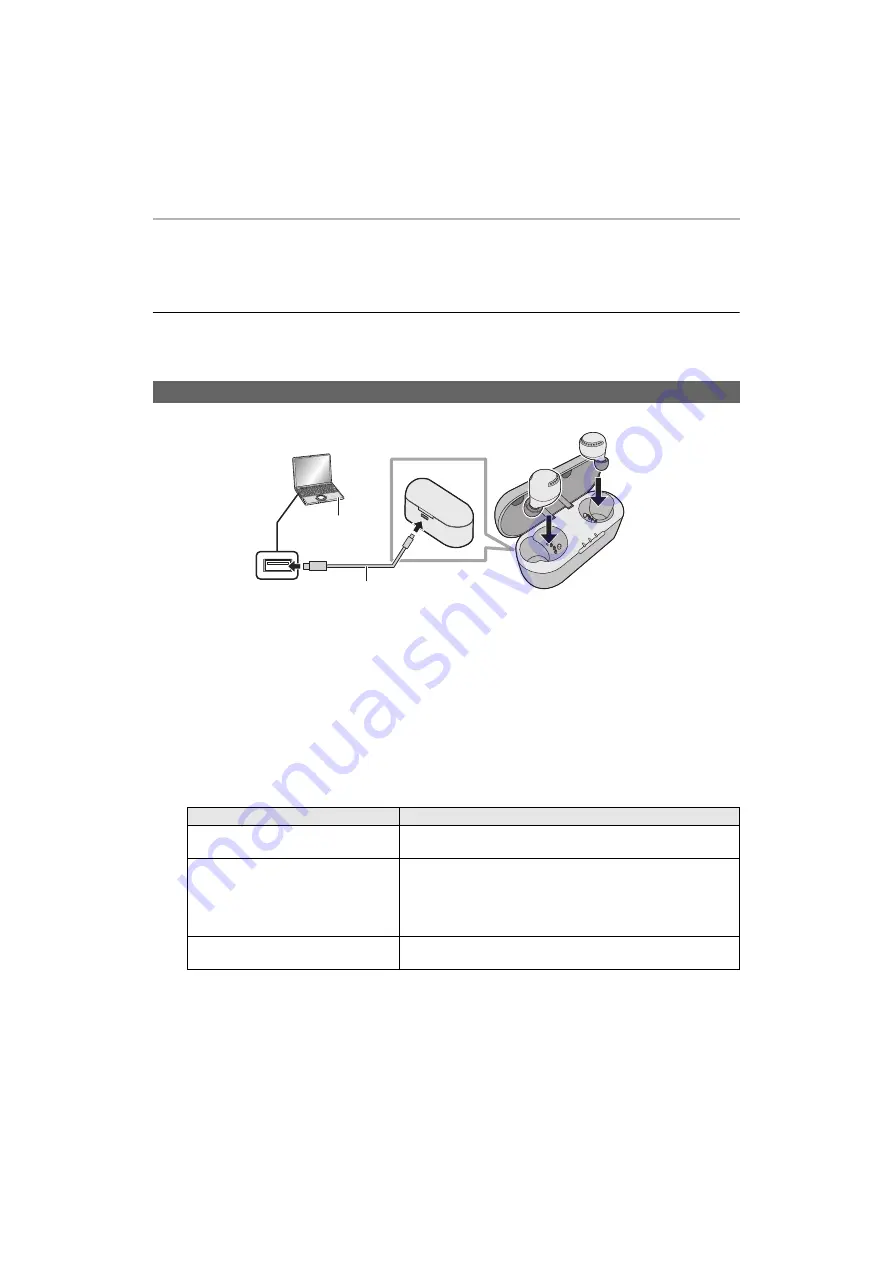
Charging

The chargeable battery (installed in the unit) is not charged initially. Charge the battery before using the unit.
• Proper charging is not possible if there is dust or droplets of water on the terminal sections of the earphones or 

charging cradle. Remove the dust or water droplets before charging.

Note

• Charge in a room temperature between 10

o

C and 35

o

C.

• It is not possible to turn the power on or connect to Bluetooth

®

 devices during charging.

When the earphones have not been put into the charging cradle, the charging cradle itself is charged.

1

Use the USB charging cord (supplied) (

b

) to connect the charging cradle to a 

computer (

a

).

• Charging of the charging cradle starts. The charging cradle LEDs light or blink (white) while the charging 

cradle is charging. Charging is complete when they turn off.

• Check the direction of the USB charging cord terminals and plug in/out straight holding onto the plug. (It may 

result in malfunction by the deforming of the terminal if it is plugged in obliquely or in wrong direction.)

2

Put the earphones into the charging cradle.

• Confirm the L side and R side of the earphones, and match the positions of the charging terminals on the 

earphones with the terminal sections in the charging cradle. (Charging of the earphones will not start if the 
positions do not match.)

• The way the earphone LEDs light when you put the earphones into the charging cradle depends on the usage 

status.

Using the USB charging cord (supplied) to charge the earphones and the charging cradle

Usage status

Earphone LED lighting/blinking patterns

Charging for the first time (after 
purchase)

The earphone LEDs light (red) about 5 seconds after you put the 
earphones into the charging cradle.

Charging any time after the first time 
(When there is still battery charge)

When you put the earphones into the charging cradle, the 
earphone LEDs light (red) about 3 seconds, then turn off. After 
about 5 seconds, the earphone LEDs light (red) again.
• If the earphone LEDs do not light (red) again, the earphones are 

fully charged.

When the batteries are depleted (When 
there is no battery charge at all)

The earphone LEDs light (red) about 5 seconds after you put the 
earphones into the charging cradle.

Summary of Contents for RZ-S500W

Page 1: ...igital Wireless Stereo Earphones Model No RZ S500W RZ S300W Thank you for purchasing this product Please read these instructions carefully before using this product and save this manual for future use...

Page 2: ...hem in the charging cradle and close the lid for storage Securely attach the earpieces If they are left in the ears after coming off injury or sickness may be caused Allergies Discontinue use if you e...

Page 3: ...his unit at a maximum range of 10 m The range can decrease depending on the environment obstacles or interference Interference from other devices This unit may not function properly and troubles such...

Page 4: ...p Panasonic Audio Connect 13 Connecting a Bluetooth device 14 Connecting by pairing registering your earphones with a Bluetooth device 14 Connecting a paired Bluetooth device 15 Operation Listening to...

Page 5: ...jects Keeping the battery performance During the long period of disuse full charge this unit once every 6 months to keep the battery performance Expressions used in this document Pages to be referred...

Page 6: ...Observe the following precautions Incorrect operation cause malfunction Do not charge the charging cradle or the earphones while your hands are wet or while there are still water droplets on this uni...

Page 7: ...he L side If the earphones fall out easily replace with earpieces supplied of a different size Fit the earphones correctly in order to get adequate noise cancelling effect RZ S500W only and acoustics...

Page 8: ...ns l 20 Operating with the touch sensors 3 Earphone LEDs 1 3 4 RZ S500W Microphone for noise cancelling 5 Earpieces 6 Microphones for calls 7 Charging terminals 8 L side left R side right indications...

Page 9: ...tion for the L side earphone 13 Terminal section for the R side earphone Do not touch the terminal sections with bare hands 14 Charging cradle LEDs 4 15 Certification information label bottom of the c...

Page 10: ...d in obliquely or in wrong direction 2 Put the earphones into the charging cradle Confirm the L side and R side of the earphones and match the positions of the charging terminals on the earphones with...

Page 11: ...ging is complete when they turn off It takes approx 2 hours to charge the earphones from empty to full The LEDs lighting or flashing on this unit indicate the remaining battery charge Earphones When t...

Page 12: ...they are blinking in red To turn the earphones off Put the earphones into the charging cradle The way the LEDs light when you put the earphones into the charging cradle depends on the usage status Re...

Page 13: ...setting etc Switch Find headphones function Check remaining battery charge Access to this document Preparation Turn on the unit 1 Download the Panasonic Audio Connect app free of charge to the smartp...

Page 14: ...a passkey input the passkey 0000 four zeros of this unit When the earphone LEDs blink blue twice at approximately 5 second intervals pairing has been completed and connection has been established The...

Page 15: ...blink slowly The batteries are low when they are blinking in red 2 Do Steps 2 to 3 of Connecting by pairing registering your earphones with a Bluetooth device l 14 3 Confirm that the earphones and th...

Page 16: ...tooth device and the unit l 14 Connecting a Bluetooth device 2 Select and play the music or the video on the Bluetooth device The unit s earphones will output the music or the audio of the video being...

Page 17: ...ce to answer an incoming call During an incoming call ringtone will sound from the unit and the earphone LEDs will blink HFP only To reject a phone call touch and hold a touch sensor L or R for about...

Page 18: ...level setting is Noise cancelling RZ S300W The default level setting is OFF 2 Adjust the volume of the playback device Noise cancelling RZ S500W only Reduces the sounds noise you can hear from outside...

Page 19: ...udio Connect app select Amazon Alexa as your voice assistant 2 Touch the Sign in with Amazon button After signing into Amazon you will need to add headphones in the device setup Install the latest ver...

Page 20: ...using A beep sounds to indicate that you have touched to reach either the maximum or minimum volume level Function Touch sensor L Touch sensor R Listening to music Playback pause Touch once Raise the...

Page 21: ...ks owned by Bluetooth SIG Inc and any use of such marks by Panasonic Corporation is under license Other trademarks and trade names are those of their respective owners Apple the Apple logo and Siri ar...

Page 22: ...r hand etc The device may be out of the 10 m communication range Move the device closer to the earphones Remove any obstacle between the earphones and the device Switch off any wireless LAN device whe...

Page 23: ...ly using working properly If your computer has other USB ports unplug the connector from its current port and plug it into one of the other ports If the measures mentioned above are not applicable unp...

Page 24: ...Noise cancelling ON SBC 15 min charge Approx 70 min Noise cancelling OFF SBC 15 min charge Approx 90 min AAC 15 min charge Approx 80 min SBC Operating time 1 Earphones i Charging cradle Approx 19 5 ho...

Page 25: ...y band 2402 MHz to 2480 MHz Supported profiles A2DP AVRCP HSP HFP Supported codec SBC AAC Operating distance Up to 10 m RZ S500W RZ S300W Driver units 8 mm 6 mm Microphone Mono MEMS Microphone Chargin...

Page 26: ...unit rather than disposing of in general waste non combustible garbage follow the local national laws and take to the appropriate collection point Contact your local government organisation if you are...

Page 27: ...s on the products packaging and or accompanying documents mean that used electrical and electronic products and batteries must not be mixed with general household waste For proper treatment recovery a...

Page 28: ...holidays Or go on line through our Internet Accessory ordering application at www pas europe com Most major credit and debit cards accepted All enquiries transactions and distribution facilities are...

Reviews: