1. Turn on the PC and install the TATSUJIN Adjustment
Program into the PC.
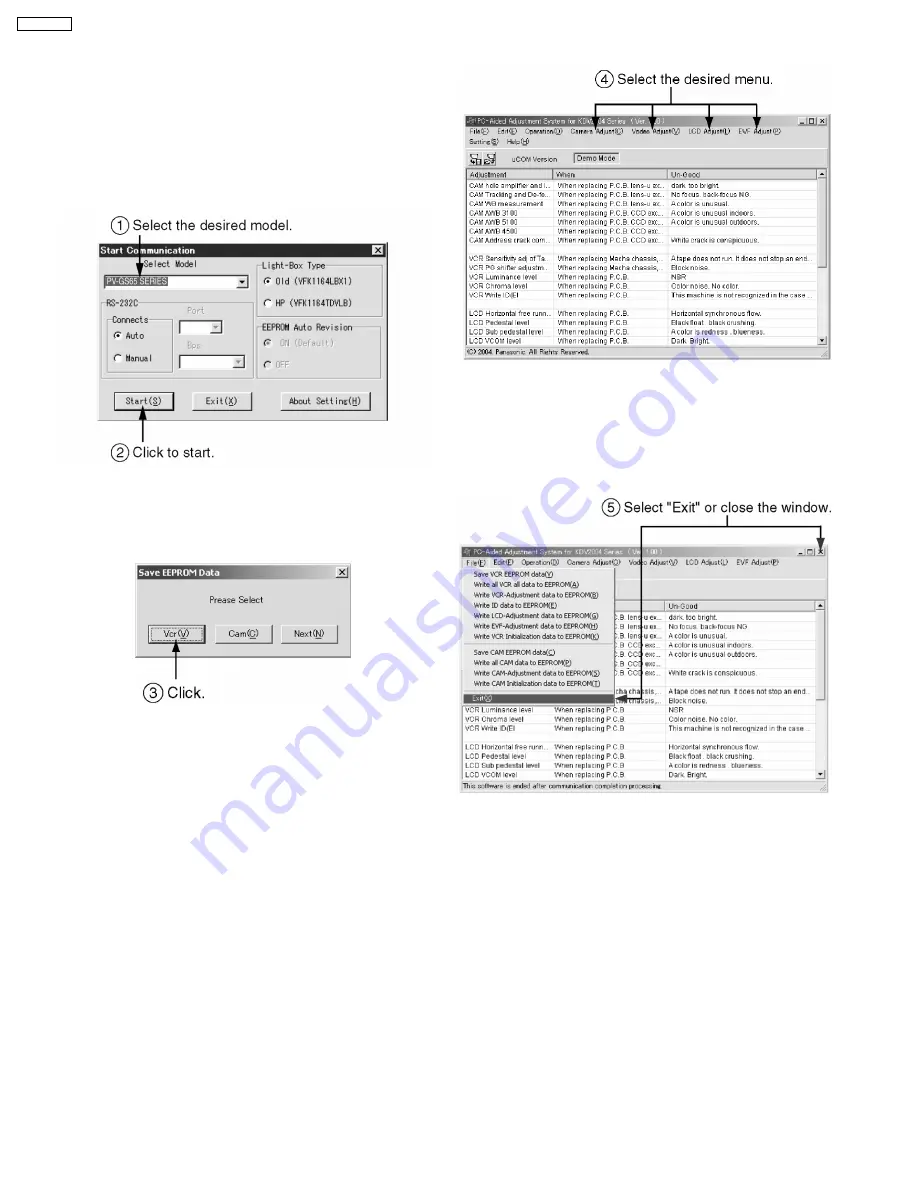
2. Execute the “Gs65.exe“ file by double clicking to start up
the PC-EVR Adjustment Program.
The main menu will be displayed.
3. Select the desired model.
4. Turn on the camcorder. Then, click “Start.”
Fig. E5-1
5. The communication is complete, and the dialog will appear.
Then, click “VCR (V) or Cam (C)” to save the EEPROM
data,
Fig. E5-2
6. Saving for EEPROM data is complete, menu will appear.
To perform each adjustment, display the adjustment menu
by selecting the desired menu from “Camera Adjust,”
“Video Adjust,” “LCD Adjust” or “EVF Adjust” and select
each adjustment item.
Fig. E5-3
Note:
The adjustment data is stored to the EEPROM IC after
each adjustment.
7. After adjustment, to end the software, select “Exit” in File
menu or close the window.
Fig. E5-4
9.3. SET UP PC-EVR ADJUSTMENT PROGRAM
32
PV-GS65PP
Summary of Contents for PV-GS65PP
Page 11: ...6 HOW TO RECYCLE THE LITHIUM BATTERY 11 PV GS65PP ...
Page 14: ...Fig D3 Fig D4 Fig D5 Fig D6 14 PV GS65PP ...
Page 15: ...Fig D7 Fig D8 Fig D9 Fig D10 15 PV GS65PP ...
Page 16: ...Fig D11 Fig D12 Fig D13 Fig D14 16 PV GS65PP ...
Page 17: ...Fig D15 Fig D16 Fig D17 Fig D18 17 PV GS65PP ...
Page 18: ...Fig D19 Fig D20 Fig D21 Fig D22 18 PV GS65PP ...
Page 20: ...Fig M3 20 PV GS65PP ...
Page 21: ...Fig M4 Fig M5 21 PV GS65PP ...
Page 22: ...Fig M6 22 PV GS65PP ...
Page 25: ...How to use extension cables Fig T1 25 PV GS65PP ...
Page 30: ...Fig E3 Rough image of set up connection 30 PV GS65PP ...
Page 35: ...Fig D2 Fig D3 35 PV GS65PP ...
Page 84: ...PV GS65PP 84 ...
Page 92: ...PV GS65PP 92 ...
Page 111: ...17 EXPLODED VIEWS 17 1 FRAME CASING SECTION 1 111 PV GS65PP ...
Page 112: ...17 2 FRAME CASING SECTION 2 112 PV GS65PP ...
Page 113: ...17 3 LCD SECTION 113 PV GS65PP ...
Page 114: ...17 4 CAMERA LENS SECTION 114 PV GS65PP ...
Page 115: ...17 5 VCR MECHANISM SECTION 115 PV GS65PP ...
Page 116: ...17 6 PACKING PARTS ACCESSORIES SECTION 116 PV GS65PP ...


