


2 Ext Option
This projector has EXT OPTION in addition to standard on-screen menus.
·
There are SELF CHECK and FLICKER ADJUST for service, etc.
2.1. Procedure to enter EXT OPTION
1. When the projector is power ON, press "POWER" button on the main unit or remote control unit to display "POWER OFF"
confirmation screen.
2. Press the right-arrow "
" button to select "CANCEL" in the "POWER OFF" confirmation screen.
3. On the main unit or remote control unit, press the buttons in order of up-arrow "
", down-arrow "
", up-arrow "
",
down-arrow "
" and "ENTER".
(When the "ENTER" button is pressed, "EXT OPTION" menu is displayed.)
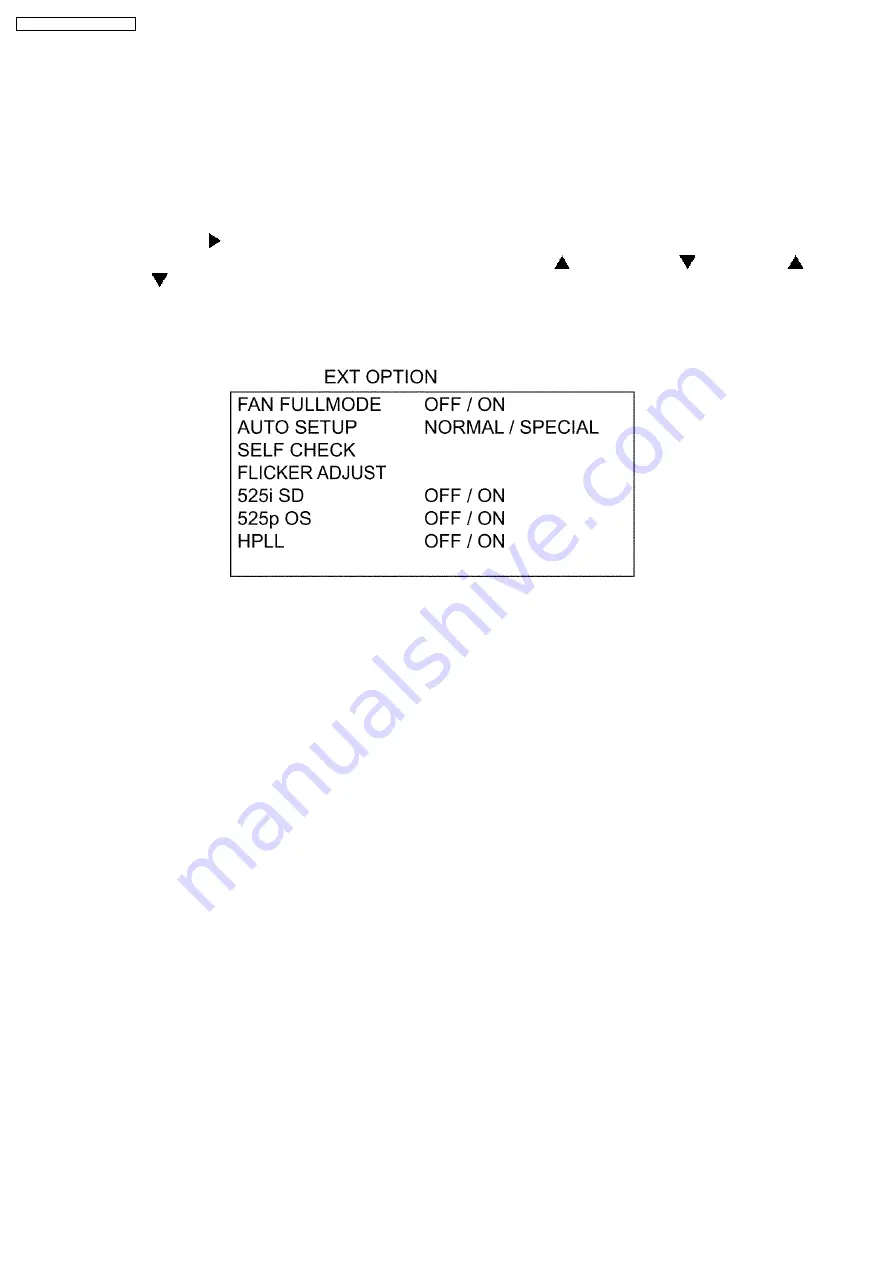
2.2. EXT OPTION Menu and Functions
·
FAN FULLMODE
Setting the cooling fan motor rotation speed
−
−
−
−
Switching ON "FAN FULLMODE", the rotation level of the fan becomes high-speed rotation (fixed). Moreover, when "FAN
FULLMODE" is ON, changing "ALTITUDE" in OPTION becomes impossible (setting FAN FULLMODE is given priority more
than ALTITUDE).
·
AUTO SETUP
Setting AUTO SETUP mode
−
−
−
−
NORMAL: To set the normal mode (the dot clock is adjusted strictly)
−
−
−
−
SPECIAL: To set the special mode (the dot clock is adjusted roughly)
* Do not change the initial setting (NORMAL).
·
SELF CHECK
To enter the self-check mode
·
FLICKER ADJUST
To enter the flicker adjustment mode
·
525i SD
When non-standard signal of 525i/625i is inputted (AV amplifier, etc.), synchronization might be disordered according to
connected equipment. In this case, set 525i SD to ON.
·
525p OS
When 525p/625p signal is inputted, reflection noise (vertical striated beat) might be generated according to connected
equipment. In this case, set 525p OS to ON. However, the resolution decreases a little.
·
HPLL
When non-standard signal of VIDEO/S-VIDEO is inputted (VTR, VHD, etc.), horizontal synchronization might be disordered
according to connected equipment. In this case, set HPLL to OFF.
2.3. Canceling EXT OPTION
Press "MENU" button on the main unit or remote control unit.
6
PT-AE1000U / PT-AE1000E
Summary of Contents for PT-AE1000U - LCD Projector - HD 1080p
Page 2: ...2 PT AE1000U PT AE1000E...
Page 3: ...3 PT AE1000U PT AE1000E...
Page 8: ...3 2 Self Check Display and Contents 8 PT AE1000U PT AE1000E...
Page 31: ...8 Troubleshooting 31 PT AE1000U PT AE1000E...
Page 32: ...32 PT AE1000U PT AE1000E...
Page 33: ...33 PT AE1000U PT AE1000E...
Page 34: ...34 PT AE1000U PT AE1000E...
Page 35: ...35 PT AE1000U PT AE1000E...
Page 36: ...36 PT AE1000U PT AE1000E...
Page 37: ...37 PT AE1000U PT AE1000E...
Page 38: ...38 PT AE1000U PT AE1000E...
Page 39: ...39 PT AE1000U PT AE1000E...
Page 40: ...40 PT AE1000U PT AE1000E...
Page 47: ...11 Schematic Diagram PT AE1000U PT AE1000E 47...
Page 48: ...11 1 A P C Board 1 8 A P C Board TXANP01VKD4 1 8 PT AE1000U PT AE1000E 48...
Page 49: ...11 2 A P C Board 2 8 A P C Board TXANP01VKD4 2 8 PT AE1000U PT AE1000E 49...
Page 50: ...11 3 A P C Board 3 8 A P C Board TXANP01VKD4 3 8 PT AE1000U PT AE1000E 50...
Page 51: ...11 4 A P C Board 4 8 A P C Board TXANP01VKD4 4 8 PT AE1000U PT AE1000E 51...
Page 52: ...11 5 A P C Board 5 8 A P C Board TXANP01VKD4 5 8 PT AE1000U PT AE1000E 52...
Page 53: ...11 6 A P C Board 6 8 A P C Board TXANP01VKD4 6 8 PT AE1000U PT AE1000E 53...
Page 54: ...11 7 A P C Board 7 8 A P C Board TXANP01VKD4 7 8 PT AE1000U PT AE1000E 54...
Page 55: ...11 8 A P C Board 8 8 A P C Board TXANP01VKD4 8 8 PT AE1000U PT AE1000E 55...
Page 64: ...PT AE1000U PT AE1000E 64...
Page 65: ...13 Terminal guide of ICs and transistors PT AE1000U PT AE1000E 65...
Page 66: ...14 Exploded Views PT AE1000U PT AE1000E 66...
Page 67: ...PT AE1000U PT AE1000E 67...
Page 68: ...PT AE1000U PT AE1000E 68...
Page 69: ...PT AE1000U PT AE1000E 69...


