background image

10

Location of Controls (continued)

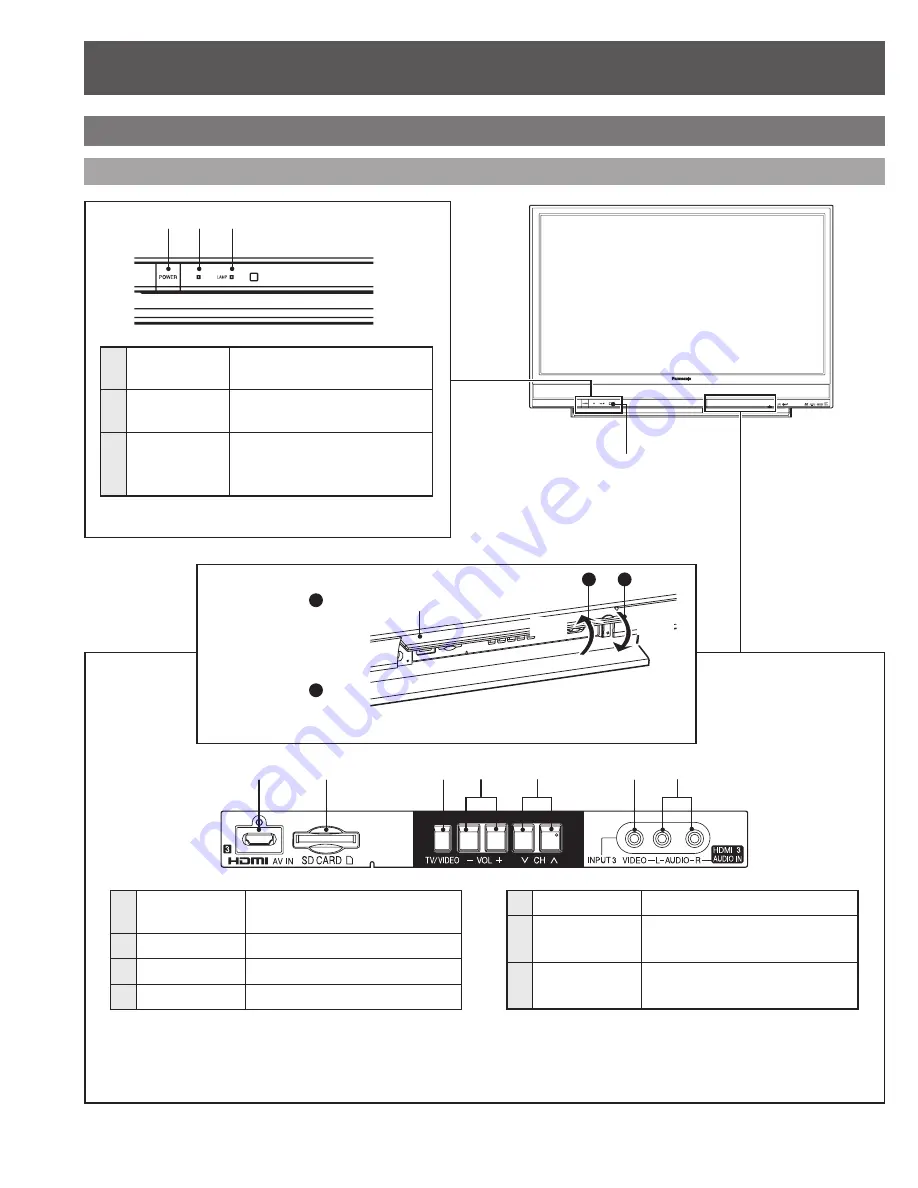
Controls and Terminals on the Projection Display

Front View <Model PT-56LCX70 unit shown>

 Remote Control 

Sensor

1

 POWER 
button

Press to turn ON and OFF. 

(p. 24, 56, 57)

2

POWER 
indicator

Lights up green when power 

is ON. (p. 24, 56, 57)

3

 LAMP 
indicator

Lights up or flashes when the 

lamp unit is malfunctioning. 

(p. 24, 56)

1

2

3

1

HDMI Input 
Terminal 3

Connect from other 

component. (HDMI 3)

2

SD CARD Slot

Insert SD Card.

3

 TV/VIDEO*

Changes Input source.

4

 VOL –+*

Press to adjust TV sound.

5

 CH 

> <

*

Press to change channels.

6

Video Input 
Connector 3

Connect from other 

component. (Video 3)

7

Audio  Input 
Connector 3

Connect from other 

component. (Video 3 / HDMI 3)

* Buttons listed above operate the same as Remote Control buttons of the same name.

Open Door:

Press position 

1

, and 

slide Door open as 

shown by arrow.

Close Door:

Press position 

2

, and 

slide Door closed as 

shown by arrow.

Door

1

2

Open

Close

1

2

3

4

5

7

6

Summary of Contents for PT-56LCX70 - 56" Rear Projection TV

Page 1: ...tinfo Puerto Rico For assistance please call 787 750 4300 or visit us at www panasonic com Canada For assistance please call 1 800 561 5505 or visit us at www panasonic ca Before connecting operating or adjusting this product please read the instructions completely Please keep this manual for future reference This operating instruction book is designed for use with models PT 56LCX70 PT 61LCX70 PT ...

Page 2: ...chments accessories specified by the manufacturer 12 Use only with the cart stand tripod bracket or table specified by the manufacturer or sold with the apparatus When a cart is used use caution when moving the cart apparatus combination to avoid injury from tip over 13 Unplug this apparatus during lightning storms or when unused for long periods of time 14 Refer all servicing to qualified service...

Page 3: ... OF FIRE OR ELECTRIC SHOCK DO NOT EXPOSE THIS EQUIPMENT TO RAIN OR MOISTURE DO NOT PLACE OBJECTS FILLED WITH WATER SUCH AS A VASE OR THE LIKE ON TOP OF THIS APPARATUS WARNING WARNING Trademarks VGA and XGA are trademarks of International Business Machines Corporation Macintosh is a registered trademark of Apple Inc USA SVGA is a trademark of the Video Electronics Standard Association Even if no sp...

Page 4: ...tion against harmful interference in a residential installation This equipment generates uses and can radiate radio frequency energy and if not installed and used in accordance with the instructions may cause harmful interference to radio communications However there is no guarantee that interference will not occur in a particular installation If this equipment does cause harmful interference to r...

Page 5: ...ion Display Operation 29 ASPECT Controls 33 EZ Sync Feature 34 Picture Adjustments 35 Audio Adjustments 38 Sleep Timer Feature 40 Lock Feature 41 Viewing from SD Card 46 Setup Features 49 Warning Indicators 56 Troubleshooting 57 Specifications 59 Customer Services Directory for U S A 60 Limited Warranty for U S A 61 Limited Warranty for Canada 62 Index 63 Basic Operation Information Advanced Op er...

Page 6: ... cable you ll need Safety Precaution Please take safety precautions to prevent the unit from falling over WARNING The unit may tip or fall if not situated on a stable surface if pushed or during an earthquake Use a strong rope or chain not included to fasten the Projection Display firmly to a strong wall support Installation Dimensions Diagram CAUTION Keep the unit at least 100 mm 4 away from the ...

Page 7: ...ing the Projection Display set Reset All Memory Functions Use when moving unit to a new location or when First Time Setup needs to be done over Note When using EZ Sync HDAVI Control with the device connected set EZ Sync first to Off and then On using the Setup Menu p 52 53 CAUTION CAUTION Helpful Hints Frequent Remote Control users choose long lasting Alkaline batteries as replacements Helpful Hin...

Page 8: ...e screen Please wipe with a soft cloth from time to time If you use a chemically treated cloth please be careful to follow the instructions that come with the cloth Projection Display The unit contains many plastic parts For this reason DO NOT use benzine thinner or other chemicals to clean the unit DO NOT bring into contact with insecticide or other volatile substances DO NOT allow the unit to co...

Page 9: ...NE Press to switch to previously viewed channel or input modes 11 SAP In analog mode press to access audio modes Stereo SAP or Mono In digital mode press to access next audio track 12 EZ Sync Press to display EZ Sync menu 13 EXIT Press to exit menus 14 SELECT Controls navigation around on screen menu 15 OK Press to select menu and sub menu items 16 RETURN Press to return one step backward in menus...

Page 10: ...nput Terminal 3 Connect from other component HDMI 3 2 SD CARD Slot Insert SD Card 3 TV VIDEO Changes Input source 4 VOL Press to adjust TV sound 5 CH Press to change channels 6 Video Input Connector 3 Connect from other component Video 3 7 Audio Input Connector 3 Connect from other component Video 3 HDMI 3 Buttons listed above operate the same as Remote Control buttons of the same name Open Door P...

Page 11: ...I Input Terminal 2 Audio Video 2 Connect from other component HDMI 2 7 Video Out Connector Output video signal 8 DIGITAL AUDIO OUT Output audio signal Digital 9 PC RGB Input Connector Connect from PC PC 10 Audio Input Connector Connect from PC PC 11 Audio Input Connector 1 Connect from other component Video 1 12 HDMI Input Terminal 2 Audio 2 Connect from other component HDMI 2 Audio Input Connecto...

Page 12: ...VD Recorder VCR or DVD Recorder VCR or Satellite Antenna Satellite Receiver Satellite Antenna Satellite Receiver Enjoying Home theater and DVD recorder with HDMI connection Home theater and DVD Recorder HDMI connection enables you to enjoy higher quality audio and video with a single cable Enjoying large screen capabilities with PC connection You can enjoy playing computer games or making presenta...

Page 13: ...tenna terminal Back of the unit Power Cord Connect after all the other connections Cable TV VHF UHF Antenna or If using Cable Box Set the TV channel to CH3 CH4 or select the appropriate input When using Nut type RF coaxial cable tighten with fingers only Overtightening may damage terminal CAUTION AC 120 V 60 Hz For HDTV Cable Service For Digital Cable or or To use HDMI terminals To use COMPONENT t...

Page 14: ...the unit VHF UHF Antenna Power Cord To use HDMI terminals next page To use COMPONENT terminals next page To use COMPOSITE terminals next page To use S VIDEO terminals next page DVD Recorder or VCR with TV tuner Installation continued To use OUTPUT terminals p 21 22 When using Nut type RF coaxial cable tighten with fingers only Overtightening may damage terminal CAUTION AC 120 V 60 Hz ...

Page 15: ...s and high quality sound by connecting this Projection Display and the devices Recorders may also be connected to COMPOSITE or S VIDEO terminals see below The S Video input will override the composite video signal when S Video cable is connected Connect either S Video or Video cable Connecting to S VIDEO terminals will enable you to enjoy greater picture quality than using Composite terminals DVD ...

Page 16: ... use COMPONENT terminals p 15 To use COMPOSITE terminals p 15 To use S VIDEO terminals p 15 DVD Recorder or VCR with TV tuner ANT IN Connecting this Projection Display and DVD recorder VCR Connect in the same way as on page 15 Installation continued To connect antenna terminals When using Nut type RF coaxial cable tighten with fingers only Overtightening may damage terminal CAUTION AC 120 V 60 Hz ...

Page 17: ... Connect either S Video or Video cable Connecting to S VIDEO terminals will enable you to enjoy greater picture quality than using Composite terminals DVD Recorder HDMI AV OUT white red green blue red white red green blue red white red green blue red DVD Recorder COMPONENT VIDEO OUT COMPOSITE OUT red red white white yellow yellow red white yellow VCR red red white white red white AUDIO OUT S VIDEO...

Page 18: ...Recorder Notes It is recommended that you use Panasonic s HDMI cable p 52 When Using the COMPONENT VIDEO OUT terminals or the S VIDEO OUT terminal refer to page 17 To use COMPONENT terminals or To use S VIDEO terminals If you connect RAM theater or Player theater with HDMI cable use audio cable instead of the optical digital audio cable p 22 Home theater HDMI AV OUT Home theater DIGITAL AUDIO IN A...

Page 19: ...re not supplied with this set Do not set the horizontal and vertical scanning frequencies for PC signals which are above or below the specified frequency range Select the desired PC input position by pressing the TV VIDEO button on the Remote Control p 29 Pin No Signal name 1 R 2 G 3 B 4 NC 5 NC 6 Ground for R 7 Ground for G 8 Ground for B 1 6 7 8 3 9 4 5 10 15 14 13 12 11 2 NC Not connected Pin N...

Page 20: ...st on page 37 Mode type Signal data No of dots H V Horizontal frequency kHz Vertical frequency Hz Personal Computer Signals VGA400 70 Hz 640 400 31 47 70 08 VGA480 60 Hz 640 480 31 47 59 94 Macintosh 13 640 480 35 00 66 67 VGA480 75 Hz 640 480 37 50 75 00 SVGA 60 Hz 800 600 37 88 60 32 SVGA 75 Hz 800 600 46 88 75 00 SVGA 85 Hz 800 600 53 67 85 06 Macintosh 16 832 624 49 73 74 55 WVGA 60 Hz 852 480...

Page 21: ...cillation set the Monitor out setting when connecting the VCR with loop connection p 50 When equipment STB DVD etc is connected to HDMI or COMPONENT terminals only audio signals can be obtained From the output terminals no video signals can be passed When receiving digital channel signals all digital formats are down converted to composite NTSC video to be output through the OUTPUT terminals SD Ca...

Page 22: ...nc under EZ Sync setting first to Off and then On using the Setup Menu p 52 53 DIGA Panasonic DVD Recorder Connecting this unit to the DIGA RAM theater Player theater or HD Camcorder For DIGA Connect with HDMI cable For RAM theater and Player theater Connect with the HDMI and audio cables If audio cable is not connected you cannot listen to the TV program through the theater system For HD Camcorde...

Page 23: ...al device For details of the applicable HDMI signals see below About HDMI HDMI is the first all digital consumer electronics A V interface that supports several uncompressed standards enhanced and high definition video formats as well as all existing multichannel audio formats One jack supports both video and audio information The HDMI HDCP 1 input can be connected to an EIA CEA 861 861D 2 complia...

Page 24: ...e or ambient temperature is low The fan rotating sound may be increased in high temperature condition Power OFF Press POWER on Projection Display or Remote Control to turn power off Power shuts off after a Black Screen is displayed for about 3 minutes If the POWER button is pressed during the Black Screen display Power is turned back on The Power Indicator blinks Red for about 3 minutes and then L...

Page 25: ...e Program channel ANT in Auto Cable Program channel 5 Press to select Auto 6 Press OK to display the Auto program menu 7 Press to select All channels Analog only or Digital only 8 Press OK to start scan Channels available for reception will be set automatically 9 After Auto program is complete the unit will return to Manual program mode To place the channels that were located by auto scan in memor...

Page 26: ...ivable channels to memory Procedure 1 Press MENU to display the Main Menu screen 2 Press to select Setup icon 3 Press OK to display the Setup menu 4 Press to select Program channel 5 Press OK to display the Program channel menu Surf mode All Language Program channel External devices CC EZ Sync setting Setup 1 2 Surf mode All Language Program channel External devices CC EZ Sync setting Setup 1 2 La...

Page 27: ...meter Cable Program channel All channels Analog only Digital only Auto program Auto program Scanning digital channel Progress Quit 40 All channels Analog only Digital only Auto program Auto program Scanning digital channel Progress Quit 40 Manual program setting Use this procedure when changing setting of receiving channels or changing the channel display Also use to add or delete channels from ch...

Page 28: ...s 5 Yes 6 Yes 7 Yes 8 Yes Channel Caption Favorite Add Prev page Next page Y G B OK Select RETURN R Caption Caption detail Apply Cancel Caption select Caption Caption detail Apply Cancel Caption select Caption Apply Cancel Caption detail Caption Apply Cancel Caption detail 6 Press to select the character to input change 7 Press to move to the character to input change 8 Press OK to enter your sele...

Page 29: ...lume level is lowered Component 1 Signal of source connected to COMPONENT VIDEO INPUT 1 is displayed Component 2 Signal of source connected to COMPONENT VIDEO INPUT 2 is displayed HDMI 1 Signal of source connected to HDMI IN 1 is displayed HDMI 2 Signal of source connected to HDMI IN 2 is displayed HDMI 3 Signal of source connected to HDMI IN 3 is displayed Video 1 Signal of source connected to VI...

Page 30: ... Banner Display 1 Press 1 1 2 Press 5 15 3 Press OK 15 Direct Tuning Example Step Action Channel Banner Display 1 Press 1 1 2 Press 5 15 3 Press PROG 15 4 Press 1 15 1 5 Press OK 15 1 Direct Tuning Example Step Action Channel Banner Display 1 Press 1 1 2 Press 5 15 3 Press PROG 15 4 Press 1 15 1 5 Press OK 15 1 Projection Display operation continued Unit Status Display Press CH or RECALL except wh...

Page 31: ... Set favorite CC Caption select Signal meter All Off Setup SUB MENU Surf mode Set favorite CC Caption select Signal meter All Off Setup SUB MENU Surf mode Set favorite CC Caption select Signal meter All Off Setup SUB MENU 5 Press FAVORITE repeatedly to change between pages 1 3 2 3 3 3 or exit Pressing also changes the page 6 Press to highlight a position on the list Then press OK to save the displ...

Page 32: ...he display flickers select Mono audio mode for possibly better results SAP broadcast Secondary Audio Program sub language Select SAP audio mode for the sub language Mono broadcast Normal monaural sound broadcast Stereo SAP Mono Stereo SAP Mono Stereo SAP Mono Stereo SAP Mono Use Favorite Feature Procedure 1 Press FAVORITE Press FAVORITE repeatedly to change between pages 1 3 2 3 3 3 or exit Pressi...

Page 33: ...an enjoy the picture as it was intended to be seen Mode Picture Explanation JUST JUST 9 16 JUST mode will display a 4 3 picture at maximum size but with aspect correction applied to the center of the screen so that elongation is only apparent at the left and right edges of the screen The size of the picture will depend on the original signal 4 3 4 3 3 4 4 3 mode displays a 4 3 picture at the stand...

Page 34: ... If you connect equipment that has the HDAVI Control 2 function to the TV with HDMI cable you can enjoy using this convenient function For details EZ Sync Control on pages 22 and 52 54 Procedure 1 Press to select the equipment 2 Press OK to operate the selected equipment with this Projection Display s Remote Control Follow the menu of the equipment and enjoy watching For the remote control operati...

Page 35: ...lor temp Color temperature To increase or decrease Warm red and Cool blue colors to suit personal preferences Color mgmt Color management Enhances green and blue color reproduction especially outdoor scenes AI picture Controls dark areas without affecting the black level or brightness in the overall picture Item Explanations Normal Resets all picture adjustments to factory default settings Lamp Ad...

Page 36: ...tments continued 5 Press to select each item 6 Press to adjust each item Zoom Adjust Adjust the vertical image position and size It works when Aspect mode is Zoom Procedure 1 Press to select Zoom adjust 2 Press OK to display the Zoom adjust menu 3 Press to adjust the vertical position 4 Press to adjust the vertical size Note Press OK to reset the aspect ratio Normal AI brightness Black extension W...

Page 37: ...the signal being input some menu items may or may not be adjustable and some functions may or may not be available Other Adjust Other detailed picture adjustments can be made This function is not available when Input select is selected to PC p 29 Procedure 1 Press to select Other adjust 2 Press OK to display the Other adjust menu 3 Press to select each item 4 Press to adjust each item Color temp C...

Page 38: ...e Item Explanations Normal Reset Bass Treble and Balance adjustments to factory default settings Bass Increase or decrease the bass response Treble Increase or decrease the treble response Balance Emphasize the left right speaker volume Normal Bass Treble Balance Other adjust No 0 0 0 Audio Normal Bass Treble Balance Other adjust No 0 0 0 Audio AI sound BBE VIVA 3D BBE Surround Speaker output HDMI...

Page 39: ...audio leveler monitors the difference in audio levels between input signals from external equipment and minimizes the change in output volume that could occur when switching input signals Item Explanations AI sound Equalize overall volume levels across all channels BBE VIVA 3D BBE ViVA HD3D High Definition 3D Sound provides musically accurate natural 3D image with Hi Fi sound The clarity of the so...

Page 40: ...ress to select 0 30 60 or 90 Notes Pressing the RECALL button with sleep timer set displays remaining time The on screen display will flash 3 2 and 1 to indicate the last three 3 remaining minutes prior to turn off Sleep 60 Timer Sleep 60 Timer Sleep Timer Feature While Main Menu only is displayed pressing MENU will exit the menu screen Return to previous level menu Press RETURN to return to previ...

Page 41: ...k the viewing of movies and television programs according to the rating category There are four 4 Content Advisory Categories MPAA Motion Picture Association of America TV Parental Guidelines Ratings Canadian English Language Ratings and Canadian French Language Ratings These categories are used as guidelines for blocking the programs The default mode for the Lock category is the Unlocked state In...

Page 42: ...ssword Enter password 0 9 Mode Channel Game Program Change password Custom Off Off Off Lock Mode Channel Game Program Change password Custom Off Off Off Lock Channel Lock Block channel selection Select up to 7 1 7 channels to be blocked out These channels will be blocked out regardless of the program rating Procedure 1 Press to select Channel 2 Press OK to display the Channel lock menu 3 Press to ...

Page 43: ...f Off Off Off Off Program lock Mode Monitor out MPAA U S TV C E L R C F L R On Off Off Off Off Off Program lock 6 Press OK to display the program lock menu MPAA for U S movie ratings U S TV for U S TV program ratings C E L R for Canadian English ratings C F L R for Canadian French ratings 7 Press to highlight the desired rating level Monitor out setting Procedure 1 Press to select Program 2 Press ...

Page 44: ...ive sexual dialogue and situations TV 14 D L S V all selected Any combination of D L S V Parents strongly cautioned This program may contain sophisticated themes sexual content strong language and more intense violence TV MA L S V all selected Any combination of L S V Mature audiences only This program may contain mature themes profane language graphic violence and explicit sexual content FV Fanta...

Page 45: ...pected and possibly confusing results may occur and you may not receive emergency bulletins or any of the following types of programming Emergency Bulletins Such as EAS messages weather warnings and others Locally originated programming News Political Public Service Announcements Religious Sports Weather Customer Caution The V Chip system that is used in this set is capable of blocking NR programs...

Page 46: ...g children Do not allow children to handle the SD card 1 Always insert card in the correct direction Failure to do so may result in damage to the card and this unit 2 The SD Card is precision devices Do not subject them to excessive pressure or strong impacts Data Format for Card Browsing DCF Design rule for camera file system A Japan Electronics and Information Technology Industries Association s...

Page 47: ...ess the G button to Single Play Mode Present status While reading the data Single Play Mode Present status While reading the data Slide show R Y G B Prev Next Accessing RETURN Rotate Press the R button to Slide Show Mode Single R Y G B Pause Prev Next Accessing RETURN Slide Show Mode Press the G button to Single Play Mode Present status While reading the data Single Play Mode Present status While ...

Page 48: ... Picture When MENU is pressed in Photo viewer mode or Single Play mode the JPEG menu is displayed Procedure 1 Press to select Picture 2 Press OK to display the Picture menu 3 Press to select each item 4 Press to set each item Viewing from a GalleryPlayer SD Card You can view high definition art and photography purchased on or downloaded to an SD card GalleryPlayer provides pre loaded SD cards with...

Page 49: ...s been set you must enter your password to display the Program channel menu 3 Press to select Signal meter 4 Press OK to display the Signal meter menu Surf mode All Language Program channel External devices CC EZ Sync setting Setup 1 2 Surf mode All Language Program channel External devices CC EZ Sync setting Setup 1 2 Surf mode All Language Program channel External devices CC EZ Sync setting Setu...

Page 50: ... 1 Video 2 Video 3 PC Input labels Monitor out When connecting external equipment to this unit Stops output of the picture and sound signals at the AV OUT jacks for the input source selected in this menu to avoid signal loop Procedure 1 Press to select External devices 2 Press OK to display the External devices menu 3 Press to select Monitor out 4 Press OK to display the Monitor out menu 5 Press t...

Page 51: ...n service of Analog broadcasting Procedure 1 Press to select Analog 2 Press to select the setting CC Mode for Digital The Digital Closed Caption menu lets you configure the way you choose to view the digital captioning Procedure 1 Press to select Digital 2 Press to select the setting Primary Second Service 3 Service 4 Service 5 Service 6 Mode Analog Digital Digital setting CC reset On CC1 Primary ...

Page 52: ...tomatic Transparent Translucent Solid Flashing Outline The outline of the text if selected under style Automatic Black White Red Green Blue Yellow Magenta Cyan Setup Features continued CC Reset Reset the CC settings Procedure 1 Press to select CC reset 2 Press OK to reset Closed Caption settings EZ Sync HDAVI Control Simultaneously control all Panasonic HDAVI Control equipped components using one ...

Page 53: ... on the playback equipment For the RAM theater the speakers automatically switch to the theater system If using the DIGA operation this Projection Display s input automatically switches to the DIGA and DIGA menu is displayed Speaker control You can select Home theater or TV speakers for audio output Control theater speakers with this Projection Display s remote control This function is available o...

Page 54: ...put TV DVD recorder Home theater HD camcorder Speaker output TV DVD recorder Home theater HD camcorder Speaker output TV DVD recorder Home theater HD camcorder Speaker output TV Setup Features continued Available this Projection Display s remote control buttons One touch theater playback If the ONE TOUCH PLAY key is pressed on the remote control for Panasonic Home Theater system the following sequ...

Page 55: ... on for the first time after turning the power off by No signal shut off The on screen display will flash 3 2 and 1 to indicate the last three 3 remaining minutes prior to the shut off No action shut off To conserve energy this Projection Display automatically turns off when no operation of remote or front panel key continues more than 3 hours Notes Not in use when setting PC No action shut off wa...

Page 56: ...n 9 Wait for about 1 minute then try turning Power On several times If error persists contact service center Flashes red 3 times Power shuts off Internal overheat error 1 Flashes red 4 times Power shuts off Internal overheat error 1 Flashes red 5 times Power shuts off Malfunction 10 Flashes red 8 times Power shuts off Malfunction 11 Disconnect the AC plug and wait for about 5 seconds Reconnect the...

Page 57: ...aused condensation in the internal optics which results in blurring or vertical lines Please wait until room temperature is normal and constant before turning power ON These symptoms will clear up as time passes Depending on the connected device a 1080i input signal may cause the picture to flicker If the connected device has a format selection switch set the format to 720p Color patches or no col...

Page 58: ...eturn the screen to normal Pictures from equipment are unusual when the equipment is connected via HDMI Is the HDMI cable connected properly 12 14 18 21 22 Turn Off the TV unit and device then turn them On again Check the input signal from the equipment 29 No sound is produced Is Sound Mute active 30 Is the volume set to the minimum 29 Is Speaker output set to Off 39 Change SAP settings 32 Check H...

Page 59: ... S VIDEO Y 1 Vp p 75 Ω C 0 286 Vp p 75 Ω Mini DIN 4 pin AUDIO L R 0 5 Vrms RCA Pin Jack 2 COMPONENT VIDEO INPUT 1 2 Y 1 0 Vp p with sync 75 Ω Pin Jack PB PR 0 35 Vp p 75 Ω Pin Jack 2 AUDIO L R 0 5 Vrms RCA Pin Jack 2 HDMI 1 3 HDMI type A Connector This Projection Display supports HDAVI Control 2 function AUDIO L R 0 5 Vrms RCA Pin Jack Type 2 Card slot SD CARD slot 1 Output signals AV OUT VIDEO 1 ...

Page 60: ... San Gabriel Industrial Park Carolina Puerto Rico 00985 Phone 787 750 4300 Fax 787 768 2910 For hearing or speech impaired TTY users TTY 1 877 833 8855 Purchase Parts Accessories and Instruction Books online for all Panasonic Products by visiting our Web Site at http www pstc panasonic com or send your request by E mail to npcparts us panasonic com You may also contact us directly at 1 800 332 536...

Page 61: ...ty ONLY COVERS failures due to defects in materials or workmanship and DOES NOT COVER normal wear and tear or cosmetic damage The warranty also does not cover damages which occurred in shipment or failures which are caused by products not supplied by the warrantor or failures which result from accidents misuse abuse neglect bug infestation mishandling misapplication alteration faulty installation ...

Page 62: ...anty is extended to the original end user purchaser only A purchase receipt or other proof of date of original purchase is required before warranty service is performed THIS EXPRESS LIMITED WARRANTY IS IN LIEU OF ALL OTHER WARRANTIES EXPRESS OR IMPLIED INCLUDING ANY IMPLIED WARRANTIES OF MERCHANTABILITY AND FITNESS FOR A PARTICULAR PURPOSE IN NO EVENT WILL PANASONIC CANADA INC BE LIABLE FOR ANY SP...

Page 63: ...First Time Setup 25 G Game Lock 43 H HDMI 23 29 39 HDMI input terminals 11 I Input 1 2 3 terminals 10 11 Input labels 50 Insert Remove the Card 46 J JPEG 46 48 L LAMP indicator 10 56 Lock Set 42 M Manual program setting 27 Monitor out 50 MPAA 41 43 MUTE button 9 30 N NUMBER keys 9 30 P Password 41 42 45 PC Adjust 37 PC input terminal 11 PC position 29 Picture Mode 36 POWER button Remote Control 9 ...

Page 64: ... identification in the event of theft or loss and for Warranty Service purposes Model Number Serial Number Panasonic Consumer Electronics Company Division of Panasonic Corporation of North America One Panasonic Way Secaucus New Jersey 07094 Panasonic Sales Company PSC Division of Panasonic Puerto Rico Inc Ave 65 de Infantería Km 9 5 San Gabriel Industrial Park Carolina Puerto Rico 00985 Panasonic ...

Reviews: