background image

38

Facsimile Features

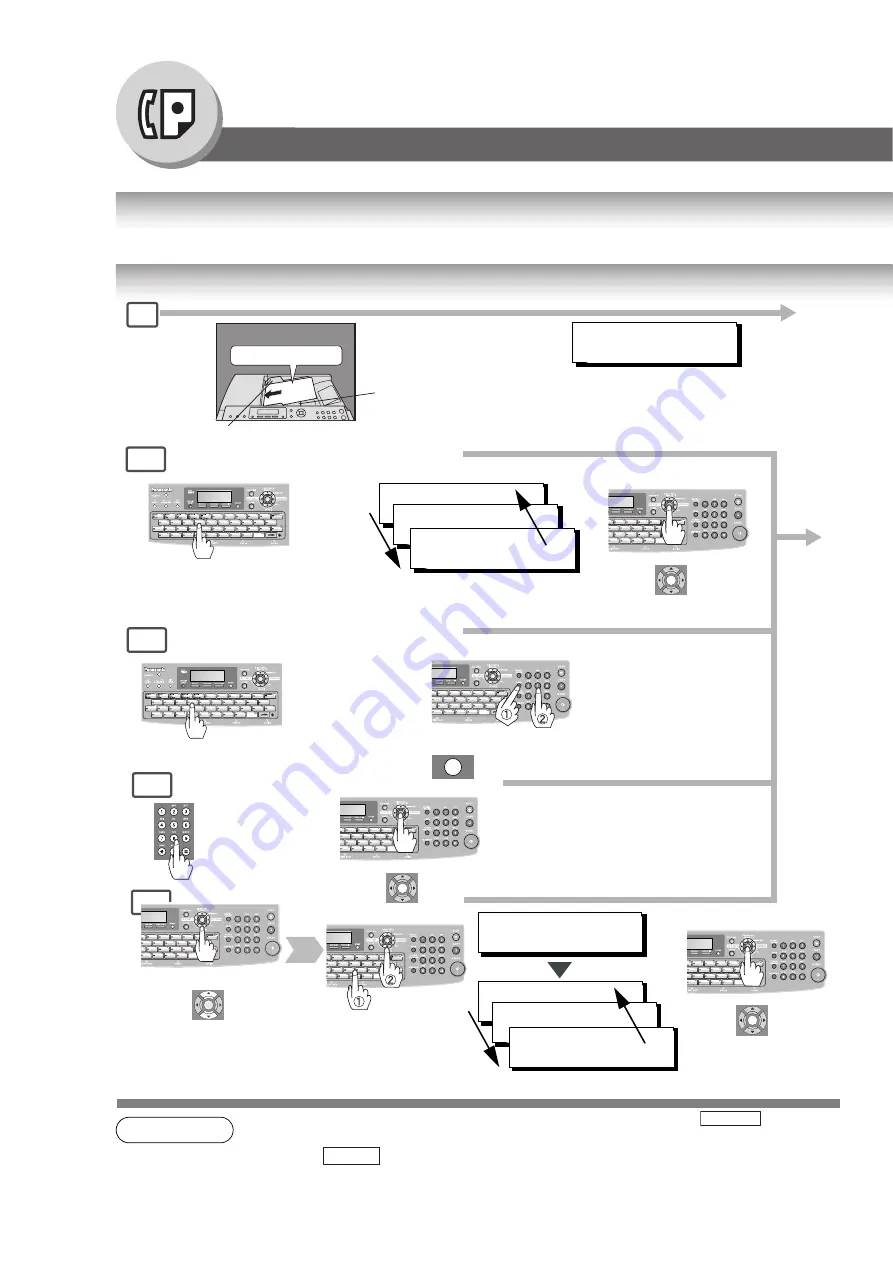
Sending Documents

General Description

Your machine quickly stores the document(s) into the machine's memory. Then, starts to dial the telephone number. If the 

transmission fails, your machine will retransmit the remaining unsuccessful page(s) automatically.

Memory Transmissions

NOTE

1. If you need to dial a prefix to get an outside line, dial it first then press 

 to enter a 

pause (represented by a "-") before dialling the full number.


Ex:

 9  

 5551234

2. Auto dialler (Address Book/One-Touch/ABBR.) is only available when stations are registered. 

(See page 9496)

SET

(See Note 5)

3d

3c

3b

Make sure that the above message


is shown on the display.


If not, press the STOP key.

One-Touch/ABBR. dialling (see Note 2)

(When Fax Parameter No. 119 is set to "1:One-Touch", See page 110.)

Quick Name Search dialling (see Note 2)

(When Fax Parameter No. 119 is set to "2:Quick Name Search", See page 110.)

Manual Number dialling (Up to 50 Stations)

Directory Search dialling 

or

 +  ABBR No.(3-digit)

Telephone 
Number

ABBR

DIAL

3a

A B C

Face Up

Original Guides

*

Max. 100 pages


(A4 size originals)

1

ENTER STATION(S)
THEN PRESS START 00%

(See page 40)

+

DIRECTORY

SEARCH

SALES 3

5551234

SALES 2

5551234

SALES

5551234

(See Note 5)

+

Enter the first letter of the name you wish 
to search repeatedly until it is shown on 
the LCD display.search.
Ex: "S"

SET

+

ENTER LETTER (s)
SA

[100]SALES 3

5551234

[005]SALES 2

5551234

[001]SALES

5551234

Enter the first letter(s) of 
the name you wish to 
search.
Ex: "SA"

SET

*Hold the center of the guides 


  when adjusting the width.

PAUSE

PAUSE

Summary of Contents for Panafax UF-7100

Page 1: ...his equipment please read these instructions completely and keep these operating instructions for future reference For Facsimile and Copy Functions Getting To Know Your Machine Facsimile Features Copy Features Setting Your Machine Printing Journals and Lists Problem Solving Appendix ...

Page 2: ...ed Application Software Document Manager Document Viewer Network Scanner Utilities Network Status Monitor Address Book Editor Network Configuration Editor Panafax Desktop Facsimile and Copy Use the information provided on the enclosed CD Operating Instructions for a Facsimile and Copy function requires intervention For example How to send receive a Fax make copies add paper replace the toner cartr...

Page 3: ...ging the Initial Machine Modes General Copier Printer and Scanner Settings See pages 92 117 Transaction Journal See pages 118 119 Communication Journal See pages 120 121 One Touch Abbreviated and Directory Search List See pages 122 123 Program List See pages 124 125 Fax Parameter List See pages 126 127 Troubleshooting Machine Care See pages 128 133 Set the Date and Time See page 104 Replacing the ...

Page 4: ...nel Go to next step Go to next step below A B C Press Key Input numbers dialling Number of Copies etc Input text with QWERTY keyboard Station Name Directory Search etc 5 Getting to know your machine Before starting When sending receiving document s When making copies When setting the machine modes When printing the journals or lists Problem solving Appendix Specifications Index ...

Page 5: ...entilation 13 Handling 13 Laser Safety 14 Caution Label 14 Regulatory Information 16 For U K Users 17 For Germany Users 18 For New Zealand Users 18 IMPORTANT NOTICE 18 Connecting the Cables 19 Directory Search and Quick Name Search 20 Operation Chart 22 Sending Documents 22 To Stop the Transmission 24 Making Copies 24 Using the ADF 24 Copying onto Transparency Film OHP Thick Heavy Paper Stock etc ...

Page 6: ...ations 50 General Description 50 Deferred Transmission 50 Deferred Polling 50 Batch Transmission 52 General Description 52 Real Time Batch Transmission 52 Polling 54 General Description 54 Preparing to be Polled 54 Poll Documents from Another Station 56 Program Keys 58 General Description 58 Setting for Group dialling 58 Setting Programmed Communication 60 Changing the Program Key Setting 60 Sub A...

Page 7: ...als 1 1 86 Sort Mode 86 Copying with Variable or Preset Zoom Ratios 86 Using the ADF 87 Creative Features 88 1 2 Copy 88 2 2 Copy 2 1 Copy 88 Other Features 90 Changing the Paper Size Sheet Bypass 90 Energy Saver Power Saver Mode Sleep Shutdown Mode 90 Adjusting the Volume and dialling Method Tone or Pulse 92 Setting the dialling Method Tone or Pulse 92 Setting the Monitor Volume 92 Setting the Ri...

Page 8: ... For Key Operator 115 Changing the Paper Size 116 Changing the Paper Size Paper Tray 116 Transaction Journal 118 Communication Journal COMM JOURNAL 120 One Touch Abbreviated and Directory Search List 122 Program List 124 Fax Parameter List 126 Troubleshooting Maintenance 128 Information Code 130 Verification Stamp 133 Verification Stamp 133 Replacing the Battery 133 Specifications 134 Glossary 138...

Page 9: ... fire or electric shock Ensure that the plug connection is free of dust In a damp environment a contaminated connector can draw a significant amount of current that can generate heat and eventually cause fire over an extended period of time Always use the power cord provided with your machine When an extension power cord is required always use a properly rated cord 200 V 13 A or 120 V 15 A If you ...

Page 10: ...and unplug it If an unused machine is left connected to a power source for a long period degraded insulation can cause electric shocks current leakage or fire Be sure to switch Off and unplug the machine before accessing the interior of the machine for cleaning maintenance or fault clearance Access to a live machine s interior can cause electric shock Be sure to switch Off and unplug the machine b...

Page 11: ...d of time to minimize the ozone density in the air Pull out paper trays slowly to prevent injuries When removing jammed paper make sure that no pieces of torn paper are left in the machine A piece of paper remaining in the machine can cause fire If a sheet of paper is wrapped around the heat roller or when clearing a jammed paper that is difficult or impossible to see do not try to remove it by yo...

Page 12: ...ze single side printing default density The yield of a Toner Cartridge varies depending on the coverage temperature humidity media etc Therefore the average yield cannot be guaranteed Continuously printing 10 coverage of printable area will reduce the yield of the Toner Cartridge to about half as compared to 5 coverage printing The maximum yield of the Toner Cartridge will not exceed 6 000 pages I...

Page 13: ...reference Dept DEPARTMENT Code Number of Copies The maximum number of copies is up to 999 3 digit with keypad During the copy mode if you input 4 8 digit numbers they will be interpreted as being a phone number and displayed on the LCD then the machine will switch to the Fax mode Auto Reset Timer As the initial setting for Auto Reset Time is 1 minute selected operation mode returns to default oper...

Page 14: ...ER SAFETY This machine employs a laser Only qualified service personnel should attempt to service this device due to possible eye injury CAUTION USE OF CONTROLS ADJUSTMENTS OR PERFORMANCE PROCEDURES OTHER THAN THOSE SPECIFIED HEREIN MAY RESULT IN HAZARDOUS RADIATION EXPOSURE ...

Page 15: ...ING POOL AVOID USING A TELEPHONE OTHER THAN A CORDLESS TYPE DURING AN ELECTRICAL STORM THERE MAY BE A REMOTE RISK OF ELECTRIC SHOCK FROM LIGHTNING DO NOT USE THE TELEPHONE TO REPORT A GAS LEAK IN THE VICINITY OF THE LEAK SAVE THESE INSTRUCTIONS Energy Star CAUTION IMPORTANT SAFETY INSTRUCTIONS As an ENERGY STAR Partner Panasonic has determined that this product meets the ENERGY STAR guidelines for...

Page 16: ...amage which results in the internal parts becoming accessible in normal use In this instance users should have the equipment repaired or dispose of If the power supply cord and or telephone line cord of this equipment are damaged they must be replaced by the special cords supplied by an Authorized Panasonic service centre CAUTION When you know that a thunderstorm is coming we recommend that you 1 ...

Page 17: ...F THE CUT OFF PLUG IS INSERTED INTO ANY 13 AMP SOCKET If a new plug is to be fitted please observe the wiring code as shown below If in any doubt please consult a qualified electrician WARNING THIS APPLIANCE MUST BE EARTHED IMPORTANT The wires in this mains lead are coloured in accordance with the following code As the colours of the wires in the main lead of this appliance may not correspond with...

Page 18: ...elepermitted equipment only may be connected to the auxiliary telephone port The auxiliary telephone port is specifically designed for 3 wire connected equipment 3 wire connected equipment might not respond to incoming ringing when attached to this port Different characteristics of the equipment at the other end of the call and or variations in line conditions may mean that it will not always be p...

Page 19: ...able from the Optional Handset Kit into the HANDSET jack on the back of the machine External Telephone Jack You can connect an additional standard single line telephone to the machine To connect a telephone remove the protective tab on the TEL jack Telephone Jack Optional G3 Communication Port Kit UE 407026 is required Optional 2nd Telephone Line Jack Telephone Line Cable Adapter LAN Connection Ja...

Page 20: ...t and then search within the Auto dialler If LDAP server is not programmed only the Auto dialler will be searched Directory Search allows the entry of multiple letters from the QWERTY keyboard to narrow down the search to quickly find the name off the large database such as LDAP server or the optional 1 000 station Auto dialler Quick Name Search function works with the machine s Auto dialler only ...

Page 21: ...21 memo Getting To Know Your Machine ...

Page 22: ... of the name you wish to search repeatedly until it is shown on the LCD display Ex S Manual Number dialling Up to 50 Stations Directory Search dialling or ABBR No 3 digit Telephone Number Enter the first letter s of the name you wish to search Ex SA SALES 3 5551234 SALES 2 5551234 SALES 5551234 ABBR DIAL 3a A B C Face Up Original Guides Adjust to the original s width Max 100 pages A4 size original...

Page 23: ...ls with Fine Resolution HALFTONE S FINE for photo originals with S Fine Resolution HALFTONE 600 dpi for photo originals with 600 dpi Resolution Select the desired Transmission setting See the column on the right The document s is stored into memory with a file number Then starts sending the document s Transmission Settings START RESOLUTION CONTRAST See Note 3 3a 3b 3c 3d 2 dialling No Indication S...

Page 24: ...uides when adjusting the width 3 Original Size A5 A4 A B C ADF Tray Original Guides Adjust to the original s width A B Upper Limit Indicator A Upper Limit Guide B Set the originals up to the upper limit indicator A and guide B Originals that cannot be used Post Cards Drawing Papers Transparencies Labelling Papers Heavyweight Papers Thin Art Papers Film Thermal papers Inappropriate Originals Paper ...

Page 25: ... See page 86 OR START Number of Copies Max 999 or COPY 6 STOP to return to standby STOP NOTE When the desired copy size paper is not loaded in the paper tray s use the Sheet Bypass see page 90 Catch Rear Cover Before Pressing the Start Key Making Copies NOTE Do not open the Rear Cover when copying Thin paper as it may cause a paper jam Open the Rear Cover Catch the ejected copy do not pull Close t...

Page 26: ...ray 1 or Tray 2 has run out of paper or is not closed firmly See page 33 Replenish the paper in the tray s or ensure that the tray s are closed Empty Full Printing Side Up Copying on Special Paper etc NOTE For envelope printing details refer to the Panasonic DMS Operating Instructions manual included on the CD Feed 1 sheet of paper at a time Paper Weight 60 165 g m2 Adjust the width guides Incorre...

Page 27: ...paper is set properly and that it does not exceed the Tray 1 Tray 2 Max Level Indicator 3 NOTE 1 Feeding paper into the Sheet Bypass at the same time when the copying printing has started and paper is feeding from either Tray 1 or Tray 2 will show REMOVE MISFED PAPER J00 message on the LCD display When this occurs remove the paper from the Sheet Bypass to reset the jam indication then resume copyi...

Page 28: ... less than 50 prints Toner is Empty Machine stops Based on 5 print coverage TONER IS RUNNING LOW U13 OUT OF TONER U13 CAUTION Be careful not to scratch the surface of the OPC Drum Green and not to touch it with bare hands The OPC Drum is sensitive to light To prevent optical exposure problems do not expose the OPC Drum to direct sunlight or bright light Place the Toner Cartridge over the Guide Rai...

Page 29: ...e the protective cover until you are ready to use it 5 2 3 4 9 6 7 8 10 11 12 4 3 TONER REPLACEMENT 1 YES 2 NO New Toner New Drum Unit Tape and Protective Cover Shake 10 15 times Drum Unit New Toner New Toner Drum Unit NEW TONER REPLACED 1 YES 2 NO NOTE If 2 NO is selected the image density may be inadequate and may cause Copy Print quality issues NOTE Return the replaced Toner Cartridge to your A...

Page 30: ...l Toner Cartridge REMOVE MISFED PAPER J44 NOTE The J Code indicates the most probable Jam location If the jam message reappears after the jam is cleared paper is most likely jammed at other location s Check the Jam Error Codes Table on page 32 for other check points and remove all misfed paper Rear Side Place the Toner Cartridge over the Guide Rails and insert it until it stops 1 2 6 7 J43 J44 J82...

Page 31: ...ge Misfed Paper Misfed Paper Front Cover 6 3 4 5 6 3 4 5 8 9 8 CAUTION Do not scratch or touch the surface of the OPC Drum Green with bare hands The OPC Drum is sensitive to light To prevent optical exposure problems do not expose the OPC Drum to direct sunlight or bright light ADF Cover 3 4 ADF Tray Misfed Paper ...

Page 32: ...d in the machine Check again and remove all misfed paper Code Check Points Code Check Points U01 Front Cover is open U20 ADF Cover is open U13 Low Toner or Out of Toner See page 28 U90 Battery requires replacement See page 133 U16 Toner Cartridge is not installed correctly Code Check Points Code Check Points J00 Remove paper from the Sheet Bypass Open and close the Front Cover J71 J72 J74 Remove m...

Page 33: ...cessed a BYPASS ADD PAPER prompt message will appear on LCD display insert an additional media into the Sheet Bypass one at the time until your copy job is completed Adding Paper Tray 2 Always remove all paper from Tray 2 fan and straighten remaining paper before replenishing paper This helps prevent multiple sheets of paper from feeding through the Tray 2 at one time thus reducing paper jams Maxi...

Page 34: ...ult values Home position You can change the Home position of these settings in the Fax Parameters mode See page 106 FUNCTION FUNCTION 1 2 3 6 Deferred Communication 1 Deferred Transmission See page 50 2 Deferred Polling See page 50 3 Advanced Communication Advanced Communication 4 Sub Address Transmission See page 62 5 LAN Relay Transmission For Internet Fax Email function only Polling 1 Polling S...

Page 35: ...e Toner Order Form Toner Replacement See page 28 LCD Brightness see Note 3 Select Mode see Note 2 1 Communication Journal OFF ON INC See page 120 2 Delivery Notice OFF ON 3 Cover Sheet OFF ON See page 64 5 RCV to Memory OFF ON PRINT 6 File Type and Name TIFF PDF 9 Memory Transmission OFF ON See page 38 42 2 and 6 for Internet Fax Email function only Edit File Mode 1 File List Print View See page 7...

Page 36: ...ication stamp is set to ON See page 109 Fax Parameter No 028 FUNCTION Key Used to start or select the function and subfunctions These functions are explained in detail on page 34 CLEAR Key Clears the number or character on the LCD display Go back to the previous LCD screen and function as Back Space key SET Key Used to set operations Cursor Keys Adjust the Monitor and Ringer volume Move the cursor...

Page 37: ... out Machine detected trouble such as paper misfed or jammed Flashes Machine detected an alarm status No paper in the Tray Tray not selected Toner is getting low etc PRINT DATA LED GREEN Flashes When receiving printing data Lights While printing When you change to the included other Directory Sheet Cover Keyboard Sheet change the Fax Parameter No 65 to 2 Change see page 110 Directory Sheet Cover i...

Page 38: ... press the STOP key One Touch ABBR dialling see Note 2 When Fax Parameter No 119 is set to 1 One Touch See page 110 Quick Name Search dialling see Note 2 When Fax Parameter No 119 is set to 2 Quick Name Search See page 110 Manual Number dialling Up to 50 Stations Directory Search dialling or ABBR No 3 digit Telephone Number ABBR DIAL 3a A B C Face Up Original Guides Max 100 pages A4 size originals...

Page 39: ...to transmit the successfully stored documents or to cancel the transmission Press YES to cancel or press NO to transmit If no action is taken within 10 seconds the machine will start transmitting the stored documents If memory overflows while storing 1st page use Direct Transmission An Information Code will be displayed if the transmission has failed or there was no answer at the receiving side af...

Page 40: ...red in the One Touch Keys up to 80 stations 2 stations with each One Touch Key 1 40 2 1 Press One Touch Key 1 40 ADF Tray Original Guides Adjust to the original s width A B C Lower Indicator If two Stations are registered onto the One Touch Key or Press One Touch Key 1 40 Last dialled numbers max 5 numbers will be recorded and can be used for redialling 1 2 ADF Tray Original Guides Adjust to the o...

Page 41: ... into memory with a file number Then starts sending the document s START 3 4 13 SALES 01 0123456789001 13 SALES 02 0123456789012 3 4 SET START The document s is stored into memory with a file number Then starts sending the document s TEL NO 5551234 TEL NO 5551234 TEL NO 0123456789012 TEL NO 0123456789012 TEL NO 0123456789012 Select the number ...

Page 42: ...te You cannot send document s to multiple stations in this case 1 or Manual Number dialling Telephone Number Up to 36 digits Quick Name Search dialling see Note 2 When Fax Parameter No 119 is set to 2 Quick Name Search See page 110 One Touch ABBR dialling see Note 2 When Fax Parameter No 119 is set to 1 One Touch See page 110 Enter a letter s of a name you wish to search Ex SA ABBR DIAL ABBR No 3 ...

Page 43: ... Keys and or or FUNCTION SET START You can reserve to send the urgent document s to a single station only 3 5a 4 6 MEMORY XMT ON 1 OFF 2 ON SET If you need to change the preset Memory position change the setting of Fax Parameter No 5 See page 108 5b 5d 5c Quick Name Search dialling One Touch ABBR dialling Manual Number dialling Directory Search dialling Set the desired Transmission setting if nece...

Page 44: ... 1 DUPLEX ADF Tray 6 INSERT SECOND SIDE ORIENTATION AS IS A B C Long Edge Originals Short Edge Originals 2 4 6 6 4 2 Original Received 1 3 2 4 1 2 3 4 Place the second side of the original s of step 1 in the order and direction of ejection Even Number pages 1 3 5 A B C Step Second Side Page No 1 2 4 6 ...

Page 45: ... when the original s are double fed of the 2 Sided originals SIDE 1 2 PAGE COUNTS DO NOT MATCH and RESCAN ORIGINALS START WITH 1ST SIDE will be displayed and all scanned data will be cancelled If this occurs restart from Step 1 and Step 4 to Step 7 Real Time and Quick Memory Transmission features are not available START Press or to select binding position SET START ...

Page 46: ... MONITOR 1 2 dialling 5551234 3 A B C You will hear the dial tone through the monitor speaker Your machine starts to dial the telephone number 2 Telephone Number A B C 3 When you hear the voice of the other party tell the other party to prepare to receive a document 4 1 If you wish to send the document after talking with the other party first use Voice Mode Transmission Your machine requires the o...

Page 47: ...ing press represented by a The dialling mode will be changed from Pulse to Tone after dialling the digit Ex 9 5551234 3 Off Hook dialling is not available with the second telephone line Line 2 START 4 Then when you hear a beep press START START Then when you hear a beep press and hang up the handset START 5 TONE PAUSE TONE ...

Page 48: ...per runs out jams or if the toner runs out during reception the machine automatically starts receiving documents into its image data memory Stored documents will be printed automatically after replenishing the recording paper toner or clearing the jam See Notes 1 2 and 3 When the machine completes the memory reception and there is no recording paper or toner this error message appears on the displ...

Page 49: ...ee page 110 Under the following conditions your machine cannot receive 2 Sided transmissions It will automatically change to a 1 Sided reception When receiving Legal size document s with 600 dpi Resolution When the machine detects memory overflow When the paper except for the size of A4 Letter or Legal is set in the paper tray Lift the handset START Press then hang up the telephone The machine sta...

Page 50: ...erred Communication settings See page 78 1 FUNCTION SET ENTER STATION S THEN PRESS START Dial by any combination of the following methods One Touch ABBR dialling Quick Name Search Directory Search dialling See page 38 or 2 4 A B C Store document s in memory 1 Calling at predetermined time 2 Transmit 1 3 Receive 1 4 DEFERRED POLLING PASSWORD SET Enter a 4 digit polling password then press SET 1 SET...

Page 51: ... hour clock Ex and SET 2 3 3 0 SET START 4 3 5 Station name 5551234 Station name 5551234 DEFERRED POLLING START TIME SET Enter the start time from the keypad Use a 4 digit 24 hour clock Ex and 2 3 3 0 SET Dial by any combination of the following methods One Touch ABBR dialling Quick Name Search Directory Search dialling See page 38 or ENTER STATION S THEN PRESS START START 3 2 4 5 CLEAR ...

Page 52: ...cuments for the same destination s to be transmitted in a single phone call Real Time Batch Transmission NOTE 1 The machine cannot Batch a file s that is are under Waiting to Redial status or is currently being sent but it will Batch files that have not been dialled to NY to LA to London to LA to London Transmit to NY Transmit to LA Transmit to LONDON Time ...

Page 53: ...mile Features During memory transmission this machine searches its memory for reserved files up to 5 files to transmit to the same destination automatically batching and transmitting them in a single phone call ...

Page 54: ...me polled file See page 80 3 To delete a polled file See page 78 4 If you have set the polling password in Fax Parameter No 26 the password will appear on the display see page 109 You can still change the password temporarily by overwriting it with a new one To allow other stations to poll your machine you must prepare your machine by storing a document into memory Be sure to set the polling passw...

Page 55: ...t in the polled station you may poll the other station even though your machine has a password POLLING NO 1 POLLING 2 POLLED POLLED PASSWORD Enter a 4 digit polling password Ex 4 3 2 1 3 5 4 POLLED PASSWORD 4321 START To store document s into the memory ...

Page 56: ...ou have set the polling password in Fax Parameter No 26 the password will appear on the display see page 109 You can still change the password temporarily by overwriting it with a new one FUNCTION Store document s in memory See page 54 1 Polling 1 2 Transmit Receive For Deferred Polling See page 50 1 POLLING NO 1 POLLING 2 POLLED Station name 5551234 START 2 6 ...

Page 57: ...ter a 4 digit polling password Ex 4 3 2 1 POLLING PASSWORD 4321 SET 3 6 5 4 Enter the stations Quick Name Search One Touch ABBR dialling Manual Number dialling Directory Search dialling For details See page 38 ENTER STATION S THEN PRESS START ...

Page 58: ...l 2 The Program Key cannot be modified or erased until the communication using it has finished To change or erase the settings cancel the communication first by using the Edit File Mode See page 78 FUNCTION SET ENTER STATION S THEN PRESS START 1 PROGRAM 1 5 ENTER NO OR SET 5 Station name 5551234 START 6 The Program Keys are useful if you frequently need to send or poll the same group of stations E...

Page 59: ...the Directory Sheet Press One Touch key 1 40 or to register the Group Dial Ex STOP 10 GROUP 10 NAME ENTER NAME You can now set other Program Keys by repeating the procedures from Step 3 or return to standby mode by pressing STOP 5 4 7 Enter the Group name up to 15 characters by using the Character keys then press Ex PROG A SET SET 2 GROUP DIAL PRESS ONE TOUCH ...

Page 60: ...tore multiple stations to be polled or to set up a deferred transmission 1 4 PROGRAM 1 5 ENTER NO OR SET Select a function to program 1 Deferred Communication See page 50 2 Advanced Communication See page 62 3 Polling Communication See page 54 FUNCTION 1 3 ENTER NO OR This example is when the Fax Parameter No 119 is set to 2 Quick Name Search See page 110 2 5 To change the below Program key settin...

Page 61: ...t See page 124 You can now set other Program Keys by repeating the procedures from Step 3 or return to standby mode by pressing STOP PROGRAM NAME ENTER NAME Enter the program name up to 15 characters by using the Character keys then press Ex PROG A SET SET 6 4 3 ...

Page 62: ...ook or On Hook dialling cannot be used with the Sub addressing Transmission Sending a Fax with Sub Address Setting the Sub Address into an Address Book When Fax Parameter No 119 is set to 2 Quick Name Search see page 110 1 A B C SET FUNCTION ADD STATION 5551234s2762 SET 1 2 4 5 ADDRESS BOOK 1 3 ENTER NO OR ENTER NAME 5551234s2762 Enter Station Name SET SUB ADDR aaa bbb 201 333 1234 aaa bbb 2222 33...

Page 63: ...mber pauses spaces FLASH and Sub address Ex 5551234 2762 SUB ADDR SUB ADDR SET STOP You can send the document using a Address Book dialling with a preset Sub Address TEL NO Sub Addr SALES DEPT 5551234s2762 START Send the document s with Sub Addressing information See Note 5 2 3 4 3 6 ADD STATION ENTER TEL NO Enter the telephone number press then enter the Sub address Up to 20 digits Up to 36 digit...

Page 64: ...e page 110 2 Page 1 2 Page 1 Sample Fax Cover Sheet FACSIMILE COVER SHEET 1 DD mmm yyyy 15 00 2 Message To SALES DEPT 3 Message From PANASONIC 201 555 1212 4 02 Page s Following This Cover Page Sending Receiving Cover 5 1 2 SET FUNCTION Explanation of Contents 1 Starting time of communication 2 Recorded name in the Address Book station 3 Your LOGO up to 25 characters and ID Number up to 20 digits ...

Page 65: ...the Quick Memory Transmission feature is disabled COVER SHEET OFF 1 OFF 2 ON SET 5 3 4 ENTER STATION THEN PRESS START 00 Dial by any one of the following methods Quick Name Search One Touch ABBR dialling Manual Number dialling Directory Search dialling For details See page 38 ...

Page 66: ...ted immediately after pressing press in Step 3 This feature is used to secure all received documents by storing them into memory To print the document s received in memory the authorized operator must enter the correct password Setting RCV To Memory Password Setting the RCV To Memory Printing Documents After receiving documents with the Receive To Memory feature the following message will appear o...

Page 67: ...ange the password set the RCV TO MEMORY feature to OFF first Then change the password See page 109 37 RCV TO MEMORY 4 digit RCV to Memory Password Ex 1234 37 RCV TO MEMORY 1234 SET STOP 3 4 RCV TO MEMORY ON 1 OFF 2 ON 3 PRINT dd MMM yyyy 15 00 RCV TO MEMORY SET 3 4 RCV TO MEMORY PRINT 1 OFF 2 ON 3 PRINT SET INPUT PASSWORD 4 digit RCV to Memory Password and press Ex 1234 SET SET 3 4 ...

Page 68: ... or Suffix dialling with a PIN Code NOTE 1 The PIN Code is shown as on the display when dialling the number for security 1 aaa PBX PIN Personal Identification Number PIN Code Transmit 4 FUNCTION SET 39 PIN CODE ACCESS 2 SUFFIX ENTER PIN CODE 9876 1 2 5 6 ENTER STATION S THEN PRESS START 00 Dial by any one of the following methods Quick Name Search dialling One Touch ABBR dialling Manual Number dia...

Page 69: ... or On Hook Direct dialling mode SET FAX PARAMETER 1 169 NO SET STOP 4 2 3 5 39 PIN CODE ACCESS 1 NONE 2 SUFFIX 3 PREFIX NOTE When Internet Fax Email Network Scanner Module option is installed Fax Parameters are 1 177 Station name 5551234 START 5 3 4 ENTER PIN CODE PIN code Up to 36 digits Ex 9876 ...

Page 70: ...umber 1 50 when it is printed Setting the Department Code NOTE 1 The Department Code List can be printed out with the Fax Parameter List To enable the printing of the Department Code List change the setting of Fax Parameter No 77 Department Code to Valid in advance See pages 72 and 110 aaa Requires the input of a preset Department Code 8 digit Department Code is printed Reception 1 4 7 FUNCTION SE...

Page 71: ... to 8 digit Department Code Ex 12345678 4 2 3 5 SET 77 DEPARTMENT CODE 1 INVALID Department Name Up to 25 characters and press Ex PANASONIC SET SET 7 6 INPUT DEPT NAME 12 NOTE When Internet Fax Email Network Scanner Module option is installed Fax Parameters are 1 177 2 VALID ...

Page 72: ...ANAFAX If you wish to erase the Department Code press after pressing Go to Step 7 CLEAR SET SET CLEAR Requires the input of a preset Department Code 8 digit 1 2 5 Dial by any one of the following methods Quick Name Search One Touch ABBR dialling Manual Number dialling Directory Search dialling For details See page 38 The document is sent with the header of the selected Department Name The selected...

Page 73: ...77 DEPARTMENT CODE 2 VALID 4 DEPT CODE 1 50 ENTER NO OR Enter the Department Code number you wish to change or erase 1 to 50 and press Ex 12 SET SET then enter a new Department Code and press Ex 12345678 CLEAR SET INPUT DEPT CODE 12 Previous Code CLEAR 6 7 5 SET Station name 551234 START 3 INPUT DEPT CODE 8 digit Department Code Ex 12345678 5 4 ...

Page 74: ... 00 15 28 02 Panafax Service NO COMM PAGES FILE DURATION X R IDENTIFICATION DATE TIME DIAGNOSTIC 019 OK 001 001 017 00 00 13 XMT 5551234 DD mmm 10 10 C0044903C0000 030 OK 011 011 045 00 08 15 XMT SERVICE DEPT DD mmm 13 10 C0044903C0000 TOTAL PAGES 000012 TOTAL TIME 00 08 28 PANASONIC UF xxxx HEAD OFFICE 201 555 1212 DEPT CODE JOURNAL DATE DD mmm yyyy TIME 15 00 P 02 RECEIVED CALLS DD mmm TO DD mmm...

Page 75: ...his machine 3 Total transmitted received time for this machine 4 Department Code 5 Department Name 6 Total number of pages transmitted received for this department 7 Total transmitted received time for this department FUNCTION SET PRINTING JOURNAL JOURNAL 1 PRINT 2 VIEW Prints a Journal Journal View See page 118 Ex 1 2 1 1 2 3 ...

Page 76: ...E 15 00 1 2 3 4 5 6 FILE COMM TYPE CREATED TIME START TIME PAGES DESTINATION S No 001 DEFERRED XMT DD mmm 13 20 20 30 SALES 002 MEM DEF XMT DD mmm 13 20 22 30 003 AMERICA ASIA PANASONIC UF xxxx HEAD OFFICE 201 555 1212 1 File number If the file is now being executed a is indicated on the left of the file number 2 Communication type 3 Created date time Date time when these files are created 4 Execu...

Page 77: ...USE THE KEYS TO SCROLL EACH FILE 3a 3b 123 XMT 12 00 P001 01 SALES Type of Communication XMT Transmission RCV TO MEM Receive to memory POLL Polling POLLED Polled FWD Fax Forward RMT Remote Diagnostic Start Time File Number Station No Station Name Number of Pages Scroll Marker Latest transaction Oldest transaction ...

Page 78: ...start time and or stations in a communication file FUNCTION SET 1 2 5 ENTER FILE NO OR FILE NO File No or Scroll Ex 0 0 1 or TEL NO 5551234 keys to scroll the entered Station If you wish to delete Station s press Or enter new Station s CLEAR Use the following procedure to delete the file from memory DELETING FILE NO 001 FUNCTION SET 1 2 5 ENTER FILE NO OR FILE NO File No or Scroll Ex 0 0 1 or to d...

Page 79: ... Press to execute the file immediately 4 If using DELETE ALL FILES it takes several minutes ENTER FILE NO OR FILE NO 001 5 3 4 DEFERRED XMT START TIME 22 30 CLEAR then enter a new START Time and press Ex 0600 6 00am CLEAR SET 6 START SET 5 ENTER FILE NO OR FILE NO 001 DELETE ALL FILES 1 YES 2 NO SET 3b 3a DELETE FILE NO 001 1 YES 2 NO 4b DELETING ALL FILES 4a START 1 RETRY INCOMP FILE 1 YES 2 NO ...

Page 80: ... 2 Your machine cannot add document s into a file while it is being sent or waiting to redial Use the following procedure to print the contents of the communication file FUNCTION SET 1 2 ENTER FILE NO OR FILE NO File No or Scroll Ex 0 0 1 or Use the following procedure to add documents into the file STORE NO 001 PAGES 002 10 1 2 5 FUNCTION SET A B C ...

Page 81: ...81 Facsimile Features ENTER FILE NO OR FILE NO 001 SET 3 4 PRINTING PAGE 001 003 ENTER FILE NO OR FILE NO File No or Scroll Ex 0 0 1 or 5 3 4 ENTER FILE NO OR FILE NO 001 SET ...

Page 82: ...unication has been unsuccessful due to a busy line or no answer the document you stored is automatically erased from memory after the last redial If you need to retain the document even if the communication failed change the setting of Fax Parameter No 31 Incomplete File Save to Valid in advance See page 109 Use the following procedure to retry the incomplete file FUNCTION SET 1 2 ENTER FILE NO OR...

Page 83: ...83 Facsimile Features SET ENTER FILE NO OR 3 4 STORE NO 001 Station name dialling NO 001 Station name ...

Page 84: ... again Registering the Access Code does not affect the use of the machine in any other way Setting the Access Code Operating FAX with the Access NOTE 1 To erase the Access Code enter the Access Code and press and follow the procedure above to Step 2 then press and FUNCTION SET SET FAX PARAMETER 1 169 NO 1 2 3 SET 38 ACCESS CODE 4 digit Access Code Ex 1234 FUNCTION SET SET dd mmm yyyy 15 00 ACCESS ...

Page 85: ...ters 38 ACCESS CODE 2 PARAMETERS 1234 38 ACCESS CODE 1 ALL 1234 SET STOP 4 5 or FAX PARAMETER 1 169 NO dd mmm yyyy 15 00 00 ENTER ACCESS CODE Now you can operate the machine normally 4 3b NOTE When Internet Fax Email Network Scanner Module option is installed Fax Parameters are 1 177 SET ...

Page 86: ...rted in the original s page order Non Sort Multiple copies of each original will be made non sorted NOTE Initial Sort Mode settings can be selected within the Function Settings See page 114 Copier Setting No 10 to 2 Sort 71 141 Preset Ratios ex Reduction 1 2 Variable Zoom Ratios Copies with variable zoom ratios from 71 to141 in 1 increments A B C A4 R A5 A5 R FLS A4 A5 A5 FLS COPY ORIGINAL SIZE A5...

Page 87: ...d Edge that is ripped creased folded punched or glued Mixed width Originals Post it Notes Pressure sensitive or carbon backed papers Paper with excessive curl Stapled originals Freshly printed copies from a laser printer Originals with fresh White Out Liquid paper correction fluid Set the originals up to the upper limit indicator A and guide B Number of Copies Max 999 or START COPY 3 4 Reduction e...

Page 88: ... FLS COPY ORIGINAL SIZE A B C 2 2 Copy 2 Sided 2 Sided Copy 2 1 Copy 2 Sided 1 Sided Copy 1 3 5 A Long Edge Originals 1 3 5 A Short Edge Originals 2 4 6 1 3 5 A Step Reverse Side Page No 1 Long Edge Originals Short Edge Originals 2 4 6 6 4 2 1 2 6 Odd Number Pages NOTE When using the Sheet Bypass 2 2 Copy function is not available INSERT SECOND SIDE ORIENTATION AS IS Place the reverse side of the ...

Page 89: ... 7 8 NOTE If the page count for the Back side does not match the page count for the Front side i e page double fed of the 2 Sided originals a SIDE 1 2 PAGE COUNTS DO NOT MATCH and RESCAN ORIGINALS START WITH 1ST SIDE will be displayed and all scanned data will be cancelled If this occurs restart from Step 1 and Steps 5 d to Step 7 9 PRESS START TO CONTINUE SET ORIGINALS ON ADF START SET DIRECTORY ...

Page 90: ... SAVER ENERGY SAVER Lights Sleep Shutdown Mode These modes save power while the machine is not in use You can select desired save mode and timer in Fax Parameter No 34 See page 109 Power Saver Mode To enter Automatically enters the Power Saver Mode after 10 minutes default setting from the last operation or Sleep Shutdown Mode Automatically enters the Sleep Shutdown Mode after 10 minutes from the ...

Page 91: ...lect the Paper Type For LETTER A4 PAPER TYPE PLAIN 1 PLAIN 2 HEAVY Others or or and SET NOTE 3 OHP selection is displayed only when Letter or A4 paper size is selected See page 25 PAPER TYPE PLAIN 1 PLAIN 2 HVY 3 OHP INVOICE Invoice R FLS1 FLS2 A4 B5 LEGAL LETTER Letter R A5 A5 R ...

Page 92: ...lume NOTE 1 This message is displayed when optional G3 Communication Port Kit is installed FAX PARAMETER 1 169 NO FUNCTION SET SET 1 2 06 dialling METHOD 2 TONE L 1 for PULSE for TONE Ex 1 2 1 3 See Note 1 MONITOR MONITOR or repeatedly to raise or lower the volume 1 2 MONITOR VOLUME LOW HIGH 3 or repeatedly to raise or lower the volume dd MMM yyyy 15 00 00 RINGER VOLUME 1 2 STOP To return to stand...

Page 93: ...93 Setting Your Machine SET STOP 06 dialling METHOD 1 PULSE L 1 4 MONITOR To return to standby 4 ...

Page 94: ...nd the Program Name Programming Address Book Dial NOTE 1 If you are using Pulse dialling and you wish to change to Tone dialling in the middle of dialling press represented by a The dialling method will be changed from Pulse to Tone after dialling the digit 2 When using Address Book Dials you can not use ABBR NUMBER dialling ADD STATION 335 5 ENTER NAME 335 SET Ex SALES 6 ADDRESS BOOK 1 3 ENTER NO...

Page 95: ...NTER TEL NO 3 4 7 1 ADD STATION PRESS SET TO SELECT 5 8 To program another station repeat from Steps 4 to 6 To return to standby press up to 280 stations plus additional 720 with the optional SD Memory Card installed STOP SET Enter Telephone Number up to 36 digits ...

Page 96: ...breviated dialling 13 ENTER TEL NO 1 ONE TOUCH 2 ABBR NO Lower Indicator is OFF 1 2 5 SET or 13 ENTER TEL NO Lower Indicator is lights SET FUNCTION When Fax Parameter No 119 is set to 1 One Touch see page 110 Enter Telephone Number up to 36 digits 3 6 ONE TOUCH PRESS ONE TOUCH LOWER Ex 335 When changing to Lower side of One Touch button 13 ENTER NAME 335 Ex SALES Enter Station Name using the QWERT...

Page 97: ... press STOP 022 ENTER NAME 335 5 SET Enter Station Name using the QWERTY keyboard up to 15 characters Ex SALES Enter Telephone Number up to 36 digits Ex 335 1 up to 200 stations plus additional 720 with the optional SD Memory Card installed ABBR ENTER ABBR NO To record another number repeat from Steps 3 to 6 To return to standby press STOP 2 SET Select One Touch Ex 13 4 ...

Page 98: ...r programming the One Touch dialling numbers you can print the Directory Sheet which includes each station s name This sheet is available when the Fax Parameter No 119 is set to 1 One Touch see page 110 PRINTING DIRECTORY SHEET FUNCTION SET Your machine prints the Directory Sheet 1 2 ...

Page 99: ...rogram Key is not programmed DIRECTORY SHEET DATE dd MMM yyyy TIME 15 00 AMERICA AFRICA ASIA CANADA BRAZIL JAPAN PANASONIC UF xxxx HEAD OFFICE 201 555 1212 Cut the Directory Sheet along the dashed lines and insert into the Directory Holder Note It may be necessary to trim the edges a bit further for the sheet to fit into the holder better ...

Page 100: ...he right side of the incorrect number press then reenter the correct number ADDRESS BOOK 1 3 ENTER NO OR 1 2 PANA 335 SET FUNCTION SET Press then enter a New Telephone Number then press CLEAR SET When Fax Parameter No 119 is set to 2 Quick Name Search see page 110 2 5 SET PANA 335 6 ADDRESS BOOK 1 3 ENTER NO OR 1 2 5 SET FUNCTION SET When Fax Parameter No 119 is set to 2 Quick Name Search see page...

Page 101: ...RESS SET TO SELECT To return to standby press STOP SET Press then enter the station name using the Character Keys up to 15 characters then press CLEAR SET PANA 555 SET Enter the first letter s of the name you wish to search then press or to select desired station to modify Ex PA DELETE STATION ENTER LETTER S 3 4 6 7 PANA DELETE 1 YES 2 NO 3 DELETE STATION PRESS SET TO SELECT To return to standby p...

Page 102: ...any of the One Touch ABBR No enter a new number email address or station name after pressing key in each steps 4 To correct a mistake use or to move the cursor to the right side of the incorrect number press then re enter the correct number 001 SALES DEPT 9 555 2345 Press then enter a new telephone number s or email address then press CLEAR SET CLEAR SET FUNCTION 1 ONE TOUCH 2 ABBR NO To change To...

Page 103: ...tings cancel the communication first by Edit File Mode See page 78 ABBR ENTER ABBR NO STOP To return to standby 001 SALES DEPT 9 555 3456 Press then enter the station name using the QWERTY keyboard up to 15 characters then press Ex PANAFAX CLEAR SET CLEAR 001 SALES DEPT ENTER TEL NO SET 3 6a 5a 6b 5b ABBR ENTER ABBR NO 4a 4b To change To erase or SET STOP To return to standby ABBR ENTER ABBR NO Ex...

Page 104: ...ollow the Operating Instructions included in the Panasonic Document Management System CD Setting the User Parameters NOTE 1 Special characters such as Å Ä Ö Ü Æ è and é cannot be used for Character ID 2 To correct a mistake use or to move the cursor to the right side of the incorrect number or character press then re enter the new number or character FUNCTION SET CHARACTER ID HEAD OFFICE SET CHARA...

Page 105: ...ry code Ex 1 201 555 1212 1 for U S A country code 81 3 111 2345 81 for Japan country code ID NO 201 555 1212 SET STOP To return to standby LOGO Enter your LOGO Up to 25 characters and numbers Ex PANASONIC 4 6 5 9 LOGO PANASONIC SET Exits the User Parameter Mode Programming other User Parameters is not neccessary to use the Facsilime Function TONE ...

Page 106: ...peration just before a trans mission is made When the transmission ends however these parameters return to their preset values Home posi tion Other parameters can only be changed by the procedure described below Setting the Fax Parameters NOTE 1 To scroll the Fax Parameters in step 2 press or 2 To print out a Fax Parameter List See page 126 FAX PARAMETER 1 169 NO FUNCTION SET Enter Fax Parameter n...

Page 107: ...meter setting mode is accessible only when the machine is in the Ready Mode SET 04 STAMP HOME 1 OFF Change setting Ex for ON 2 4 5 04 STAMP HOME 2 ON To set another parameter press to return to step 3 or press to return to standby CLEAR STOP ...

Page 108: ...inted 2 Outside 3 No print 008 HEADER FORMAT 1 Logo ID No Selecting the header format 2 From To 009 RCV D TIME PRINT 1 Invalid Selecting whether the machine prints the received date time remote ID percentage of reduction and page number on the bottom of each received document 2 Valid 010 KEY BUZZER VOLUME 1 Off Selecting the key touch beep sound 2 Soft 3 Loud 012 COMM JOURNAL 1 Off Selecting the h...

Page 109: ...ects whether the DRD service is used if available If this parameter is set to Valid your machine detects the specified ring pattern only to receive a document automatically 2 Valid 031 INCOMPLETE FILE SAVE 1 Invalid Selecting whether the machine retains the document in memory if the document is not successfully transmitted 2 Valid 034 ENERGY SAVER MODE 1 Invalid Select a Energy Saver mode and time...

Page 110: ...rst page 2 Valid 088 LINE SELECTION 1 Auto Selecting telephone line 2 Line 1 when the optional G3 3 Line 2 Communication Port Kit is installed 095 DUPLEX PRINT 1 Invalid Selecting whether the machine performs duplex print when receiving the document via G3 Fax or Internet Fax 2 Valid 097 SPECIAL TRAY No 1 2 1 None Select a Special Tray that will not be used for printing received faxes Tray 1 or 2 ...

Page 111: ...trieval from the POP Server 2 Valid 149 DELETE POP ERROR EMAIL 1 Invalid Selecting whether to delete the email that includes an incompatible file attachment from the POP Server 2 Valid 150 IFAX RETURN RECEIPT 1 Invalid Selecting whether to send a return receipt when receiving from another Panasonic Internet Fax 2 Valid 151 EMAIL HEADER FORMAT 1 All Selecting the header information to print when an...

Page 112: ...164 IFAX XMT HEADER Email only 1 Included Selecting whether to include the header when sending a document to an addressee in the same Domain as specified in the Default Domain parameter This is useful when using the machine to scan documents back to your PC Note When sending to a Domain other than as specified in the Default Domain parameter the header will be included regardless of the selection ...

Page 113: ... F8 2 2 On 174 APOP AUTHENTICATION See Note 3 1 Invalid This parameter allows you to encrypt the protocol for the POP password security when connecting with the POP server 2 Valid 177 XMT FILE TYPE 1 TIFF Selecting whether the document s are converted to TIFF F or PDF format when Scanning to Email or TIFF F format when sending to an Internet Fax The default is PDF as PDF has become the industry st...

Page 114: ...E Sets the auto exposure setting 1 INVALID 2 VALID 2 VALID 10 SORT PRIORITY ADF Selects the sort priority when using the ADF 1 NON SORT 2 SORT 2 SORT 12 1 2 BINDING DEF Selects the binding location for 1 2 Copy 1 LONG EDGE 2 SHORT EDGE 1 LONG EDGE 13 2 1 BINDING DEF Selects the binding location for 2 1 Copy 1 LONG EDGE 2 SHORT EDGE 1 LONG EDGE 19 KEY OPERATOR MODE Inputs the key operator password ...

Page 115: ...de 1 5 3 05 MAX COPY SETTING Determines the maximum number of copies sets allowed to be copied 1 999 999 08 MEM FULL ACTION Selects the action to take during memory full condition 1 PRINT 2 CANCEL 1 PRINT 09 TONER SAVE Selects the toner save in Text mode 1 OFF 2 ON 1 OFF 11 TONER SAVE HT Selects the toner save in Halftone mode 1 OFF 2 ON 1 OFF When selecting the Key Operator Mode Input the Key Ope...

Page 116: ...A4 Letter and Legal or other size paper Paper Tray 1 2 3 6 7 8 SET PAPER TYPE PLAIN 1 PLAIN 2 OHP LETTER A4 size only Tray 1 When the optional 2nd Paper Feed Module TRAY 2 is installed press the SET Key once and repeat from Steps 4 and 5 1 PLAIN 2 OHP STOP FUNCTION SET SET SET 23 REC PAPER SIZE 1 TRAY 1 A4 FAX PARAMETER 1 169 NO ...

Page 117: ...ting Your Machine Paper Tray 4 5 6 9 10 11 SET TRAY 1 A4 A4 B5 LEGAL Paper Guide A B Adjustment Guide B Guide A Paper Guide A Length Adjustment For Legal size For other size Release Button Push Push LETTER A5 ...

Page 118: ...UE 13 PANASONIC UF xxxx HEAD OFFICE 201 555 1212 15 14 FUNCTION SET 1 2 JOURNAL 1 PRINT 2 VIEW for printing a Transaction Journal for viewing a Transaction Journal 1 3a 2 3b 01 12 10 00 OK P01 XMT 5551234 Type of Communication XMT Transmission RCV Reception POL Polling PLD Polled FWD Fax Forward RMT Remote Diagnostic Date Time Latest transaction Oldest transaction Only 1 transaction Number of page...

Page 119: ...ory two 3 digit numbers will appear The first 3 digit number represents the number of pages successfully transmitted The second 3 digit number represents the total number of pages that were attempted to be transmitted Asterisk indicates that the quality of some received copies was poor 6 File Number 001 to 999 If the document is stored into memory a file number is assigned for each communication 7...

Page 120: ...T dd MMM 14 50 END dd MMM 15 00 FILE NO 050 4 5 6 7 8 9 10 STN COMM ONE TOUCH STATION NAME EMAIL ADDRESS TELEPHONE NO PAGES DURATION NO ABBR NO 001 OK 01 SERVICE DEPT 001 001 00 01 30 002 OK 02 SALES DEPT 001 001 00 01 25 003 407 03 ACCOUNTING DEPT 000 001 00 01 45 004 BUSY 021 111 1234 000 001 00 00 00 PANASONIC UF xxxx HEAD OFFICE 201 555 1212 001 OK SERVICE SERVICE DEPT 001 001 00 01 30 002 OK ...

Page 121: ...sent R OK indicates that the Relayed XMT was successful B OK indicates that the Batch Transmission was successful indicates LAN transmission 3 digit Info Code See page 130 indicates that the communication has failed In this case the machine will print the attached report with first page of your document as shown on the previous page 7 One Touch Abbreviated Number or Symbol mark indicates dialled b...

Page 122: ...01 555 1212 1 One Touch number or Abbreviated number nn One Touch number nnn Abbreviated number 2 Station name recorded in the machine Up to 15 characters 3 Telephone number recorded in the machine Up to 36 digits Telephone number Email address recorded in the machine Up to 60 characters Email address number Telephone Number programmed into One Touch ABBR NO 4 Number of recorded One Touch and ABBR...

Page 123: ...cs mei co jp 1773 81 0467 5251 1234 NO OF STATION 005 4 PANASONIC UF xxxx HEAD OFFICE 201 555 1212 ONE TOUCH LIST DATE dd MMM yyyy TIME 11 11 P 01 1 2 3 ONE STATION NAME EMAIL ADDRESS TELEPHONE NO 7 TOUCH ROUTING SUB ADDR 5 ROUTING TSI 6 RELAY ADDR ABBR NO 01 John Smith 201 555 3456 4452 1 201 123 4567 001 02 Jane Smith 201 555 1212 1212 212 555 1234 002 03 Bob Jones jonesb abcdefg com 123456 201 ...

Page 124: ...ANASONIC2 T TIMER POLL POLL 19 00 TIMER POLL TIMER XMT XMT 12 00 TIMER XMT PANASONIC UF xxxx HEAD OFFICE 201 555 1212 PROGRAM LIST DATE dd MMM yyyy TIME 15 00 1 2 3 4 5 PROGRAM PROGRAM NAME TYPE TIMER ABBR NOS 03 TIMER XMT XMT 12 00 001 03 TIMER POLL POLL 19 00 002 05 PROG A POLL 001 002 05 PROG B ABBR GRP 001 002 003 UPPER 01 40 LOWER 01 40 PANASONIC UF xxxx HEAD OFFICE 201 555 1212 To print a Pr...

Page 125: ...icates transmission POLL indicates polling ABBR GRP indicates that the Program key is programmed as a group or one touch key POP indicates that the Program key is programmed as a POP access key 4 Timer Indicates the starting time indicates that the Program key contains non deferred program 5 Destination s Numbers Recorded in the Program One Touch ABBR numbers Telephone number or email address ...

Page 126: ...SET 1 2 PRINTING FAX PARAMETER LIST FAX PARAMETER LIST DATE dd MMM yyyy TIME 15 00 P 01 1 2 3 4 5 PARAMETER DESCRIPTION SELECTION CURRENT STANDARD NUMBER SETTING SETTING 6 001 CONTRAST HOME 1 Lightest 3 Normal 5 Darkest 3 3 002 RESOLUTION HOME 1 Standard 2 Fine 3 S Fine 3 2 PANASONIC UF xxxx HEAD OFFICE 201 555 1212 ...

Page 127: ... 1 Parameter Number 4 Current setting indicates code or password is not set 2 Description HOME means home position setting 3 Selection 5 Standard setting Factory preset standard setting 6 Changed setting indicated that the Factory preset setting was changed ...

Page 128: ...r misfed Remove the misfed paper 30 Recording paper doesn t advance into machine Make sure that there is paper in the Paper Tray Follow the instructions for loading paper 26 Recording paper doesn t eject after printing Check to see if the recording paper is jammed inside of the machine Confirm that paper exit tray is clear and free from obstructions 30 Document auto reduction doesn t work Check Pr...

Page 129: ... again Mode Symptom Possible Cause Action Page Wipe marks off on the Contact Image Sensor with a dry soft cloth Open the ADF Cover Clean the Separation Roller with a well wrung damp cloth with water Clean the Pick Up Feed Rollers with a well wrung damp cloth with water Clean the Pad with a soft dry cloth Wipe marks off on the White Sheet with a dry soft cloth Close the ADF Cover Contact Image Sens...

Page 130: ...t and send again 406 Transmission Password does not match Receiving Password does not match Received from an unauthorized station in Selective Reception mode Check the password or the telephone number in One Touch or Abbreviated station 407 No confirmation from the receiving station for the previous page sent Wait a few minutes and send again 408 409 Remote side confirms previous page s is are ill...

Page 131: ... Password Sub address function Check the remote station 62 623 No document loaded on the ADF Reload the document and send again 630 Redial was not successful due to a busy line Reload the document and send again 631 During dialling STOP was pressed Reload the document and send again 634 Redial was not successful due to no response from the called station or wrong number dialled Note If busy tone w...

Page 132: ...s no capability Check with the other party 826 Received Sub address is not registered in the Auto dialler One Touch ABBR dialling Check the Auto dialler Check the remote station 870 Memory overflow occurred while storing documents into memory for transmissions 1 Transmit documents without storing them into memory first Use Direct Transmission when using G3 Fax Communication 2 Install Optional Memo...

Page 133: ...the Back Side of the machine to the OFF position Remove a Screw and the Bettery Holder 1 2 side of battery should be facing upwards Observe the polarity see CAUTION below Close the Battery Holder and reinstall a Screw just removed Turn the Power Switch on the Back Side of the machine to the ON position 1 2 4 If the clock is flashing on the LCD Display follow the procedures on page 104 to reset the...

Page 134: ...cpm A4 size Enlargement Ratios 101 to 141 in 1 increments Reduction Ratios 99 to 71 in 1 increments Paper Feed Paper Trays 250 sheets Standard 550 sheets Option Single Sheet Bypass Transparency film should feed from standard paper tray Tray 1 20 sheets or Sheet Bypass 1 sheet Paper Weight Paper Tray 60 105 g m2 75 90 g m2 2 Sided Copy Bypass 60 165 g m2 Quantity Selector Max 999 sheets Output Tray...

Page 135: ...olution Vertical 3 85 lines mm Standard Resolution 7 7 lines mm Fine Resolution 15 4 lines mm Super Fine Resolution 600 dpi 600 dpi Resolution One Touch Abbreviated dialling Memory Capacity 200 Stations ABBR No 80 Stations One Touch or Program key 50 Stations Direct dialling plus additional 720 stations with the optional SD Memory Card installed Each station can register up to 36 digits for each t...

Page 136: ...ion Board DA EM600 Additional Expansion Board for PCL Printing Printer Controller Module UE 404091 Printer Controller for PCL6 Internet Fax Email Network Scanner Module UE 404090 For Network Scan and Email Function Toner Cartridge UG 5530 UG 5535 All in one cartridge For USA and Canada All in one cartridge For Other Countries SD Memory Card Only Genuine 32MB to 512MB SD Memory Card with a SD trade...

Page 137: ...137 memo Appendix ...

Page 138: ...pabilities Max Modem Speed is 33600 BPS CCITT Consultative Committee on International Telegraph and Telephone This organization has presently developed four groups of industry standards that insure facsimile compatibility Character ID A programmed proprietary code name that allows up to 16 alphanumeric characters identifying your machine Character Keys The keys that are used to enter letters and s...

Page 139: ...r the specified time Fax Forward The ability to forward all incoming faxes to the specified station registered in the Address Book Fax Parameter List The list that contains the home FAX parameters settings that you have programmed into your machine FAX TEL Auto Switching The ability to share a single telephone line for both fax and voice usage File A task that has been stored into the memory of yo...

Page 140: ...t displays the first 15 characters of the station Name Keypad A group of numeric keys located on your control panel LCD Liquid Crystal Display The display area of your machine LOGO Your programmed company name or identification up to 25 alphanumeric characters Manual Reception A mode that requires operator intervention to receive an incoming document Memory Transmission The documents are scanned i...

Page 141: ...ument to a relay station which in turn sends the document to the end receiving station Resolution Relates to the number of dots scanned or printed per certain square The quality of the image increases as the number of dots per certain square increases Selective Reception A function that can be set so that your machine will receive from only those machines programmed into your dialler Sleep Mode Th...

Page 142: ...le transmission verification stamp can be placed on scanned documents that are successfully transmitted or stored in memory View Mode File List Allows you to view the brief contents of the memory files through the LCD display without having to print the Memory File List View Mode Journal Allows you to view the brief contents of the journal through the LCD display without having to print the journa...

Page 143: ...143 Appendix ITU T Image No 1 All specifications are based on the ITU T Image No 1 The sample shown below is not to scale ...

Page 144: ...One Touch Dials 96 F Facsimile Features 38 Fax Cover Sheet 64 Fax Parameter List 126 Fax Parameter Table 108 Fixed Reduction 48 G Group dialling 58 H Header Format 108 Header Print 108 I IFax Return Receipt 111 Image Memory Capacity 135 Incomplete File Save 109 Information Code 130 ITU T Image No 1 143 J Journals and Lists 118 M Manual Reception 48 Memory Transmissions 38 Mode Setting 34 Monitor V...

Page 145: ...the Sub Address into an Address Book 62 Setting Your Machine 92 Sub Address Password 110 Sub Addressing 62 Substitute Memory Reception 48 141 T Timer Controlled Communications 50 To Stop the Transmission 24 Transaction Journal 112 118 Transmission Password 141 Troubleshooting 128 U User Parameter s 104 142 Using the Functions 34 V Verification Stamp 133 142 The following trademarks and registered ...

Page 146: ...For Service Call Published in Japan November 2004 PJQMC0074ZC T0904 2114 For Customer Support Panasonic Communications Co Ltd Fukuoka Japan http www panasonic co jp global ...

Reviews: