-12-
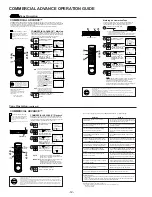
COMMERCIAL ADVANCE OPERATION GUIDE
5
Push MENU three times
to return to the normal
screen.
ON
Timer recordings, VCR Plus+ recordings, and One Touch
Recordings are marked automatically.
The screen at right appears when
STOP is pushed during a normal
recording. Select one of the following:
Push the 1 NUMBERED key to
mark the recording now.
The screen below right will appear.
Push the 2 NUMBERED key, to
mark the recording later, after
the power has been turned off.
• If the tape is rewound and another
recording started before the power
is turned off, the commercials may
not be marked correctly.
Push MENU to cancel the marking
of this recording.
1
Push MENU to display
the menu screen.
COMMERCIAL ADVANCE™ Marking
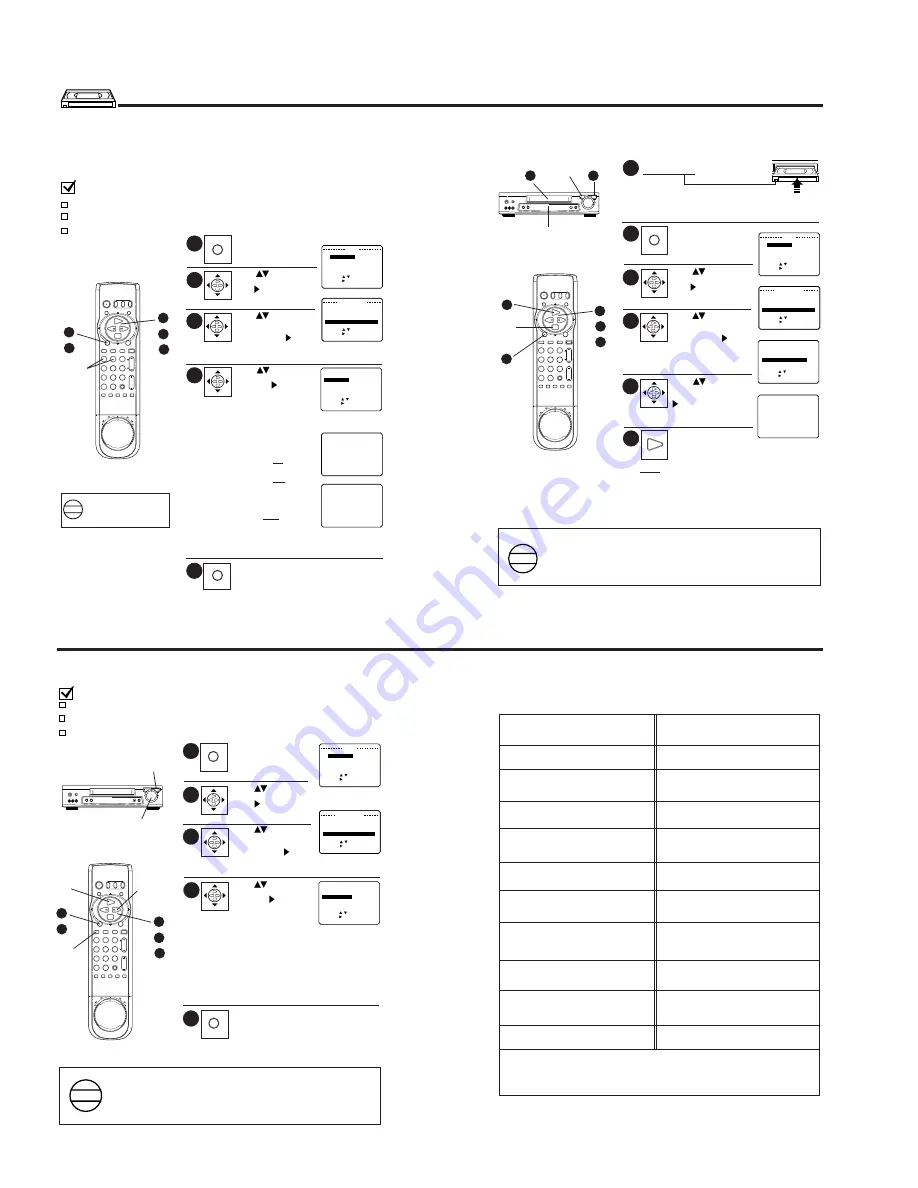
When the COMMERCIAL ADVANCE RECORD setting is ON, the
VCR automatically rewinds the tape after a recording has been made
and marks the beginning and end of any detected commercial blocks.
After marking is done, the tape is returned to the end of the
recording. Commercials are not erased from the tape.
Check list before you begin
All connections have been made and
the One Time Setup is completed.
Your TV and VCR are plugged in and
turned on.
TV is tuned to the VCR channel (CH 3
or 4).
COMMERCIAL ADVANCE™
COMMERCIAL ADVANCE™ detects and marks the beginning and end points of commercials on your tape for
recordings over 15 minutes in length. When the COMMERCIAL ADVANCE™ marked tape is played back, the VCR
automatically advances through the commercial segments at high speed. You can also set this feature to Manual
so as to have more control over the advance process.
The effectiveness of this system can vary due to differences in the way television stations broadcast.
COMMERCIAL ADVANCE is a
trademark of SRT, Inc.
A Jerry Iggulden invention licensed
in association with Arthur D. Little
Enterprises, Inc.
U.S.Pat. No. 5,333,091
other patents pending
• The selection made in step 4 remains set unless there is a power outage in which case the original factory setting
will be restored.
• If the time interval between scheduled timer recordings is insufficient for marking, the VCR will wait until all
recordings are finished before marking them.
• The VCR can store up to 4 programs or 40 commercial blocks in memory at one time. As marking is performed,
memory storage space is replenished.
However, if storage capacity is exceeded, the remaining commercials will not be marked.
• The VCR will playback the tape at normal speed. Then, the tape is rewound and marking will be performed.
2
3
4
NOTES
The VCR will not mark commercials.
Off should be selected when you are
editing or dubbing a tape, or when you
simply do not wish to use this feature.
OFF
Our Vacation
Tape Operation
Push
to select
“SET UP VCR,” and then
push to display the
“SET UP VCR” screen.
SET : KEY
SELECT : KEY
END : MENU KEY
MENU
SET UP V
SET UP VCR
SET C LOCK
SET UP CHANNEL
I D I OMA / LANGUE : ENGL I SH
Push
to select
“SET UP
COMMERCIAL ADV.,”
and then push to
display the “SET UP
COMMERCIAL ADV.” screen.
Push
to select
“C/A RECORD,” and
then push to set “ON”
or “OFF.”
•
1
5
•
3
2
SLOW
SLOW
PAUSE
PAUSE
C/A SKIP
C/A SKIP
ZERO
ZERO
REC/TIME
REC/TIME
1
4
7
100
100
2
5
8
0
3
6
9
ADD/DLT
ADD/DLT
CATV
CATV
TV
TV
VCR
VCR
RESET
RESET
INDEX
INDEX DISPLAY
DISPLAY
SPEED
SPEED COUNTER
COUNTER
CH
CH
VOL
VOL
Hi-Fi
Hi-Fi
TRACKINGTRACKING
INPUT
INPUT
VCR/TV
VCR/TV
SAP/
SAP/
POWER
POWER
P
R
O
G
M
E
N
U
PLAY
FF
STOP
REW
ENTER
ENTER
/F
F
REW
/
•
4
1
Push MENU to display
the menu screen.
Marking an Unmarked Tape
This feature allows you to turn your existing unmarked tapes into
Commercial Advance tapes. The VCR will scan the previously
recorded tape for commercial segments, and then mark it.
2
3
4
Push
to select
“SET UP VCR,” and then
push to display the
“SET UP VCR” screen.
SET : KEY
SELECT : KEY
END : MENU KEY
MENU
SET UP V
SET UP VCR
SET C LOCK
SET UP CHANNEL
I D I OMA / LANGUE : ENGL I SH
Push
to select
“SET UP
COMMERCIAL ADV.,”
and then push to
display the “SET UP
COMMERCIAL ADV.”
screen.
Push
to select
“MARK UNMARKED
TAPE,” and then push
to display the screen
at right.
• Recorded segments must be at least 15 minutes
in length or marking cannot be performed.
• If necessary, push REW or FF to place the tape at the start point of
a recorded segment of over 15 minutes for commercial marking.
Insert the pre-recorded tape
with record tab.
5
Push PLAY to start
commercial marking.
• “CA” will appear on the Multi Function Display.
6
PLAY
MENU
NUMBERED
Keys
•
2
5
3
SLOW
SLOW
PAUSE
PAUSE
C/A SKIP
C/A SKIP
ZERO
ZERO
REC/TIME
REC/TIME
1
4
7
100
100
2
5
8
0
3
6
9
ADD/DLT
ADD/DLT
CATV
CATV
TV
TV
VCR
VCR
RESET
RESET
INDEX
INDEX DISPLAY
DISPLAY
SPEED
SPEED COUNTER
COUNTER
CH
CH
VOL
VOL
Hi-Fi
Hi-Fi
TRACKINGTRACKING
INPUT
INPUT
VCR/TV
VCR/TV
SAP/
SAP/
POWER
POWER
P
R
O
G
M
E
N
U
PLAY
FF
STOP
REW
ENTER
ENTER
/F
F
REW
/
•
4
6
POWER
POWER
VCR/TV
VCR/TV
EJECT
EJECT
REC/TIME
REC/TIME
CHANNEL
CHANNEL
VIDEO IN 2 L-AUDIO IN 2-R
VIDEO IN 2 L-AUDIO IN 2-R
MONO
MONO
/
F
F
R
E
W
/
PLAY
PLAY
STOP
STOP
1
Multi Function Display
6
NOTE:
If 15 minutes after marking is started an already marked portion
of tape is encountered, a message will appear to alert you.
Push STOP to mark the marked portion of tape.
If within 15 minutes after marking has begun, an already
marked portion of tape is encountered, a message will appear
to alert you. Push STOP to remove the message.
STOP
STOP
SET : KEY
SELECT : KEY
END : MENU KEY
SET UP VCR
REPEAT PL AY : ON
BEEPER : ON
SPAT I AL I ZER : ON
SET
SET UP
UP
COMM
MMERC
ERC I AL ADV
AL ADV.
SET UP COMMERC I AL ADV.
C / A
A RE
RECORD
CORD
: ON
C / A PLAYBACK : AUTO
MARK UNMARKED TAPE.
SET : KEY
SELECT : KEY
END : MENU KEY
THE VCR I S WA I T I NG TO
MARK COMMERC I ALS I N THE
PROGRAM YOU RECORDED.
MARK I NG
NOW : PUSH 1 KEY
LATER : PUSH 2 KEY
CANCEL : PUSH MENU KEY
NOW MARK I NG COMMERC I ALS
CANCEL : PUSH STOP KEY
START MARK I NG FROM
CURRENT TAPE POS I T I ON.
START : PLAY KEY
CANCEL : STOP KEY
SET UP COMMERC I AL ADV.
C / A RECORD : ON
C / A PLAYBACK : AUTO
MARK
RK U
UNMARKED
RKED TAPE.
TAPE.
SET : KEY
SELECT : KEY
END : MENU KEY
SET : KEY
SELECT : KEY
END : MENU KEY
SET UP VCR
REPEAT PL AY : ON
BEEPER : ON
SPAT I AL I ZER : ON
SET
SET UP
UP CO
COMM
MMERC
ERC I AL ADV
AL ADV.
• When using the timer to record
two adjacent shows on the same
channel, better accuracy can be
obtained by programming each
show separately.
NOTE
®
• The selection made in step 4 remains set unless there is a power outage in which case the original factory
setting will be restored.
• A commercial may not be skipped if playback is started in the middle of a commercial, only a single isolated
commercial is shown, or an individual commercial is longer than one minute. Push FAST FORWARD/ SEARCH
to quickly advance through the commercial.
• Part of a recorded program may be skipped over if the program portion between commercials is less than one
minute, or there are frequent dark and quiet scenes. Rewind the tape to the beginning of the skipped portion
and push PLAY.
NOTES
COMMERCIAL ADVANCE™ Playback
When playing back recordings which have been marked using the
COMMERCIAL ADVANCE™ feature, you can either set the VCR to
automatically advance through marked commercial blocks, or set it so
that commercials are only skipped on your command.
1
Push MENU to display
the menu screen.
2
3
Check list before you begin
All connections have been made and
the One Time Setup is completed.
Your TV and VCR are plugged in and
turned on.
TV is tuned to the VCR channel (CH 3
or 4).
Are commercials still recorded on the tape in
case I choose to view them sometime?
Yes. By setting the C/A PLAYBACK to MANU(al),
you can view or advance through commercials as
desired.
Does the VCR advance through commercials
each time I playback tapes which were recorded
using COMMERCIAL ADVANCE™ ?
After marking commercials, does the VCR stop at
the end of the tape, or rewind to the beginning?
The tape stops at the end of the recording so that any
additional timer recordings can be performed.
Yes. As long as C/A PLAYBACK is set to AUTO, the
VCR should advance through commercials each time
the tape is played back.
The most commonly asked questions about COMMERCIAL ADVANCE™ are answered below.
Question
Answer
How fast does the VCR advance through
commercials?
The VCR advances through a 3-minute commercial
block in about 8 to 12 seconds if the tape speed is SLP.
In SP, it takes about 25 to 35 seconds.
Are commercials advanced through only when I
playback a recording?
Yes. The commercials are not marked until after the
recording is finished.
Does COMMERCIAL ADVANCE™ work in all
recording speeds?
Yes. COMMERCIAL ADVANCE™ works in SP, LP,
and SLP.
Does the marking process interfere with other
programmed recordings?
No. If the interval between 2 or more timer programs
is not sufficient to mark the recording, marking will be
done after all recordings are complete and the power
goes off.
What happens if I cancel the marking in progress
so I can use the VCR?
Marking will be resumed when the VCR’s power is
turned off as long as the tape has not been ejected.
What if part of my program is advanced through
along with the commercials?
Rewind the tape to where the program should have
started, and push PLAY to view the program.
Can I play my COMMERCIAL ADVANCE™
recordings in non-COMMERCIAL ADVANCE™
VCRs?
Yes. COMMERCIAL ADVANCE™ marked recordings
will play in non-COMMERCIAL ADVANCE™ VCRs,
but commercials will not be advanced through.
COMMERCIAL ADVANCE™
Tape Operation
(continued)
Additional Notes:
• Because of the various ways in which commercials are broadcast, the VCR may not be able to recognize all
commercials.
• If a timer recording is scheduled for the middle of the night, please be aware that the VCR will make some
noise as it rewinds and fast forwards the tape while marking commercials.
4
The VCR will automatically advance through
marked commercial blocks recorded on the tape
and then resume playback.
AUTO
The VCR will advance through commercials only
when C/A SKIP ZERO is pushed.
Playback will resume when the end mark of a
commercial block is found, or a new recording or
blank portion is detected, or after eight minutes.
MANU(al)
5
Push MENU three times to
return to the normal screen.
PLAY
FAST FORWARD/
SEARCH
FAST
FORWARD/
SEARCH
Push
to select
“SET UP VCR,” and then
push to display the
“SET UP VCR” screen.
SET : KEY
SELECT : KEY
END : MENU KEY
MENU
SET UP V
SET UP VCR
CR
SET C LOCK
SET UP CHANNEL
I D I OMA / LANGUE : ENGL I SH
Push
to select
“SET UP
COMMERCIAL ADV.,”
and then push to
display the “SET UP
COMMERCIAL ADV.” screen.
Push
to select
“C/A PLAYBACK,” and
then push to set
“AUTO” or “MANU(al).”
•
1
5
•
3
2
POWER
POWER
VCR/TV
VCR/TV
EJECT
EJECT
REC/TIME
REC/TIME
CHANNEL
CHANNEL
VIDEO IN 2 L-AUDIO IN 2-R
VIDEO IN 2 L-AUDIO IN 2-R
MONO
MONO
/
F
F
R
E
W
/
PLAY
PLAY
STOP
STOP
SLOW
SLOW
PAUSE
PAUSE
C/A SKIP
C/A SKIP
ZERO
ZERO
REC/TIME
1
4
7
100
100
2
5
8
0
3
6
9
ADD/DLT
ADD/DLT
CATV
CATV
TV
TV
VCR
VCR
RESET
INDEX DISPLAY
SPEED COUNTER
CH
CH
VOL
VOL
Hi-Fi
TRACKINGTRACKING
INPUT
VCR/TV
SAP/
POWER
POWER
P
R
O
G
M
E
N
U
PLAY
FF
STOP
REW
ENTER
/FF
REW/
C/A SKIP
ZERO
PLAY
•
4
Can I mark a recording that was made an another VCR?
Yes. See “Marking an Unmarked Tape.”
SET : KEY
SELECT : KEY
END : MENU KEY
SET UP VCR
REPEAT PL AY : ON
BEEPER : ON
SPAT I AL I ZER : ON
SET
SET UP
UP CO
COMM
MMERC
ERC I AL ADV
AL ADV.
SET UP COMMERC I AL ADV.
C / A RECORD : ON
C / A
A PLAY
AYBACK
CK
: AUTO
MARK UNMARKED TAPE.
SET : KEY
SELECT : KEY
END : MENU KEY
COMMERCIAL ADVANCE is a trademark of SRT, Inc.
A Jerry Iggulden invention licensed in association with Arthur D. Little Enterprises, Inc.
U.S.Pat. No. 5,333,091
other patents pending
®
Summary of Contents for Omnivision VHS PV-7664
Page 18: ... 16 MEMO ...
Page 19: ......
Page 20: ......
Page 21: ......
Page 22: ......
Page 23: ......
Page 24: ......
Page 25: ......
Page 26: ......
Page 27: ......
Page 28: ......
Page 29: ......
Page 30: ......
Page 31: ......
Page 32: ......
Page 33: ......
Page 34: ......
Page 35: ......
Page 36: ......
Page 37: ......
Page 38: ......
Page 39: ......
Page 40: ......
Page 41: ......
Page 42: ......
Page 43: ......
Page 44: ......
Page 45: ......
Page 46: ......
Page 47: ......
Page 48: ... 60 Printed in Japan R ...


