-98-
ENGLISH
!"#
P
!"#$%&'()
1
!
N xaKc^abNz
2
!
O xaKc^abOz
3
!
P xaKc^abPz
1
xafdfq^i=bccb`qz
!
!"
x bccb`qOz
O
xaKc^abNz
!"
N
xaKc^abOz
!
O
xaKc^abPz
!
P
l
TU
≥
x
©
z
!
2
!
xc^abz
!
!"#$
x`lilroz
!
!"#$%&'()
1
≥
!"#$%&'()*+,-./
∫
3
!"#$%&'()*+,-./
xc^abz
≥
!"#$%&'()*+,-./
4
!"#$
!"
L
!"
5
P
–
Q
!"#$
xc^abz
∫
6
!"#$%&'
xc^abz
7
!"#$
!"
L
!"
8
%
xc^abz
!"#$%&'()
xafdfq^i=bccb`qz
!
!"
xbccb`qOz
xlccz
Digital Fade
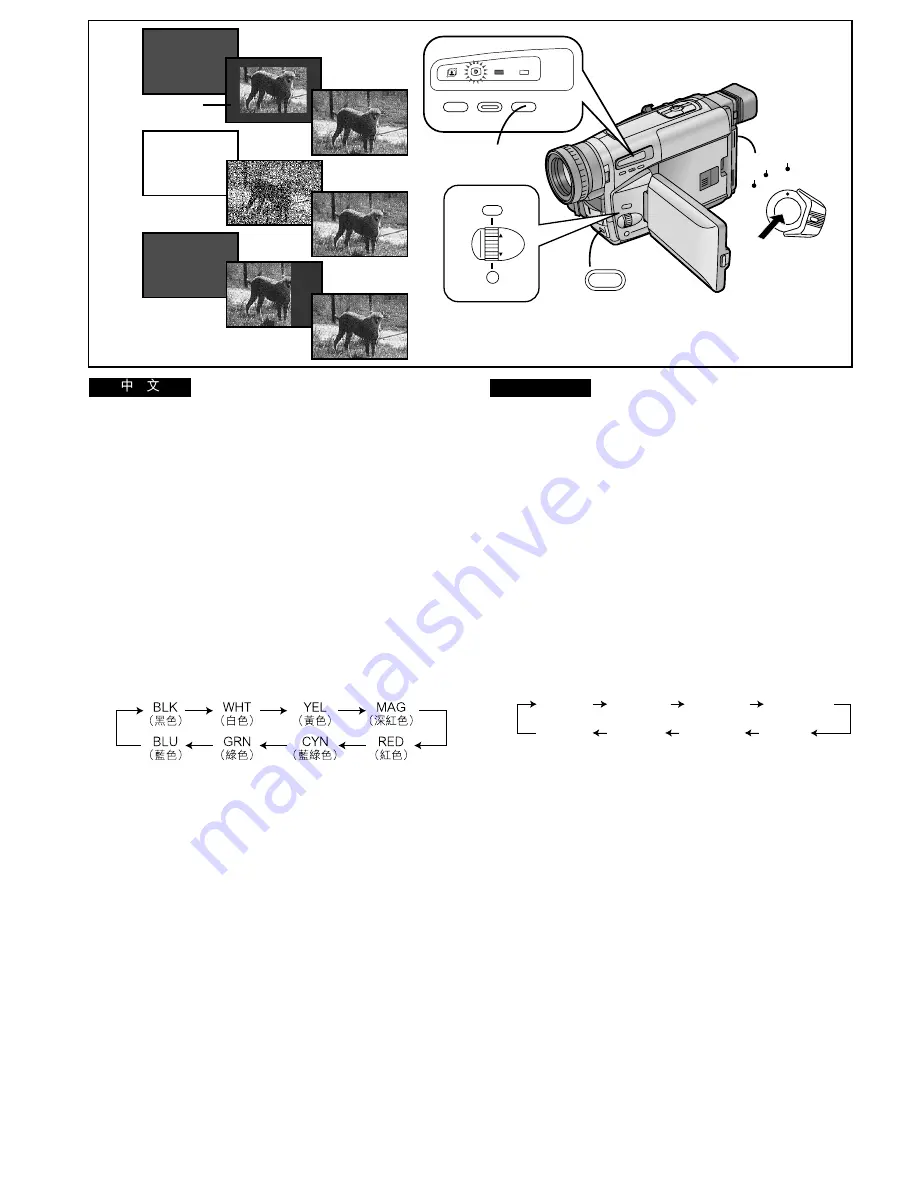
There are 3 Digital Fade Modes available.
1
Digital Fade 1 [D.FADE1]
2
Digital Fade 2 [D.FADE2]
3
Digital Fade 3 [D.FADE3]
1
Set [EFFECT2] on the [DIGITAL EFFECT] Sub-
Menu to [D.FADE1], [D.FADE2] or [D.FADE3].
(
l
78)
≥
The [
©
] Lamp lights.
2
While keeping the [FADE] Button pressed,
repeatedly press the [COLOUR] Button until
the desired colour
1
is displayed.
≥
The colours of the Digital Fade change in the following
order:
∫
Fading In
3
With the Movie Camera in the Recording Pause
Mode, keep the [FADE] Button pressed.
≥
The picture disappears gradually with the selected
digital fade effect.
4
When the picture has completely disappeared,
press the Recording Start/Stop Button to start
recording.
5
Approximately 3–4 seconds later, release the
[FADE] Button.
∫
Fading Out
6
During recording, keep the [FADE] Button
pressed.
7
After the picture has completely disappeared,
press the Recording Start/Stop Button to stop
recording.
8
Release the [FADE] Button.
Cancelling the Selected Digital Fade Function
Set [EFFECT2] on the [DIGITAL EFFECT] Sub-Menu to [OFF].
1
2
3
FADE
2, 3, 5,
6, 8
MENU
FOCUS / SET
MF/
TRACKING
1
4, 7
CAMERA
OFF
VCR
1
INFO-
WINDOW
CAMERA
V C R
PROG. AE STORE COLOUR
OFF/ON
2
D.FADE2
WHT
D.FADE1
BLK
D.FADE1
BLK
D.FADE3
BLK
D.FADE1
BLK
D.FADE2
WHT
D.FADE2
WHT
D.FADE3
BLK
D.FADE3
BLK
BLK
(Black)
WHT
(White)
YEL
(Yellow)
MAG
(Magenta)
BLU
(Blue)
GRN
(Green)
CYN
(Cyan)
RED
(Red)


