background image

7

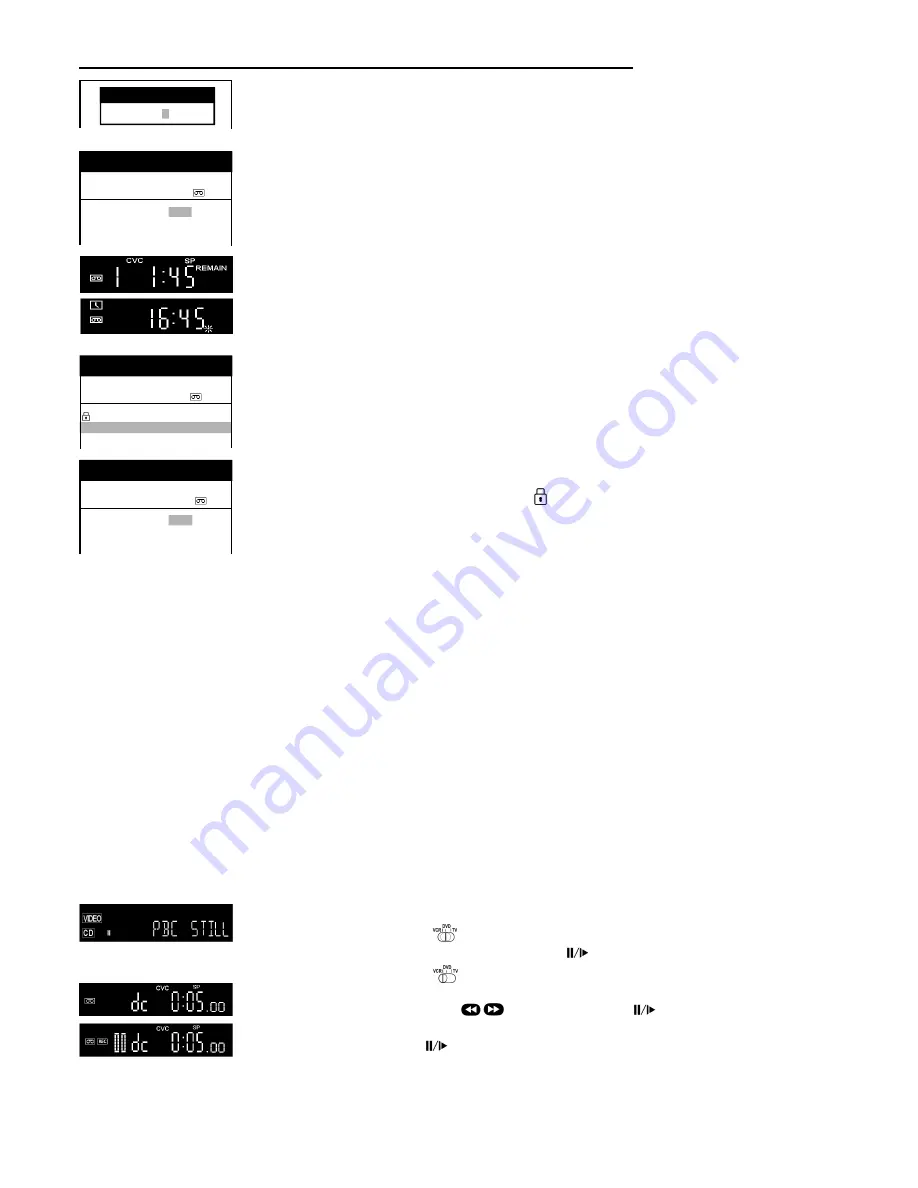
Recording with Intelligent Timer Function

To easily set the Timer for programmes often broadcasted on the same channel and time each day (for example series),

the Intelligent Timer Function remembers the channel number along with the start and end times of the last 8 programmes

that you have recorded using Timer recording.

n

Press 

|


I-TIMER|

n

To select the programme 

:;

n

Press 

|TIMER|

  to switch the VCR to Standby mode for 

Timer recording. 

If you want to modify the data first, follow the next steps.

n

If more than 8 programmes are stored, the oldest data will be lost. To delete recording data manually, press 

|CANCEL|

.

n

To protect a programme press 

9

 and the lock symbol   will appear. To unlock a programme press 

8

 .

n

To modify the data, press 

|ENTER|

 and the [Timer recording] menu will appear.

n

Change the data 

:;8


9

.

n

Press 

|TIMER|

  to switch the VCR to Standby mode for 

Timer recording.

 For more information, see page 6.

Note:

 These functions can be also used with the VCR buttons:   

|


INTELLIGENT TIMER|

|TIMER REC

i

|

When [Shipping condition], [Auto - Setup Restart] etc. has been carried out, Intelligent Timer data will be lost.

To use Intelligent Timer Function, at least one timer recording has to be done.

Cancel Standby mode for Timer recording

n

Press 

|TIMER|

 and in the VCR display 

i

 will disappear.

n

Now you can playback a cassette or make a recording.

n

After that, you must press the button again to switch the VCR to the Standby mode for Timer recording.

Check the


Timer recording

n

Press 

|PROG/CHECK|

 to display the [Timer recording]  menu.

n

Press 

|EXIT|

 to quit the menu.

Delete or change a


Timer recording

n

Press 

|PROG/CHECK|

 to display the [Timer recording]  menu.

n

Use 

:;

 to select the entry to be changed, press 

|CANCEL|

 to delete the Timer recording.

n

Use 

:;

 to select the entry to be changed, press 

|ENTER|

, change entry with 

:;8


9

.

n

Press 

|ENTER|

 to store these changes.

n

Press 

|EXIT|

 to quit the menu or press 

|TIMER|

 to switch the VCR to Standby mode.

VCR Recording

Synchronous recording 

(DVD, VCD, CD, MP3)

To copy synchronous from the DVD, VCD, CD or MP3 to a VHS tape.

n

Switch the remote control to DVD 

 .

n

Set the beginning of the scene with 

Playback 

>

 and 

Pause 

n

Switch the remote control to VCR 

 .

n

Select the 

Disc channel 

(dc) by pressing 

|AV|

n

Set the beginning of the recording with 


Playback


>

and 

Pause 

n

Press 

|REC|

n

Start the recording, press 

Pause 

 (disc will start the playback synchronous).

VCR display

DVD display


Panasonic     VCR

Video Plus+

8  3  5  4  2  -  -  -  -

Timer recording with VIDEO Plus+

Switch on and set the TV to the video output channel, insert a cassette with an intact

erasure prevention tab into the VCR and set the remote control to VCR operation.

n

Press 

|VIDEO Plus+|

n

Enter the VIDEO Plus+ number. For correction use  

8

 .

n

To access [Timer recording], press 

|ENTER|

.

n

If the channel name is not set automatically, select the channel [Pos] 

:;

 and store with 

|ENTER|

.

The name of channel will be saved. To modify the [Name], see page 10.

n

Set the Tape Speed [SP], [LP], [EP] or [A] (automatic).

n

Check the Remaining tape time.

n

To store the programme, press  

|ENTER|

 .

&

To preset other recordings repeat the procedure.

n

Press 

|TIMER|

 to switch the VCR to Standby mode. Make sure that the VCR display 

i

   appears.

VIDEO Plus+ and PlusCode are registered trademarks of Gemstar Development Corporation.

The VIDEO Plus+ system is manufactured under licence from Gemstar Development Corporation.


    Panasonic   VCR


Timer recording   

                           1/2

 Pos
 Name Date Start Stop  

PDC

 1. BBC1  20/4  15:00 16:00  SP ON

 2. - - - - - - -/- - - -:- -  - -:- -    -

- - -

 3. - - - - - - -/- - - -:- -  - -:- -    -

- - -

     Pos
     Name  Date   Start   Stop   

   PDC

  BBC1    20/04  15:00  16:00   SP  ON

      BBC2    21/04  15:00  16:00   SP  ON


     Panasonic   VCR


 INTELLIGENT TIMER     

            19/04/02

 Pos
 Name Date Start Stop   

PDC

1.  BBC2 21/04 15:00  16:00  SP  ON

2.  - - - - - - -/- -   - -:- -

 - -:- -  - - - -

3.  - - - - - - -/- -   - -:- -    - -:- -

 - - - -


  Panasonic     VCR


Timer recording   

                           1/2

Note:

n

Copying of  copy protected material from disc is against copyright laws. If copying is attempted a warning message

will appear on the screen. Although the unit will continue recording, the playback picture will be distorted and unwatchable.

n

Recording of NTSC material from disc to tape in not possible because this unit is not designed to

 convert NTSC to PAL format.

Summary of Contents for NV-VHD1 B

Page 1: ...s 23 Index Specifications 24 DVD Easy Setup 13 DVD Operation 14 DVD Playback VCR Functions 15 DVD Settings 17 DVD OSD Menu 19 Information about the player 20 Information about the VCR 21 Troubleshooting 22 Warning and Precautions 2 Setting up 3 VCR DVD Controls 4 VCR DVD Operations 5 VCR Recording 6 VCR Functions 8 VCR Tuning 10 Connecting External Equipment 11 RQTD0021 B NV VHD1 B Connecting a Re...

Page 2: ...frequency of use n Do not use one old and one new battery or different types of batteries together e g one alkali and one zinc carbon battery n Only insert batteries which contain no toxic materials such as lead cadmium mercury n Do not use rechargeable type batteries n If the remote control will not be used for a long time remove the batteries and store them in a cool and dry place n Do not heat ...

Page 3: ...sappear Note If the Auto Setup or Owner ID menu does not appear after switching on the unit you can restart the automatic setting and set the Owner ID manually see page 9 Anincorrectsettingoftimeordate observesummer andwintertime willinfluencethetimerrecording Connect the TV only with a RF Coaxial lead YoumustensurethatthevideooutputchannelisadjustedtotheinputchanneloftheTV For this purpose please...

Page 4: ...he menu next line next page 8 9 General Operations Standby on switch g Presstoswitchtheunitfromontostandbymode or vice versa In standby mode the unit is still consumingasmallamountofpower EXIT a menu Switch the screen format between the wide screen and other formats DVD display Operate REPLAY Function Press this button during playback To select the inputpressthisbuttonrepeatedly VCR channel A1 A2 ...

Page 5: ...heunit orpressStop formorethan3secondsontheremotecontrol Display time Tape counter or Remaining tape time Pressthisbuttonrepeatedly ResettheTapecounter Press this button When inserting a cassette the counter is reset to 0 00 00 Forward Search Backward Search Slow motion playback n Keep this button pressed down while paused n Slow playback forward n Slow playback backward n Resumenormalplaybackbypr...

Page 6: ... Screen Display VCR Display RQTD0021 B Pos Name Date Start Stop PDC 1 2 3 Panasonic VCR Timer recording 1 2 Pos Name Date Start Stop PDC 1 32 Mo Sa 13 30 14 00 LP ON 2 32 20 9 15 00 16 00 SP OFF 3 Panasonic VCR Timer recording 1 2 Timer recording with On Screen Menu With the On Screen Menu you can programme Timer recordings up to 16 programmes SwitchonandsettheTVtothevideooutputchannelandinsertaca...

Page 7: ...ecording Synchronous recording DVD VCD CD MP3 To copy synchronous from the DVD VCD CD or MP3 to a VHS tape n Switch the remote control to DVD n Set the beginning of the scene with Playback and Pause n Switch the remote control to VCR n Select the Disc channel dc by pressing AV n Set the beginning of the recording with Playback and Pause n Press REC n Start the recording pressPause discwillstartthe...

Page 8: ...List willappear n Press EXIT to quit the menu Note If you have removed the cassette or the power supply was interrupted the Intro Jet Scan will be activated when pressing the SEARCH button VHS Index Search System To quickly find the beginning of a programme press forwardINDEXj or press backwardINDEX k This function only works on playback mode or in stop mode Depending on how many times you press t...

Page 9: ... MAN Time 20 30 24 Date 21 03 01 Panasonic VCR Main menu Timer recording Tuning Clock setting Other settings Remote Control setting To use a second Panasonic VCR with one remote control in the same place n Press MENU n Select Othersettings n Access by pressing ENTER n Select Remote n Selecttheinputfield9 n Selectthesetting n Store by pressing ENTER n Press EXIT VCR1 To use first VCR VCR2 To use se...

Page 10: ...ER n Access Manual by pressing ENTER n SearchforanunusedChannelposition for rapid search keep the cursor button pressed down or Add between other Channels using the button and add by pressing ENTER n Access by pressing ENTER n Select the new Channel n Store by pressing ENTER n Select Tuning menu by pressing MENU n Select the Channel to be deleted n Select Delete by pressing the button n Delete by ...

Page 11: ...ecoder to AV2 This device is used to decode scrambled broadcasts Pay TV EXTLINK2 Tocontrolexternalrecordingwithsome SatelliteReceiver Videosignal EXTLINK1 ForaDigitalReceiverwhichtransmits aspecialcontrolsignalforrecordings for example the F U N Receiver TU DSF31 VCR DVD Decoder notsupplied AV2 AV1 TV not supplied Connecting External Equipment RQTD0021 B NORMAL Toconnect anexternalequipment e g TV...

Page 12: ...o DVD OUT terminal Insert fully with this side facing up Connecting an Active subwoofer You can enjoy more powerful bass by connecting an active subwoofer n Placethesubwooferascloseaspossibletothefrontofthecenter n Turn the BASS function to BASS PLUS ON to boost the output from the subwoofer see page 17 n Adjust the volume of the subwoofer to suit your preference Change of initial settings PCM Dow...

Page 13: ... 3format andwishtoview16 9softwareintheLetterboxstyle Thewholepictureisdisplayed butblackbandsappeartopandbottomofthescreen TVscreenformats TherearetwotypesofTVformat 4 3or16 9 The16 9formatcorrespondstoWidescreen Whenyouselect Widescreen 16 9 thefollowingsetting Pan Scan Letterbox willbeskipped Note This may not work with some discs Password Entera4 digitpassword Childlockpassword Youcanpreventth...

Page 14: ... by pressing the button repeatedly n Press Playback to restart playback Note You cannot move backwards with VIDEO CD during slow motion Fast Forward and Rewind SEARCH DVD VCD CD n Press SEARCH during playback the speed of search increases by up to 5 steps by pressing the button repeatedly for MP3 only 1 step possible DVD Operation Playback n Switch remote control to DVD n Press VCR DVD OUTPUT to s...

Page 15: ...ST n Press EXIT the programme is retained in memory Note The programme is cleared when the unit is turned off or the disc tray is opened Clear the PLAYLIST n Press PLAY MODE while stopped n Select 8 CLEAR LIST n Press ENTER n Press EXIT RANDOM playback n Press PLAY MODE while stopped n Select 8 RANDOM n Press ENTER to exit RANDOM mode press two times Stop Chapter review DVD VCD CD MP3 n Press for ...

Page 16: ...theunit sdisplay Resume function DVD VCD CD MP3 n Press Stop during playback the unit remembers the position n Press Playback while symbol 9 in the DVD display is flashing Playback restarts from the position you stopped it Cancel the Resume function n Press Stop during playback n Press Stop until 9 disappears from the DVD s display Note The resume function does not work if the playback time is not...

Page 17: ... Increase the volume and clarity of speech or dialogue during playback n DIALOGUE ENHANCER ON n DIALOGUE ENHANCER OFF Factory preset Recalling your settings with one button DVD VCD CD Thisfeatureallowsthesettingsthatyoumadefor ADVANCEDSURROUND BASS CINEMAand DIALOGUEENHANCERtobestoredandrecalledwithjustonebuttonpress n Storing the settings in memory Press and hold the button ONETOUCH MEMORY until ...

Page 18: ...All Menu list Factory preset Settings TV Aspect 4 3 Pan Scan 4 3 Letterbox 16 9 AV1 Output Scart Video RGB Still mode Automatic Field Frame NTSC Disc output PAL60 NTSC ZOOM Off On Menu list Factory preset Settings PCM Down conversion Yes No Dolby Digital PCM Bitstream DTS Digital Surround Off Bitstream MPEG Audio PCM Bitstream Dynamicrangecompr Off On only in the format Dolby Digital Menu list Fac...

Page 19: ...layback When you have connected an active subwoofer Makes the dialogue in movies easier to hear Normal Cinema User Adjustthecontrasttosuityourpreference Adjust the vertical position of OSD bar on the screen Makes possible to have a surround like effect if you areusing only 2 front speakers Turn Advanced Surround off if it causes distortion If there are several titles tracks on a DVD VCD or CD uset...

Page 20: ...ctively on the television using the menu screen This unit can playback Video CDs with playback control Title Chapter DVD s are divided up into large sections titles and smaller sections chapters The numbers allocated to these sections are called title numbers and chapter numbers Track Video CDs and CDs are divided up into sections called tracks and the numbers allocated to these sections are calle...

Page 21: ...p extremely fast and is stopping softly in very short time Q Link WithanEuroAVconnectionandwiththeQLinkfunctiontheVCRisabletocommunicatewiththeTV n copying automatically the tuning positions of the TV n afterfinishingtheplayback theVCRwillswitchautomaticallyintoStandbymodeifyouswitchoftheTV n one touch on DIRECT TV REC and the VCR will record the film you are watching on the TV n if you insert a t...

Page 22: ...SETUP screen and change TV Aspect to suit your TV n Ensure that the unit is connected directly to the television and is not connected through a video cassette recorder Ensurethe AV1Output Scart selectioniscorrectfortheTVinput Automatic Clock correction is not working correctly Clock setting is on manually MAN n Set clock to AUTO see page 9 There is no programme with clock signal available Set the ...

Page 23: ... Croat 8372 Shona 8378 Sindhi 8368 Singhalese 8373 Slovac 8375 Slovenian 8376 Somali 8379 Spanish 6983 Sundanese 8385 Swahili 8387 Swedish 8386 Tagalog 8476 Tajik 8471 Tamil 8465 Tatar 8484 Telugo 8469 Thai 8472 Tibetan 6679 Tigrinya 8473 Tonga 8479 Turkish 8482 Turkmen 8475 Twi 8487 Ukrainian 8575 Urdu 8582 Uzbek 8590 Vietnamese 8673 Volapük 8679 Welsh 6789 Wolof 8779 Xhosa 8872 Yiddish 7473 Yoru...

Page 24: ...PLAY 5 6 9 18 Disposal 2 Dolby Digital 12 13 18 20 DTS Digital Surround 12 13 18 20 DVD Menu 15 Dynamic range 18 20 EASY SETUP 13 Page EJECT 5 EP SUPER LP 6 7 Erasure prevention 8 EXIT 4 EXT LINK 11 21 Fast Forward Fast Rewind 5 14 Field 18 20 Frame 18 20 Frame by frame viewing 14 INDEX VHS Index Search System 8 INPUT SELECT 4 10 Intro Jet Scan 8 21 I TIMER INTELLIGENT TIMER 7 21 JET SEARCH 5 Lang...

Reviews: