background image

Playback mode

35

LSQT0891

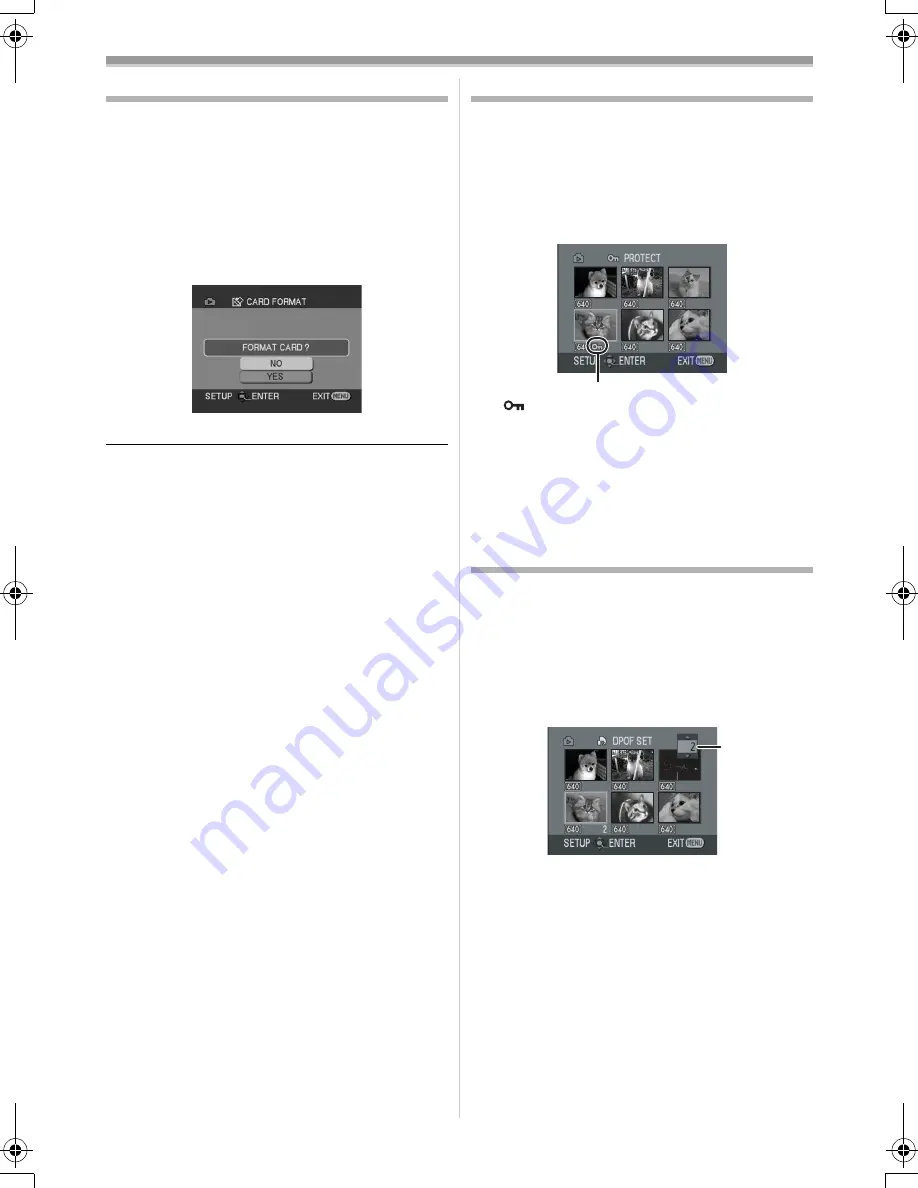
Formatting a card 

Please be aware that if a card is formatted, then 
all the data recorded on the card will be erased. 
Store important data on a personal computer, etc.

Set to Picture Playback Mode.

1

Set


[ADVANCE] >> [CARD FORMAT] >> 

[YES]. 

2

When the confirmation message appears, 
select [YES] and press the joystick in order 
to format the card.

In order to stop formatting, select [NO].

Normally, it is not necessary to format the card. 
If a message appears even though you insert 
and remove the card several times, format it.

If the SD Memory Card is formatted on other 
equipment, the time spent for recording may 
become longer. If the SD Memory Card is 
formatted on a PC, it cannot be used on the 
Movie Camera. Format the SD Memory Card on 
the Movie Camera, in this case.

The Movie Camera supports SD Memory Cards 
formatted in FAT12 system and FAT16 system 
based on SD Memory Card Specifications.

Protecting files on a card

Files recorded on a card can be locked so that they 
may not be deleted by mistake. (Even if the files are 
locked, they will be deleted if the card is formatted.) 

Set to Picture Playback Mode.

1

Set


[BASIC] >> [PROTECT] >> [YES].

2

Move the joystick to select a file to be 
locked, and then press it.


[

] Indication 

1

 appears and the selected 

file is locked. Press the joystick again, and 
the lock will be cancelled.

2 or more files can be locked in succession.

ª

To complete the settings

Press the [MENU] button.

Writing the printing data on a card 
(DPOF setting)

You can write the data of pictures to be printed, 
number of copies, and other information 
(DPOF data) onto the card.

Set to Picture Playback Mode.

1

Set [ADVANCE] >> [DPOF SET] >> [SET].

2

Move the joystick to select a file to be set, 
and then press it.

The number of prints 

1

 set to be in DPOF is 

displayed.

3

Move the joystick up or down in order to 
select the number of prints, and then press 
it.

You can select from 0 to 999. (Selected 
number of pictures can be printed as you set 
the number of prints with the printer 
supporting DPOF.)

2 or more files can be set in succession.

1

1

GS35_21_17EB.book  35 ページ  2005年1月20日 木曜日 午前10時59分

Summary of Contents for NV-GS35EB

Page 1: ...Operating Instructions Digital Video Camera Model No NV GS35EB NV GS21EB NV GS17EB Before use please read these instructions completely LSQT0891 A R...

Page 2: ...t not be used until a replacement cover is obtained A replacement fuse cover can be purchased from your local Panasonic Dealer IF THE FITTED MOULDED PLUG IS UNSUITABLE FOR THE SOCKET OUTLET IN YOUR HO...

Page 3: ...indicated by dashes either side of a number for example 00 The menu operation flow is indicated by in the description Use only the recommended accessories Do not use any other AV cables and USB cables...

Page 4: ...iew functions 24 Soft skin mode 24 Fade in fade out function 25 Wind noise reduction function 25 Self timer recording NV GS35 and NV GS21 only 25 Recording images for wide screen TVs 26 Image stabiliz...

Page 5: ...trap supplied with NV GS35 7 6 USB cable supplied with NV GS35 and NV GS21 CD ROM supplied with NV GS35 Optional 1 AC adaptor VW AD11EB 2 Battery pack lithium CGR DU06 640mAh 3 Battery pack lithium CG...

Page 6: ...NV GS35 and NV GS21 only 11 29 Card slot cover NV GS35 and NV GS21 only 11 30 Card slot NV GS35 and NV GS21 only 11 31 Card slot cover open lever NV GS35 and NV GS21 only 11 32 Cassette holder 10 33...

Page 7: ...elt similarly Fitting the lens cap Fit the lens cap to protect the surface of the lens 1 The lens cap and lens cap cord comes preattached to the grip belt Pass the end of the lens cap cord through the...

Page 8: ...or can be adjusted from the menu If it is forcibly opened or rotated the camera may be damaged or fail Check that the card slot cover is closed When the LCD monitor is rotated by 180o towards the lens...

Page 9: ...e the lamp will light up and normal charging will start When the battery temperature is excessively high or low the CHARGE lamp flashes and the charging time will be longer than normal Connecting to t...

Page 10: ...ing the LCD monitor frontward to record yourself etc The batteries heat up after use or charging The main unit of the movie camera being used will also heat up This is normal Along with the reduction...

Page 11: ...er Accidental erasure prevention If the accidental erasure prevention slider 1 of a cassette is opened slide in the direction of the SAVE arrow the cassette cannot be recorded When recording close the...

Page 12: ...amera is turned on with the lens cap fitted the automatic white balance adjustment may not function properly Please turn the camera on after removing the lens cap How to turn on the power 1 While pres...

Page 13: ...h is set to AUTO 2 Tape recording mode AUTO MANUAL FOCUS switch is set to MANUAL 3 Tape playback mode 4 Card recording mode AUTO MANUAL FOCUS switch is set to AUTO 5 Card recording mode AUTO MANUAL FO...

Page 14: ...to select the top menu 3 Move the joystick right or press it to set the selection 4 Move the joystick up or down in order to select the sub menu 5 Move the joystick right or press it to set the select...

Page 15: ...he joystick to determine the setting The clock function starts at 00 seconds About date time The date and time function are driven by a built in lithium battery Make sure to check the time before reco...

Page 16: ...ng the remote control NV GS35 only Remote control Using the remote control supplied will enable controlling almost all the functions of this camera to be controlled 1 Date time button DATE TIME 40 2 O...

Page 17: ...eously 2 Concerning the button type battery When the button type battery runs down replace it with a new battery part number CR2025 The battery is normally expected to last about 1 year but it depends...

Page 18: ...st images use this mode 3 Press the LIGHT button 3 The LED video light turns off Pressing the LIGHT button again returns to 1 The subject should be within 1 5 metres of the movie camera Using the LED...

Page 19: ...the AUTO MANUAL FOCUS switch to AUTO and colour balance white balance and focusing will be adjusted automatically Auto white balance 53 Auto focusing 53 Colour balance and focus may not be adjusted d...

Page 20: ...e is indicated in minutes When it reaches less than 3 minutes the indication starts flashing During a 15 second or shorter recording the remaining tape time indication may not be displayed or the rema...

Page 21: ...Stopping blank search midway through Move the joystick down If the cassette tape has no blank part then the camera will stop at the end of the tape The camera stops at a point approx 1 second before t...

Page 22: ...and NV GS17 optically Set to Tape Card Recording Mode 1 Wide angle recording zoom out Push the W T lever towards W Close up recording zoom in Push the W T lever towards T When zooming in and taking a...

Page 23: ...y in approx 1 7 seconds 1 3 seconds on NV GS21 and NV GS17 after the power is turned on This is only activated in the following cases A tape or a card is inserted while the Tape Recording Mode is set...

Page 24: ...et to Tape Recording Mode 1 Press the joystick until the icon 1 appears 2 Move the joystick up to select the night view icon Each upward press switches the modes OFF Colour night view function OFF To...

Page 25: ...t recording images Besides it also takes several seconds to pause recording Wind noise reduction function This reduces the wind noise coming into the microphone when recording Set to Tape Recording Mo...

Page 26: ...cinema picture is imported into a personal computer the imported picture may not be displayed correctly depending on the software in used Image stabilizer function Reduces the image shaking due to ha...

Page 27: ...g in various situations Scene mode When you record images in different situations this mode automatically sets optimum shutter speeds and apertures Set to Tape Card Recording Mode 1 Set the AUTO MANUA...

Page 28: ...ent lamps 3 Outdoor mode 4 Manual adjustment mode To restore to the automatic adjustment Move the joystick left or right until the indication appears Or set the AUTO MANUAL FOCUS switch to AUTO When t...

Page 29: ...hutter speed indication or aperture value indication appears 1 Shutter speed 2 Aperture Iris gain value 3 Move the joystick left or right in order to adjust the shutter speed or aperture To restore to...

Page 30: ...g on the zoom magnification there are iris values that are not displayed Shutter speed range 1 50 1 8000 seconds Tape Recording Mode 1 50 1 500 seconds Card Recording Mode The shutter speed closer to...

Page 31: ...der to cancel the repeat playback mode set REPEAT PLAY OFF or set OFF ON switch to OFF When you set USB FUNCTION WEBCAM and then connect the USB connection cable the repeat playback mode is canceled S...

Page 32: ...or the D button in the playback pause and then the images will continuously be played back frame by frame Variable speed search function NV GS35 only The speed of cue review playback can be varied Th...

Page 33: ...please read the operating instructions for the TV To display the on screen information on the TV The information displayed on the LCD monitor or the viewfinder operation icon time code and mode indica...

Page 34: ...degrade or not play back data recorded on the movie camera Deleting files recorded on a card The deleted files cannot be restored Set to Picture Playback Mode 1 Move the joystick left or right to sele...

Page 35: ...files on a card Files recorded on a card can be locked so that they may not be deleted by mistake Even if the files are locked they will be deleted if the card is formatted Set to Picture Playback Mod...

Page 36: ...ed by this camera Please perform the DPOF settings on your movie camera To set so that all pictures are not printed Select CANCEL ALL in Step 1 What is DPOF DPOF stands for Digital Print Order Format...

Page 37: ...RAM or other such media Refer to the instructions for the recorder Place a recorded cassette in the movie camera and an unrecorded DVD RAM or cassette in the DVD recorder or VCR 1 Connect the movie c...

Page 38: ...equipment with the DV cable 2 Start playback Player 3 Start recording Recorder 4 Stop playback Player Do not plug or unplug the DV cable during dubbing or the dubbing may not be completed properly Eve...

Page 39: ...after recording with audio dubbing Set BASIC REC SPEED SP to take pictures To play back the sound recorded with audio dubbing You can switch between the sound recorded with audio dubbing and the orig...

Page 40: ...6 USB FUNCTION Refer to the operating instructions for PC connection D ZOOM 22 ZOOM MIC 23 DATE TIME 42 INITIAL SET 42 3 SETUP FADE COLOUR 25 AUDIO REC 42 DISPLAY 42 REMOTE 17 BEEP SOUND 42 LCD SET 16...

Page 41: ...T MODE 27 SHTR EFFECT 22 DATE TIME 42 INITIAL SET 42 3 SETUP DISPLAY 42 REMOTE 17 BEEP SOUND 42 LCD SET 16 EVF SET 16 POWER SAVE 42 4 LANGUAGE 14 PICTURE PLAYBACK MENU 1 BASIC DATE TIME 42 PROTECT 35...

Page 42: ...nd it takes time more than usual to start recording after you press the recording start stop button 5 MINUTES When about 5 minutes passed without any operation the movie camera automatically turns off...

Page 43: ...incandescent lamp 28 Outdoor mode 28 White balance adjustment mode 28 WEB CAMERA mode recording Playback indications Recording underway 1 Playback 31 Pause 31 5 Fast forward Cue playback 31 6 Rewind R...

Page 44: ...first operation of the remote control after powering on 17 WRONG TAPE FORMAT You are attempting to play back a tape section that has been recorded with a different TV system This cassette is incompati...

Page 45: ...not be selected due to its specifications The table below shows examples of functions restricted by conditions Functions Conditions which disable the functions Progressive When recording onto a tape a...

Page 46: ...affected by ambient temperature In cold places the operating time of the battery becomes shorter Has the battery worn out The battery has a limited life If the operating time is still too short even...

Page 47: ...er open If the cover is open the movie camera may not operate normally Close the cassette cover 10 2 The screen has changed suddenly Has the demonstration started In the Tape Recording mode if you set...

Page 48: ...c pattern noise appears on images during cue or review playback This phenomenon is characteristic of digital video systems It is not a malfunction 2 Horizontal stripes appear on images during cue and...

Page 49: ...ple modes such as SP and LP recording mode 12bit and 16bit sound recording mode normal and wide recorded and unrecorded parts the movie camera may malfunction at a point where the mode switches When y...

Page 50: ...able to the tape If so try another cassette During playback the picture or sound may be interrupted momentarily but this is not a malfunction of the movie camera One possible cause is that the playbac...

Page 51: ...ened When you travel do not forget to bring an AC adaptor so that you can recharge the batteries at your destination If you drop the battery accidentally check to see if the terminals are deformed Att...

Page 52: ...be destroyed or erased After use be sure to remove the card from the movie camera for storage After use or when storing or carrying the card put it in the storage case Do not allow dust water or fore...

Page 53: ...era can adjust the balance among the other colours Since white colour is the reference of all colours light the movie camera can record pictures in a natural hue if it can recognize the reference whit...

Page 54: ...function USB 2 0 compliant Hi Speed NV GS35 Full Speed NV GS21 and NV GS17 No copyright protection support Digital interface DV output terminal IEEE1394 4 pin Dimensions Approx 63 5 mm W k81 mm H k11...

Page 55: ...tion 24 Condensation 49 Continuous Photoshot 27 D Date Time Setting 15 Digital Dubbing 38 Digital Zoom 22 DPOF Setting 35 Dubbing 37 E Erasure Prevention Slider 11 F Fade 25 Formatting 35 Frame by fra...

Page 56: ...B LSQT0891 A F0105Ke0 10000 A C Matsushita Electric Industrial Co Ltd Web site http www panasonic co jp global...

Reviews: