background image

Before using

12

LSQT1008

Inserting/removing a cassette

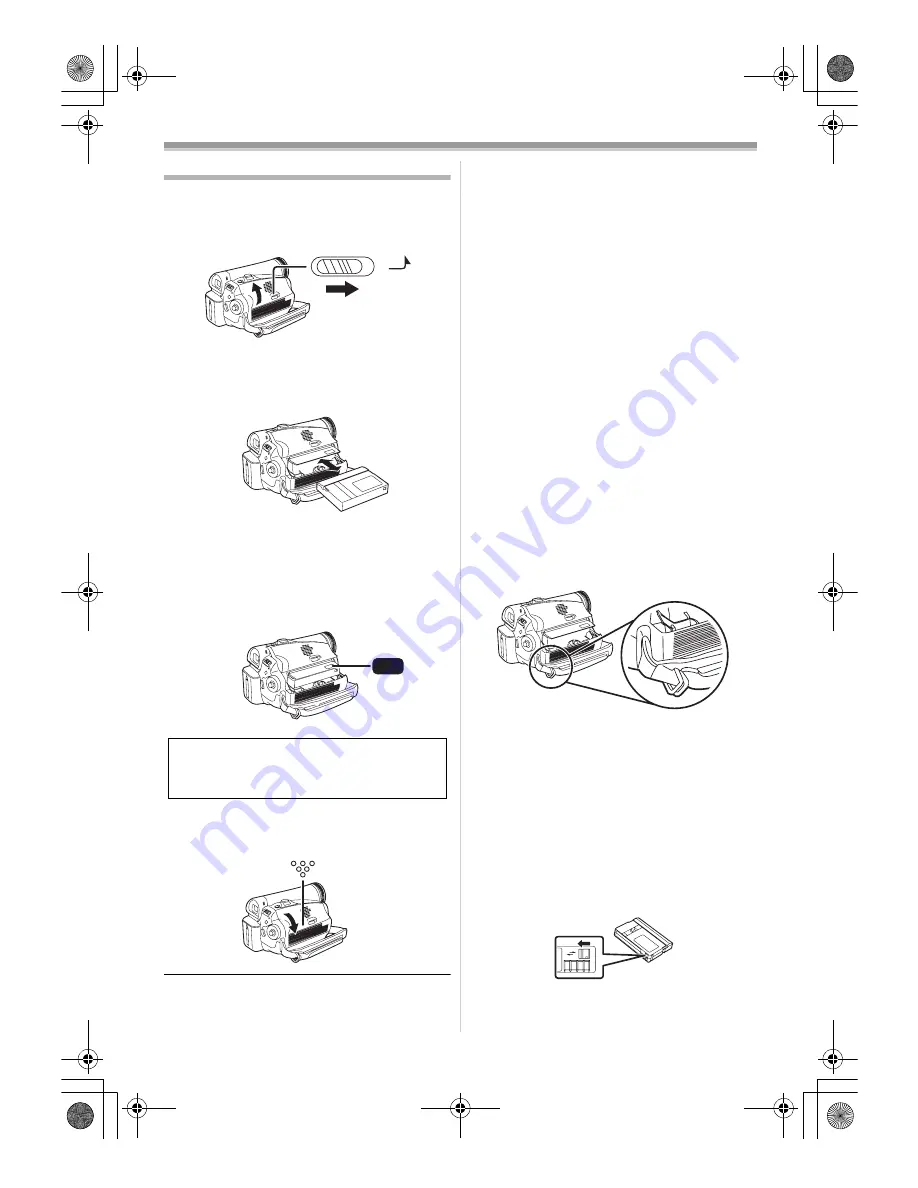
1

Fit the AC adaptor or the battery and turn on 
the power.

2

Slide the [OPEN/EJECT] lever and open the 
cassette cover.

When the cover is fully opened, the cassette 
holder will come out.

3

After the cassette holder is opened, insert/
remove the cassette.

When inserting a cassette, orient it as shown 
in the figure, and then securely insert it as far 
as it goes.

When removing, pull it straight out.

4

Push the [PUSH] mark 

1


in order to close 

the cassette holder.

The cassette holder is housed.

5

Only after the cassette holder is completely 
housed, close the cassette cover by 
pressing the mark 

2

.

When inserting a previously recorded cassette, 
use the blank search function to find the position 
where you want to continue recording. If you are 
overwriting a previously recorded cassette, be 
sure to find the position where you want to 
continue recording.

Close the cassette cover tightly.

When closing the cassette cover, do not get 
anything, such as a cable, caught in the cover.

After use, be sure to rewind the cassette 
completely, remove it and put it in a case. Store 
the case in an upright position. (

-40-

If the indicator of the condensation does not 
display on the LCD monitor and/or the 
viewfinder and you notice condensation on the 
lens or the main unit, do not open the cassette 
cover otherwise condensation may be formed 
on the heads or the cassette tape. (

-38-

ª

When the cassette holder does not 
come out

Close the cassette cover completely, and then 
open it again completely.

Check if the battery has run down.

Check if the cassette compartment cover is in 
contact with grip belt as shown below. If so, be 
sure the grip belt stays clear of the cover when 
opening.

ª

When the cassette holder cannot be 
housed

Set the [OFF/ON] switch to [OFF], then to [ON] 
again.

Check if the battery has run down.

ª

Accidental erasure prevention

If the accidental erasure prevention slider 

of a 

cassette is opened (slide in the direction of the 
[SAVE] arrow), the cassette cannot be recorded. 
When recording, close the accidental erasure 
prevention slider of the cassette (slide in the 
direction of the [REC] arrow).

Caution:

Take care not to trap your fingers under the  
cassette holder when closing it.

OPEN/

EJECT

1

PUSH

2

R E C

SAVE

1

LSQT1008ENG.book  12 ページ  2006年1月18日 水曜日 午前10時4分

Summary of Contents for NV-GS27GN

Page 1: ...Operating Instructions Digital Video Camera Model No NV GS27GN Before use please read these instructions completely LSQT1008 A LSQT1008ENG book 1...

Page 2: ...disassemble or modify the Movie Camera Windows is a trademark or registered trademark of Microsoft Corporation U S A All other company and product names in the operating instructions are trademarks or...

Page 3: ...Backlight compensation function 21 Colour Night view function 21 Soft skin mode 22 Fade in fade out function 22 Wind noise reduction function 23 Recording images for wide screen TVs 23 Image stabilize...

Page 4: ...4E 9 ND filter VW LND30E 10 MC protector VW LMC30E 11 Tripod VW CT45E 12 DV cable VW CD1E Some optional accessories may not be available in some countries Parts identification and handling Camera 1 Wh...

Page 5: ...tional tripod VW CT45E Please carefully read the operating instructions for how to attach the tripod to the camera 29 Shoulder strap fixture Put the strap optional through the fixture 1 and through th...

Page 6: ...s the lens cap through the loop made by itself and pull tight When not using the lens cap pull the lens cap cord in the direction of the arrow 1 When you are not recording be sure to cover the lens wi...

Page 7: ...will start When the battery temperature is excessively high or low the CHARGE lamp flashes and the charging time will be longer than normal Connecting to the AC outlet 1 Connect the AC mains lead to...

Page 8: ...fter use or charging The main unit of the movie camera being used will also heat up This is normal Along with the reduction of the battery capacity the display will change If the battery discharges th...

Page 9: ...on a tape 3 Open the LCD monitor or extend the viewfinder to turn the power on and use the movie camera again The status indicator lights up and the power turns on Setting date and time When the movie...

Page 10: ...mage while viewing it on the opened LCD monitor 1 Put a finger on the LCD monitor open part and open the LCD monitor out in the direction of the arrow It can open up to 90o 2 Adjust the angle of the L...

Page 11: ...Quick Start 1 Set SETUP QUICK START OFF 15 If the OFF ON switch is set to OFF while the unit is in quick start standby the power turns off If the standby continues for approx 30 minutes then the statu...

Page 12: ...be sure to rewind the cassette completely remove it and put it in a case Store the case in an upright position 40 If the indicator of the condensation does not display on the LCD monitor and or the vi...

Page 13: ...the centre to set it Joystick and screen display Push the centre of the joystick and icons will be displayed on the screen Each time the joystick is moved down the indication changes In the Tape Play...

Page 14: ...ode icon The help mode explains the operation icons displayed when the AUTO MANUAL FOCUS switch is set to AUTO in Tape Recording Mode 3 Move the joystick up left or right to select the desired icon An...

Page 15: ...or down in order to select the top menu 3 Move the joystick right or press it to set the selection 4 Move the joystick up or down in order to select the sub menu 5 Move the joystick right or press it...

Page 16: ...ET Brightness of the viewfinder 3 Move the joystick left or right to move the bar indication representing the brightness 4 Press the MENU button or the joystick to complete the settings When the LCD m...

Page 17: ...17 About auto mode Set the AUTO MANUAL FOCUS switch to AUTO and colour balance white balance and focusing will be adjusted automatically Auto white balance 42 Auto focusing 42 Depending on the bright...

Page 18: ...the screen The remaining tape time is indicated in minutes When it reaches less than 3 minutes the indication starts flashing During a 15 seconds or shorter recording the remaining tape time indicati...

Page 19: ...cond before the end of the last image recorded When you start recording at that point the image can be recorded seamlessly from the last image Recording a still picture on a tape Photoshot Still pictu...

Page 20: ...age quality is degraded About the variable speed zoom function When pushing the W T lever as far as it will go you can zoom from 1k to 30k in 3 5 seconds at the maximum The zoom speed varies according...

Page 21: ...can be used Recorded scene is seen as if frames were missed Colour night view function You can record dark locations brightly in colour Set to Tape Recording Mode 1 Press the joystick to display the...

Page 22: ...nd audio gradually disappear Set to Tape Recording Mode 1 Press the joystick to display the icon Move the joystick down until icon 1 appears 2 Move the joystick left to select the fade icon The FADE O...

Page 23: ...with wide screen TVs Cinema Function Images are recorded with a black belt appearing along the top and bottom of the screen so that they look like theatre movies Set to Tape Recording Mode 1 Set BASI...

Page 24: ...lens is used When recording is done in an extremely dark place When the camera is shaken greatly When you record a moving subject while tracking it Recording in various situations Scene mode When you...

Page 25: ...e the scene mode setting to OFF Low light mode Extremely dark scenes may not be able to be recorded finely Spotlight mode If the recording subject is extremely bright the recorded image may become whi...

Page 26: ...be set in the manual adjustment mode White balance may not be adjusted properly in the manual adjustment mode in dark places If so use the auto white balance mode During setting in the manual adjustme...

Page 27: ...see vertical lines of light in the playback image of a brightly shining subject or highly reflective subject but this is not a malfunction During normal playback image movement may not look smooth Wh...

Page 28: ...volume for playback 1 Move the sVOLUMEr lever to adjust the volume Towards r increases the volume Towards s decreases the volume Nearer the bar to r larger the volume When the adjustment is completed...

Page 29: ...a and a TV Connect the movie camera and a TV by using the AV cable 1 2 Turn on this camera and set the mode dial to the Tape Playback Mode 3 Select the input channel on the TV 4 Move the joystick up t...

Page 30: ...ra and a recorder with the DV cable these indications may not appear When neither image nor sound from the movie camera is output to the TV set Check that the plugs are inserted as far as they go Chec...

Page 31: ...UT 23 CINEMA 23 CLOCK SET 9 2 ADVANCED SIS 24 FADE COLOUR 22 AUDIO REC 32 D ZOOM 20 ZOOM MIC 20 SHTR EFFECT 19 3 SETUP DISPLAY 32 DATE TIME 32 POWER SAVE 32 QUICK START 11 BEEP SOUND 32 LCD SET 16 EVF...

Page 32: ...n you turn on the power When the unit goes from quick start standby mode to recording pause 2 Beeps When you pause recording When you turn off the power When the unit goes into quick start standby mod...

Page 33: ...TEREO Stereo sound main sound and sub sound L Left channel sound main sound R Right channel sound sub sound Other menus INITIAL SET When there is a menu that cannot be selected depending on a combinat...

Page 34: ...indications 1 Playback 28 Pause 28 5 Fast forward Cue playback 28 6 Rewind Review playback 28 1 2 Frame by frame playback 29 Repeat playback 28 12bit 16bit Audio recording mode 32 Volume adjustment 28...

Page 35: ...AUTO MANUAL FOCUS switch is set to AUTO REVERSE THE LCD MONITOR When the LCD monitor is rotated by 180 towards the lens the brightness of the LCD monitor cannot be adjusted CANCEL NIGHT VIEW MODE You...

Page 36: ...y charged depending on the usage the battery has worn out and can no longer be used 5 The movie camera cannot be operated though powered up The movie camera does not operate normally The movie camera...

Page 37: ...lt in speaker of the movie camera 0 Is the volume too low During playback push the jVOLUMEi lever to display the volume indication and adjust it 28 2 Different sounds are reproduced at the same time H...

Page 38: ...y a tape with copyright protection copy guard Pictures of the tape with copyright protection copy guard cannot be displayed on the PC The audio of the tape can be played For details refer to the opera...

Page 39: ...orted by strong magnetic fields created by speakers or large motors Electromagnetic wave radiation generated by digital circuits including microprocessor may adversely affect the movie camera causing...

Page 40: ...places such as a ski resort the period during which you can record pictures is shortened When you travel do not forget to bring an AC adaptor so that you can recharge the batteries at your destinatio...

Page 41: ...ing This is called automatic white balance adjustment However since the movie camera only stores white colour information under several light sources automatic white balance adjustment does not functi...

Page 42: ...rrectly in the following situations Record pictures in the manual focus mode Recording a subject with one end located closer to the movie camera and the other end farther away from it As auto focus ad...

Page 43: ...e Video output level 1 0 Vp p 75 h Audio output level Line 316 mV 600 h USB USB 2 0 compliant Full Speed No copyright protection support Digital interface DV output terminal IEEE1394 4 pin Dimensions...

Page 44: ...A LSQT1008 A F0106Nm0 5100 A C Matsushita Electric Industrial Co Ltd Web site http www panasonic co jp global LSQT1008ENG book 44...

Reviews: